JDBC连接Mysql数据库
文章目录
- JDBC
-
- JDBC快速入门
- 数据库事务
- ResultSet
- 使用PreparedStatement
- 数据库连接池
-
- 1 数据库连接池简介
- 2 数据库连接池实现
- 3 Driud使用
- 综合案例练习
-
- 1 需求
- 2 案例实现
-
- 2.1 环境准备
- 2.2 查询所有
- 2.3 添加数据
- 2.4 修改数据
- 2.5 删除数据
JDBC
注意:省略很多知识点,偏向于实践,详细知识点请另外查看官方文件!
JDBC快速入门
idea快捷键:
ctrl + shift + alt + s—— 打开项目结构管理(设置模块等)
- 创建新的空的项目
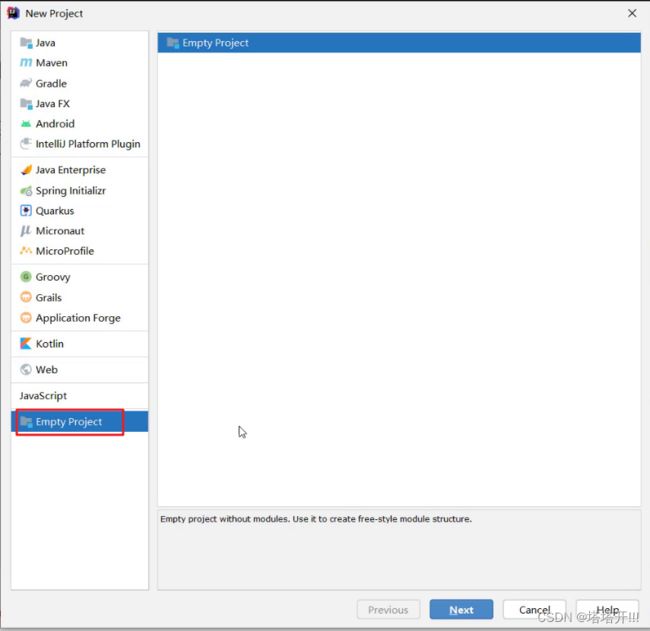
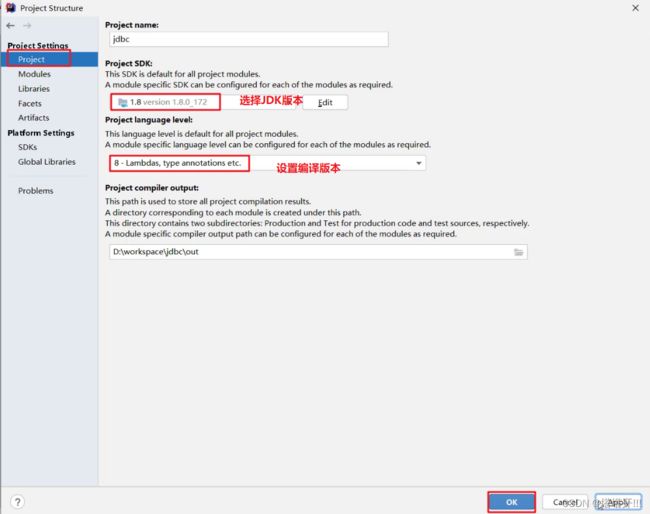
- 定义项目的名称,并指定位置

- 对项目进行设置,JDK版本、编译版本
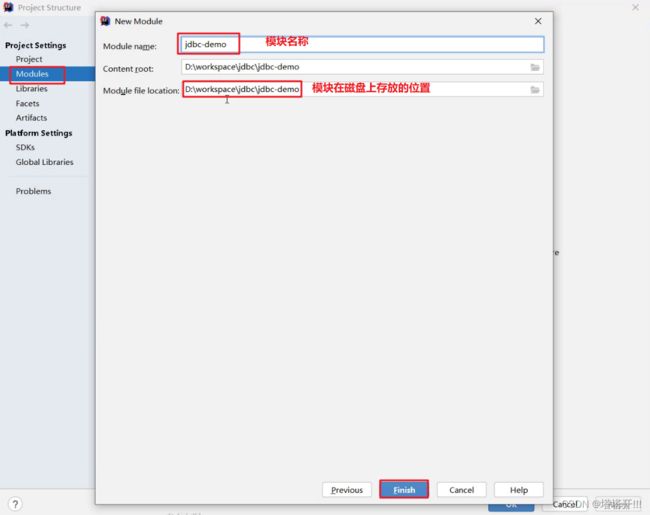
- 创建模块,指定模块的名称及位置
-
导入驱动包
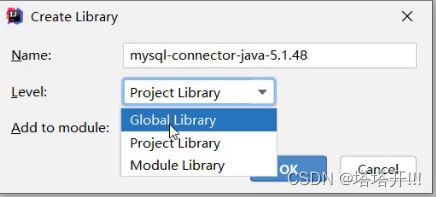
将mysql的驱动包放在模块下的lib目录(随意命名)下,并将该jar包添加为库文件
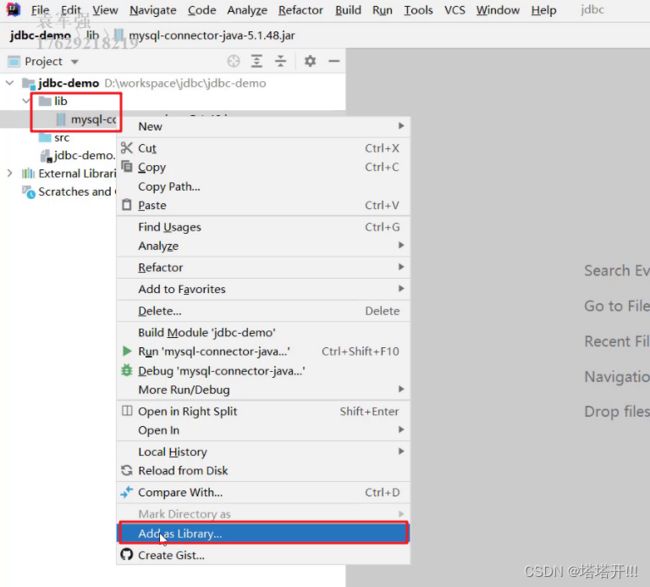
- 在添加为库文件的时候,有如下三个选项
- Global Library : 全局有效
- Project Library : 项目有效
- Module Library : 模块有效
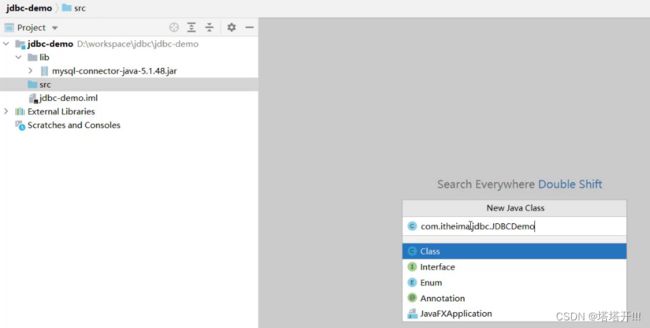
- 在src下创建类
尤其要注意
MySQL8和8之前:
- 注册驱动时的一些区别,8之后加上
cj- 编写
url的区别
这里给出8之后的模板:
        // 1.注册驱动
        Class.forName("com.mysql.cj.jdbc.Driver");
        //2.获取链接(mysql8之后的连接)
        String url = "jdbc:mysql://127.0.0.1:3306/db1?useUnicode=true&characterEncoding=utf8&useSSL=false&serverTimezone=Asia/Shanghai";
        String username = "root";
        String password = "root";
        Connection conn = DriverManager.getConnection(url,username,password);
快速入门代码:
package com.test.jdbc;

import com.mysql.cj.x.protobuf.MysqlxDatatypes;

import java.sql.Connection;
import java.sql.DriverManager;
import java.sql.Statement;

public class JDBCDemon {
    public static void main(String[] args) throws Exception{
        // 1.注册驱动
        Class.forName("com.mysql.cj.jdbc.Driver");
        //2.获取链接(mysql8之后的连接)
        String url = "jdbc:mysql://127.0.0.1:3306/db1?useUnicode=true&characterEncoding=utf8&useSSL=false&serverTimezone=Asia/Shanghai";
        String username = "root";
        String password = "root";
        Connection conn = DriverManager.getConnection(url,username,password);

        //3.定义sql
        String sql = "update account set money = 100 where id = 1";

        //4. 获取执行sql地对象
        Statement stmt = conn.createStatement();

        //5. 执行sql
        int count = stmt.executeUpdate(sql);

        //6. 处理结果
        System.out.println(count);

        //7. 释放资源
        conn.close();
        stmt.close();

    }
}
用配置文件进行配置:
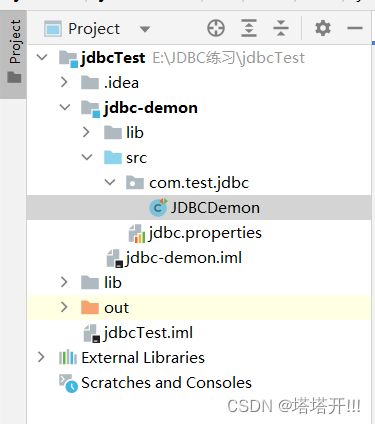
配置文件:
- 其中,配置文件声明在工程的src目录下:【jdbc.properties】
将之前的复制过来改一下即可!

    @Test
    public void test2() throws Exception{
        // 1.加载配置文件
        Properties properties = new Properties();
        properties.load(JDBCDemon.class.getClassLoader().getResourceAsStream("jdbc.properties"));
        //2. 读取配置文件
        String username = properties.getProperty("username");
        String password = properties.getProperty("password");
        String url = properties.getProperty("url");
        String driver = properties.getProperty("driver");
        //3. 加载(注册)驱动
        Class.forName(driver);
        //4.获取数据库连接对象
        Connection conn = DriverManager.getConnection(url,username,password);

        //5.定义sql
        String sql = "update account set money = 20 where id = 1";

        //6. 获取执行sql地对象
        Statement stmt = conn.createStatement();

        //7. 执行sql
        int count = stmt.executeUpdate(sql);

        //6. 处理结果
        System.out.println(count);

        //8. 释放资源
        conn.close();
        stmt.close();
    }
}
数据库事务
先回顾一下MySQL事务管理的操作:
- 开启事务 : BEGIN; 或者 START TRANSACTION;
- 提交事务 : COMMIT;
- 回滚事务 : ROLLBACK;
MySQL默认是自动提交事务
接下来学习JDBC事务管理的方法。
Connection几口中定义了3个对应的方法:
-
开启事务

参与autoCommit 表示是否自动提交事务,true表示自动提交事务,false表示手动提交事务。而开启事务需要将该参数设为为false。
-
提交事务
![]()
- 回滚事务
![]()
事务处理:
-
数据一旦提交,就不可回滚。
-
数据什么时候意味着提交?
- 当一个连接对象被创建时,默认情况下是自动提交事务:每次执行一个 SQL 语句时,如果执行成功,就会向数据库自动提交,而不能回滚。
- **关闭数据库连接,数据就会自动的提交。**如果多个操作,每个操作使用的是自己单独的连接,则无法保证事务。即同一个事务的多个操作必须在同一个连接下。
-
DBUtils程序中为了让多个 SQL 语句作为一个事务执行:
- 调用 Connection 对象的 setAutoCommit(false); 以取消自动提交事务
- 在所有的 SQL 语句都成功执行后,调用 commit(); 方法提交事务
- 在出现异常时,调用 rollback(); 方法回滚事务
若此时 Connection 没有被关闭,还可能被重复使用,则需要恢复其自动提交状态 setAutoCommit(true)。尤其是在使用数据库连接池技术时,执行close()方法前,建议恢复自动提交状态。
【案例】
package com.test.jdbc;

import java.sql.Connection;
import java.sql.DriverManager;
import java.sql.Statement;

/**
 * JDBC API 详解:Connection
 */
public class JDBCDemo3_Connection {

    public static void main(String[] args) throws Exception {
        // 1.注册驱动
        Class.forName("com.mysql.cj.jdbc.Driver");
        //2.获取链接(mysql8之后的连接)
        String url = "jdbc:mysql://127.0.0.1:3306/db1?useUnicode=true&characterEncoding=utf8&useSSL=false&serverTimezone=Asia/Shanghai";
        String username = "root";
        String password = "root";
        Connection conn = DriverManager.getConnection(url,username,password);

        //3. 定义sql
        String sql1 = "update account set money = 2 where id = 1";
        String sql2 = "update account set money = 3 where id = 2";

        //4. 获取执行sql的对象 Statement
        Statement stmt = conn.createStatement();

        try {
            // ============开启事务==========
            conn.setAutoCommit(false);
            //5. 执行sql
            int count1 = stmt.executeUpdate(sql1);//受影响的行数
            //6. 处理结果
            System.out.println(count1);
            int i = 3/0;
            //5. 执行sql
            int count2 = stmt.executeUpdate(sql2);//受影响的行数
            //6. 处理结果
            System.out.println(count2);

            // ============提交事务==========
            //程序运行到此处,说明没有出现任何问题,则需求提交事务
            conn.commit();
        } catch (Exception e) {
            // ============回滚事务==========
            //程序在出现异常时会执行到这个地方,此时就需要回滚事务
            conn.rollback();
            e.printStackTrace();
        } finally {
            //====恢复每次DML操作的自动提交功能===
            conn.setAutoCommit(true);
            //7. 释放资源
            stmt.close();
            conn.close();
        }

    }
}
结果:虽然第一条SQL执行成功了,但出现异常后,抛出就事务回滚了,因此数据库中的数据并没有变化
注意:一个conn对应一个事务!
ResultSet
ResultSet(结果集对象)作用:
- 封装了SQL查询语句的结果。
而执行了DQL语句后就会返回该对象,对应执行DQL语句的方法如下:
ResultSet executeQuery(sql):执行DQL 语句,返回 ResultSet 对象
那么我们就需要从 ResultSet 对象中获取我们想要的数据。ResultSet 对象提供了操作查询结果数据的方法,如下:
boolean next()
- 将光标从当前位置向前移动一行
- 判断当前行是否为有效行
方法返回值说明:
- true : 有效航,当前行有数据
- false : 无效行,当前行没有数据
xxx getXxx(参数):获取数据
- xxx : 数据类型;如: int getInt(参数) ;String getString(参数)
- 参数
- int类型的参数:列的编号,从1开始
- String类型的参数: 列的名称
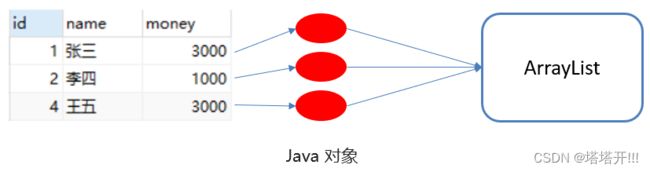
【案例】:
- 需求:查询account账户表数据,封装为Account对象中,并且存储到ArrayList集合中
- 代码实现
Account对象代码:
package com.test.jdbc;

public class Account {
    private Integer id;
    private String name;
    private int money;
    public Account() {

    }
    public Account(Integer id, String name, int money) {
        this.id = id;
        this.name = name;
        this.money = money;
    }

    public Integer getId() {
        return id;
    }

    public void setId(Integer id) {
        this.id = id;
    }

    public String getName() {
        return name;
    }

    public void setName(String name) {
        this.name = name;
    }

    public int getMoney() {
        return money;
    }

    public void setMoney(int money) {
        this.money = money;
    }

    @Override
    public String toString() {
        return "Account{" +
                "id=" + id +
                ", name='" + name + '\'' +
                ", money=" + money +
                '}';
    }
}
测试代码:
 /**
  * 查询account账户表数据,封装为Account对象中,并且存储到ArrayList集合中
  * 1. 定义实体类Account
  * 2. 查询数据,封装到Account对象中
  * 3. 将Account对象存入ArrayList集合中
  */
	@Test
    public void testAccountTable() throws Exception{
        // 加载配置文件
        Properties properties = new Properties();
        properties.load(JDBCDemon.class.getClassLoader().getResourceAsStream("jdbc.properties"));
        // 读取配置文件
        String username = properties.getProperty("username");
        String password = properties.getProperty("password");
        String url = properties.getProperty("url");
        String driver = properties.getProperty("driver");
        // 加载驱动
        Class.forName(driver);
        //获取连接
        Connection conn = DriverManager.getConnection(url,username,password);

        //定义sql
        String sql = "select * from account";
        // 获取执行sql地对象
        Statement stmt = conn.createStatement();
        // 执行sql
        ResultSet rs = stmt.executeQuery(sql);

        // 创建集合
        List<Account> list = new ArrayList<>();

        while(rs.next()){
            // 创建account对象
            Account account = new Account();
            // 获取数据
            int id = rs.getInt("id");
            String name = rs.getString("name");
            int money = rs.getInt("money");

            // 赋值
            account.setId(id);
            account.setName(name);
            account.setMoney(money);

            // 存入集合
            list.add(account);
        }
        //结果
        System.out.println(list);

        // 释放资源
        conn.close();
        stmt.close();
    }
使用PreparedStatement
使用PreparedStatement获取执行sql地对象:
- 缓存更快
- 不会出现Statement获取的
SQL注入问题
【案例】:模拟用户登录功能
 public void testLogin() throws Exception{
        // 加载配置文件
        Properties properties = new Properties();
        properties.load(JDBCDemon.class.getClassLoader().getResourceAsStream("jdbc.properties"));

        //读取配置文件
        String username = properties.getProperty("username");
        String password = properties.getProperty("password");
        String url = properties.getProperty("url");
        String driver = properties.getProperty("driver");
        //加载驱动
        Class.forName(driver);
        //获取连接
        Connection conn = DriverManager.getConnection(url,username,password);

        // 接收到用户输入的用户名 和 密码
        String u_name = "张三";
        String u_pwd = "123456";
        // String pwd = "' or '1' = '1"; 不会再出现SQL注入问题

        //定义sql
        String sql = "select * from user where name = ? and pwd = ?";

        //获取执行sql地对象(pstmt对象)
        PreparedStatement pstmt = conn.prepareStatement(sql);

        //设置?的值
        pstmt.setString(1, u_name);
        pstmt.setString(2, u_pwd);

        //执行sql
        ResultSet rs = pstmt.executeQuery();

        // 判断是否登录成功
        if(rs.next()){// 说明有数据
            System.out.println("登录成功");
        }else{
            System.out.println("登陆失败");
        }

        //释放资源
        conn.close();
        pstmt.close();
    }
数据库连接池
1 数据库连接池简介
数据库连接池是个容器,负责分配、管理数据库连接(Connection)
它允许应用程序重复使用一个现有的数据库连接,而不是再重新建立一个;
释放空闲时间超过最大空闲时间的数据库连接来避免因为没有释放数据库连接而引起的数据库连接遗漏
好处
- 资源重用
- 提升系统响应速度
- 避免数据库连接遗漏
之前我们代码中使用连接是没有使用都创建一个Connection对象,使用完毕就会将其销毁。这样重复创建销毁的过程是特别耗费计算机的性能的及消耗时间的。
而数据库使用了数据库连接池后,就能达到Connection对象的复用,如下图
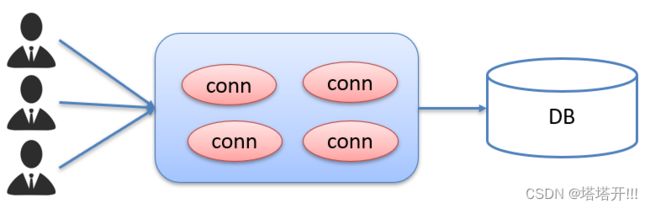
连接池是在一开始就创建好了一些连接(Connection)对象存储起来。用户需要连接数据库时,不需要自己创建连接,而只需要从连接池中获取一个连接进行使用,使用完毕后再将连接对象归还给连接池;这样就可以起到资源重用,也节省了频繁创建连接销毁连接所花费的时间,从而提升了系统响应的速度。
2 数据库连接池实现
-
标准接口:DataSource
官方(SUN) 提供的数据库连接池标准接口,由第三方组织实现此接口。该接口提供了获取连接的功能:
Connection getConnection()那么以后就不需要通过
DriverManager对象获取Connection对象,而是通过连接池(DataSource)获取Connection对象。 -
常见的数据库连接池
- DBCP
- C3P0
- Druid
我们现在使用更多的是Druid,它的性能比其他两个会好一些。
-
Druid(德鲁伊)
-
Druid连接池是阿里巴巴开源的数据库连接池项目
-
功能强大,性能优秀,是Java语言最好的数据库连接池之一
-
3 Driud使用
- 导入jar包 druid-1.1.12.jar
- 定义配置文件
- 加载配置文件
- 获取数据库连接池对象
- 获取连接
现在通过代码实现,首先需要先将druid的jar包放到项目下的lib下并添加为库文件
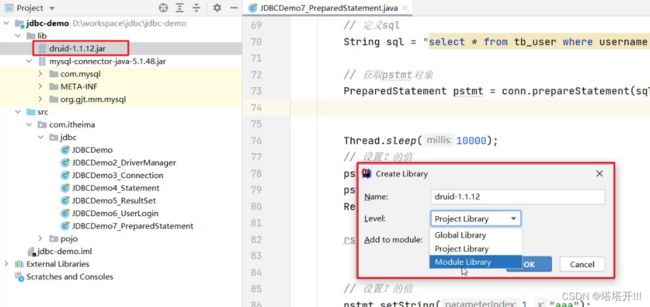
项目结构如下:

编写配置文件如下:
和之前的jdbc.properties差不多。
url=jdbc:mysql://127.0.0.1:3306/db1?useUnicode=true&characterEncoding=utf8&useSSL=false&serverTimezone=Asia/Shanghai
username=root
password=root
driver=com.mysql.cj.jdbc.Driver
# 初始化连接数量
initialSize=5
# 最大连接数
maxActive=10
# 最大等待时间
maxWait=3000
使用druid的代码如下:
package com.test.jdbc.druid;

import com.alibaba.druid.pool.DruidDataSourceFactory;

import javax.sql.DataSource;
import java.sql.Connection;
import java.util.Properties;

public class DruidDemo {
    public static void main(String[] args) throws Exception{
        //1.导入jar包
        //2.定义配置文件druid.properties
        //3.加载配置文件
        Properties prop = new Properties();
        prop.load(DruidDemo.class.getClassLoader().getResourceAsStream("druid.properties"));
        //4.获取连接池对象
        DataSource dataSource = DruidDataSourceFactory.createDataSource(prop);

        //5.获取数据库连接对象(之前jdbc是DriverManager获取的)
        Connection conn = dataSource.getConnection();
        System.out.println(conn);//获取到了连接后就可以继续做其他操作了,类似之前jdbc对数据库的操作 定义sql语句,执行....
        // com.mysql.cj.jdbc.ConnectionImpl@64bf3bbf

        //.....
    }
}
综合案例练习
快捷键:
- 创建对象时快速补充类型:
alt + enter- 显示替换:
alt + l- 竖向多行编辑:
alt + 鼠标左键
1 需求
完成商品品牌数据的增删改查操作
- 查询:查询所有数据
- 添加:添加品牌
- 修改:根据id修改
- 删除:根据id删除
2 案例实现
2.1 环境准备
-
数据库表
tb_brand-- 删除tb_brand表 drop table if exists tb_brand; -- 创建tb_brand表 create table tb_brand ( -- id 主键 id int primary key auto_increment, -- 品牌名称 brand_name varchar(20), -- 企业名称 company_name varchar(20), -- 排序字段 ordered int, -- 描述信息 description varchar(100), -- 状态:0:禁用 1:启用 status int ); -- 添加数据 insert into tb_brand (brand_name, company_name, ordered, description, status) values ('三只松鼠', '三只松鼠股份有限公司', 5, '好吃不上火', 0), ('华为', '华为技术有限公司', 100, '华为致力于把数字世界带入每个人、每个家庭、每个组织,构建万物互联的智能世界', 1), ('小米', '小米科技有限公司', 50, 'are you ok', 1);
- homework包下的Brand对象类型
package com.test.jdbc.homework;

public class Brand {
    // id 主键
    private Integer id;
    // 品牌名称
    private String brandName;
    // 企业名称
    private String companyName;
    // 排序字段
    private Integer ordered;
    // 描述信息
    private String description;
    // 状态:0:禁用  1:启用
    private Integer status;

    public Brand() {
    }

    public Brand(Integer id, String brandName, String companyName, Integer ordered, String description, Integer status) {
        this.id = id;
        this.brandName = brandName;
        this.companyName = companyName;
        this.ordered = ordered;
        this.description = description;
        this.status = status;
    }

    public Integer getId() {
        return id;
    }

    public void setId(Integer id) {
        this.id = id;
    }

    public String getBrandName() {
        return brandName;
    }

    public void setBrandName(String brandName) {
        this.brandName = brandName;
    }

    public String getCompanyName() {
        return companyName;
    }

    public void setCompanyName(String companyName) {
        this.companyName = companyName;
    }

    public Integer getOrdered() {
        return ordered;
    }

    public void setOrdered(Integer ordered) {
        this.ordered = ordered;
    }

    public String getDescription() {
        return description;
    }

    public void setDescription(String description) {
        this.description = description;
    }

    public Integer getStatus() {
        return status;
    }

    public void setStatus(Integer status) {
        this.status = status;
    }

    @Override
    public String toString() {
        return "Brand{" +
                "id=" + id +
                ", brandName='" + brandName + '\'' +
                ", companyName='" + companyName + '\'' +
                ", ordered=" + ordered +
                ", description='" + description + '\'' +
                ", status=" + status +
                '}';
    }
}
2.2 查询所有
    /**
     * 查询所有
     * 1.SQL:select * from tb_brand;
     * 2.参数:不需要
     * 3.结果:List
     */
    @Test
    public void testSelectAll() throws Exception{
        // 加载配置文件,连接连接池,拿到数据库连接对象
        Properties prop = new Properties();
        prop.load(BrandTest.class.getClassLoader().getResourceAsStream("druid.properties"));
        DataSource dataSource = DruidDataSourceFactory.createDataSource(prop);
        Connection conn = dataSource.getConnection();

        // 定义SQL语句
        String sql = "select * from tb_brand";
        // 获取pstmt对象
        PreparedStatement pstm = conn.prepareStatement(sql);
        // 设置参数:无
        // 执行SQl
        ResultSet rs = pstm.executeQuery();
        List<Brand> list = new ArrayList<>();
        //处理结果:List丰庄brand对象,存入List集合中

        while(rs.next()){
            // 获取数据
            int id = rs.getInt("id");
            String brandName = rs.getString("brand_name");
            String companyName = rs.getString("company_name");
            int ordered = rs.getInt("ordered");
            String description = rs.getString("description");
            int status = rs.getInt("status");

            // 将信息封装到对象中
            Brand brand = new Brand(id, brandName, companyName, ordered, description, status);

            // 加入集合
            list.add(brand);
        }
        System.out.println(list);

        // 释放资源
        conn.close();
        rs.close();
        pstm.close();

    }
2.3 添加数据
    /**
     * 添加数据
     * 1.SQL: insert into tb_brand(brand_name, company_name, ordered, description, status)
     *         values(?,?,?,?,?);
     * 2.参数:需要,除了id之外的数据的参数信息(id自增长)
     * 3.结果:boolean
     */
    @Test
    public void testInsert() throws Exception{

        // 接收页面提交的参数
        String brandName = "香飘飘";
        String companyName = "香飘飘";
        int ordered = 10;
        String description = "绕地球三圈";
        int status = 1;
        int id = 4;//

        // 加载配置文件,连接连接池,拿到数据库连接conn对象
        Properties prop = new Properties();
        prop.load(BrandTest.class.getClassLoader().getResourceAsStream("druid.properties"));
        DataSource dataSource = DruidDataSourceFactory.createDataSource(prop);
        Connection conn = dataSource.getConnection();
        // 定义SQL语句
        String sql = "insert into tb_brand(brand_name, company_name, ordered, description, status)\n" +
                "             values(?,?,?,?,?);";

        // 获取pstmt对象
        PreparedStatement psmt = conn.prepareStatement(sql);
        // 设置参数:?
        psmt.setString(1, brandName);
        psmt.setString(2, companyName);
        psmt.setInt(3, ordered);
        psmt.setString(4, description);
        psmt.setInt(5, status);
        // 执行SQl
        int i = psmt.executeUpdate();

        // 处理结果
        System.out.println(i > 0);

        // 释放资源
        conn.close();
        psmt.close();

    }
2.4 修改数据
    /**
     * 修改数据
     * 1.SQL:
     *      update tb_brand
     *          set brand_name = ?,
     *          company_name= ?,
     *          ordered     = ?,
     *          description = ?,
     *          status      = ?
     *       where id = ?
     *
     * 2.参数:需要
     * 3.结果:boolean
     */
    @Test
    public void testUpdate() throws Exception{

        // 接收页面提交的参数
        String brandName = "香飘飘";
        String companyName = "香飘飘";
        int ordered = 1000;
        String description = "绕地球三圈";
        int status = 1;
        int id = 4;// id不用我们进行修改

        // 加载配置文件,连接连接池,拿到数据库连接conn对象
        Properties prop = new Properties();
        prop.load(BrandTest.class.getClassLoader().getResourceAsStream("druid.properties"));
        DataSource dataSource = DruidDataSourceFactory.createDataSource(prop);
        Connection conn = dataSource.getConnection();
        // 定义SQL语句
        String sql = " update tb_brand\n" +
                "         set brand_name  = ?,\n" +
                "         company_name= ?,\n" +
                "         ordered     = ?,\n" +
                "         description = ?,\n" +
                "         status      = ?\n" +
                "     where id = ?";

        // 获取pstmt对象
        PreparedStatement psmt = conn.prepareStatement(sql);
        // 设置参数:?
        psmt.setString(1, brandName);
        psmt.setString(2, companyName);
        psmt.setInt(3, ordered);
        psmt.setString(4, description);
        psmt.setInt(5, status);
        psmt.setInt(6, id);
        // 执行SQl
        int i = psmt.executeUpdate();

        // 处理结果
        System.out.println(i > 0);

        // 释放资源
        conn.close();
        psmt.close();

    }
2.5 删除数据
    /**
     * 根据id删除数据
     * 1.SQL: delete from tb_brand where id = ?;
     * 2.参数:需要,id
     * 3.结果:boolean
     */
    @Test
    public void testDeleteById() throws Exception{
        // 接收页面提交的参数
        int id = 4;

        // 加载配置文件,连接连接池,拿到数据库连接conn对象
        Properties prop = new Properties();
        prop.load(BrandTest.class.getClassLoader().getResourceAsStream("druid.properties"));
        DataSource dataSource = DruidDataSourceFactory.createDataSource(prop);
        Connection conn = dataSource.getConnection();
        // 定义SQL语句
        String sql = "delete from tb_brand where id = ?;";

        // 获取pstmt对象
        PreparedStatement psmt = conn.prepareStatement(sql);
        // 设置参数:?
        psmt.setInt(1, id);

        // 执行SQl
        int i = psmt.executeUpdate();

        // 处理结果
        System.out.println(i > 0);

        // 释放资源
        conn.close();
        psmt.close();

    }
参考学习:
1.黑马程序员最新版JavaWeb基础教程,Java web从入门到企业实战完整版_哔哩哔哩_bilibili
2.【2021就业班】超级详细的jdbc讲解,看完必会_哔哩哔哩_bilibili