C++ 调用python
本文代码已在vs2017上验证。
c++调用python需要三类文件,这些文件都可以在python安装目录下找到。
(1)include文件夹:位于python目录下。
(2)dll文件,位于python目录下,如python37.dll。
(3)lib文件,位于python目录的libs文件夹下,如python37.lib。
1、将这三类文件复制到自己工程的文件夹下,最好与cpp代码在同一个目录。
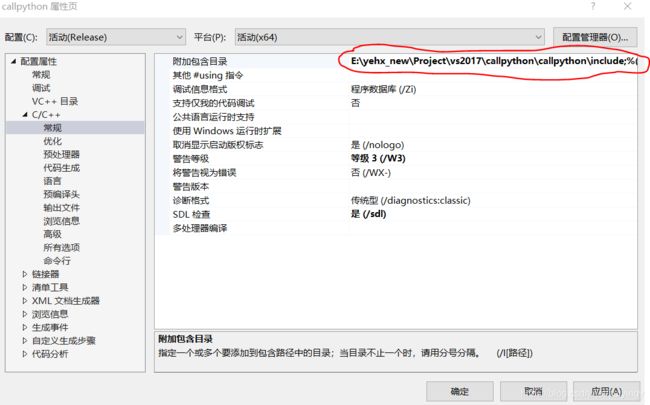
2、添加include路径,项目->属性->C/C++->常规->附加包含目录:
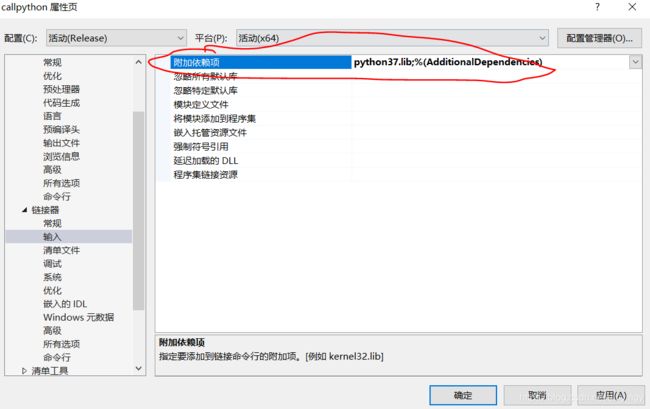
3、添加python37.lib,项目->属性->链接器->输入->附加依赖项:
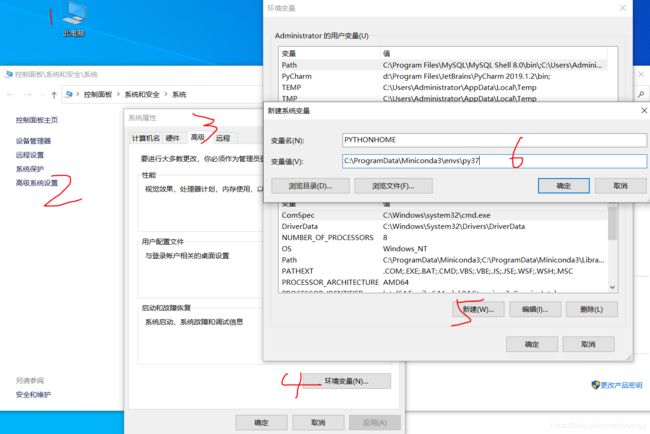
4、在环境变量中增加PYTHONHOME,取值为python安装目录,一般为python.exe所在目录。否则会报错误:ModuleNotFoundError: No module named 'encodings'。设置步骤:邮件此电脑->高级系统设置->高级->环境变量->新建系统环境变量PYTHONHOME。注意:设置完之后,一定要重启vs工程,否则仍然会报该错误。
5、python demo代码
#coding:utf-8
import os

def run(com):
    return com + ' @ python return'
def main():
    print(run(("test")))

if __name__=='__main__':
   pass
6、C++代码,如果需要传递中文参数,请按下面代码进行gbk和utf8的编码转换;如果是英文参数,则不需要转换。编码介绍:C++ gbk与utf8互转。
#include
#include
#include
#include
#include
#include

using namespace std;

string GBK_2_UTF8(string gbkStr)
{
	string outUtf8 = "";
	int n = MultiByteToWideChar(CP_ACP, 0, gbkStr.c_str(), -1, NULL, 0);
	WCHAR *str1 = new WCHAR[n];
	MultiByteToWideChar(CP_ACP, 0, gbkStr.c_str(), -1, str1, n);
	n = WideCharToMultiByte(CP_UTF8, 0, str1, -1, NULL, 0, NULL, NULL);
	char *str2 = new char[n];
	WideCharToMultiByte(CP_UTF8, 0, str1, -1, str2, n, NULL, NULL);
	outUtf8 = str2;
	delete[]str1;
	str1 = NULL;
	delete[]str2;
	str2 = NULL;
	return outUtf8;
}

string UTF8_2_GBK(string utf8Str)
{
	string outGBK = "";
	int n = MultiByteToWideChar(CP_UTF8, 0, utf8Str.c_str(), -1, NULL, 0);
	WCHAR *str1 = new WCHAR[n];
	MultiByteToWideChar(CP_UTF8, 0, utf8Str.c_str(), -1, str1, n);
	n = WideCharToMultiByte(CP_ACP, 0, str1, -1, NULL, 0, NULL, NULL);
	char *str2 = new char[n];
	WideCharToMultiByte(CP_ACP, 0, str1, -1, str2, n, NULL, NULL);
	outGBK = str2;
	delete[] str1;
	str1 = NULL;
	delete[] str2;
	str2 = NULL;
	return outGBK;
}

int main()
{
	//***python调用***//
	//初始化python模块
	Py_Initialize();
	// 检查初始化是否成功
	if (!Py_IsInitialized())
	{
		cout << "初始化失败" << endl;
		Py_Finalize();
	}

	PyObject *pModule;
	PyObject*pFunc = NULL;
	PyObject*pArg = NULL;
	PyRun_SimpleString("import sys");
	PyRun_SimpleString("sys.path.append('./')");//设置python模块,搜寻位置,文件放在.cpp文件一起

	pModule = PyImport_ImportModule("demo");//Python文件名: demo.py
	if (!pModule) {
		cout << "py文件导入失败" << endl;
		Py_Finalize();
	}
	else {
		pFunc = PyObject_GetAttrString(pModule, "run");//Python文件中的函数名
		if (!pFunc) {
			cout << "函数导入失败" << endl;
			Py_Finalize();
		}
		std::string a = "{\"type\": \"文字\", \"wxid\": \"lianghua-2021\", \"wxname\": \"微信聊天机器人\", \"source\": \"好友消息\", \"msgSender\": \"NULL\", \"content\": \"公众号:微聊机器人\"}";
		PyObject* pyParams = Py_BuildValue("(s)", GBK_2_UTF8(a).c_str());//c++类型转python类型,传入参数

		char * result1;
		//string result1;
		pArg = PyEval_CallObject(pFunc, pyParams);//调用函数
		PyArg_Parse(pArg, "s", &result1);//python类型转c++类型
		cout << UTF8_2_GBK(result1) << endl;

		system("pause");
	}
}
7、注意事项:
(1)x86 32位和x64 64位编译环境下需要相应的python库也为32位或64位callpython.zip;32位python或64位python安装方式见:conda 安装32位python。
(2)在debug模式下,需要将python37.lib重命名为python37_d.lib,并在属性链接器的输入中对应修改。
(3)切换环境是记得同步更新PYTHONHOME环境变量。但设置完之后conda路径会失效,除非再删除该环境变量。
32位和64位完整代码:callpython.zip。


