【博主推荐】SpringBoot API接口对数据库增删改查,路由,TOKEN,WebSocket完整版(附源码)
SpringBoot API接口对数据库增删改查,路由,TOKEN,WebSocket完整版
-
- 1.新建SpringBoot工程
-
- 1.1 SpringBoot介绍
- 1.2 准备工作
- 1.3 创建SpringBoot项目
- 1.4 创建Controller
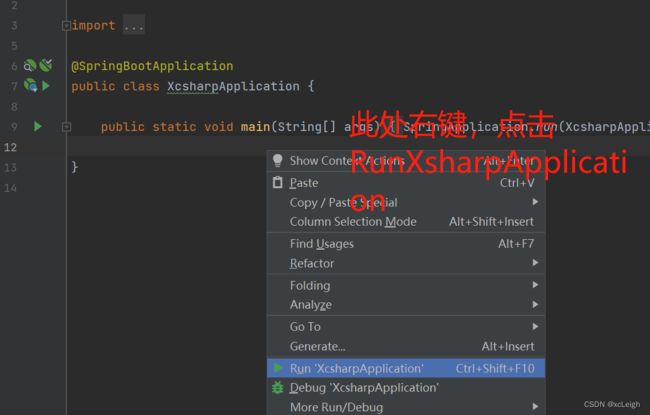
- 1.5 IDEA 启动 Spring Boot
- 1.6 XcsharpApplication讲解
- 1.7 application.properties讲解
- 2.注解说明
- 3.websocket服务端实现
-
- 3.1 添加日志组件的依赖(可以在建项目的时候添加引用)
- 3.2 配置文件WebSocketConfig.java
- 3.3 添加服务的类WebSocket.java
- 3.4 整体路径
- 3.5 启动springboot,客户端连接效果
- 3.6 服务端接收控制台打印
- 4.JWT实现TOKEN认证,路由器拦截配置
-
- 4.1 添加JWT引用
- 4.2 JWT工具类
- 4.3 token验证拦截器
- 4.4 拦截器配置
- 4.5 登录返回token
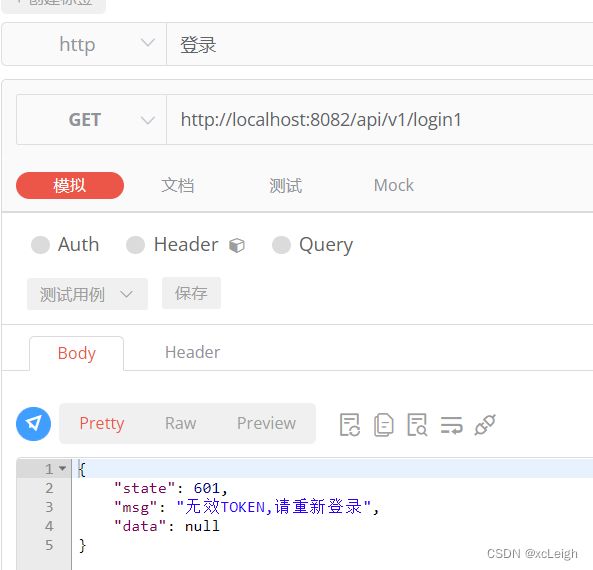
- 4.6 token验证效果
- 5.定时任务
-
- 5.1 Schedule定时执行
- 5.2 TimerTask定时执行
- 6.API对数据的增删改查,实现双数据库(Mysql和Oracle)
-
- 6.1 application.properties配置两个数据库连接串
- 6.2 配置两个数据库的数据源
- 6.3 配置数据服务
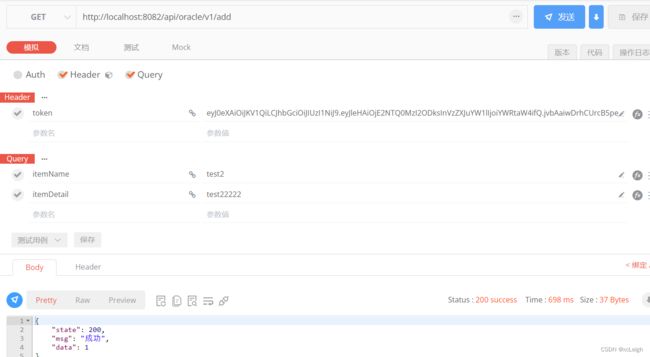
- 6.4 双数据库的新增API
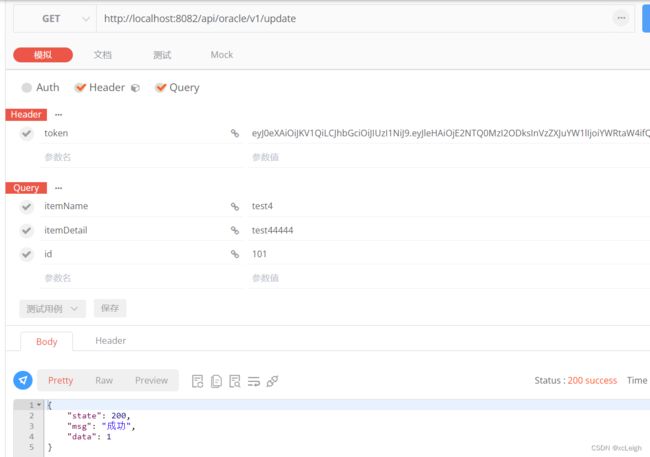
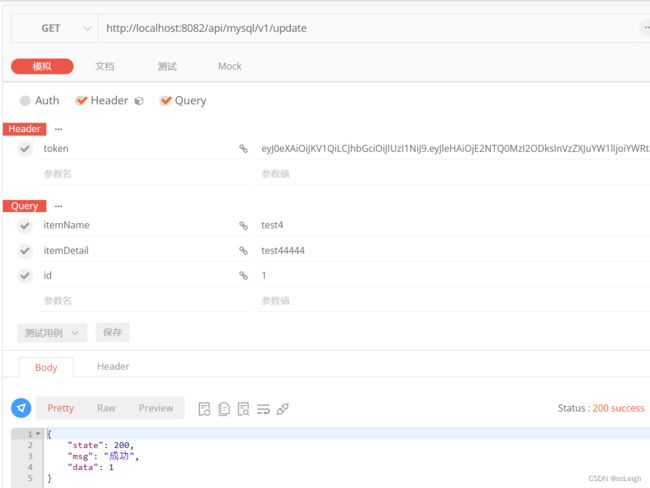
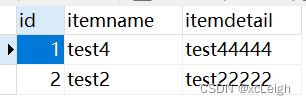
- 6.5 双数据库的修改API
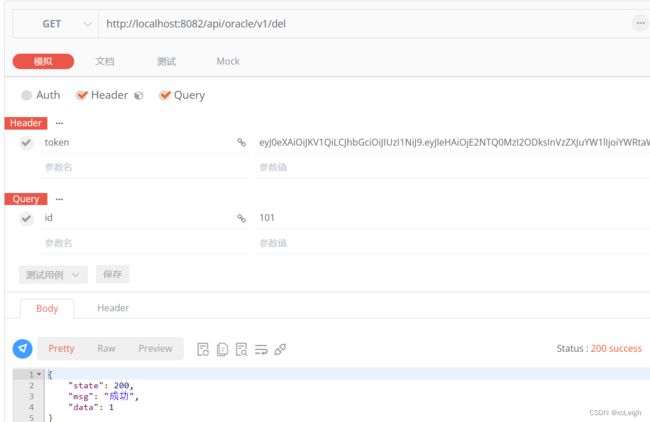
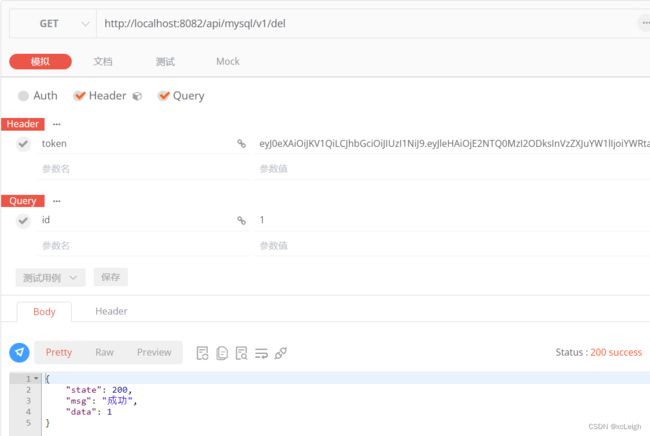
- 6.6 双数据库的删除API
- 6.7 双数据库的查询API,获取全部
- 6.8 双数据库的分页查询API
- 7.部署项目
-
- 7.1 项目打包
- 7.2 看服务器是否有JDK
- 7.3 项目部署
- 7.4 相关问题
- 8.开发遇到的问题
-
- 8.1 乱码问题
- 源码下载
【博主推荐】springboot API接口对数据库增删改查完整版(附源码)
使用说明:
idea直接导入项目,pom.xml把引用jar包下到本地,然后配置数据库后直接使用,可以快速使用这套完整架构,注释详细,直接使用。
功能实现:
实现双数据库同时使用(mysql和oracle)
实现增删改查API
实现token验证
实现定时任务
实现websocket服务端
1.新建SpringBoot工程
1.1 SpringBoot介绍
Spring Boot 是由 Pivotal 团队提供的全新框架。Spring Boot 是所有基于 Spring Framework 5.0 开发的项目的起点。Spring Boot 的设计是为了让你尽可能快的跑起来 Spring 应用程序并且尽可能减少你的配置文件。
从最根本上来讲,Spring Boot 就是一些库的集合,它能够被任意项目的构建系统所使用。它使用 “习惯优于配置” (项目中存在大量的配置,此外还内置一个习惯性的配置)的理念让你的项目快速运行起来。用大佬的话来理解,就是 spring boot 其实不是什么新的框架,它默认配置了很多框架的使用方式,就像 maven 整合了所有的 jar 包,spring boot 整合了所有的框架,总结一下及几点:
(1)为所有 Spring 开发提供一个更快更广泛的入门体验。
(2)零配置。无冗余代码生成和XML 强制配置,遵循“约定大于配置” 。
(3)集成了大量常用的第三方库的配置, Spring Boot 应用为这些第三方库提供了几乎可以零配置的开箱即用的能力。
(4)提供一系列大型项目常用的非功能性特征,如嵌入式服务器、安全性、度量、运行状况检查、外部化配置等。
(5)Spring Boot 不是Spring 的替代者,Spring 框架是通过 IOC 机制来管理 Bean 的。Spring Boot 依赖 Spring 框架来管理对象的依赖。Spring Boot 并不是Spring 的精简版本,而是为使用 Spring 做好各种产品级准备。
1.2 准备工作
- JDK11安装配置
- IntelliJ IDEA下载
- maven安装配置
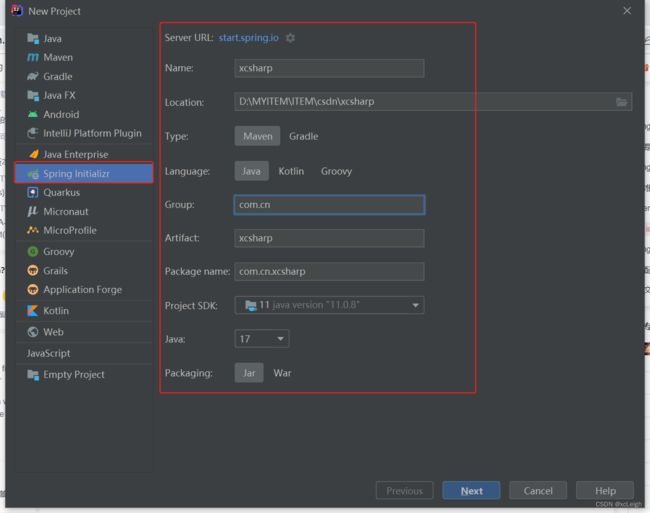
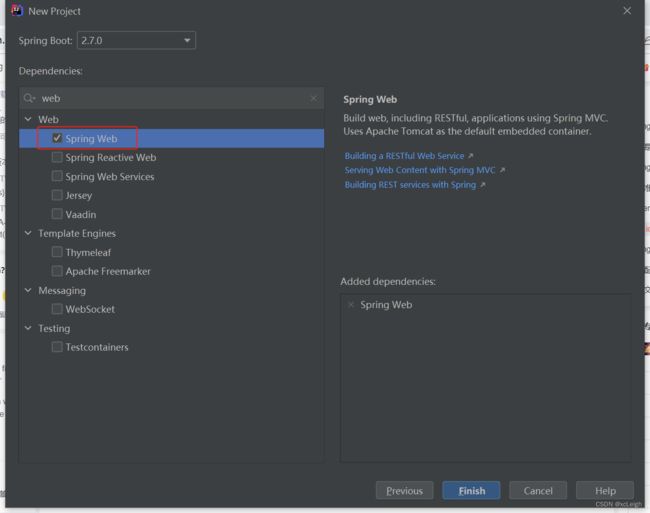
1.3 创建SpringBoot项目
第一次配置 Spring Boot 的话可能需要等待一会儿 IDEA 下载相应的 依赖包。
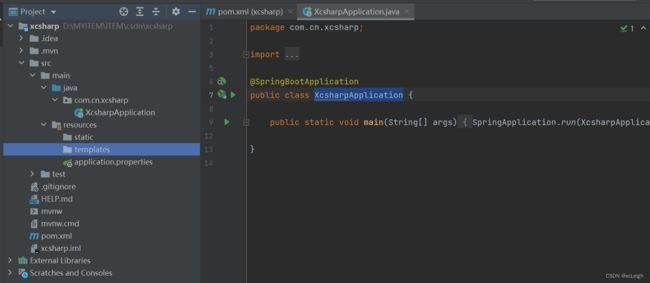
关键说明:
XcsharpApplication --带有 main() 方法的类,用于启动应用程序
SpringbootApplicationTests --Junit 测试,它加载了一个使用 Spring Boot 字典配置功能的 Spring 应用程序上下文
pom.xml --MAVEN构建依赖引用,配置文件
application.properties – 配置需要属性,常用定义
1.4 创建Controller
- 新建包
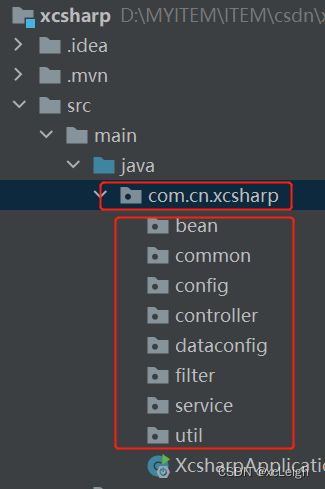
先创建系统要用的包名
bean --存放实体类
common --存放通用的工具如websocket,task定时任务,等
config --配置类
controller --Controller是SpringBoot里最基本的组件,他的作用是把用户请求通过对URL的匹配,分配给不同的接收器,再进行处理,然后向用户返回结果
util --工具类,处理字符串、时间,特定方法等工具
service --服务类
filter --路由器
dataconfig --数据库配置
package com.cn.xcsharp.controller;

import org.springframework.web.bind.annotation.RequestMapping;
import org.springframework.web.bind.annotation.RestController;
/**
*@author xcsharp
*@date 2022/5/29 12:49
*描述:控制器  API测试
*/
@RestController
public class XcSharpController {
    @RequestMapping("/xcsharp")
    public String xcsharp() {
        return "Spring Boot is ok!";
    }
}
1.5 IDEA 启动 Spring Boot
一个简单的流程就完成了,恭喜你入门了。
1.6 XcsharpApplication讲解
应用入口类 SpringbootApplication.java
Spring Boot 项目通常有一个名为 *Application 的入口类,入口类里有一个 main 方法, 这个 main 方法其实就是一个标准的 Javay 应用的入口方法。
@SpringBootApplication 是 Spring Boot 的核心注解,它是一个组合注解,该注解组合了:
@Configuration
@EnableAutoConfiguration
@ComponentScan
若不用 @SpringBootApplication 注解也可以使用这三个注解代替。
其中,@EnableAutoConfiguration 让 Spring Boot 根据类路径中的 jar 包依赖为当前项目进行自动配置,例如,添加了 spring-boot-starter-web 依赖,会自动添加 Tomcat 和 Spring MVC 的依赖,那么 Spring Boot 会对 Tomcat 和 Spring MVC 进行自动配置。
Spring Boot 还会自动扫描 @SpringBootApplication 所在类的同级包以及下级包里的 Bean ,所以入口类建议就配置在 grounpID + arctifactID 组合的包名下(这里为 com.cn.xcsharp 包)
1.7 application.properties讲解
Spring Boot 使用一个全局的配置文件 application.properties 或 application.yml,放置在【src/main/resources】目录或者类路径的 /config 下。
Spring Boot 不仅支持常规的 properties 配置文件,还支持 yaml 语言的配置文件。yaml 是以数据为中心的语言,在配置数据的时候具有面向对象的特征。
Spring Boot 的全局配置文件的作用是对一些默认配置的配置值进行修改。
- 修改配置文件 application.properties
##配置图片上传最大大小
spring.servlet.multipart.max-file-size=70MB
spring.servlet.multipart.max-request-size=100MB
##配置文件路径
preread.imgPath=D://xcSharpLog/xcsharp/
#配置访问端口
server.port=8082
#默认的访问路径从 “/” 修改为 “/cn”
server.servlet.context-path=/xcsharp
#用户会话session过期时间,以秒为单位
server.session-timeout=7200
#自定义全局变量
XCSHARP.NAME=My First App
Controller类中使用 @Value 来获取配置属性
@RestController
public class XcSharpController {
	//获取 application.properties里面的XCSHARP.NAME
    @Value("${XCSHARP.NAME}")
    private String appName;

    @RequestMapping("/xcsharp")
    public String xcsharp() {

        return "Spring Boot is ok!"+appName;
    }
}
2.注解说明
-
1、@SpringBootApplication:申明让Spring Boot自动给程序进行必要的配置,这个配置等同于:@Configuration ,@EnableAutoConfiguration 和 @ComponentScan 三个配置。
-
2、@ResponseBody:表示该方法的返回结果直接写入HTTP Response Body中,一般在异步获取数据时使用,用于构建RESTful的api。
在使用@RequestMapping后,返回值通常解析为跳转路径,加上@ResponseBody后返回结果不会被解析为跳转路径,而是直接写入HTTP Response Body中。
比如异步获取json数据,加上@ResponseBody后,会直接返回json数据。该注解一般会配合@RequestMapping一起使用。 -
3、@Controller:用于定义控制器类,在spring 项目中由控制器负责将用户发来的URL请求转发到对应的服务接口(service层)
一般这个注解在类中,通常方法需要配合注解@RequestMapping。 -
4、@RestController:用于标注控制层组件(如struts中的action),@ResponseBody和@Controller的合集。
-
5、@RequestMapping:提供路由信息,负责URL到Controller中的具体函数的映射。
-
6、@EnableAutoConfiguration:Spring Boot自动配置(auto-configuration):尝试根据你添加的jar依赖自动配置你的Spring应用。
例如,如果你的classpath下存在HSQLDB,并且你没有手动配置任何数据库连接beans,那么我们将自动配置一个内存型(in-memory)数据库”。
你可以将@EnableAutoConfiguration或者@SpringBootApplication注解添加到一个@Configuration类上来选择自动配置。
如果发现应用了你不想要的特定自动配置类,你可以使用@EnableAutoConfiguration注解的排除属性来禁用它们。 -
7、@ComponentScan:表示将该类自动发现扫描组件。
个人理解相当于,如果扫描到有@Component、@Controller、@Service等这些注解的类,并注册为Bean,可以自动收集所有的Spring组件,包括@Configuration类。
我们经常使用@ComponentScan注解搜索beans,并结合@Autowired注解导入。可以自动收集所有的Spring组件,包括@Configuration类。
如果没有配置的话,Spring Boot会扫描启动类所在包下以及子包下的使用了@Service、@Repository等注解的类。 -
8、@Configuration:相当于传统的xml配置文件,如果有些第三方库需要用到xml文件,建议仍然通过@Configuration类作为项目的配置主类——可以使用@ImportResource注解加载xml配置文件。
-
9、@Import:用来导入其他配置类。
-
10、@ImportResource:用来加载xml配置文件。
-
11、@Autowired:自动导入依赖的bean
-
12、@Service:一般用于修饰service层的组件
-
13、@Repository:使用@Repository注解可以确保DAO或者repositories提供异常转译,这个注解修饰的DAO或者repositories类会被ComponetScan发现并配置,同时也不需要为它们提供XML配置项。
-
14、@Bean:用@Bean标注方法等价于XML中配置的bean。
-
15、@Value:注入Spring boot application.properties配置的属性的值。
-
16、@Inject:等价于默认的@Autowired,只是没有required属性;
-
17、@Component:泛指组件,当组件不好归类的时候,我们可以使用这个注解进行标注。
-
18、@Bean:相当于XML中的,放在方法的上面,而不是类,意思是产生一个bean,并交给spring管理。
-
19、@AutoWired:自动导入依赖的bean。byType方式。把配置好的Bean拿来用,完成属性、方法的组装,它可以对类成员变量、方法及构造函数进行标注,完成自动装配的工作。当加上(required=false)时,就算找不到bean也不报错。
-
20、@Qualifier:当有多个同一类型的Bean时,可以用@Qualifier(“name”)来指定。与@Autowired配合使用。@Qualifier限定描述符除了能根据名字进行注入,但能进行更细粒度的控制如何选择候选者,
-
21、@Resource(name=”name”,type=”type”):没有括号内内容的话,默认byName。与@Autowired干类似的事。
-
22、@RequestMapping:@RequestMapping(“/path”)表示该控制器处理所有“/path”的URL请求
-
23、@ControllerAdvice:包含@Component。可以被扫描到。统一处理异常。
-
24、@ExceptionHandler(Exception.class):用在方法上面表示遇到这个异常就执行以下方法。
-
25、@RequestParam:用在方法的参数前面。
-
26、@PathVariable:路径变量。
此处只做简单说明,若想进一步了解,可以一个一个注意,在代码中应用一遍
3.websocket服务端实现
WebSocket 是 HTML5 开始提供的一种在单个 TCP 连接上进行全双工通讯的协议。WebSocket 使得客户端和服务器之间的数据交换变得更加简单,允许服务端主动向客户端推送数据。在 WebSocket API 中,浏览器和服务器只需要完成一次握手,两者之间就直接可以创建持久性的连接,并进行双向数据传输。
在 WebSocket API 中,浏览器和服务器只需要做一个握手的动作,然后,浏览器和服务器之间就形成了一条快速通道。两者之间就直接可以数据互相传送。HTML5 定义的 WebSocket 协议,能更好的节省服务器资源和带宽,并且能够更实时地进行通讯。
3.1 添加日志组件的依赖(可以在建项目的时候添加引用)
    org.springframework.boot
    spring-boot-starter-websocket
3.2 配置文件WebSocketConfig.java
@Component
public class WebSocketConfig {
    /**
     * ServerEndpointExporter 作用
     * 这个Bean会自动注册使用@ServerEndpoint注解声明的websocket endpoint
     * @return
     */
    @Bean
    public ServerEndpointExporter serverEndpointExporter() {
        return new ServerEndpointExporter();
    }
}
3.3 添加服务的类WebSocket.java
/**
 * websocket 服务类
 *
 * @ServerEndpoint 这个注解有什么作用?
 * 这个注解用于标识作用在类上,它的主要功能是把当前类标识成一个WebSocket的服务端
 * 注解的值用户客户端连接访问的URL地址
 */
@Component
@ServerEndpoint("/api/ws/{name}")
public class WebSocket {
    /**
     * 与某个客户端的连接对话,需要通过它来给客户端发送消息
     */
    private Session session;
    /**
     * 标识当前连接客户端的用户名
     */
    private String name;
    /**
     * 用于存所有的连接服务的客户端,这个对象存储是安全的
     */
    private static ConcurrentHashMap webSocketSet = new ConcurrentHashMap<>();
    @OnOpen
    public void OnOpen(Session session, @PathParam(value = "name") String name) {
        this.session = session;
        this.name = name;
        // name是用来表示唯一客户端,如果需要指定发送,需要指定发送通过name来区分
        webSocketSet.put(name, this);
        System.out.println("[WebSocket] 连接成功,当前连接人数为:" + webSocketSet.size());
    }
    @OnClose
    public void OnClose() {
        webSocketSet.remove(this.name);
        System.out.println("[WebSocket] 退出成功,当前连接人数为:" + webSocketSet.size());
    }
    @OnMessage
    public void OnMessage(String message) {
        System.out.println("[WebSocket] 收到消息:" + message);
        //判断是否需要指定发送,具体规则自定义
        if (message.indexOf("TOUSER") == 0) {
            String name = message.substring(message.indexOf("TOUSER") + 6, message.indexOf(";"));
            AppointSending(name, message.substring(message.indexOf(";") + 1, message.length()));
        } else {
            GroupSending(message);
        }

    }
    /**
     * 群发
     *
     * @param message
     */
    public void GroupSending(String message) {
        for (String name : webSocketSet.keySet()) {
            try {
                webSocketSet.get(name).session.getBasicRemote().sendText(message);
            } catch (Exception e) {
                e.printStackTrace();
            }
        }
    }
    /**
     * 指定发送
     *
     * @param name
     * @param message
     */
    public void AppointSending(String name, String message) {
        try {
            webSocketSet.get(name).session.getBasicRemote().sendText(message);
        } catch (Exception e) {
            e.printStackTrace();
        }
    }
}
3.4 整体路径
3.5 启动springboot,客户端连接效果
3.6 服务端接收控制台打印

websocket服务端,客户端通信成功。
客户端在线工具:websocket客户端
4.JWT实现TOKEN认证,路由器拦截配置
4.1 添加JWT引用
    com.auth0
    java-jwt
    3.4.0
4.2 JWT工具类
package com.cn.xcsharp.util;

import com.auth0.jwt.JWT;
import com.auth0.jwt.JWTVerifier;
import com.auth0.jwt.algorithms.Algorithm;
import com.auth0.jwt.interfaces.DecodedJWT;

import javax.servlet.http.HttpServletRequest;
import java.util.Date;

/* *
 *  JWT工具类
 * @Param
 * @Return
 */
public class JwtUtil {

    // Token过期时间30分钟
//    public static final long EXPIRE_TIME = 30 * 60 * 1000;
    //Token过期时间7天
    public static final long EXPIRE_TIME = 7 * 24 * 60 * 60 * 1000;

    /* *
     * @Author lsc
     *  校验token是否正确
     * @Param token
     * @Param username
     * @Param secret
     * @Return boolean
     */
    public static boolean verify(String token, String username, String secret) {
        try {
            // 设置加密算法
            Algorithm algorithm = Algorithm.HMAC256(secret);
            JWTVerifier verifier = JWT.require(algorithm)
                    .withClaim("username", username)
                    .build();
            // 效验TOKEN
            DecodedJWT jwt = verifier.verify(token);
            return true;
        } catch (Exception exception) {
            return false;
        }
    }
    /* *
     * @Author lsc
     * 生成签名,30min后过期
     * @Param [username, secret]
     * @Return java.lang.String
     */
    public static String sign(String username, String secret) {
        Date date = new Date(System.currentTimeMillis() + EXPIRE_TIME);
        Algorithm algorithm = Algorithm.HMAC256(secret);
        // 附带username信息
        return JWT.create()
                .withClaim("username", username)
                .withExpiresAt(date)
                .sign(algorithm);

    }

    /* *
     * @Author lsc
     *  获得用户名
     * @Param [request]
     * @Return java.lang.String
     */
    public static String getUserNameByToken(HttpServletRequest request)  {
        String token = request.getHeader("token");
        DecodedJWT jwt = JWT.decode(token);
        return jwt.getClaim("username")
                .asString();
    }
}
4.3 token验证拦截器
package com.cn.xcsharp.filter;

import com.cn.xcsharp.util.CommonResult;
import com.cn.xcsharp.util.JwtUtil;
import com.cn.xcsharp.util.StrDbUtils;
import com.cn.xcsharp.util.StrUtils;
import com.fasterxml.jackson.databind.ObjectMapper;
import org.springframework.stereotype.Component;
import org.springframework.web.method.HandlerMethod;
import org.springframework.web.servlet.HandlerInterceptor;

import javax.servlet.http.HttpServletRequest;
import javax.servlet.http.HttpServletResponse;
import java.io.IOException;

/**
 * token验证拦截器
 */
@Component
public class JwtInterceptor implements HandlerInterceptor {
    @Override
    public boolean preHandle(HttpServletRequest request, HttpServletResponse response, Object handler) throws Exception {
        try{
            // 从 http 请求头中取出 token
            String token = request.getHeader("token");
            // 如果不是映射到方法直接通过
            if(!(handler instanceof HandlerMethod)){
                return true;
            }
            if (token != null){
                String username = JwtUtil.getUserNameByToken(request);
                // 这边拿到的 用户名 应该去数据库查询获得密码,简略,步骤在service直接获取密码
                boolean result = JwtUtil.verify(token,username, StrDbUtils.getPassword(username));
                if(result){
//                    System.out.println("通过拦截器");
                    return true;
                }
            }
        }catch (Exception e){

        }
        falseResult(response);
        return false;
    }
    public void falseResult(HttpServletResponse response) throws IOException {
        response.setCharacterEncoding("UTF-8");
        response.setContentType("application/json; charset=utf-8");
        CommonResult result = new CommonResult();
        result.setState(601);
        result.setMsg(StrUtils.INFO_601);
        ObjectMapper objectMapper = new ObjectMapper();
        response.getWriter().println(objectMapper.writeValueAsString(result));
        return;
    }

    @Override
    public void afterCompletion(HttpServletRequest request, HttpServletResponse response, Object handler, Exception ex) throws Exception {

    }
}
4.4 拦截器配置
放行不需要经过token认证的请求
package com.cn.xcsharp.filter;
import org.springframework.context.annotation.Bean;
import org.springframework.context.annotation.Configuration;
import org.springframework.web.servlet.config.annotation.CorsRegistry;
import org.springframework.web.servlet.config.annotation.InterceptorRegistry;
import org.springframework.web.servlet.config.annotation.WebMvcConfigurer;

/* *
 * 拦截器配置
 * @Param
 * @Return
 */
@Configuration
public class InterceptorConfig implements WebMvcConfigurer {
    /* *
     * @Author lsc
     *  设置拦截路径
     * @Param [registry]
     * @Return void
     */
    @Override
    public void addInterceptors(InterceptorRegistry registry) {
        registry.addInterceptor(authenticationInterceptor())
                .addPathPatterns("/**")
                .excludePathPatterns("/api/img/*","/api/error/*","/api/v1/login","/static/**");//不用token验证的路径
    }
    /* *
     * @Author lsc
     *  将拦截器注入context
     * @Param []
     * @Return com.zszxz.jwt.interceptor.JwtInterceptor
     */
    @Bean
    public JwtInterceptor authenticationInterceptor() {
        return new JwtInterceptor();
    }

    /* *
     * @Author lsc
     * 跨域支持
     * @Param [registry]
     * @Return void
     */
    @Override
    public void addCorsMappings(CorsRegistry registry) {
        registry.addMapping("/**")
//                .allowedOrigins("*")
                .allowedOriginPatterns("*")
                .allowCredentials(true)
                .allowedMethods("GET", "POST", "DELETE", "PUT", "PATCH", "OPTIONS", "HEAD")
                .maxAge(3600 * 24 * 30 * 6);//秒  6个月
    }
}
4.5 登录返回token
登录成功,返回token,数据请求token放到header
Map map = new HashMap<>();
String username = sysUser.getUsername();
String password = sysUser.getPassword();

CommonResult result = new CommonResult();
password=new MD5Utils().getMD5ofStr(username.toUpperCase()+password);
String sql="select * from S_USERS t where name='"+username+"' and password='"+password+"'";
List list=Ipds.getList(sql,new  Object[]{});
if(list.size()>0){
    String token = JwtUtil.sign(username,password);
    if (token != null){
        map.put("token", token);
        result.setMsg(StrUtils.INFO_200);
        result.setState(200);
        result.setData(map);
    }else{
        result.setMsg(StrUtils.INFO_602);
        result.setState(602);
    }
}else{
    result.setMsg(StrUtils.INFO_602);
    result.setState(602);
}
return result;
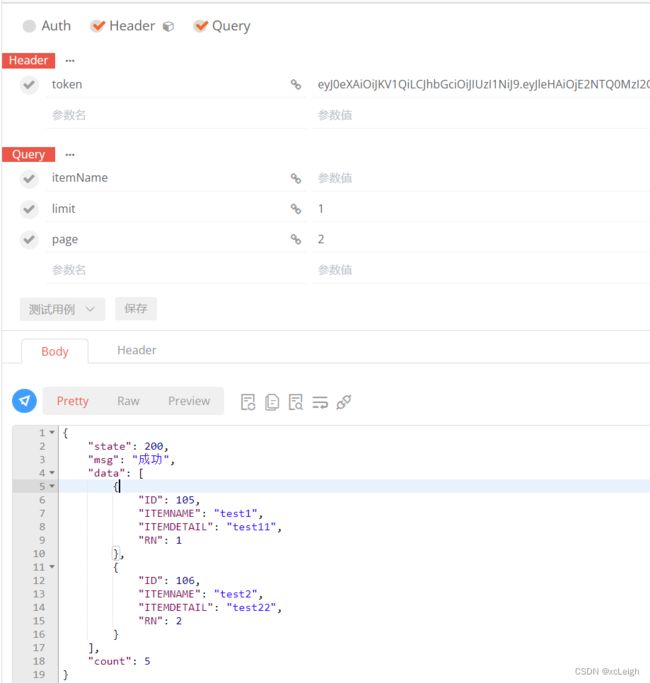
4.6 token验证效果
5.定时任务
项目中运行的是Schedule定时执行任务案例。
5.1 Schedule定时执行
//@Schedule 定时任务
//1.启动类 里面加 @EnableScheduling 注解,开启对定时任务的支持
//2.写此方法
@Component
public class JsbapiTask {
@Scheduled(fixedRate = 5*60*1000)//5分钟
public void scheduledTask() {
System.out.println("API任务:" + LocalDateTime.now())  }
}
5.2 TimerTask定时执行
@Component
public class TimeTask implements ApplicationRunner {
    @Override
    public void run(ApplicationArguments args) throws Exception {
        TimerTask timerTask = new TimerTask() {
            @Override
            public void run() {
                System.out.println("task  run:"+ new Date());
            }
        };
        Timer timer = new Timer();
        //安排指定的任务在指定的时间开始进行重复的固定延迟执行。这里是每3秒执行一次
        timer.schedule(timerTask,10,3000);

    }
}
6.API对数据的增删改查,实现双数据库(Mysql和Oracle)
6.1 application.properties配置两个数据库连接串
##配置oracle数据库连接
spring.datasource.orcle.type=com.alibaba.druid.pool.DruidDataSource
spring.datasource.orcle.url=jdbc:oracle:thin:@IP:PORT:orcl
spring.datasource.orcle.username=自己的数据库名称
spring.datasource.orcle.password=自己的数据库密码
spring.datasource.orcle.driver-class-name=oracle.jdbc.driver.OracleDriver
#spring.datasource.orcle.max-idle=10
spring.datasource.orcle.max-wait=10000
spring.datasource.orcle.min-idle=5
spring.datasource.orcle.initial-size=5
spring.datasource.orcle.name=orcle
spring.datasource.orcle.filters=stat

##mysql库需要的引用
spring.datasource.mysql.url=jdbc:mysql://IP:PORT/自己的数据库名?serverTimezone=Asia/Shanghai&useSSL=false
spring.datasource.mysql.username=自己数据库的用户名
spring.datasource.mysql.password=自己数据库的密码
spring.datasource.mysql.driver-class-name=com.mysql.jdbc.Driver
6.2 配置两个数据库的数据源
@Configuration
public class WebMvcConfig {
    @Bean
    @ConfigurationProperties(prefix = "spring.datasource.orcle")
    DataSource orcle(){
        return DruidDataSourceBuilder.create().build();
    }
    @Bean
    @ConfigurationProperties(prefix = "spring.datasource.mysql")
    DataSource mysql(){
        return DruidDataSourceBuilder.create().build();
    }
}
@Configuration
public class JdbcTemplateConfig {
    @Bean
    //注入orcle数据源到jdbcTemplateOrcle
    JdbcTemplate jdbcTemplateOrcle(@Qualifier("orcle") DataSource orcle){
        return new JdbcTemplate(orcle);
    }
    @Bean//注入mysql数据源到jdbcTemplateMysql
    JdbcTemplate jdbcTemplateMysql(@Qualifier("mysql") DataSource mysql){
        return new JdbcTemplate(mysql);
    }
}
6.3 配置数据服务
oracle的数据服务
@Service
@Repository
public class PublicDataServiceImpl implements IPublicDataService {
    //导入JDBCTemplate模板
//    @Resource
//    private JdbcTemplate jdbcTemplate;
    @Resource(name = "jdbcTemplateOrcle")
    JdbcTemplate jdbcTemplateOrcle;
    @Override
    public int insertDB(String sql) {
        return  jdbcTemplateOrcle.update(sql);
    }

    @Override
    public int updateDB(String sql) {
        return  jdbcTemplateOrcle.update(sql);
    }

    @Override
    public int deleteDB(String sql) {
        return  jdbcTemplateOrcle.update(sql);
    }

    @Override
    public List getList(String sql, Object... params) {
        List> list = null;
        try {
            list = jdbcTemplateOrcle.queryForList(sql, params);
        } catch (DataAccessException e) {
            e.printStackTrace();
            list = new ArrayList<>();
        }
        return list;
    }

    @Override
    public PagingBean getListFy(String sql, int pageNo, int pageSize, Object... params) {
        PagingBean pagingBean=new PagingBean();
        pagingBean= PagingUtils.getJdbcPage(sql,pageNo,pageSize,jdbcTemplateOrcle,params);
        return pagingBean;
    }
}
mysql的数据服务
@Service
@Repository
public class PublicMysqlDataServiceImpl implements IPublicMysqlDataService {
    @Resource(name = "jdbcTemplateMysql")
    JdbcTemplate jdbcTemplateMysql;
    @Override
    public int insertDB(String sql) {
        return  jdbcTemplateMysql.update(sql);
    }
    @Override
    public int updateDB(String sql) {
        return  jdbcTemplateMysql.update(sql);
    }
    @Override
    public int deleteDB(String sql) {
        return  jdbcTemplateMysql.update(sql);
    }
    @Override
    public List getList(String sql, Object... params) {
        List> list = null;
        try {
            list = jdbcTemplateMysql.queryForList(sql, params);
        } catch (DataAccessException e) {
            e.printStackTrace();
            list = new ArrayList<>();
        }
        return list;
    }
    @Override
    public PagingBean getListFy(String sql, int pageNo, int pageSize, Object... params) {
        PagingBean pagingBean=new PagingBean();
        pagingBean= PagingUtils.getJdbcPage(sql,pageNo,pageSize,jdbcTemplateMysql,params);
        return pagingBean;
    }
}
6.4 双数据库的新增API
- oracle mysql代码
新增sql,唯一的区别是mysql是自增,不用管id,oracle的id需要调用创建的序列
---oracle代码
@RequestMapping("/add")
public CommonResult add(String itemName,String itemDetail) {
    CommonResult result = new CommonResult();
    try {
        String sql="insert into s_item(id,itemname,itemdetail)values(SEQ_B_YC.Nextval,'"+itemName+"','"+itemDetail+"')";
        System.out.println("sql:"+sql);
        int num=Ipds.insertDB(sql);
        //将查询结果封装到CommonResult中
        result.setData(num);
        return result;
    } catch (Exception e) {
        e.printStackTrace();
        result.setState(501);
        result.setMsg(StrUtils.INFO_501);
        return result;
    }
}
---mysql代码
@RequestMapping("/add")
public CommonResult add(String itemName,String itemDetail) {
    CommonResult result = new CommonResult();
    try {
        String sql="insert into s_item(itemname,itemdetail)values('"+itemName+"','"+itemDetail+"')";
        System.out.println("sql:"+sql);
        int num=Ipmds.insertDB(sql);
        //将查询结果封装到CommonResult中
        result.setData(num);
        return result;
    } catch (Exception e) {
        e.printStackTrace();
        result.setState(501);
        result.setMsg(StrUtils.INFO_501);
        return result;
    }
}
6.5 双数据库的修改API
- oracle mysql代码
修改sql一样
---oracle代码
@RequestMapping("/update")
public CommonResult update(String id,String itemName,String itemDetail) {
    CommonResult result = new CommonResult();
    try {
        String sql="update s_item set itemname='"+itemName+"',itemdetail='"+itemDetail+"' where id="+id;
        System.out.println("sql:"+sql);
        int num=Ipds.updateDB(sql);
        //将查询结果封装到CommonResult中
        result.setData(num);
        return result;
    } catch (Exception e) {
        e.printStackTrace();
        result.setState(501);
        result.setMsg(StrUtils.INFO_501);
        return result;
    }
}
---mysql代码
@RequestMapping("/update")
public CommonResult update(String id,String itemName,String itemDetail) {
    CommonResult result = new CommonResult();
    try {
        String sql="update s_item set itemname='"+itemName+"',itemdetail='"+itemDetail+"' where id="+id;
        System.out.println("sql:"+sql);
        int num=Ipmds.updateDB(sql);
        //将查询结果封装到CommonResult中
        result.setData(num);
        return result;
    } catch (Exception e) {
        e.printStackTrace();
        result.setState(501);
        result.setMsg(StrUtils.INFO_501);
        return result;
    }
}
6.6 双数据库的删除API
- oracle mysql代码
sql删除,mysql和oracle不同
---oracle代码
@RequestMapping("/del")
public CommonResult del(String id) {
    CommonResult result = new CommonResult();
    try {
        String sql="delete s_item where id="+id;
        System.out.println("sql:"+sql);
        int num=Ipds.deleteDB(sql);
        //将查询结果封装到CommonResult中
        result.setData(num);
        return result;
    } catch (Exception e) {
        e.printStackTrace();
        result.setState(501);
        result.setMsg(StrUtils.INFO_501);
        return result;
    }
}
---mysql代码
@RequestMapping("/del")
public CommonResult del(String id) {
    CommonResult result = new CommonResult();
    try {
        String sql="delete from s_item where id="+id;
        System.out.println("sql:"+sql);
        int num=Ipmds.deleteDB(sql);
        //将查询结果封装到CommonResult中
        result.setData(num);
        return result;
    } catch (Exception e) {
        e.printStackTrace();
        result.setState(501);
        result.setMsg(StrUtils.INFO_501);
        return result;
    }
}
6.7 双数据库的查询API,获取全部
- oracle mysql代码
---oracle代码
@RequestMapping("/getlist")
public CommonResult getlist() {
    CommonResult result = new CommonResult();
    try {
        String sql="select * from S_ITEM t where 1=1 ";
        System.out.println("sql:"+sql);
        List list=Ipds.getList(sql,new  Object[]{});
        //将查询结果封装到CommonResult中
        result.setData(list);
        return result;
    } catch (Exception e) {
        e.printStackTrace();
        result.setState(501);
        result.setMsg(StrUtils.INFO_501);
        return result;
    }
}
---mysql代码
@RequestMapping("/getlist")
public CommonResult getlist() {
    CommonResult result = new CommonResult();
    try {
        String sql="select * from s_item";
        System.out.println("sql:"+sql);
        List list=Ipmds.getList(sql,new  Object[]{});
        //将查询结果封装到CommonResult中
        result.setData(list);
        return result;
    } catch (Exception e) {
        e.printStackTrace();
        result.setState(501);
        result.setMsg(StrUtils.INFO_501);
        return result;
    }
}
6.8 双数据库的分页查询API
- oracle mysql代码
limit 页码
page 页大小
itemName 参数
---oracle代码
@RequestMapping("/getfylist")
public CommonResultFy getfylist(int limit, int page, String itemName, HttpServletRequest request){
    CommonResultFy result = new CommonResultFy();
    try {
        String username = JwtUtil.getUserNameByToken(request);
        //分页
        if(!itemName.equals("")&&!itemName.equals(null)){
            itemName=" and itemName like '%"+itemName+"%' ";
        }
        String sql="select * from S_ITEM t where 1 = 1"+itemName;
        PagingBean pagingBean = Ipds.getListFy(sql,limit,page,new  Object[]{});
        //将查询结果封装到CommonResult中
        result.setCount(pagingBean.getTotalCount());
        result.setData(pagingBean.getData());
        return result;
    } catch (Exception e) {
        e.printStackTrace();
        result.setState(501);
        result.setMsg(StrUtils.INFO_501);
        return result;
    }
}
---mysql代码
@RequestMapping("/getfylist")
public CommonResultFy getfylist(int limit, int page, String itemName, HttpServletRequest request){
    CommonResultFy result = new CommonResultFy();
    try {
        String username = JwtUtil.getUserNameByToken(request);
        //分页
        if(!itemName.equals("")&&!itemName.equals(null)){
            itemName=" and itemName like '%"+itemName+"%' ";
        }
        String sql="select * from S_ITEM t where 1 = 1"+itemName;
        PagingBean pagingBean = Ipmds.getListFy(sql,limit,page,new  Object[]{});
        //将查询结果封装到CommonResult中
        result.setCount(pagingBean.getTotalCount());
        result.setData(pagingBean.getData());
        return result;
    } catch (Exception e) {
        e.printStackTrace();
        result.setState(501);
        result.setMsg(StrUtils.INFO_501);
        return result;
    }
}
7.部署项目
SpringBoot两种打包方式 JAR包 和 WAR包
- 两者区别
1.war是一个web模块,其中需要包括WEB-INF,是可以直接运行的WEB模块;jar一般只是包括一些class文件,在声明了Main_class之后是可以用java命令运行的。
打包说明
JAR打包命令 java -jar xx.jar
War打包直接把文件放到tomcat里面的webapps目录下
2. war包是做好一个web应用后,通常是网站,打成包部署到容器中;jar包通常是开发时要引用通用类,打成包便于存放管理.
3.war是Sun提出的一种Web应用程序格式,也是许多文件的一个压缩包。这个包中的文件按一定目录结构来组织;classes目录下则包含编译好的Servlet类和Jsp或Servlet所依赖的其它类(如JavaBean)可以打包成jar放到WEB-INF下的lib目录下。
我们本篇文章是讲的springboot开发api,所以基于后台,在新建 Spring Initializr 项目,直接选的jar包方式。
7.1 项目打包
7.2 看服务器是否有JDK
java -version
如果有,请忽略这一步,如果没有,安装JDK。
JDK11安装配置
7.3 项目部署
把复制的jar包,放到指定文件,打开CMD,进入到该目录
运行命令
启动方式1
java -jar xcsharp-0.0.1-SNAPSHOT.jar --这种方式是带控制台运行的,关闭命令控制台,就关闭了程序
启动方式2
start javaw -jar xcsharp-0.0.1-SNAPSHOT.jar --这种方式是后台启动
7.4 相关问题
- springboot项目jar包部署相关,api请求不了,服务自启动等
8.开发遇到的问题
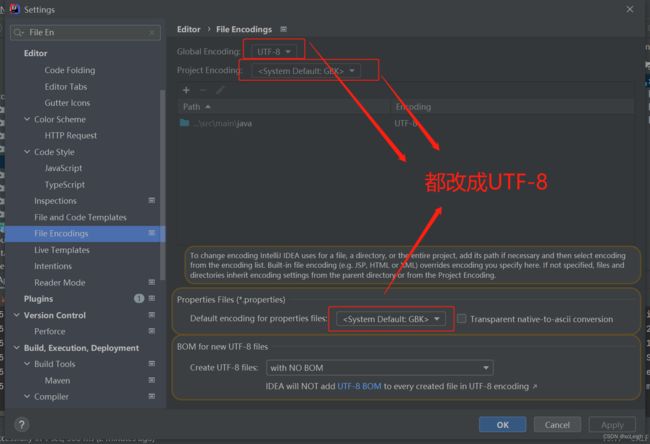
8.1 乱码问题
Settings 》 搜索File Encodings,都改成UTF-8
源码下载
【博主推荐】springboot API接口对数据库增删改查完整版(源码)
