前端项目部署nginx服务器(http&https)
(一)安装nginx并放置build包
// 使用brew安装nginx
brew install nginx
// 查看nginx的配置信息
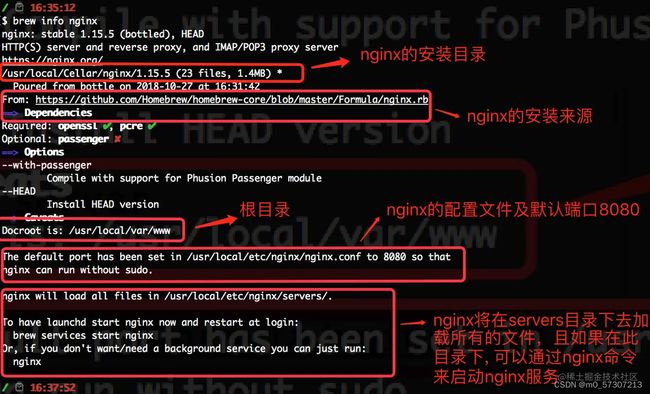
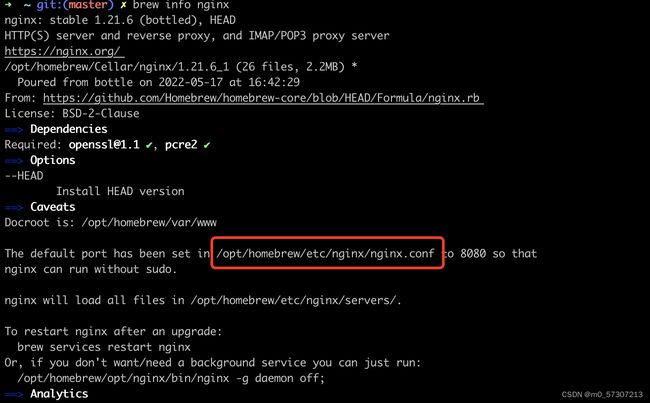
brew info nginx

以本人为例:

![]()
打开文件夹看到html文件,点击进去就是我们放压缩包的地方。
(二)nginx.conf文件配置
nginx.conf文件位置如下:

以下以影子设备项目为例,下面列举了http服务器和https服务器的nginx.conf文件内容配置,https服务器运行起来还需要额外的操作,见后面的章节,http服务器和https服务器任选其一配置即可。
http服务器配置:
如下,重点在 underscores_in_headers on;这个配置,和cookie有关。
Access-Control-Allow-Origin的配置是为了在本地接入研测平台。
#user  nobody;
worker_processes  1;

#error_log  logs/error.log;
#error_log  logs/error.log  notice;
#error_log  logs/error.log  info;

#pid        logs/nginx.pid;


events {
    worker_connections  1024;
}


http {
    include       mime.types;
    default_type  application/octet-stream;
    underscores_in_headers on;
    etag on;
    #log_format  main  '$remote_addr - $remote_user [$time_local] "$request" '
    #                  '$status $body_bytes_sent "$http_referer" '
    #                  '"$http_user_agent" "$http_x_forwarded_for"';

    #access_log  logs/access.log  main;

    sendfile        on;
    #tcp_nopush     on;

    #keepalive_timeout  0;
    keepalive_timeout  65;

    gzip  on;
    gzip_types text/plain text/css application/json application/javascript text/xml application/xml application/xml+rss text/javascript;

    server {
        listen       9980;
        server_name  localhost;

        #charset koi8-r;

        #access_log  logs/host.access.log  main;

        location / {
            add_header Access-Control-Allow-Origin *;
            add_header Access-Control-Allow-Methods 'GET, POST, OPTIONS';
            add_header Access-Control-Allow-Headers 'DNT,X-Mx-ReqToken,Keep-Alive,User-Agent,X-Requested-With,If-Modified-Since,Cache-Control,Content-Type,Authorization';
            root   html/dist;
            index  index.html index.htm;
            try_files $uri $uri/ /index.html;
            #rewrite ^/.*/$ / last; # Redirect everything to / (ex index.html) and let the JS router take care of the rest
           # rewrite ^([^.]*[^/])$ $1/ permanent; # Force trailing slash
        }
        location /api/ {
            proxy_pass https://testbook-ng.wgine-daily.com:7799/;
        }
        location /galaxy-virtual-api/ {
            proxy_pass https://cde-open.wgine-daily.com:7799/;
        }

        #error_page  404              /404.html;

        # redirect server error pages to the static page /50x.html
        #
        error_page   500 502 503 504  /50x.html;
        location = /50x.html {
            root   html;
        }

        # proxy the PHP scripts to Apache listening on 127.0.0.1:80
        #
        #location ~ \.php$ {
        #    proxy_pass   http://127.0.0.1;
        #}

        # pass the PHP scripts to FastCGI server listening on 127.0.0.1:9000
        #
        #location ~ \.php$ {
        #    root           html;
        #    fastcgi_pass   127.0.0.1:9000;
        #    fastcgi_index  index.php;
        #    fastcgi_param  SCRIPT_FILENAME  /scripts$fastcgi_script_name;
        #    include        fastcgi_params;
        #}

        # deny access to .htaccess files, if Apache's document root
        # concurs with nginx's one
        #
        #location ~ /\.ht {
        #    deny  all;
        #}
    }


    # another virtual host using mix of IP-, name-, and port-based configuration
    #
    #server {
    #    listen       8000;
    #    listen       somename:8080;
    #    server_name  somename  alias  another.alias;

    #    location / {
    #        root   html;
    #        index  index.html index.htm;
    #    }
    #}


    # HTTPS server
    #
    #server {
    #    listen       443 ssl;
    #    server_name  localhost;

    #    ssl_certificate      cert.pem;
    #    ssl_certificate_key  cert.key;

    #    ssl_session_cache    shared:SSL:1m;
    #    ssl_session_timeout  5m;

    #    ssl_ciphers  HIGH:!aNULL:!MD5;
    #    ssl_prefer_server_ciphers  on;

    #    location / {
    #        root   html;
    #        index  index.html index.htm;
    #    }
    #}
    include servers/*;
}
在bin文件夹下终端输入sudo nginx启动nginx,即可看到前端部署成功。
注意事项:
(1)项目build之前,确认项目的全局变量ENV,REGION都插入到index.html页面中了,
(2)确认webpack的output节点下的publicPath为’/',而不是cdn前缀(因为我们的js,css静态文件并没有上传cdn,引入不到会白屏)
如下,影子设备独立部署nginx服务器成功:

我们把研测接入的影子设备的端口改成9980,yarn run dev启动研测平台,发现影子设备也成功接入了。
https服务器配置:
#user  nobody;
worker_processes  1;

#error_log  logs/error.log;
#error_log  logs/error.log  notice;
#error_log  logs/error.log  info;

#pid        logs/nginx.pid;


events {
    worker_connections  1024;
}


http {
    include       mime.types;
    default_type  application/octet-stream;
    underscores_in_headers on;
    etag on;
    #log_format  main  '$remote_addr - $remote_user [$time_local] "$request" '
    #                  '$status $body_bytes_sent "$http_referer" '
    #                  '"$http_user_agent" "$http_x_forwarded_for"';

    #access_log  logs/access.log  main;

    sendfile        on;
    #tcp_nopush     on;

    #keepalive_timeout  0;
    keepalive_timeout  65;

    gzip  on;
    gzip_types text/plain text/css application/json application/javascript text/xml application/xml application/xml+rss text/javascript;


    # server {
    #     listen       9980;
    #     server_name  localhost;

        #charset koi8-r;

        #access_log  logs/host.access.log  main;

        # location / {
        #     add_header Access-Control-Allow-Origin *;
        #     add_header Access-Control-Allow-Methods 'GET, POST, OPTIONS';
        #     add_header Access-Control-Allow-Headers 'DNT,X-Mx-ReqToken,Keep-Alive,User-Agent,X-Requested-With,If-Modified-Since,Cache-Control,Content-Type,Authorization';
        #     root   html/dist;
        #     index  index.html index.htm;
        #     try_files $uri $uri/ /index.html;
        #     #rewrite ^/.*/$ / last; # Redirect everything to / (ex index.html) and let the JS router take care of the rest
        #    # rewrite ^([^.]*[^/])$ $1/ permanent; # Force trailing slash
        # }
        # location /api/ {
        #     proxy_pass https://testbook-ng.wgine-daily.com:7799/;
        # }
        # location /galaxy-virtual-api/ {
        #     proxy_pass https://cde-open.wgine-daily.com:7799/;
        # }

        #error_page  404              /404.html;

        # redirect server error pages to the static page /50x.html
        #
        # error_page   500 502 503 504  /50x.html;
        # location = /50x.html {
        #     root   html;
        # }

        # proxy the PHP scripts to Apache listening on 127.0.0.1:80
        #
        #location ~ \.php$ {
        #    proxy_pass   http://127.0.0.1;
        #}

        # pass the PHP scripts to FastCGI server listening on 127.0.0.1:9000
        #
        #location ~ \.php$ {
        #    root           html;
        #    fastcgi_pass   127.0.0.1:9000;
        #    fastcgi_index  index.php;
        #    fastcgi_param  SCRIPT_FILENAME  /scripts$fastcgi_script_name;
        #    include        fastcgi_params;
        #}

        # deny access to .htaccess files, if Apache's document root
        # concurs with nginx's one
        #
        #location ~ /\.ht {
        #    deny  all;
        #}
    # }


    # another virtual host using mix of IP-, name-, and port-based configuration
    #
    #server {
    #    listen       8000;
    #    listen       somename:8080;
    #    server_name  somename  alias  another.alias;

    #    location / {
    #        root   html;
    #        index  index.html index.htm;
    #    }
    #}


    # HTTPS server
    #
    server {
       listen       845 ssl http2;
       server_name  localhost;

       ssl_certificate      /Users/yuhui/ssl/server.crt;
       ssl_certificate_key  /Users/yuhui/ssl/server.key;

       ssl_session_cache    shared:SSL:1m;
       ssl_session_timeout  5m;

       ssl_ciphers  HIGH:!aNULL:!MD5;
       ssl_prefer_server_ciphers  on;

       location / {
            add_header Access-Control-Allow-Origin *;
            add_header Access-Control-Allow-Methods 'GET, POST, OPTIONS';
            add_header Access-Control-Allow-Headers 'DNT,X-Mx-ReqToken,Keep-Alive,User-Agent,X-Requested-With,If-Modified-Since,Cache-Control,Content-Type,Authorization';
            root   html/dist;
            index  index.html index.htm;
            try_files $uri $uri/ /index.html;
            #rewrite ^/.*/$ / last; # Redirect everything to / (ex index.html) and let the JS router take care of the rest
           # rewrite ^([^.]*[^/])$ $1/ permanent; # Force trailing slash
        }
        location /api/ {
            proxy_pass https://testbook-ng.wgine-daily.com:7799/;
        }
        location /galaxy-virtual-api/ {
            proxy_pass https://cde-open.wgine-daily.com:7799/;
        }
        error_page   500 502 503 504  /50x.html;
        location = /50x.html {
            root   html;
        }
    }
    include servers/*;
}
(三)https服务器额外配置
生成自签名的证书
在终端输入以下四句指令即可
第一句作用:目的是生成server.pass.key这样的东西
第二句作用:生成私钥,它是把第一句生成的东西作为输入来生成私钥的。
有了私钥后,我们要生成csr,通过csr才能去请求生成我们的证书

第三句作用:生成csr
它会要求我们输入一些内容,我们输入下面框起来的前面四个内容后,就可以一路回车。

第四句:最后通过csr和私钥来生成我们最后的证书。
最后我们会在终端工作目录下生成.key文件和.crt文件,我们把它粘贴到我们配置的证书和私钥的位置如下:
配置好后保存退出,并且重启一下nginx即可。
输入thisisunsafe打开https本地服务器
地址栏输入https://localhost:845

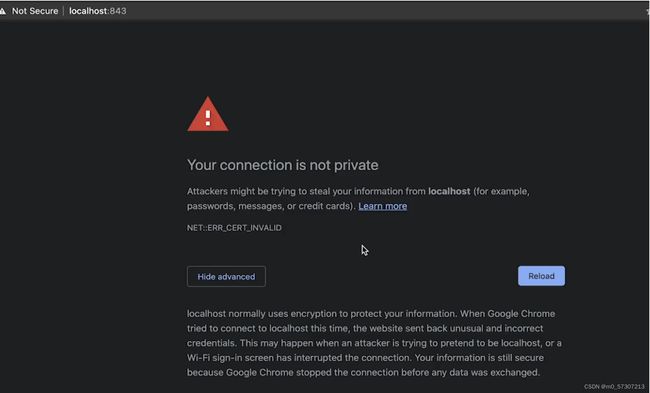
第一次输入会遇到以下这种情况

遇到这个情况,我们直接敲击thisisunsafe即可。
然后你就可以在本地以https打开网页了。
关于thisisunsafe 如何输入的文章请参考以下链接:
https://blog.csdn.net/qq_30546099/article/details/114332243
最终显示界面是如下这样的:
(四)nginx常用命令:
在bin文件夹下 sudo nginx即可。
1、启动nginx:sudo nginx
2、关闭nginx:sudo nginx -s stop
3、重启nginx:sudo nginx -s reload
参考文章:
https://juejin.cn/post/6986190222241464350#heading-3


