RabbitMQ 入门到应用 ( 五 ) 基本应用
6.更多应用
6.1.AmqpAdmin 工具类
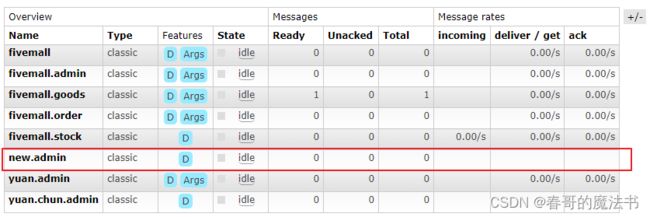
可以通过Spring的@Autowired 注入 AmqpAdmin 工具类 , 通过这个工具类创建 队列, 交换机及绑定
import org.springframework.amqp.core.AmqpAdmin;
import org.springframework.amqp.core.Binding;
import org.springframework.amqp.core.DirectExchange;
import org.springframework.amqp.core.Queue;
import org.springframework.beans.factory.annotation.Autowired;
import org.springframework.web.bind.annotation.RequestMapping;
import org.springframework.web.bind.annotation.RestController;

@RestController
public class TestController {

    @Autowired
    private AmqpAdmin amqpAdmin;

    @RequestMapping("/testAdmin")
    public String test(){
        // 创建队列
        // 队列名称,  是否为持久性, 是否为独享, 是否自动删除
        Queue queue = new Queue("new.admin", true, false, false);
        String queueStr = amqpAdmin.declareQueue(queue);
        System.out.println("queueStr = " + queueStr);

        // 创建交换机
        // 队列名称,  是否为持久性, 是否为独享, 是否自动删除
        DirectExchange directExchange = new DirectExchange("new.exchange.direct", true, false);
        amqpAdmin.declareExchange(directExchange);

        // 绑定
        // 目标 : 队列名 , 目标类型 ,  交换机 , 路由键  , 自定义参数
        Binding binding = new Binding(
                "new.admin",
                Binding.DestinationType.QUEUE,
                "new.exchange.direct",
                "new.admin",
                null);
        amqpAdmin.declareBinding(binding);

        return "over";
    }
}
调用方法后, 观察操作界面可以看到
新的交换机
及 绑定信息
6.2.主题交换机
6.2.1.配置 队列 交换机 及 绑定关系
通过 new org.springframework.amqp.core.Queue() 创建 队列, 传入队列的 name 属性
import org.springframework.amqp.core.Binding;
import org.springframework.amqp.core.BindingBuilder;
import org.springframework.amqp.core.Queue;
import org.springframework.amqp.core.TopicExchange;
import org.springframework.context.annotation.Bean;
import org.springframework.context.annotation.Configuration;


@Configuration
public class RabbitConfig {

    /**
     * 声明 队列
     */
    @Bean
    public Queue fivemallQueue() {
        return new Queue("fivemall");
    }

    @Bean
    public Queue goodsQueue() {
        return new Queue("fivemall.goods");
    }

    @Bean
    public Queue adminQueue() {
        return new Queue("fivemall.admin");
    }

    @Bean
    public Queue yuanAdminQueue() {
        return new Queue("yuan.admin");
    }

    /**
     * 声明 交换机
     */
    @Bean
    public TopicExchange topicExchange() {
        // 声明 name 为 "topicExchange" 的 主题交换机
        return new TopicExchange("topicExchange");
    }


    /**
     * 为 交换机 绑定 队列
     */

    @Bean
    public Binding bindingFivemallExchange(Queue fivemallQueue, TopicExchange topicExchange) {
        return BindingBuilder.bind(fivemallQueue).to(topicExchange).with("fivemall.#");
    }

    @Bean
    public Binding bindingGoodsExchange(Queue goodsQueue, TopicExchange topicExchange) {
        return BindingBuilder.bind(goodsQueue).to(topicExchange).with("fivemall.#");
    }


    @Bean
    public Binding bindingAdminExchange(Queue adminQueue, TopicExchange topicExchange) {
        return BindingBuilder.bind(adminQueue).to(topicExchange).with("*.admin");
    }

    @Bean
    public Binding bindingYuanExchange(Queue yuanAdminQueue, TopicExchange topicExchange) {
        return BindingBuilder.bind(yuanAdminQueue).to(topicExchange).with("*.admin");
    }

}
6.2.2.接收消息
import org.springframework.amqp.rabbit.annotation.RabbitHandler;
import org.springframework.amqp.rabbit.annotation.RabbitListener;
import org.springframework.stereotype.Component;

@Component
public class TopicReceiver {


    @RabbitHandler
    @RabbitListener(queues = "fivemall")
    public void fivemall(String msg) {
        System.out.println("fivemall 接收信息: "+msg);
    }

    @RabbitHandler
    @RabbitListener(queues = "fivemall.goods")
    public void fivemallGoods(String msg) {
        System.out.println("fivemall.goods 接收信息: "+msg);
    }


    @RabbitHandler
    @RabbitListener(queues = "fivemall.admin")
    public void fivemallAdmin(String msg) {
        System.out.println("fivemall.admin 接收信息: "+msg);
    }


    @RabbitHandler
    @RabbitListener(queues = "yuan.admin")
    public void yuanAdmin(String msg) {
        System.out.println("yuan.admin 接收信息: "+msg);
    }
}
6.2.3.发送消息
import org.springframework.amqp.core.AmqpTemplate;
import org.springframework.beans.factory.annotation.Autowired;
import org.springframework.stereotype.Component;


@Component
public class TopicSender {

    @Autowired
    private AmqpTemplate rabbitTemplate;

    public void topicFivemall(String msg){
        System.out.println("发送 fivemall.order: "+msg);
        // 交换机 , 路由键 , 消息
        // fivemall.order 满足 fivemall.#,  所以 fivemall,  fivemall.goods 可以接收到消息
        rabbitTemplate.convertAndSend("topicExchange", "fivemall.order", msg);
    }

    public void topicAdmin(String msg){
        System.out.println("发送 fivemall.admin: "+msg);
        // fivemall.admin 同时满足 fivemall.#  /  *.admin  两个路由键
        // 所以 fivemall,  fivemall.goods , fivemall.admin  , yuan.admin  都可以接收到消息
        rabbitTemplate.convertAndSend("topicExchange", "fivemall.admin", msg);
    }
}
6.3.传递对象
6.3.1.定义vo类
这个类必须 可以序列化 , 实现 implements Serializable
import lombok.Data;
import java.io.Serializable;

@Data
public class Student implements Serializable {

    private String name;
    private Integer age;

}
6.3.2.发送消息
@RequestMapping("/sendObj")
public String sendObj(){
    Student stu = new Student();
    stu.setName("王小二");
    stu.setAge(22);

    rabbitTemplate.convertAndSend("new.exchange.direct", "new.admin", stu );

    return "已经发送";
}
6.3.3.接收信息
@RabbitListener(queues = "new.admin")
@RabbitHandler
public void receiveObj(Message message, Student student) {

    System.out.println("new.admin 队列 接收消息 : " + message);
    MessageProperties messageProperties = message.getMessageProperties();
    byte[] body = message.getBody();
    System.out.println("student = " + student);
}
在 控制台 查看输出:
new.admin 队列 接收消息 : (Body:'[serialized object]' MessageProperties [headers={}, contentType=application/x-java-serialized-object, contentLength=0, receivedDeliveryMode=PERSISTENT, priority=0, redelivered=false, receivedExchange=new.exchange.direct, receivedRoutingKey=new.admin, deliveryTag=1, consumerTag=amq.ctag-7VnkoHigsGqUapoFWM_-bg, consumerQueue=new.admin])
student = Student(name=王小二, age=22)
可以看到 Message 分为 Body, MessageProperties
而 Body 的内容是 serialized object
6.3.3.1.加入转换类
import org.springframework.amqp.support.converter.Jackson2JsonMessageConverter;
import org.springframework.amqp.support.converter.MessageConverter;
import org.springframework.context.annotation.Bean;
import org.springframework.context.annotation.Configuration;

@Configuration
public class RabbitMessageConfig {

    @Bean
    public MessageConverter messageConverter(){
        return new Jackson2JsonMessageConverter();
    }
}
再来测试, 查看控制台输出
new.admin 队列 接收消息 : (Body:'{"name":"王小二","age":22}' MessageProperties [headers={__TypeId__=com.yuan.rabbitdemo.entity.Student}, contentType=application/json, contentEncoding=UTF-8, contentLength=0, receivedDeliveryMode=PERSISTENT, priority=0, redelivered=false, receivedExchange=new.exchange.direct, receivedRoutingKey=new.admin, deliveryTag=1, consumerTag=amq.ctag-grY888419qaD_fUA6YkK8Q, consumerQueue=new.admin])
student = Student(name=王小二, age=22)
Body 的内容是 转为 JSON结构

