Tomcat源码解析二(Tomcat初始化过程解析)
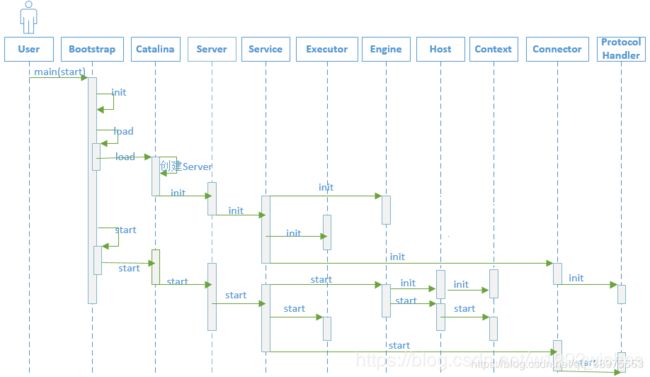
Tomcat启动流程图:
org.apache.catalina.startup.Bootstrap是Tomcat的入口, 在Bootstrap的main方法中完成了对Catalina的初始化以及启动
Tomcat的启动入口main方法是在Bootstrap类里,但具体的执行过程是在Catalina里边,这样做可以使得把启动的入口和具体的管理类进行分开,从而可以方便的创建多种启动的方式。
Catalina是整个Tomcat的管理类,他有三个方法load、start、stop分别用来管理整个服务器的生命周期。load方法用于加载tomcat/conf目录下的server.xml配置文件,用来创建Server并调用Server的init方法进行初始化操作,start用于启动服务器器,stop用于停止服务器,start和stop方法在内部分别调用Server的start和stop方法,load方法在内部调用了 Server的init方法,这三个方法都会按层次分逐层调用相应的方法。
main方法逻辑:
public static void main(String args[]) {

        if (daemon == null) {
            // 在init()完成之前不要设置守护程序
            Bootstrap bootstrap = new Bootstrap();
            try {
                /**
                 * 1.设置类加载, 并实例化Catalina
                 */
                bootstrap.init();
            } catch (Throwable t) {
                handleThrowable(t);
                t.printStackTrace();
                return;
            }
            daemon = bootstrap;
        } else {
            //如果当前的守护线程正在运行, 那么将不再创建新的守护线程, 而是修改该线程的类加载器,防止出现NotFoundExecption异常
            Thread.currentThread().setContextClassLoader(daemon.catalinaLoader);
        }

        try {
            //默认执行的命令, 可以通过传参进行覆盖
            String command = "start";
            if (args.length > 0) {
                command = args[args.length - 1];
            }

            if (command.equals("startd")) {
                args[args.length - 1] = "start";
                daemon.load(args);
                daemon.start();
            } else if (command.equals("stopd")) {
                args[args.length - 1] = "stop";
                daemon.stop();
            } else if (command.equals("start")) {
                // 启动catalina守护线程
                daemon.setAwait(true);
                /**
                 * 2.利用反射执行Catalina中的load()方法  --> 初始化
                 */
                daemon.load(args);
                /**
                 * 3.利用反射执行Catalina中的start()方法  --> 启动
                 */
                daemon.start();
                if (null == daemon.getServer()) {
                    System.exit(1);
                }

            } else if (command.equals("stop")) {
                daemon.stopServer(args);
            } else if (command.equals("configtest")) {
                daemon.load(args);
                if (null == daemon.getServer()) {
                    System.exit(1);
                }
                System.exit(0);
            } else {
                log.warn("Bootstrap: command \"" + command + "\" does not exist.");
            }
        } catch (Throwable t) {
            // Unwrap the Exception for clearer error reporting
            if (t instanceof InvocationTargetException &&
                    t.getCause() != null) {
                t = t.getCause();
            }
            handleThrowable(t);
            t.printStackTrace();
            System.exit(1);
        }

    }
主要逻辑:
- Catalina初始化(类加载器初始化以及相关设置), init()方法中首先初始化各种类加载器, 实例化Catalina, 然后利用反射给Catalina设置共享扩展类加载器
- 初始化服务器, load()方法中利用反射执行Catalina中的load方法初始化Server以及各种组件
- 启动服务器, start()方法中利用反射执行Catalina中的start方法启动Server以及各种组件
思考: 为什么tomcat中使用了大量反射去加载服务器?
原因:
- Tomcat中有conf/server.xml和web.xml配置文件,允许用户自定义需要实例化的类,所以,必须使用反射机制进行动态实例化。
- 为了安全考虑,tomcat中载入器只允许载入特定目录下的servlet类,所以要实现自定义的类加载器。同时也可以混淆class文件, 防止进行反编译
- 为了实现tomcat运行过程中的重新部署,tomcat会有一个线程专门定时查询目录下的类是否改变,如果改变,则会动态重新加载
1. BootStrap#init()方法实现:
 public void init() throws Exception {

        initClassLoaders();
        //给当前线程设置catalinaLoader类加载器, 用于加载Catalina类信息
        Thread.currentThread().setContextClassLoader(catalinaLoader);

        SecurityClassLoad.securityClassLoad(catalinaLoader);

        /**
         * Load our startup class and call its process() method
         * 加载启动类, 并且利用反射调用process()方法
         */
        if (log.isDebugEnabled())
            log.debug("Loading startup class");
        //加载类型路径
        Class startupClass = catalinaLoader.loadClass("org.apache.catalina.startup.Catalina");
        /**
         * 实例化启动类
         * 此处存在的一个问题: 在这一步已经实例化了Catalina, 为什么在后面不是直接调用setParentClassLoader方法,而是通过反射
         * 原因: 主要是为了解耦, 如果后面对Catalina类进行了修改, 不再叫Catalina, 那么后面所有实例都需要改变; 使用代理机制,
         *       只需要改class的类路径,以及启动的method名字,调用方法都交给invoke,实现类似配置化的功能
         */
        Object startupInstance = startupClass.getConstructor().newInstance();

        //设置共享扩展类加载器(利用反射)
        if (log.isDebugEnabled())
            log.debug("Setting startup class properties");
        String methodName = "setParentClassLoader";
        Class paramTypes[] = new Class[1];
        paramTypes[0] = Class.forName("java.lang.ClassLoader");
        Object paramValues[] = new Object[1];
        paramValues[0] = sharedLoader;
        Method method =
            startupInstance.getClass().getMethod(methodName, paramTypes);
        //执行setParentClassLoader(...)方法
        method.invoke(startupInstance, paramValues);
        //初始化完成
        catalinaDaemon = startupInstance;
    }
2. BootStrap#load方法实现:
private void load(String[] arguments)
        throws Exception {

        /**
         * 利用反射执行Catalina中的load方法
         * {@link Catalina#load()}
         */
        String methodName = "load";
        Object param[];
        Class paramTypes[];
        //封装参数
        if (arguments==null || arguments.length==0) {
            paramTypes = null;
            param = null;
        } else {
            paramTypes = new Class[1];
            paramTypes[0] = arguments.getClass();
            param = new Object[1];
            param[0] = arguments;
        }
        //获取方法对象
        Method method =
            catalinaDaemon.getClass().getMethod(methodName, paramTypes);
        if (log.isDebugEnabled())
            log.debug("Calling startup class " + method);
        //执行该方法对象
        method.invoke(catalinaDaemon, param);
    }
分析:
利用反射调用Catalina中的load方法
Catalina#load()方法实现
 public void load() {

        if (loaded) {
            return;
        }
        loaded = true;

        long t1 = System.nanoTime();

        /**
         * 1. 读取server.xml输入流信息
         */

        initDirs();

        // Before digester - it may be needed
        initNaming();

        // 定义解析server.xml的配置,告诉Digester哪个xml标签应该解析成什么类
        Digester digester = createStartDigester();

        InputSource inputSource = null;
        InputStream inputStream = null;
        File file = null;
        try {
            try {
                //获取server.xml配置文件的输入流信息
                file = configFile();
                inputStream = new FileInputStream(file);
                inputSource = new InputSource(file.toURI().toURL().toString());
            } catch (Exception e) {
                if (log.isDebugEnabled()) {
                    log.debug(sm.getString("catalina.configFail", file), e);
                }
            }
            if (inputStream == null) {
                try {
                    //通过Catalina的类加载器来获取server.xml的输入流信息
                    inputStream = getClass().getClassLoader()
                        .getResourceAsStream(getConfigFile());
                    inputSource = new InputSource
                        (getClass().getClassLoader()
                         .getResource(getConfigFile()).toString());
                } catch (Exception e) {
                    if (log.isDebugEnabled()) {
                        log.debug(sm.getString("catalina.configFail",
                                getConfigFile()), e);
                    }
                }
            }

            // This should be included in catalina.jar
            // Alternative: don't bother with xml, just create it manually.
            if (inputStream == null) {
                try {
                    inputStream = getClass().getClassLoader()
                            .getResourceAsStream("server-embed.xml");
                    inputSource = new InputSource
                    (getClass().getClassLoader()
                            .getResource("server-embed.xml").toString());
                } catch (Exception e) {
                    if (log.isDebugEnabled()) {
                        log.debug(sm.getString("catalina.configFail",
                                "server-embed.xml"), e);
                    }
                }
            }

            //如果不存在conf/server.xml,则加载server-embed.xml(该xml在catalina.jar中)
            if (inputStream == null || inputSource == null) {
                if  (file == null) {
                    log.warn(sm.getString("catalina.configFail",
                            getConfigFile() + "] or [server-embed.xml]"));
                } else {
                    log.warn(sm.getString("catalina.configFail",
                            file.getAbsolutePath()));
                    if (file.exists() && !file.canRead()) {
                        log.warn("Permissions incorrect, read permission is not allowed on the file.");
                    }
                }
                return;
            }

            /**
             * 2. 解析server.xml信息
             */
            try {
                inputSource.setByteStream(inputStream);
                //把Catalina作为一个顶级实例
                digester.push(this);
                /**
                  *  ================= 重点 ===============
                  * Digester利用jdk提供的sax解析功能,将server.xml的配置解析成对应的Bean,并完成注入,比如往Server中注入Service
                  * 在创建相关组件实例后,后面将会通过init()去初始化各组件
                  */
                digester.parse(inputSource);
            } catch (SAXParseException spe) {
                log.warn("Catalina.start using " + getConfigFile() + ": " +
                        spe.getMessage());
                return;
            } catch (Exception e) {
                log.warn("Catalina.start using " + getConfigFile() + ": " , e);
                return;
            }
        } finally {
            if (inputStream != null) {
                try {
                    //关闭流
                    inputStream.close();
                } catch (IOException e) {
                    // Ignore
                }
            }
        }
        /**
         * 3. 初始化Server
         */
        //给Server设置相关信息
        getServer().setCatalina(this);
        getServer().setCatalinaHome(Bootstrap.getCatalinaHomeFile());
        getServer().setCatalinaBase(Bootstrap.getCatalinaBaseFile());

        // Stream redirection
        initStreams();

        //启动新的服务
        try {
            /**
             * {@link StandardServer#initInternal()}
             */
            getServer().init();
        } catch (LifecycleException e) {
            if (Boolean.getBoolean("org.apache.catalina.startup.EXIT_ON_INIT_FAILURE")) {
                throw new java.lang.Error(e);
            } else {
                log.error("Catalina.start", e);
            }
        }
        //计算并记录初始化所用时间
        long t2 = System.nanoTime();
        if(log.isInfoEnabled()) {
            log.info("Initialization processed in " + ((t2 - t1) / 1000000) + " ms");
        }
    }
分析:
- 首先初始化jmx的环境变量
- 定义解析server.xml的配置,告诉Digester哪个xml标签应该解析成什么类,如果我们要改变server.xml的某个属性值(比如优化tomcat线程池),直接查看对应实现类的setXXX方法即可
- 解析conf/server.xml或者server-embed.xml,并且实例化对应的组件并且赋值操作,比如Server、Container、Connector等; Digester利用jdk提供的sax解析功能,将server.xml的配置解析成对应的Bean,并完成注入,比如往Server中注入Service
- 为Server设置catalina信息,指定Catalina实例,设置catalina的home、base路径
- 先调用LifecycleBase#init()方法, 对Serve的生命周期进行设置, 然后在LifecycleBase#init()方法中调用StandardServer#initInternal方法,开始各个组件的初始化,并且由父组件初始化子组件,一层嵌套一层
StandardServer#initInternal()方法实现
    @Override
    protected void initInternal() throws LifecycleException {

        super.initInternal();

        /**
         *  注册全局字符串缓存
         * 请注意,尽管缓存是全局的,但如果JVM中存在多个服务器(嵌入时可能会发生),则相同的缓存将以多个名称注册。
         */
        onameStringCache = register(new StringCache(), "type=StringCache");

        //注册MBeanFactory
        MBeanFactory factory = new MBeanFactory();
        factory.setContainer(this);
        onameMBeanFactory = register(factory, "type=MBeanFactory");

        //注册名称资源
        globalNamingResources.init();

        // 使用来自公共和共享的JAR填充扩展验证器
        if (getCatalina() != null) {
            ClassLoader cl = getCatalina().getParentClassLoader();
            // 遍历类加载器层次结构。 在系统类加载器处停止。
            // 这将添加共享(如果存在)和通用类加载器
            while (cl != null && cl != ClassLoader.getSystemClassLoader()) {
                if (cl instanceof URLClassLoader) {
                    URL[] urls = ((URLClassLoader) cl).getURLs();
                    for (URL url : urls) {
                        if (url.getProtocol().equals("file")) {
                            try {
                                File f = new File (url.toURI());
                                if (f.isFile() &&
                                        f.getName().endsWith(".jar")) {
                                    ExtensionValidator.addSystemResource(f);
                                }
                            } catch (URISyntaxException e) {
                                // Ignore
                            } catch (IOException e) {
                                // Ignore
                            }
                        }
                    }
                }
                cl = cl.getParent();
            }
        }
        //初始化我们定义的服务
        for (int i = 0; i < services.length; i++) {
            /**
             * 循环遍历初始化定义的Service
             * {@link LifecycleBase#init()}
             * {@link StandardService#initInternal()}
             */
            services[i].init();
        }
    }
分析:
- 相关资源的注册
- Service初始化; 先调用LifecycleBase#init()方法, 对Service的生命周期进行设置, 然后在LifecycleBase#init()方法中调用StandardService#initInternal方法
StandardService#initInternal()方法实现
    @Override
    protected void initInternal() throws LifecycleException {

        super.initInternal();

        if (engine != null) {
            /**
             * 初始化engine
             * {@link StandardEngine#initInternal()}
             */
            engine.init();
        }

        // Initialize any Executors
        for (Executor executor : findExecutors()) {
            if (executor instanceof JmxEnabled) {
                ((JmxEnabled) executor).setDomain(getDomain());
            }
           //初始化线程池
            executor.init();
        }

        //初始化mapper监听器
        mapperListener.init();

        // Initialize our defined Connectors
        synchronized (connectorsLock) {
            for (Connector connector : connectors) {
                try {
                    /**
                     * 初始化Connector
                     * {@link Connector#initInternal()}
                     */
                    connector.init();
                } catch (Exception e) {
                    String message = sm.getString(
                            "standardService.connector.initFailed", connector);
                    log.error(message, e);

                    if (Boolean.getBoolean("org.apache.catalina.startup.EXIT_ON_INIT_FAILURE"))
                        throw new LifecycleException(message);
                }
            }
        }
    }
分析:
- 初始化Engine(容器); 对Realm进行设置, 启动线程池
- 初始化Executor线程
- 初始化mapper监听器
- 初始化Connector(连接器)
StandardEngine#initInternal()的实现
@Override
protected void initInternal() throws LifecycleException {
    // Ensure that a Realm is present before any attempt is made to start
    // one. This will create the default NullRealm if necessary.
    getRealm();
    super.initInternal();
}

// org.apache.catalina.core.ContainerBase#initInternal
@Override
protected void initInternal() throws LifecycleException {
      BlockingQueue startStopQueue = new LinkedBlockingQueue<>();
      startStopExecutor = new ThreadPoolExecutor(
           getStartStopThreadsInternal(),
           getStartStopThreadsInternal(), 10, TimeUnit.SECONDS,
           startStopQueue,
           new StartStopThreadFactory(getName() + "-startStop-"));
      startStopExecutor.allowCoreThreadTimeOut(true);
      super.initInternal();
}
分析:
- Realm设置
- 创建线程池
Connector#initInternal()方法实现
    @Override
    protected void initInternal() throws LifecycleException {

        super.initInternal();

        /**
         * 创建CoyoteAdapter适配器
         * 当Http11Processor解析之后生成的Request和Response不能直接传递到容器中,需要通过适配器,
         * 将Request和Response转换成ServletRequest和ServletReqponse
         */
        adapter = new CoyoteAdapter(this);  //将Connector设置给CoyoteAdapter
        protocolHandler.setAdapter(adapter);

        // Make sure parseBodyMethodsSet has a default
        if (null == parseBodyMethodsSet) {
            setParseBodyMethods(getParseBodyMethods());
        }

        if (protocolHandler.isAprRequired() && !AprLifecycleListener.isAprAvailable()) {
            throw new LifecycleException(sm.getString("coyoteConnector.protocolHandlerNoApr",
                    getProtocolHandlerClassName()));
        }
        if (AprLifecycleListener.isAprAvailable() && AprLifecycleListener.getUseOpenSSL() &&
                protocolHandler instanceof AbstractHttp11JsseProtocol) {
            AbstractHttp11JsseProtocol jsseProtocolHandler =
                    (AbstractHttp11JsseProtocol) protocolHandler;
            if (jsseProtocolHandler.isSSLEnabled() &&
                    jsseProtocolHandler.getSslImplementationName() == null) {
                // OpenSSL is compatible with the JSSE configuration, so use it if APR is available
                jsseProtocolHandler.setSslImplementationName(OpenSSLImplementation.class.getName());
            }
        }

        try {
            /**
             * 初始化protocolHandler
             * {@link AbstractHttp11Protocol#init()}
             */
            protocolHandler.init();
        } catch (Exception e) {
            throw new LifecycleException(
                    sm.getString("coyoteConnector.protocolHandlerInitializationFailed"), e);
        }
    }
分析:
- 创建CoyoteAdapter适配器; 当Http11Processor解析Socket之后生成的Request和Response不能直接传递到容器中, 需要通过适配器, 将Request和Response转换成ServletRequest和ServletResponse
- 初始化ProtocolHandler; 处理网络连接和应用层协议,包含了 2 个重要部件:Endpoint 和 Processor; Endpoint 是通信端点,即通信监听的接口,是具体的 Socket 接收和发送处理器,是对传输层的抽象,因此 Endpoint 是用来实现 TCP/IP 协议的。Processor 用来实现 HTTP 协议,Processor 接收来自 Endpoint 的 Socket,读取字节流解析成 Tomcat Request 和 Response 对象,并通过 Adapter 将其提交到容器处理
ProtocolHandler继承关系

通过上面的图,可以清晰地看到它们的继承和层次关系,这样设计的目的是尽量将稳定的部分放到抽象基类,同时每一种 I/O 模型和协议的组合都有相应的具体实现类,在使用时可以自由选择。
连接器模块用三个核心组件:Endpoint、Processor 和 Adapter 来分别做三件事情,其中 Endpoint 和 Processor 放在一起抽象成了 ProtocolHandler 组件,它们的关系如下图所示。

Endpoint 负责提供字节流给 Processor,Processor 负责提供 Tomcat Request 对象给 Adapter,Adapter 负责提供 ServletRequest 对象给容器。
AbstractHttp11Protocol#init()方法实现
    @Override
    public void init() throws Exception {
        for (UpgradeProtocol upgradeProtocol : upgradeProtocols) {
            configureUpgradeProtocol(upgradeProtocol);
        }
        /**
         * {@link AbstractProtocol#init()}
         */
        super.init();
    }
AbstractProtocol#init()方法实现
    @Override
    public void init() throws Exception {
        if (getLog().isInfoEnabled()) {
            getLog().info(sm.getString("abstractProtocolHandler.init", getName()));
        }

        if (oname == null) {
            // Component not pre-registered so register it
            oname = createObjectName();
            if (oname != null) {
                Registry.getRegistry(null, null).registerComponent(this, oname, null);
            }
        }

        if (this.domain != null) {
            rgOname = new ObjectName(domain + ":type=GlobalRequestProcessor,name=" + getName());
            Registry.getRegistry(null, null).registerComponent(
                    getHandler().getGlobal(), rgOname, null);
        }

        String endpointName = getName();
        endpoint.setName(endpointName.substring(1, endpointName.length()-1));
        endpoint.setDomain(domain);
        /**
         * 初始化endpoint
         * {@link AbstractEndpoint#init()}
         */
        endpoint.init();
    }
分析:
- 初始化Endpoint
- Processor的初始化是在获取到Socket数据后解析时才会去初始化创建
AbstractEndpoint#init()方法实现
public void init() throws Exception {
        if (bindOnInit) {
            /**
             * 绑定服务端需要监听的端口
             * {@link org.apache.tomcat.util.net.NioEndpoint#bind()}
             */
            bind();
            bindState = BindState.BOUND_ON_INIT;
        }
        if (this.domain != null) {
            // Register endpoint (as ThreadPool - historical name)
            oname = new ObjectName(domain + ":type=ThreadPool,name=\"" + getName() + "\"");
            Registry.getRegistry(null, null).registerComponent(this, oname, null);

            ObjectName socketPropertiesOname = new ObjectName(domain +
                    ":type=ThreadPool,name=\"" + getName() + "\",subType=SocketProperties");
            socketProperties.setObjectName(socketPropertiesOname);
            Registry.getRegistry(null, null).registerComponent(socketProperties, socketPropertiesOname, null);

            for (SSLHostConfig sslHostConfig : findSslHostConfigs()) {
                registerJmx(sslHostConfig);
            }
        }
    }
NioEndpoint#bind()方法实现
    @Override
    public void bind() throws Exception {

        if (!getUseInheritedChannel()) {
            serverSock = ServerSocketChannel.open();
            socketProperties.setProperties(serverSock.socket());
            InetSocketAddress addr = (getAddress()!=null?new InetSocketAddress(getAddress(),getPort()):new InetSocketAddress(getPort()));
            //绑定端口,以及接受的最大连接数(100)
            serverSock.socket().bind(addr,getAcceptCount());
        } else {
            // Retrieve the channel provided by the OS
            Channel ic = System.inheritedChannel();
            if (ic instanceof ServerSocketChannel) {
                serverSock = (ServerSocketChannel) ic;
            }
            if (serverSock == null) {
                throw new IllegalArgumentException(sm.getString("endpoint.init.bind.inherited"));
            }
        }
        serverSock.configureBlocking(true); //mimic APR behavior

        // Initialize thread count defaults for acceptor, poller
        if (acceptorThreadCount == 0) {
            // FIXME: Doesn't seem to work that well with multiple accept threads
            acceptorThreadCount = 1;
        }
        if (pollerThreadCount <= 0) {
            //minimum one poller thread
            pollerThreadCount = 1;
        }
        //设置LimitLatch连接控制器
        setStopLatch(new CountDownLatch(pollerThreadCount));

        // Initialize SSL if needed
        initialiseSsl();

        selectorPool.open();
    }
分析: 绑定地址, 端口
相关文章:
Tomcat源码解析一(Tomcat整体架构解析)
Tomcat源码解析二(Tomcat初始化过程解析)
Tomcat源码解析三(Tomcat启动过程解析)
Tomcat源码解析四(连接器启动过程解析)
Tomcat源码解析五(容器的启动过程解析)
Tomcat源码解析六(Http请求过程解析_基于NIO)