大家好,我是渔夫子。本号新推出「Go工具箱」系列,意在给大家分享使用go语言编写的、实用的、好玩的工具。同时了解其底层的实现原理,以便更深入地了解Go语言。
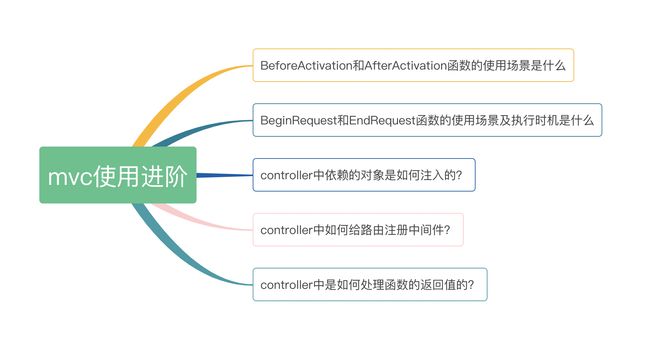
以下是本文的提纲,如果你对提纲中的内容已经完全掌握,那么本文并不适合你。否则,请继续阅读本文。
一、 Controller中的BeforeActivation和AfterActivation
如果在Controller中定义的方法的第一个单词不是请求方法,那么该如何将该方法定义成请求处理器呢?这就需要在Controller中定义BeforeActivation方法了。该方法定义如下:
func (c *testController) BeforeActivation(b mvc.BeforeActivation) {
    b.Handle("GET", "/custom_path", "CustomHandler")
}

func (c *testController) CustomHandler() {
    fmt.Println("this is custom handler")
}
和BeforeActivation对应的,还有一个是AfterActivation函数,该函数一般用来处理给特定的处理器增加中间件等操作。如下:
func (c *testController) AfterActivation(a mvc.AfterActivation) {
    // 根据方法名 获取对应的路由
    index := a.GetRoute("GetMyHome")
    // 给该路由的处理器增加前置中间件或后置中间件
    index.Handlers = append([]iris.Handler{cacheHandler}, index.Handlers...)
}
二、 Controller中的BeginRequest和EndRequest函数
我们现在定义一个AuthController,并做如下路由注册:
package main

import (
    "fmt"
    "github.com/kataras/iris/v12"
    "github.com/kataras/iris/v12/context"
    "github.com/kataras/iris/v12/mvc"
)


func main() {
    app := iris.New()
    // New一次,相当于New了一个路由
    mvcApplication := mvc.New(app.Party("/"))

    mvcApplication.Handle(new(AuthController))

    app.Listen(":8080")
}

type AuthController struct {
    UserID int64
}

// BeginRequest saves login state to the context, the user id.
func (c *AuthController) BeginRequest(ctx iris.Context) {
    ctx.Write([]byte("BeginRequest\n"))
}

func (c *AuthController) EndRequest(ctx iris.Context) {
    ctx.Write([]byte("EndRequest\n"))
}

func (c *AuthController) GetLogin(ctx iris.Context) {
    ctx.Write([]byte("Login\n"))
}
在AuthController中,我们定义了两个方法BeginRequest和EndRequest。注册的路由有GET /login。在浏览器中输入http://localhost:8080/login,则会有如下输出:
BeginRequest
Login
EndRequest
看起来执行的顺序是 BeginRequest -> GetLogin -> EndRequest这样的顺序。
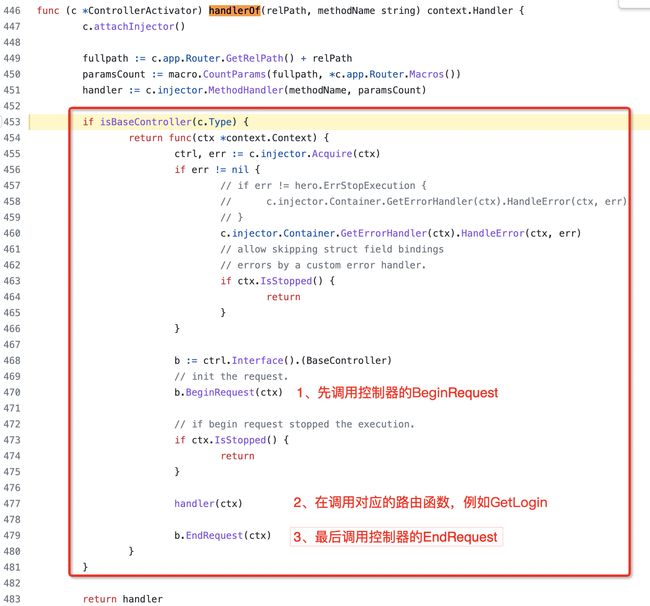
为什么会是这个执行顺序呢?其原理是因为该AuthController实现了iris中定义的BaseController接口,在将GetLogin函数转换成路由处理器时,会判断AuthController是否实现了BaseController接口。如果是,则转换成一个新的路由处理器,该路由处理器的逻辑是先调用BeginRequest,然后再调用GetLogin对应的函数,最后调用EndRequest函数。其实现在文件iris/mvc/controller.go的handlerOf函数的第453行处理的。如下:
iris中对BaseController接口类型的定义如下:
type BaseController interface {
    BeginRequest(*context.Context)
    EndRequest(*context.Context)
}这里需要注意的是,在AuthController中,BeginRequest和EndRequest函数必须同时定义,即使在EndRequest中没有做任何事情。具体示例可参考iris中给出的AuthController的示例代码:BeginRequest的应用示例
三、 Controller中的依赖注入
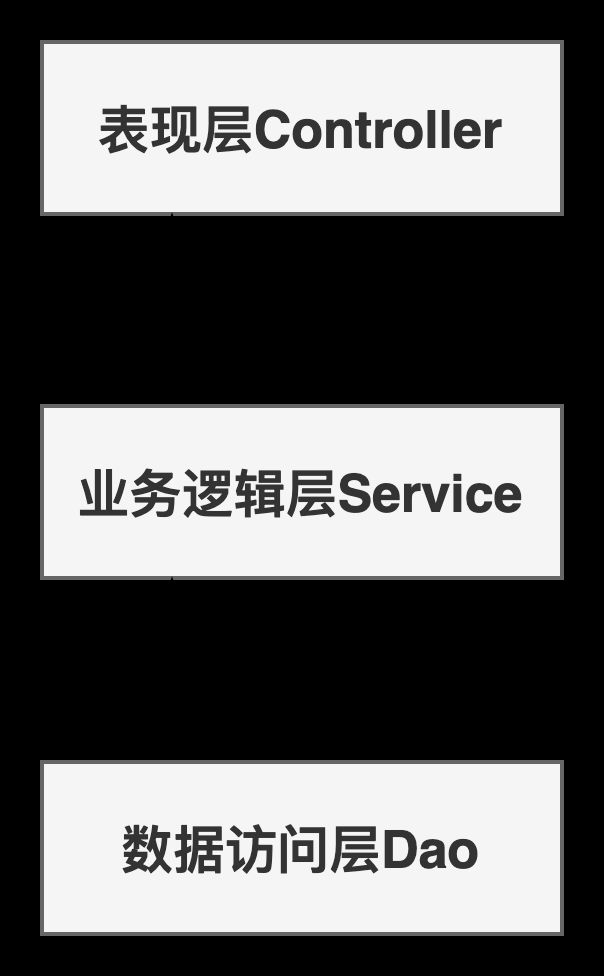
在稍微复杂一些的项目下,我们经常会分出service层,让controller调用service,service再调用数据访问层dao。
在controller中我们需要初始化service对象,然后调用service对象的相关方法。如下:
func main() {
    app := iris.New()
    // New一次,相当于New了一个路由
    mvcApplication := mvc.New(app.Party("/"))

    mvcApplication.Handle(new(UserController))

    app.Listen(":8080")
}

type UserController struct {
    Ctx iris.Context
}

func (c *UserController) GetBy(userId int) {
    service := &UserService{}
    user := service.GetUserById(userId)

    c.Ctx.Write([]byte(user))
}

type UserService struct {}

func (s *UserService) GetUserById(userId int) string {
    return "user"
}
大家看,这里是把UserService对象的初始化放在了GetBy函数中。如果在UserController中有多个路由函数,那么就需要在每个函数中都需要初始化一遍UserService对象。
在iris的MVC框架中,可以在UserController的结构体中定义一个UserService类型的字段,在每次请求的时候,iris会自动初始化该对象。这样就避免了在每个方法中都初始化一遍的重复代码。如下:
func main() {
    app := iris.New()
    // New一次,相当于New了一个路由
    mvcApplication := mvc.New(app.Party("/"))

    mvcApplication.Handle(new(UserController))

    app.Listen(":8080")
}

type UserController struct {
    Ctx iris.Context
    Service *UserService
}

var u = &UserService{}

func (c *UserController) GetBy(userId int) {

    user := c.Service.GetUserById(userId)

    c.Ctx.Write([]byte(user))
}

type UserService struct {}

func (s *UserService) GetUserById(userId int) string {
    return "user"
}
四、 在mvc中使用中间件
在iris中,中间件可以针对全局、路由分组、特定的路由三种场景下使用。
4.1 在全局路由上使用中间件
首先,我们定义一个中间件处理器LogMiddleware,然后在初始化iris对象后,使用Use使用该中间件。同时,我们初始化了两个mvc.Application对象mvcUserApp和mvcAuthApp,分别注册了两个Controller。那么,在访问各自的路由时,都是先执行中间件路由LogMiddleware中的逻辑。
package main

import (
    "fmt"
    "github.com/kataras/iris/v12"
    "github.com/kataras/iris/v12/context"
    "github.com/kataras/iris/v12/mvc"
)

func LogMiddleware(ctx *context.Context) {
    ctx.Write([]byte("I am log middle\n"))
    ctx.Next()
}

func main() {
    app := iris.New()
    app.Use(LogMiddleware)

    mvcUserApp := mvc.New(app.Party("/user"))
    mvcUserApp.Handle(new(UserController))

    mvcAuthApp := mvc.New(app.Party("/auth"))
    mvcAuthApp.Handle(new(AuthController))

    app.Listen(":8080")
}

type UserController struct {
}

func (c *UserController) Get(Ctx iris.Context) {
    c.Ctx.Write([]byte(user))
}

type AuthController struct {
}

func (c *AuthController) GetLogin(ctx iris.Context) {
    ctx.Write([]byte("Login\n"))
}
4.2 在路由组上使用中间件
当然,我们还可以将中间件只作用到特定的路由组上。即某个mvc.Application上。这里我们需要注意下,一个mvc.Application下可以注册多个Controller的,相当于形成了一个路由组。如下,我们在 /user路由组的mvcUserApp下,再多注册一个Controller:HomeController。同时,将中间件应用到这两个Controller上。这样,就有只有UserController和HomeController上的路由会使用到LogMIddleware中间件。如下:
package main

import (
    "fmt"
    "github.com/kataras/iris/v12"
    "github.com/kataras/iris/v12/context"
    "github.com/kataras/iris/v12/mvc"
)

func LogMiddleware(ctx *context.Context) {
    ctx.Write([]byte("I am log middle\n"))
    ctx.Next()
}

func main() {
    app := iris.New()
    app := iris.New()

    mvcApp := mvc.New(app.Party("/user"))
    // 将中间件移动到了mvcApp对象上
    mvcApp.Router.Use(LogMiddleware)

    mvcApp.Handle(new(UserController))
    mvcApp.Handle(new(HomeController))

    // mvcAuthApp对象将不再使用中间件
    mvcAuthApp := mvc.New(app.Party("/auth"))
    mvcAuthApp.Handle(new(AuthController))

    app.Listen(":8080")
}

type UserController struct {
}

func (c *UserController) GetBy(ctx iris.Context) {
    c.Ctx.Write([]byte("user"))
}


type HomeController struct {
}

func (c *HomeController) GetHomeBy(userId int) {
    fmt.Println("Home:", userId)
}

type AuthController struct {
    UserID int64
}

func (c *AuthController) GetLogin(ctx iris.Context) {
    ctx.Write([]byte("Login\n"))
}
4.3 在特定的路由上使用中间件
将中间件使用在特定的路由上,这个在上文中我们有提到过,就是在Controller的AfterActivation函数中。如下:
package main

import (
    "fmt"
    "github.com/kataras/iris/v12"
    "github.com/kataras/iris/v12/context"
    "github.com/kataras/iris/v12/mvc"
)

func LogMiddleware(ctx *context.Context) {
    ctx.Write([]byte("I am log middle\n"))
    ctx.Next()
}

func main() {
    app := iris.New()
    //app.Use(LogMiddleware)

    mvcApp := mvc.New(app.Party("/user"))
    mvcApp.Handle(new(UserController))
    mvcApp.Handle(new(HomeController))

    mvcAuthApp := mvc.New(app.Party("/auth"))
    mvcAuthApp.Handle(new(AuthController))

    app.Listen(":8080")
}

type UserController struct {
    Ctx iris.Context
}

func (c *UserController) Get() {
    c.Ctx.Write([]byte("user"))
}


type HomeController struct {

}

func (c *HomeController) AfterActivation(a mvc.AfterActivation) {
    route := a.GetRoute("GetHomeBy")
    route.Handlers = append([]iris.Handler{LogMiddleware}, route.Handlers...)
}

func (c *HomeController) GetHomeBy(Ctx iris.Context, userId int) {
    fmt.Println("Home:", userId)
    Ctx.Writef("Home %d\n", userId)
}
五、 Controller中函数的返回值
我们知道,函数是可以有返回值的,而在Go中,函数还可以有多个返回值。那么,如果在Controller定义的函数中有返回值,那么mvc是如何处理的呢?下面我们以testController中GetHome函数为例进行说明。
5.1 函数返回int类型
当函数返回int类型时,mvc包会把该值当做http响应的状态码来处理,返回值必须是100到999范围的数字,否则会直接报错。如果有效值范围内的返回值是RFC规定的HTTP响应码,那么就按对应的响应码返回给浏览器;否则,直接直接显示网页其余内容。 例如,返回值是404,则会返回网页Not Found。而返回10000,则直接报错。
返回有效的http状态码:404
func (c *testController) GetHome() int {
  return 404
}
输入 http://localhost:8080/home,则网页显示 Not Found页面。
返回无效的http状态码:10000
func (c *testController) GetHome() int {
  return 10000
}
输入 http://localhost:8080/home,则网页会显示网页无法工作,在接口侧会报panic。
另外,如果返回的是非int类型的数值,比如int64,int32等,那么会作为网页的内容直接输出。
5.2 函数返回bool类型
不论函数有几个返回值,只要若返回值中有bool值,并且值是false,那么,就会按404返回给浏览器。
5.3 函数返回string类型
返回string类型时,根据返回值的个数,有如下规则:
- 如果只有1个返回值,那么返回值就作为响应体直接返回给浏览器。
- 如果有多个string类型的返回值时,那么响应体中只返回最后一个返回值的内容。
如果有多个string类型的返回值时,第二个或后面的返回值中包含 "/" 字符,那么,该返回值就作为响应的内容类型。例如,在GetHome函数中,返回了两个string类型的值,如下:
func (c *testController) GetHome() (string, string) {
  return "application/json; charset=utf-8", "Hello World"
}
因为第一个返回值中有 "/",这时还没有其他返回值,所以第一个返回值会被忽略。
如果作为响应值类型的返回值在第2个位置,由于第一个返回的string值作为了响应体内容,所以,第二个返回值才能作为响应体类型。如下:
func (c *testController) GetHome() (string, string) {
    return "Hello World", "application/json; charset=utf-8"
}总之,一般情况下,在有多个string类型的返回值时,后面的值会覆盖前面的值作为响应体返回。
5.4 函数返回字节数组类型
返回字节数组类型时,返回值作为响应体的内容返回给客户端。如果有多个字节数组类型,那么后面的内容会覆盖前面的内容。
例如,只返回一个字节类型的数组 []byte("Hello")时,那么响应内容只返回 "Hello"。如下:
func (c *testController) Get() ([]byte) {
    return  []byte("Hello")
}
若函数有两个字节数组类型返回值,那么只会返回最后一个字节数组的内容。如下示例只会输出"World":
func (c *testController) Get() ([]byte, []byte) {
    return  []byte("Hello"), []byte("World")
}
如果,返回值中既有[]byte类型,又有 string类型,那么,后面的会覆盖前面的内容输出。
5.5 函数返回结构体或map类型
当函数返回值有有结构体或map类型时,该类型的值优先作为响应体内容输出。例如,在下面的函数中,返回值类型依次为 Resp类型、string类型、[]byte类型。那么,最终输出的内容还是Resp类型的值。如下:
type Resp struct {
    StatusCode int
    Message string
}

func (c *testController) Get() (Resp, string, []byte) {
    return  Resp{Message:"Hello World"}, string("World"), []byte("Hello")
}
5.6 函数返回mvc.Result类型
在iris的mvc包中,自定义了一种返回值类型:mvc.Result,该类型时一个接口,其中定义了Dispatch方法,如下:
type Result interface {
    // Dispatch should send a response to the client.
    Dispatch(*context.Context)
}
若要返回该类型的值,就需要实现Dispatch方法。而在mvc包中iris也替我们实现了该接口:mvc.Response类型、mvc.View类型。通过名字也可以知道,一个用于接口类的输出,一个用于页面的输出。如下:
type Resp struct {
    StatusCode int
    Message string
}

func (c *testController) Get() mvc.Result {
    return mvc.Response{
        Object: Resp{Message: "Hello World"},
    }
}
通过mvc.View用于页面的输出:
func (c *testController) Get() mvc.Result {
    return mvc.View{
        // Map to mvc.Code and mvc.Err respectfully on HandleHTTPError method.
        Code: iris.StatusBadRequest,
        Err:  fmt.Errorf("custom error"),
    }
}
以上就是在iris中使用mvc时输出时需要注意的地方。其输出规则的实现在源码iris/hero/func_result.go文件的dispatchFuncResult函数中,点击可查看源码:controller中方法回调结果分发实现。
特别推荐:一个专注go项目实战、项目中踩坑经验及避坑指南、各种好玩的go工具的公众号,「Go学堂」,专注实用性,非常值得大家关注。点击下方公众号卡片,直接关注。关注送《100个go常见的错误》pdf文档。

