1分钟Spring Boot入门
一.Spring Boot简介
1.什么是Spring Boot
Spring Boot是由Pivotal团队提供的框架,其设计目的是用来简化新Spring应用的初始搭建以及开发过程。
该框架使用了特定的方式(继承starter,约定优先于配置)来进行配置,从而使开发人员不再需要定义样板化的配置。通过这种方式,Boot致力于在蓬勃发展的快速应用开发领域(rapid application development)成为领导者。
Spring Boot并不是一个框架,从根本上将,它就是一些库的集合,maven或者gradle项目导入相应依赖即可使用Spring Boot,而且无需自行管理这些库的版本。
2.为什么使用
Spring Boot是为简化Spring项目配置而生,使用它使得jar依赖管理以及应用编译和部署更为简单。Spring Boot提供自动化配置,使用Spring Boot,你只需编写必要的代码和配置必须的属性。
使用Spring Boot,只需20行左右的代码即可生成一个基本的Spring Web应用,并且内置了tomcat,构建的fat Jar包通过Java -jar就可以直接运行。
如下特性使得Spring Boot非常契合微服务的概念,可以结合Spring Boot与Spring Cloud和Docker技术来构建微服务并部署到云端:
一个可执行jar即为一个独立服务很容易加载到容器,每个服务可以在自己的容器(例如docker)中运行
通过一个脚本就可以实现配置与部署,很适合云端部署,并且自动扩展也更容易
简单而言,即Spring Boot使编码更简单,使配置更简单,使部署更简单,使监控更简单。!
3.功能
3.1无需手动管理依赖jar包的版本
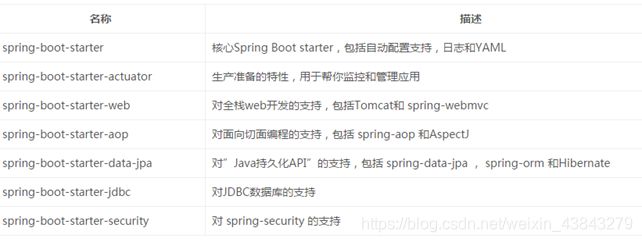
Spring boot通过spring boot starter项目管理其提供的所有依赖的版本,当升级spring boot时,这些依赖的版本也会随之升级。个人无需指定版本号。
但是也可以自定义版本号覆盖springboot的默认值。每个版本的boot都有对应的base spring version,不建议明确地指定spring版本。
例如,使用maven时,只需简单的在pom中包含spring-boot-starter-web即引入了Spring MVC和Tomcat的依赖。
下面是Spring Boot在 org.springframework.boot 组下提供的一些Starters:
4.SpringBoot在MAVEN环境下的一些集成
4.1导入Spring Boot依赖
		org.springframework.boot
		spring-boot-starter-parent
		1.5.10.RELEASE


java.version 指定jdk版本号:
1.8

添加spring-boot-starter-web依赖

		org.springframework.boot
		spring-boot-starter-web


                org.springframework.boot
                spring-boot-maven-plugin
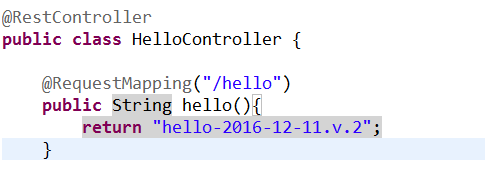
4.2测试
5.热部署
即使修改了输出内容也要重启APP,非常麻烦!可以使用spring-boot-devtools来实现!
- 介绍
spring-boot-devtools 是一个为开发者服务的一个模块,其中最重要的功能就是自动应用代码更改到最新的App上面去。原理是在发现代码有更改之后,重新启动应用,但是速度比手动停止后再启动还要更快,更快指的不是节省出来的手工操作的时间。
其深层原理是使用了两个ClassLoader,一个Classloader加载那些不会改变的类(第三方Jar包),另一个ClassLoader加载会更改的类,称为 restart ClassLoader
,这样在有代码更改的时候,原来的restart ClassLoader 被丢弃,重新创建一个restart ClassLoader,由于需要加载的类相比较少,所以实现了较快的重启时间(5秒以内)
- 使用
添加依赖包:
            org.springframework.boot

            spring-boot-devtools

            true
6.集成jsp
倒入依赖
			org.springframework.boot
			spring-boot-devtools
			true


			org.apache.tomcat.embed
			tomcat-embed-jasper
			provided
配置application.properties对jsp支持
添加src/main/resources/application.properties:

#tomcat server port
server.port=80

# 页面默认前缀目录
spring.mvc.view.prefix=/WEB-INF/jsp/
# 响应页面默认后缀
spring.mvc.view.suffix=.jsp
# 自定义属性,可以在Controller中读取
application.hello=Hello Angel From application

Yaml 方式
server:
  port: 8080
name: kd
spring:
  mvc:
    view:
      prefix: /WEB-INF/jsp/
      suffix: .jsp
测试:
@Controller
public class HelloController {
	@RequestMapping("/hello")
	public String helloJsp(Model model){
		System.out.println("HelloController.helloJsp().hello=hello");
		model.addAttribute("hello", "你好");
		return "hello";
	}
}
7.集成JDBC,jpa
只需引入依赖
		mysql
		mysql-connector-java


		    org.springframework.boot
		    spring-boot-starter-jdbc


			org.springframework.boot
			spring-boot-starter-test
引入spring-boot-starter-jdbc
那么只需要在需要使用的类中加入:
@Resource
private JdbcTemplate jdbcTemplate;
数据库支持
在application.properties文件中配置mysql连接配置文件
########################################################
###datasource
########################################################

spring.datasource.driverClassName = com.mysql.jdbc.Driver
spring.datasource.url = jdbc:mysql://localhost:3306/test
spring.datasource.username = root
spring.datasource.password = root

Yaml 方式
spring:
  datasource:
    driverClassName: com.mysql.jdbc.Driver
    url : jdbc:mysql://localhost:3306/spring-boot-demo?useUnicode=true&characterEncoding=utf-8
    username : root
    password : root
8.集成jpa
引入依赖
		mysql
		mysql-connector-java


		    org.springframework.boot
		    spring-boot-starter-data-jpa
在application.properties文件中配置mysql连接配置文件
#tomcat server port
server.port=80

########################################################
###datasource
########################################################
spring.datasource.url = jdbc:mysql://localhost:3306/test
spring.datasource.username = root
spring.datasource.password = root
spring.datasource.driverClassName = com.mysql.jdbc.Driver
spring.datasource.max-active=20
spring.datasource.max-idle=8
spring.datasource.min-idle=8
spring.datasource.initial-size=10

########################################################
### Java Persistence Api  (可以不设置,用默认的)
########################################################
# Specify the DBMS
spring.jpa.database = MYSQL
# Show or not log for each sql query
spring.jpa.show-sql = true
# Hibernate ddl auto (create, create-drop, update)
spring.jpa.hibernate.ddl-auto = update
# Naming strategy
#[org.hibernate.cfg.ImprovedNamingStrategy  #org.hibernate.cfg.DefaultNamingStrategy]
spring.jpa.hibernate.naming-strategy = org.hibernate.cfg.ImprovedNamingStrategy
# stripped before adding them to the entity manager)
spring.jpa.properties.hibernate.dialect = org.hibernate.dialect.MySQL5Dialect
9.集成Mybatis
引入依赖
			mysql
			mysql-connector-java


			org.mybatis.spring.boot
			mybatis-spring-boot-starter
			1.3.0


			com.github.pagehelper
			pagehelper-spring-boot-starter
			1.2.2
(4)在application.properties添加配置文件;
#tomcat server port
server.port=80

########################################################
###datasource
########################################################
spring.datasource.url = jdbc:mysql://localhost:3306/test
spring.datasource.username = root
spring.datasource.password = root
spring.datasource.driverClassName = com.mysql.jdbc.Driver
spring.datasource.max-active=20
spring.datasource.max-idle=8
spring.datasource.min-idle=8
spring.datasource.initial-size=10
PageHelper分页
在application.properties中配置分页插件
#pagehelper.
pagehelper.autoDialect=true
pagehelper.closeConn=true
可以使用全注解配置,如果sql语句过长可以写在xml中
最后给大家安利一个把sql语句打印出来的插件,这个插件比日志打印更加牛批
   showSql-spring-boot-starter
   showSql-spring-boot-starter
    1.0-M1
这个是我们组织的一个大佬写的,大家喜欢的就去我们组织看看吧,我们组织也是做开源项目的一群大佬;欢迎骚扰
http://www.javatv.cn/


