微信小程序原生开发学习01
文章目录
-
-
- 一、起步
-
-
- 1.注册一个小程序账号
- 2.下载安装开发者工具
- 3.新建小程序项目
-
- 二、小程序配置
-
-
- 1.全局配置
-
- (1)小程序默认启动页
- (2)页面路径列表
- (3)分包
- (4)全局默认窗口表现
- (5)底部tab栏配置
- 2.页面配置
-
- 三、基础组件
-
-
- 1.view
- 2.scroll-view
- 3.swiper
- 4.navigator
- 5.text、image、template、button等
-
- 四、自定义组件
-
-
- 1.新建自定义组件
- 2.使用自定义组件
- 3.自定义tab栏
- 4.使用自定义tab栏
-
- 五、其他
-
-
- 1.px与rpx
- 2.引入其他wxss样式文件
-
-
官方文档:微信开放文档
一、起步
1.注册一个小程序账号
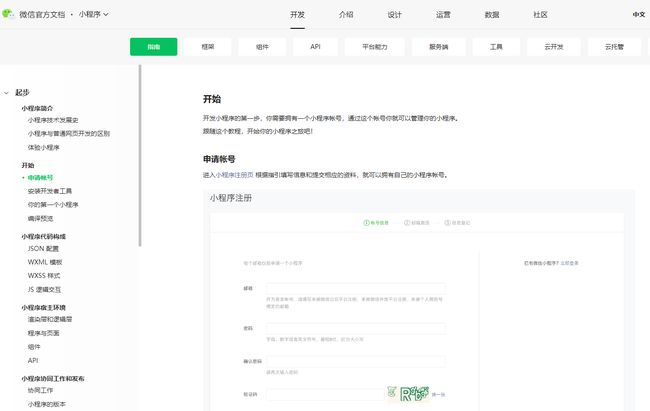
首先需要在微信公众平台注册你的小程序,官方文档中写明了教程:点我点我
2.下载安装开发者工具
官方下载链接
3.新建小程序项目
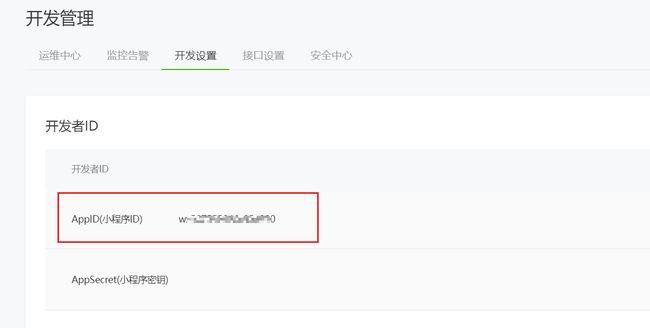
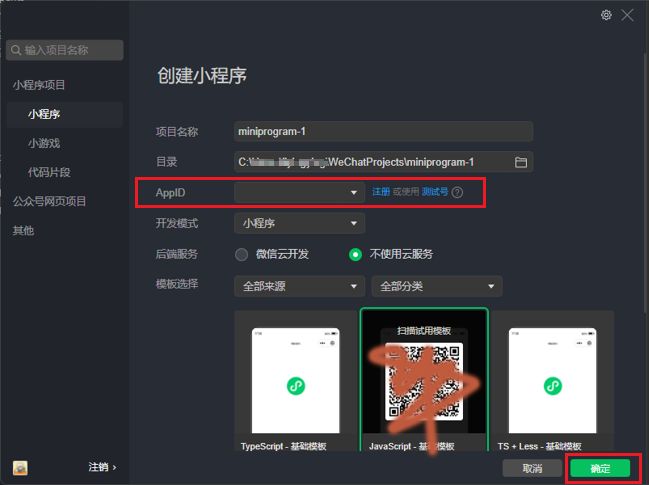
AppID(必填)在小程序账号中开发 -> 开发管理 -> 开发设置获取,复制粘贴过来即可。
点击确定,就新建好了。
二、小程序配置
小程序的文件大部分分为四种,分别是wxml、wxss、json、js。wxml文件类似html文件,用来描述页面结构;wxss文件类似于css文件,书写一些页面样式;json文件则是页面配置;js文件处理逻辑交互。
vue项目都是把页面结构、样式、逻辑交互写在一个文件,区别的是微信原生开发将这些分开来写。
1.全局配置
{
  "entryPagePath": "pages/index/index",
  "pages":[
    "pages/index/index",
    "pages/sort/sort",
    "pages/dress/dress",
		"pages/user/user",
		"pages/login/login"
	],
	"subPackages": [
		{
			"root": "packageA",
			"name": "分包A",
			"pages": [
				"pages/mydata/mydata",
				"pages/collection/collection",
				"pages/cabinet/cabinet",
        "pages/record/record",
        "pages/addData/addData"
			]
    },
    {
			"root": "packageB",
			"name": "分包B",
			"pages": [
				"pages/shareDetail/shareDetail"
			]
		}
	],
  "window":{
    "backgroundTextStyle":"light",
    "navigationBarBackgroundColor": "#fff",
    "navigationBarTitleText": "",
    "navigationBarTextStyle":"black",
    "navigationStyle": "default"
  },
  "tabBar": {
    "custom": true,
    "selectedColor": "#ff9a9e",
	"borderStyle": "white",
	"color": "#7A7E83",
	"backgroundColor": "#ffffff",
    "list": [{
      "pagePath": "pages/index/index",
      "text": "首页",
      "iconPath": "static/icon/home.png",
      "selectedIconPath": "static/icon/pink-home.png"
    },{
      "pagePath": "pages/sort/sort",
      "text": "分类",
      "iconPath": "static/icon/sort.png",
      "selectedIconPath": "static/icon/pink-sort.png"
    },{
      "pagePath": "pages/dress/dress",
      "text": "穿搭",
      "iconPath": "static/icon/dress.png",
      "selectedIconPath": "static/icon/pink-dress.png"
    },{
      "pagePath": "pages/user/user",
      "text": "我的",
      "iconPath": "static/icon/user.png",
      "selectedIconPath": "static/icon/pink-user.png"
    }]
  },
  "style": "v2",
  "sitemapLocation": "sitemap.json"
}
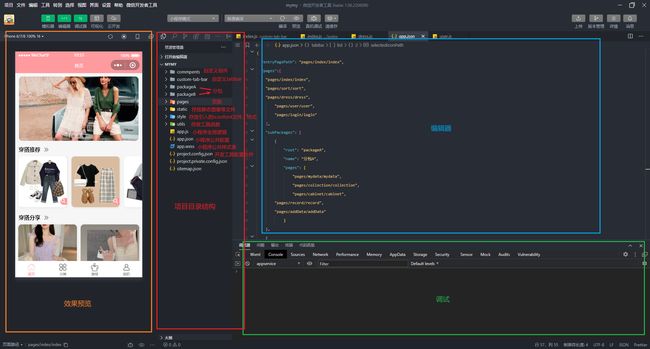
项目目录结构里面,app.json文件就是小程序全局配置,主要的配置有这些:
(1)小程序默认启动页
"entryPagePath": "pages/index/index",
指明页面路径
(2)页面路径列表
"pages":[
    "pages/index/index",
    "pages/sort/sort",
    "pages/dress/dress",
	"pages/user/user",
	"pages/login/login"
],
每一个路径对应一个页面,在列表中写好路径,页面文件就会自动生成。
(3)分包
使用分包可以优化小程序启动的耗时,官方建议按照功能划分,实现按需加载。
"subPackages": [
	{
			"root": "packageA",
			"name": "分包A",
			"pages": [
				"pages/mydata/mydata",
				"pages/collection/collection",
				"pages/cabinet/cabinet",
                "pages/record/record",
                "pages/addData/addData"
		  	]
    },
    {
			"root": "packageB",
			"name": "分包B",
			"pages": [
				"pages/shareDetail/shareDetail"
			]
	}
	],
其中root为分包根目录,name分包名,pages分包页面路径。
(4)全局默认窗口表现
 "window":{
    "backgroundTextStyle":"light",
    "navigationBarBackgroundColor": "#fff",
    "navigationBarTitleText": "",
    "navigationBarTextStyle":"black",
    "navigationStyle": "default"
  },
backgroundTextStyle:下拉 loading 的样式,仅支持dark/lightnavigationBarBackgroundColor:导航栏背景颜色navigationBarTitleText:导航栏标题文字内容navigationBarTextStyle:导航栏标题颜色,仅支持black/whitenavigationStyle:导航栏样式,仅支持以下值:default默认样式和custom自定义导航栏,只保留右上角胶囊按钮。
还有很多配置详见官方文档:点我点我
(5)底部tab栏配置
"tabBar": {
    "custom": true,
    "selectedColor": "#ff9a9e",
	"borderStyle": "white",
	"color": "#7A7E83",
	"backgroundColor": "#ffffff",
    "list": [{
      "pagePath": "pages/index/index",
      "text": "首页",
      "iconPath": "static/icon/home.png",
      "selectedIconPath": "static/icon/pink-home.png"
    },{
      "pagePath": "pages/sort/sort",
      "text": "分类",
      "iconPath": "static/icon/sort.png",
      "selectedIconPath": "static/icon/pink-sort.png"
    },{
      "pagePath": "pages/dress/dress",
      "text": "穿搭",
      "iconPath": "static/icon/dress.png",
      "selectedIconPath": "static/icon/pink-dress.png"
    },{
      "pagePath": "pages/user/user",
      "text": "我的",
      "iconPath": "static/icon/user.png",
      "selectedIconPath": "static/icon/pink-user.png"
    }]
  },
custom:自定义 tabBar,默认为falseselectedColor:tab 上的文字选中时的颜色borderStyle:tabbar 上边框的颜色color:tab 上的文字默认颜色backgroundColor:tab 的背景色list:tab 的列表,最少 2 个、最多 5 个 tab
2.页面配置
在每个页面的json文件中可以给其单独配置,官方文档:点我点我
如果想要使用自定义组件,就需要在json文件中声明。
{
  "usingComponents": {
    "组件名": "路径"
  }
}
三、基础组件
1.view
视图容器view相当于html中的div,也是块级元素。
2.scroll-view
可滚动的视图区域。可以设置其横向滚动或者纵向滚动。
具体属性详见官方文档:点我点我
3.swiper
滑块视图容器。可用来做轮播图,放置多个swiper-item组件。
4.navigator
页面链接。设置url属性即可页面跳转。
5.text、image、template、button等
与html中的相似,分别是文本组件、图像组件、模板组件、按钮组件。
四、自定义组件
1.新建自定义组件
自定义组件同样也是要新建wxml、wxss、json、js四个文件,在json文件中,添加以下语句声明是自定义组件:
{
  "component": true
}
然后在wxml文件中编写组件的结构,wxss中编写样式,与页面的写法无异。
注意:在组件 wxss 中不应使用 ID 选择器、属性选择器和标签名选择器。
在组件js文件中,要需要使用 Component() 来注册组件,官方代码示例:
Component({
  properties: {
    // 这里定义了 innerText 属性,属性值可以在组件使用时指定
    innerText: {
      type: String,
      value: 'default value',
    }
  },
  data: {
    // 这里是一些组件内部数据
    someData: {}
  },
  methods: {
    // 这里是一个自定义方法
    customMethod: function(){}
  }
})
2.使用自定义组件
在文章上方页面配置中也讲到了,如果要使用自定义组件,在页面的json文件中写如下代码:
{
  "usingComponents": {
    "component-tag-name": "path/to/the/custom/component"
  }
}
然后在页面wxml文件中引用组件即可:
<view>

  <component-tag-name inner-text="Some text">component-tag-name>
view>
官方文档注意事项:
3.自定义tab栏
如果想要做一个不一样的tab栏,可以自定义tab栏。
第一步,在app.json中的tab栏配置中添加该语句:
"custom": true,
第二步,所有 tab 页的 json 里需声明 usingComponents 项,也可以在 app.json 全局开启。
"usingComponents": {}
第三步,在项目根目录新建一个名为custom-tab-bar文件夹,新建名为index的wxml、wxss、js、json四个文件。
第四步,编写自定义组件的方式编写tab栏代码,以我写的自定义tab栏为例:
<cover-view class="tab-bar">
  <cover-view class="tab-bar-border">cover-view>
  <cover-view wx:for="{{list}}" wx:key="index" class="tab-bar-item" data-path="{{item.pagePath}}" data-index="{{index}}" bindtap="switchTab">
    <cover-image src="{{selected === index ? item.selectedIconPath : item.iconPath}}">cover-image>
    <cover-view style="color: {{selected === index ? selectedColor : color}}">{{item.text}}cover-view>
  cover-view>
cover-view>
/* index.wxss */
.tab-bar {
	position: fixed;
	bottom: 0;
	left: 0;
	right: 0;
	height: 48px;
	background: white;
	display: flex;
	padding-bottom: env(safe-area-inset-bottom);
}

.tab-bar-border {
	position: absolute;
	left: 0;
	top: 0;
	width: 100%;
	height: 1px;
	transform: scaleY(0.5);
}

.tab-bar-item {
	flex: 1;
	text-align: center;
	display: flex;
	justify-content: center;
	align-items: center;
	flex-direction: column;
}

.tab-bar-item cover-image {
	width: 27px;
	height: 27px;
}

.tab-bar-item cover-view {
	font-size: 10px;
}
// index.js
Component({
	data: {
	  selected: 0,
	  color: "#7A7E83",
	  selectedColor: "#ff9a9e",
	  list: [{
		pagePath: "/pages/index/index",
		iconPath: "/static/icon/home.png",
		selectedIconPath: "/static/icon/pink-home.png",
		text: "首页"
	  }, {
		pagePath: "/pages/sort/sort",
		iconPath: "/static/icon/sort.png",
		selectedIconPath: "/static/icon/pink-sort.png",
		text: "分类"
	  },{
		pagePath: "/pages/dress/dress",
		text: "穿搭",
		iconPath: "/static/icon/dress.png",
		selectedIconPath: "/static/icon/pink-dress.png"
	  },{
		pagePath: "/pages/user/user",
		text: "我的",
		iconPath: "/static/icon/user.png",
		selectedIconPath: "/static/icon/pink-user.png"
	  }]
	},
	attached() {
	},
	methods: {
	  switchTab(e) {
		const data = e.currentTarget.dataset
		const url = data.path
		wx.switchTab({url})
		this.setData({
		  selected: data.index
		})
	  }
	}
  })
// index.json
{
	"component": true
}
4.使用自定义tab栏
在所有 tab 页的 json 里需声明 usingComponents 项或者app.json 全局开启后,就已经可以使用了,但是此时会出现问题,点击tab图标会发现其他的tab图标变成选中的状态了,其实是tab页没有选中事件的判断,在tab页的js文件中添加如下代码:
onShow() { // 生命周期函数
	if (typeof this.getTabBar === 'function' &&
	this.getTabBar()) {
	this.getTabBar().setData({
	  selected: 0
	})
    }
}
getTabBar()方法是自定义tab栏js文件里定义的方法,selected相当于选中图标的索引,第一个图标就是0,第二个为1。
五、其他
1.px与rpx
wxss样式文件中的尺寸单位,rpx(responsive pixel)是可以根据屏幕宽度自适应的尺寸单位。
官方解释:
如在 iPhone6 上,屏幕宽度为375px,共有750个物理像素,则750rpx = 375px = 750物理像素,1rpx = 0.5px = 1物理像素。
2.引入其他wxss样式文件
将文件放于style文件夹里,在app.wxss中声明即可。
@import "./style/iconfont.wxss";


