C++调用python之图片处理
一、为什么使用C++调用python
最近项目功能实现手势识别,所以需要实现手部关键点的检测,最开始使用了openpose去实现,后面发现openpose对实时检测速度太慢,cpu推理的情况下,基本上为7~10s for 1 帧,显然并不符合,后面使用需求,无奈之下,开始寻找资料之路,后面对mediapipe和posemm都进行了对比,可能我比较菜,对于posemm各方面资料都不是很了解,短期内很难去实现,大概使用了,效果也并不是想象中的好,最后使用mediapipe进行实现
在网上我看多许多大佬使用mediapipe都是用源码去封装功能实现,我测试过,不断报错,卡在编译和build的地方,也想尽各种办法,最后都没有成功,无奈之后只能进行c++调用python的办法去实现,在此也是对现阶段学习的一个总结,有需要的朋友就看一看。
二、环境配置
以windows下,VS2019,python10,Opencv3.4.10,numpy
注意VS2019在Release X64环境下
1.VS2019配置包含目录
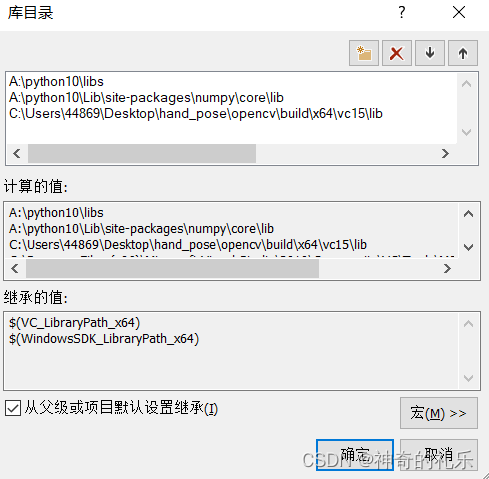
2.VS2019配置库目录
3.VS2019链接器,输入的附加依赖项
写入opencv_world3410.lib即可
三、C++调用python简单案例
#include以上都是C++代码,关键点部分已经有解释,其余的都是基本opencv代码,后续在重点分析调用python的接口
对于C++调用的infer.py的函数为
import cv2
def infer_image(img):
	# 在此你可以自己写一些图像处理的东西即可
    return img
如果你只是简单的想要使用体验一下,以上代码即可复制,在c++源代码位置下创建一个script文件夹,在里面创建infer.py代码如上即可。
三、逐步解释调用API
1.首先是void Py_Finalize()
官方文档:
Initialize the Python interpreter. In an application embedding Python, this should be called before using any other Python/C API functions; see Before Python Initialization for the few exceptions.
This initializes the table of loaded modules (), and creates the fundamental modules builtins, main and sys. It also initializes the module search path (). It does not set ; use PySys_SetArgvEx() for that. This is a no-op when called for a second time (without calling Py_FinalizeEx() first). There is no return value; it is a fatal error if the initialization fails.sys.modulessys.pathsys.argv
Note:On Windows, changes the console mode from O_TEXT to O_BINARY, which will also affect non-Python uses of the console using the C Runtime.
大致的意思解释初始化python解释器,我的理解为启动python后台
2.import_array()
大致看了下源码,内部调用了一个_import_array(void)的函数,源代码感兴趣的朋友可以自己去看,我这简单的过一下
//首先是运行了,我个人怀疑numpy.core._multiarray_umath是一个py文件,是一些numpy的dnarray的定义操作啥的
 PyObject *numpy = PyImport_ImportModule("numpy.core._multiarray_umath");
 //寻找_ARRAY_API的函数,引入该函数
PyObject *c_api = NULL;
c_api = PyObject_GetAttrString(numpy, "_ARRAY_API");

...后面太懒了,底层的一些函数设置学习成本太高,我大致看了一下,就是引入C_API的一些操作以及检查
3.PyRun_SimpleString(“import sys”)和PyRun_SimpleString(“sys.path.append(‘./script’)”)
在python解释器导入sys库,后续需要一些操作
然后设置cd script到该文件夹
PyRun_SimpleString(“”)该函数可以在python后台执行简单的命令
4.PyObject* pModule = PyImport_ImportModule(“infer”)
作用为导入模块,也就是infer.py
5.PyObject* pInfer = PyObject_GetAttrString(pModule, “infer_image”)
作用为导入函数,在infer.py找infer_image函数

