React(总结)
React总结目录
- 一. react概述
-
- 1. react 介绍
- 2. react三个特点
-
- 2.1 声明式UI
- 2.2 基于组件
- 2.3 学习一次,随处使用
- 3. React 脚手架的使用
-
- 3.1 React 脚手架意义
- 3.2 脚手架初始化项目
-
- 1. 初始化项目
- 2. 启动项目
- 3. npx 命令介绍
- 4. react 的基本使用
-
- 4.1 导入 react 和 react-dom 两个包。
- 4.2 调用 React.createElement() 方法创建 react 元素。
- 4.3 调用 ReactDOM.render() 方法渲染 react 元素到页面中。
- 二. JSX
-
- 1. JSX 的基本使用
-
- 1.1 createElement 的问题
- 1.2 JSX简介
- 1.3 使用步骤
- 1.4 JSX注意事项
- 2. JSX 中使用 JavaScript 表达式
-
- 2.1 JS 表达式
- 2.2 表达式语法
- 2.3 JSX中的注释
- 3. JSX 条件渲染
- 4. JSX 列表渲染
-
- 4.1 列表的渲染
- 4.2 JSX中渲染
- 5. JSX 样式处理
-
- 5.1 行内样式 - style
- 5.2 类名 - className【推荐】
- 三. 组件基础
-
- 1. React 组件介绍
- 2. React 组件的两种创建方式
-
- 2.1 使用函数创建组件
- 2.2 使用类创建组件
- 2.3 抽离为独立 JS 文件
- 3. 组件的状态
-
- 3.1 无状态组件
- 3.2 有状态组件
- 4. React 事件处理
-
- 4.1 注册事件
- 4.2 事件对象
- 4.3 this指向问题
- 4.4 this指向解决方案
-
- 1. 箭头函数
- 2. Function.prototype.bind()
- 3. class 的实例方法
- 5. 组件中的 state 和 setState
-
- 5.1 state的基本使用
- 5.2 setState()修改状态
- 5.3 从 JSX 中抽离事件处理程序
- 6. setState进阶
-
- 6.1 更新数据的说明
- 6.2 推荐语法
- 6.3 第二个参数
- 6.4 同步or异步
- 扩展:RESTFul API
- 扩展:json-server 提供接口数据
- 7. 表单处理
-
- 7.1 受控组件
- 7.2 非受控组件(DOM方式)
- 四. React 组件通信
-
- 1. 组件通讯介绍
- 2. 组件的props
-
- 2.1 函数组件获取props
- 2.2 类组件获取props
- 2.3 props的注意点
- 3. props 深入
-
- 3.1 children 属性
- 3.2 props 校验
-
- 1. 使用步骤
- 2. 约束规则
- 3. props 的默认值
- 4. 类的静态属性-static
- 4. 组件通讯的三种方式
-
- 4.1 父传子
- 4.2 子传父
- 4.3 兄弟组件
- 5. Context组件通讯
- 五. 组件的生命周期
-
- 1. 组件的生命周期概述
- 2. 生命周期的三个阶段
-
- 2.1 创建时(挂载阶段)
- 2.2 更新时(更新阶段)
- 2.3 卸载时(卸载阶段)
- 3. 不常用钩子函数介绍
- 六. React Hooks
-
- 1. React Hooks 介绍
-
- 1.1 Hooks是什么?
- 1.2 为什么要有 Hooks
- 1.3 hooks渐进策略
- 2. useState hook
-
- 2.1 useState-基本使用
- 2.2 useState-使用数组解构简化
- 2.3 useState-状态的读取和修改
- 2.4 useState-组件的更新过程
- 2.5 useState-使用规则
- 3. useEffect hook
-
- 3.1 useEffect-副作用介绍
- 3.2 useEffect-基本使用
- 3.3 useEffect-依赖
- 3.4 useEffect-不要对依赖项撒谎
- 3.5 useEffect-依赖是一个空数组
- 3.6 useEffect-清理工作
- 3.7 useEffect-4 种使用使用方式
- 3.8 useEffect应用-发送请求
- 3.9 useState 和 class 状态对比
- 4. React Hooks进阶
-
- 4.1 自定义hooks
- 4.2 useContext-使用
- 4.3 useRef-操作DOM
- 七. Redux基础
-
- 1. redux基本介绍
-
- 1.1 为什么要用 Redux
- 1.2 Redux 开发环境准备
- 2. redux核心概念
-
- 2.1 Redux 概述
- 2.2 Redux-action
- 2.3 Redux-action creator
- 2.4 Redux-reducer
- 2.5 Redux-store
- 2.6 纯函数的介绍
- 3. redux的执行过程
- 4. react-redux的使用
-
- 4.1 React-Redux介绍
- 4.2 React-Redux-基本使用
- 4.3 React-Redux-获取状态useSelector
- 4.4 React-Redux-分发动作useDispatch
- 4.5 理解 Redux 数据流
- 4.6 Redux应用-代码结构
- 4.7 Redux应用-ActionType的使用
- 4.8 Redux应用-Reducer的分离与合并
- 4.9 Redux应用-redux管理哪些状态
- 5. Redux 中间件
-
- 5.1 中间件概述
- 5.2 中间件的触发时机
- 5.3 redux-logger中间件
- 5.4 redux-thunk中间件
- 5.5 redux-devtools-extension中间件
- 5.6 了解:redux 中间件原理
- 5.7 理解Redux异步数据流
- 八. React 路由
-
- 1. React路由介绍
- 2. 路由的基本使用
-
- 2.1 基本使用步骤
- 2.2 常用组件说明
- 3. 路由的执行过程
- 4. 编程式导航
- 5. 默认路由
- 6. 匹配模式
-
- 6.1 模糊匹配(默认)
- 6.2 精确匹配
一. react概述
1. react 介绍
目标:了解什么是react
-
React官网
- React文档 (https://reactjs.org/)
- React中文文档(https://zh-hans.reactjs.org/)
- 新版 React 文档(https://beta.reactjs.org/)
-
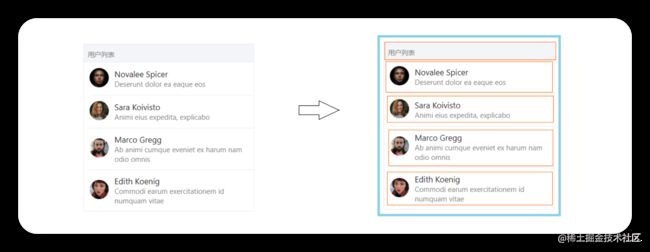
React 是一个用于构建用户界面(UI,对咱们前端来说,简单理解为:HTML 页面)的 JavaScript 库
-
React 起源于 Facebook 内部项目(News Feed,2011),后又用来架设 Instagram 的网站(2012),并于 2013 年 5 月开源(react介绍)
-
React 是最流行的前端开发框架之一,其他:Vue、Angular 等等(npm 下载趋势对比)
总结:
- React 是一个用于构建用户界面的 Javascript 库
2. react三个特点
目标:能够说出react的三个特点
2.1 声明式UI
- 你只需要描述UI(HTML)看起来是什么样的,就跟写HTML一样。
- react中通过数据驱动视图的变化,当数据发生改变react能够高效的更新并渲染DOM。
// JSX
<div className="app">
  <h1>Hello React! 动态数据变化:{count}</h1>
</div>
2.2 基于组件
- 组件是 React 最重要的内容
- 组件表示页面中的部分内容
- 组合、复用多个组件,可以实现完整的页面功能
2.3 学习一次,随处使用
- 使用react/react-dom可以开发Web应用
- 使用react/react-native可以开发移动端原生安卓 和 ios应用
- 使用react可以开发VR(虚拟现实)应用(react-360)
- 声明式 => 关注 what 而不是 how(对应的 命令式)
- 基于组件 => 组件化
- 学习一次,随处使用 => 跨平台
3. React 脚手架的使用
3.1 React 脚手架意义
- 脚手架是开发 现代Web 应用的必备。
- 充分利用 Webpack、Babel、ESLint 等工具辅助项目开发。
- 零配置,无需手动配置繁琐的工具即可使用。
- 关注业务,而不是工具配置。
3.2 脚手架初始化项目
1. 初始化项目
- 命令:
npx create-react-app my-app(my-app表示项目名称,可以修改)
2. 启动项目
- 在项目根目录执行命令:
npm start
3. npx 命令介绍
- npm v5.2.0 引入的一条命令
- 目的:提升包内提供的命令行工具的使用体验
- 原来:先安装脚手架包,再使用这个包中提供的命令
- 全局安装
npm i -g create-react-app - 在通过脚手架的命令来创建 React 项目
- 全局安装
- 现在:npx 调用最新的
create-react-app直接创建 React 项目
总结
create-react-app是react官方提供一个脚手架工具,用于创建react项目- 通过
npx create-react-app react-basic命令可以快速创建一个react项目
4. react 的基本使用
目标:掌握react的基本使用功能步骤
4.1 导入 react 和 react-dom 两个包。
// 导入react和react-dom
import React from 'react'
import ReactDOM from 'react-dom'
4.2 调用 React.createElement() 方法创建 react 元素。
- 参数一:元素名称
- 参数二:元素属性
- 第三个及其以后的参数:元素的子节点
// 创建元素
const title = React.createElement('h1', null, 'hello react')
4.3 调用 ReactDOM.render() 方法渲染 react 元素到页面中。
- 参数一:要渲染的react元素
- 参数二:挂载点
// 渲染react元素
ReactDOM.render(title, document.getElementById('root'))
二. JSX
1. JSX 的基本使用
1.1 createElement 的问题
- 繁琐不简洁
- 不直观,无法一眼看出所描述的结构
- 不优雅,开发体验不好
1.2 JSX简介
-
JSX是JavaScript XML的简写,表示了在Javascript代码中写XML(HTML)格式的代码 -
优势:声明式语法更加直观,与HTML结构相同,降低学习成本,提高开发效率。
-
JSX是react的核心内容
-
注意:JSX 不是标准的 JS 语法,是 JS 的语法扩展。脚手架中内置的 @babel/plugin-transform-react-jsx 包,用来解析该语法。
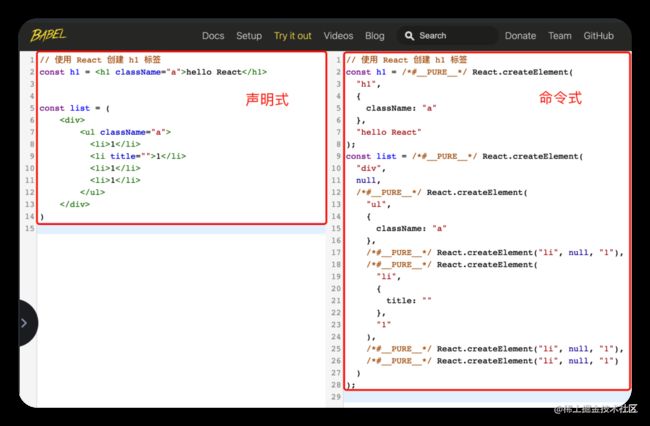
在 babel 的试一试中,可以通过切换 React Runtime 来查看:
- babel 试一试
- Classic -> React.createElement:注意这种方式,需要依赖于 React,也就是只要在代码中写 JSX 就必须导入 React 包
- Automatic -> _jsxRuntime:不依赖于 React 包,因此,代码中可以省略 React 包的导入【最新的脚手架已经默认值采用这种形式】
1.3 使用步骤
- 导入reactDOM包
import ReactDOM from 'react-dom'
- 使用jsx创建react元素
// 创建元素
const title = <h1 title="哈哈"></h1>
- 将react元素渲染到页面中
// 渲染元素
ReactDOM.render(title, document.getElementById('root'))
1.4 JSX注意事项
- JSX必须要有一个根节点
- 如果没有根节点,可以使用
<>(幽灵节点)或者
- 所有标签必须结束,如果是单标签可以使用
/>结束 - JSX中语法更接近与JavaScript,属性名采用驼峰命名法
class===>classNamefor===>htmlFor
- JSX可以换行,如果JSX有多行,推荐使用
()包裹JSX,防止 JS 自动插入分号的 bug
2. JSX 中使用 JavaScript 表达式
2.1 JS 表达式
- 数据类型和运算符的组合(可以单独出现数据类型,也可以数据类型+运算符的组合)
- 特点:有值 或者说 能够计算出一个值
- 字符串、数值、布尔值、null、undefined、object( [] / {} )
- 1 + 2、‘abc’.split(‘’)、[‘a’, ‘b’].join(‘-’)
- function fn() {}、 fn()调用
- 注意:函数不能直接渲染,可以调用
- 验证是不是 JS 表达式的技巧:看内容能不能作为方法的参数,比如,
console.log( 表达式 )
2.2 表达式语法
- 访问对象的属性
const car = {
  brand: '玛莎拉蒂'
}
const title = (
  <h1>
    汽车:{car.brand}
  </h1>
)
- 访问数组的下标
const friends = ['张三', '李四']
const title = (
  <h1>
    汽车:{friends[1]}
  </h1>
)
- 使用三元运算符
const age = 18
const title = (
  <h1>
    是否允许进入:{age >= 18 ? '是' : '否'}
  </h1>
)
- 调用方法
function sayHi() {
  return '你好'
}
const title = <h1>姓名:{sayHi()}</h1>
- JSX本身
const span = <span>我是一个span</span>
const title = <h1>JSX 做为表达式:{span}</h1>
2.3 JSX中的注释
{/* 这是jsx中的注释 */} 快键键 ctrl + /
- 注意:jsx中不能出现语句,这会导致代码出现错误!
3. JSX 条件渲染
目标:掌握在react中如何根据条件渲染结构
- 场景:loading效果
- 条件渲染:根据条件渲染特定的 JSX 结构
- 可以使用if/else或三元运算符或逻辑与运算符来实现
  // 通过判断`if/else`控制
  const isLoading = true
  const load = (isLoading) => {
    if (isLoading) {
      return '数据加载中...'
    } else {
      return '数据加载完成,此处显示加载后的数据'
    }
  }
       <div>
            <h2>03-条件渲染</h2>
            <h3>通过判断`if/else`控制</h3>
            <p>{load(true)}</p>
            <p>{load(false)}</p>
            <h3>通过三元运算符控制</h3>
            <p>{isLoading ? '数据加载中...' : '数据加载完成,此处显示加载后的数据'}</p>
            <h3>逻辑与(&&)运算符</h3>
            <p>{isLoading && '数据加载中...'}</p>
      </div>
4. JSX 列表渲染
-
如果要渲染一组数据,应该使用数组的 map() 方法
-
作用:重复生成相同的 HTML 结构,比如,歌曲列表、商品列表等
-
注意:
- 需要为遍历项添加
key属性 - key 在 HTML 结构中是看不到的,是 React 内部用来进行性能优化时使用的
- key 在当前列表中要唯一
- 如果列表中有像 id 这种的唯一值,就用 id 来作为 key 值
- 如果列表中没有像 id 这种的唯一值,就可以使用 index(下标)来作为 key 值
- 需要为遍历项添加
4.1 列表的渲染
 // 列表的渲染
  const songs = [
    { id: 1, name: '痴心绝对' },
    { id: 2, name: '像我这样的人' },
    { id: 3, name: '南山南' }
  ]

  const list = songs.map((item, k) => {
    console.log(item, k + 1);
    return <li>{item.id + '=>' + item.name}</li>
  })
 <ul>
    {list}
 </ul>
4.2 JSX中渲染
const songs = [
  { id: 1, name: '痴心绝对' },
  { id: 2, name: '像我这样的人' },
  { id: 3, name: '南山南' }
]

const dv = (
  <div>
    <ul>{songs.map(song => <li>{song.name}</li>)}</ul>
  </div>
)

ReactDOM.render(
  dv,
  document.getElementById('root')
);
5. JSX 样式处理
目标:掌握jsx中如何通过style和className控制元素的样式
5.1 行内样式 - style
const dv = (
  <div style={ { color: 'red', backgroundColor: 'pink' } }>style样式</div>
)
5.2 类名 - className【推荐】
// 导入样式
import './base.css'
const dv = <div className="title">style样式</div>
三. 组件基础
1. React 组件介绍
目标:能够知道 React 组件的意义
- 组件是 React 开发(现代前端开发)中最重要的内容
- 组件允许你将 UI 拆分为独立、可复用的部分,每个部分都可以独立的思考
- 组合多个组件(组装乐高积木)实现完整的页面功能
- 特点:独立、可复用、可组合
- 组件包含三部分:HTML/CSS/JS
- 展示页面中的可复用部分
2. React 组件的两种创建方式
2.1 使用函数创建组件
-
函数组件:使用 JS 的函数(或箭头函数)创建的组件
-
注意:
- 函数名称必须以大写字母开头
- 函数组件必须有返回值,表示该组件的结构
- 如果返回值为 null,表示不渲染任何内容
-
渲染结构:
// 渲染结构:
function Hello() {
  return (
    <div>这是我的第一个函数组件</div>
  )
}
- 不渲染结构:
// 不渲染结构:
function Hello() {
  return null
}
- 使用箭头函数创建组件:
// 使用箭头函数创建组件:
const Hello = () => <div>这是我的第一个函数组件</div>
- V18.0.0的一些改变
import { createRoot } from 'react-dom/client'
import { Component } from 'react'
// 测试渲染组件
const tpl = (
  <div className="box">
    <App></App>
    <App />
    <hr />
    <List />
    <hr />
    <App2 />
  </div>
)

// 老写法
// ReactDOM.render(tpl, document.getElementById('root'))
// 新写法
createRoot(document.getElementById('root')).render(tpl)
- 使用JS中的函数创建的组件叫做:函数组件
- 函数组件必须有返回值
- 组件名称必须以大写字母开头, React 据此区分 组件 和 普通的React 元素
- 使用函数名作为组件标签名
2.2 使用类创建组件
目标:使用ES6的class语法创建组件
- 类组件:使用 ES6 的 class 创建的组件
- 注意:
- 类名称也必须以大写字母开头
- 类组件应该继承 React.Component 父类,从而可以使用父类中提供的方法或属性
- 类组件必须提供 render() 方法
- render() 方法必须有返回值,表示该组件的结构
// 导入 React
import React from 'react'
class Hello extends React.Component {
  render() {
    return <div>Hello Class Component!</div>
  }
}
ReactDOM.render(<Hello />, root)

// 只导入 Component
import { Component } from 'react'
class Hello extends Component {
  render() {
    return <div>Hello Class Component!</div>
  }
}
- 使用组件
ReactDOM.render(<Hello />, root)
2.3 抽离为独立 JS 文件
目标:能够将react组件提取到独立的js文件中
-
思考:项目中的组件多了之后,该如何组织这些组件呢?
- 选择一:将所有组件放在同一个JS文件中
- 选择二:将每个组件放到单独的JS文件中
- 组件作为一个独立的个体,一般都会放到一个单独的 JS 文件中
-
实现步骤:
- 创建 Hello.js
- 创建组件(函数 或 类)
- 在 Hello.js 中导出该组件
- 在 index.js 中导入 Hello 组件
- 渲染组件
// index.js
import Hello from './Hello'
// 渲染导入的Hello组件
ReactDOM.render(<Hello />, root)


// Hello.js
import { Component } from 'react'
class Hello extends Component {
  render() {
    return <div>Hello Class Component!</div>
  }
}
// 导出Hello组件
export default Hello
3. 组件的状态
目标:理解函数组件和类组件的区别
- 在项目中,一般都是由函数组件和类组件共同配合来完成的
3.1 无状态组件
- 函数组件又叫做无状态组件
- 函数组件是不能自己提供数据【前提:不考虑 hooks 的情况下】
- 函数组件是没有状态的,只负责页面的展示(
静态,不会发生变化),性能比较高
3.2 有状态组件
目标:掌握react类组件中如何提供状态以及渲染状态
- 类组件又叫做有状态组件
- 类组件可以自己提供数据
- 类组件有自己的状态,负责更新UI,只要类组件的数据发生了改变,UI 就会发生更新(
动态)
class Hello extends Component {
  // 为组件提供状态
  state = {
    count: 0,
    list: [],
    isLoading: true
  }

  render() {
    return (
    // 通过 this.state 来访问类组件的状态
      <div>计数器:{this.state.count}</div>
    )
  }
}
- 状态
state,即数据,是组件内部的私有数据,只能在组件内部使用 - 状态 state 的值是对象,表示一个组件中可以有多个数据
- 通过
this.state.xxx来获取状态
4. React 事件处理
4.1 注册事件
目标: 掌握react中如何注册事件
- React注册事件与DOM的事件语法非常像
- 语法
on+事件名 ={事件处理程序}比如onClick={this.handleClick} - 注意:React事件采用驼峰命名法,比如
onMouseEnter,onClick
import { Component } from 'react'
import '../../index.css'
class App extends Component{
  // 为组件提供状态

  handleClick(){
    console.log("注册事件");
  }
  render(){
    return(
      <div className='box'>
          <h2>3.4 React 事件处理</h2>
          <h3>1. 事件处理-注册事件</h3>
          <button onClick={this.handleClick}>注册事件</button>
      </div>
    )
  }
}
export default App
4.2 事件对象
目标:掌握注册事件时如何处理事件对象
- 可以通过事件处理程序的参数获取到事件对象
- 注意:React 中的事件对象是 React 内部处理后的事件对象
- 一般称为:SyntheticBaseEvent 合成事件对象。用法与 DOM 原生的事件对象用法基本一致
import { Component } from 'react'
import '../../index.css'
class App extends Component{
  // 为组件提供状态

  handleClick(e){
    console.log("注册事件",e.target);
    // 事件对象
    e.preventDefault()
  }
  render(){
    return(
      <div className='box'>
          <h3>2. 事件处理-事件对象</h3>
          <a href='https://element.eleme.io/#/zh-CN/component/message-box#quan-ju-fang-fa' onClick={this.handleClick}>事件对象</a>
      </div>
    )
  }
}
export default App
4.3 this指向问题
目标:了解事件处理程序中this指向undefined且知道原因
- 事件处理程序中的this指向的是
undefined - render方法中的this指向的是当前react组件。只有事件处理程序中的this有问题
- 原因
- 事件处理程序的函数式函数调用模式,在严格模式下,this指向
undefined - render函数是被组件实例调用的,因此render函数中的this指向当前组件
- 事件处理程序的函数式函数调用模式,在严格模式下,this指向
class App extends React.Component {
  state = {
    msg: 'hello react'
  }
  handleClick() {
    console.log(this.state.msg)
  }
  render() {
    return (
      <div>
        <button onClick={this.handleClick}>点我</button>
      </div>
    )
  }
}
4.4 this指向解决方案
目标: 掌握常见的this指向解决方案
1. 箭头函数
- 利用箭头函数自身不绑定this的特点
- render() 方法中的 this 为组件实例,可以获取到 setState()
class App extends React.Component {
  state = {
    msg: 'hello react'
  }
  handleClick() {
    console.log(this.state.msg)
  }
  render() {
    return (
      <div>
        <button onClick={() => this.handleClick()}>点我</button>
      </div>
    )
  }
}
2. Function.prototype.bind()
- 利用ES5中的bind方法,将事件处理程序中的this与组件实例绑定到一起
class App extends React.Component {
  state = {
    msg: 'hello react'
  }
  handleClick() {
    console.log(this.state.msg)
  }
  render() {
    return (
      <div>
        <button onClick={this.handleClick.bind(this)}>点我</button>
      </div>
    )
  }
}
3. class 的实例方法
- 利用箭头函数形式的class实例方法
- 注意:该语法是实验性语法,但是,由于babel的存在可以直接使用
import React from 'react'
import ReactDOM from 'react-dom'

/*
  从JSX中抽离事件处理程序
*/

class App extends React.Component {
  state = {
    count: 0
  }

  // 事件处理程序
  onIncrement = () => {
    console.log('事件处理程序中的this:', this)
    this.setState({
      count: this.state.count + 1
    })
  }

  render() {
    return (
      <div>
        <h1>计数器:{ this.state.count }</h1>
        <button onClick={this.onIncrement}>+1</button>
      </div>
    )
  }
}

// 渲染组件
ReactDOM.render(<App />,  document.getElementById('root'))
5. 组件中的 state 和 setState
5.1 state的基本使用
- 状态即数据
- 状态是私有的,只能在组件内部使用
- 通过 this.state 来获取状态
  // 为组件提供状态
 state={
   name:'张三疯',
   age:19,
   obj:{
    name:'张三疯',
    age:19,
   }
 }
  <p>姓名:{this.state.name}<br/>年龄:{this.state.age}<br/>姓名:{this.state.obj.name}<br/>年龄:{this.state.obj.age}</p>
5.2 setState()修改状态
- 状态是可变的
- 语法:
this.setState({ 要修改的数据 }) - 注意:不要直接修改 state 中的值,这是错误的!!!
- setState() 作用:
- 修改 state
- 更新UI
- 思想:数据驱动视图
state = {
  count: 0,
  list: [1, 2, 3],
  person: {
    name: 'jack',
    age: 18
  }
}

// 【不推荐】直接修改当前值的操作:
this.state.count++
++this.state.count
this.state.count += 1
this.state.count = 1

// 只要是数组中直接修改当前数组的方法都不能用!
this.state.list.push(123)

this.state.person.name = 'rose'

// 【推荐】不是直接修改当前值,而是创建新值的操作:
this.setState({
  count: this.state.count + 1,
  list: [...this.state.list, 123],
  person: {
    ...this.state.person,
    // 要修改的属性,会覆盖原来的属性,这样,就可以达到修改对象中属性的目的了
    name: 'rose'
  }
})
5.3 从 JSX 中抽离事件处理程序
- JSX 中掺杂过多 JS 逻辑代码,会显得非常混乱
- 推荐:将逻辑抽离到单独的方法中,保证 JSX 结构清晰
- 原因:事件处理程序中 this 的值为 undefined
- 希望:this 指向组件实例(render方法中的this即为组件实例)
6. setState进阶
6.1 更新数据的说明
目的:能够理解 setState 延迟更新数据
- setState 方法更新状态是同步的,但是表现为延迟更新状态(注意:非异步更新状态!!! )
- 延迟更新状态的说明:
- 调用 setState 时,将要更新的状态对象,放到一个更新队列中暂存起来(没有立即更新)
- 如果多次调用 setState 更新状态,状态会进行合并,后面覆盖前面
- 等到所有的操作都执行完毕,React 会拿到最终的状态,然后触发组件更新
- 优势:多次调用 setState() ,只会触发一次重新渲染,提升性能
state = { count: 1 }

this.setState({
	count: this.state.count + 1
})
console.log(this.state.count) // 1
6.2 推荐语法
**目标:**能够掌握setState箭头函数的语法,解决多次调用依赖的问题
- 推荐:使用
setState((prevState) => {})语法 - 参数 prevState:表示上一次
setState更新后的状态
this.setState((prevState) => {
  return {
    count: prevState.count + 1
  }
})
6.3 第二个参数
**目标:**能够使用setState的回调函数,操作渲染后的DOM
- 场景:在状态更新(页面完成重新渲染)后立即执行某个操作
- 语法:
setState(updater[, callback])
this.setState(
	(state) => ({}),
	() => {console.log('这个回调函数会在状态更新后并且 DOM 更新后执行')}
)
6.4 同步or异步
目标:能够说出setState到底是同步的还是异步
- setState本身并不是一个异步方法,其之所以会表现出一种“异步”的形式,是因为react框架本身的一个性能优化机制
- React会将多个setState的调用合并为一个来执行,也就是说,当执行setState的时候,state中的数据并不会马上更新
- setState如果是在react的生命周期中或者是事件处理函数中,表现出来为:延迟合并更新(“异步更新”)
- setState如果是在setTimeout/setInterval或者addEventListener声明原生事件中,表现出来是:立即更新(“同步更新”)
import { Component } from 'react'
export default class App extends Component {
  state = {
    count: 0,
  }
  // 点击按钮,分别查看 情况1 和 情况2 的 render 打印次数
  handleClick = () => {
    // 情况1
    this.setState({
      count: this.state.count + 1,
    })
    this.setState({
      count: this.state.count + 1,
    })
    console.log('1:', this.state.count)

    // 情况2
    // setTimeout(() => {
    //   this.setState({
    //     count: this.state.count + 1,
    //   })
    //   this.setState({
    //     count: this.state.count + 1,
    //   })
    //   console.log('2:', this.state.count)
    // }, 0)
  }

  render() {
    console.log('render')
    return (
      <div>
        <p>{this.state.count}</p>
        <button onClick={this.handleClick}>add</button>
      </div>
    )
  }
}
-
原因:
- 在React的setState函数实现中,会根据一个变量
isBatchingUpdates判断是直接更新this.state还是放到队列中回头再说, - 而isBatchingUpdates默认是false,也就表示setState会同步更新this.state,
- 但是,**有一个函数batchedUpdates,这个函数会把isBatchingUpdates修改为true,
- 而当React在调用事件处理函数之前就会调用这个batchedUpdates,造成的后果,就是由React控制的事件处理过程setState不会同步更新this.state。
- 在React的setState函数实现中,会根据一个变量
-
注意:
- setState的“异步”并不是说内部由异步代码实现,
- 其实本身执行的过程和代码都是同步的,只是合成事件和钩子函数的调用顺序在更新之前,导致在合成事件和钩子函数中没法立马拿到更新后的值,形式了所谓的“异步”,
- 当然可以通过第二个参数 setState(partialState, callback) 中的callback拿到更新后的结果。
-
扩展阅读: 深入 setState 机制
扩展:RESTFul API
目标:能够知道什么是 RESTFul API
-
RESTFul API(或 REST API)是一套流行的接口设计风格,参考 RESTFul API 设计指南 -
使用
RESTFul API时,常用请求方式有以下几种:- GET(查询):从服务器获取资源
- POST(新建):在服务器新建一个资源
- DELETE(删除):从服务器删除资源
- PUT(更新):在服务器更新资源(注意:需要提供接口所需的完整数据)
- PATCH(部分更新):在服务器更新资源(只需要提供接口中要修改过的数据)
-
约定:请求方式是动词,接口地址使用名词
-
示例:
- GET /zoos:获取所有动物园
- POST /zoos:新建一个动物园
- GET /zoos/ID:获取某个动物园的信息
- DELETE /zoos/ID:删除某个动物园
- PUT /zoos/ID:更新某个动物园的信息(提供该动物园的全部信息)
- PATCH /zoos/ID:部分更新某个动物园的信息(提供该动物园的部分信息)
扩展:json-server 提供接口数据
目标:能够使用 json-server 提供接口数据
-
json-server 文档
-
作用:根据 json 文件创建 RESTful 格式的 API 接口
-
步骤:
- 准备文件data.json
{
  "tabs": [
    {
        "id": 1,
        "name": "热度",
        "type": "hot"
      },
      {
        "id": 2,
        "name": "时间",
        "type": "time"
      }
  ],
  "list": [
    {
      "id": 1,
      "author":"猫爷",
      "comment":"来杯啤酒",
      "time":"2021-11-24T03:13:40.644Z",
      "attitude":0
   	}
  ],
  "test":[
    {
      "id": 1,
      "author":"张三疯",
      "comment":"来杯啤酒",
      "time":"2021-11-24T03:13:40.644Z",
      "attitude":0
   	}
  ]
    }
- 使用 json-server 启动接口
# 使用 npx 命令调用 json-server
# 指定用于提供数据的 json 文件
# --port 用于修改端口号
# --watch 表示监听 json 文件的变化,当变化时,可以不重启终端命令的前提下读取到 json 文件中的最新的内容
npx json-server ./data.json --port 8888 --watch

# 接口地址为:
http://localhost:8888/tabs
http://localhost:8888/list
- 使用接口
// 5.2 生命周期的三个阶段
import React from 'react';
import axios from 'axios';
class Constructor extends React.Component {
	state = {
		list: []
	};
  componentDidMount() {
    this.getList()
  }
  getList = async () => {
    const res = await axios.get('http://localhost:8888/test')
    console.log(res);
    this.setState({
      list: res.data
    })
  }
	constructor(props) {
		super(props);
		this.state = {
			count: 0
		};
	}
	render() {
		return (
			<div>
				<h2>6.1 生命周期的三个阶段</h2>
			</div>
		);
	}
}

export default Constructor;
7. 表单处理
7.1 受控组件
目标: 能够使用受控组件的方式获取文本框的值
- HTML中表单元素是可输入的,即表单元素维护着自己的可变状态(value)
- 但是在react中,可变状态通常是保存在
state中的,并且要求状态只能通过setState进行修改 - React中将state中的数据与表单元素的value值绑定到了一起,由state的值来控制表单元素的值
- 受控组件:value值受到了react状态控制的表单元素
- 步骤:
- 在 state 中添加一个状态,作为表单元素的value值(控制表单元素值的来源)
- 给表单元素绑定 change 事件,将表单元素的值设置为 state 的值(控制表单元素值的变化)
 state={
   name:'张三疯',
   age:19,
   count:99,
   obj:{
    name:'张三',
    age:19,
   }
 }

  <h3>4. 表单处理-受控组件</h3>
  受控组件:<input type="text" value={this.state.count} onChange={(e)=>{this.setState({count:e.target.value})}}/>
- 多表单元素优化:
- 问题:每个表单元素都有一个单独的事件处理程序处理太繁琐
- 优化:使用一个事件处理程序同时处理多个表单元素
- 多表单元素优化步骤:
- 给表单元素添加name属性,名称与 state 相同
- 根据表单元素类型获取对应值
- 在 change 事件处理程序中通过 [name] 来修改对应的state
- 优化前
import React from 'react'
import ReactDOM from 'react-dom'

/*
  受控组件示例
*/

class App extends React.Component {
  state = {
    txt: '',
    content: '',
    city: 'bj',
    isChecked: false
  }

  handleChange = e => {
    this.setState({
      txt: e.target.value
    })
  }

  // 处理富文本框的变化
  handleContent = e => {
    this.setState({
      content: e.target.value
    })
  }

  // 处理下拉框的变化
  handleCity = e => {
    this.setState({
      city: e.target.value
    })
  }

  // 处理复选框的变化
  handleChecked = e => {
    this.setState({
      isChecked: e.target.checked
    })
  }

  render() {
    return (
      <div>
        {/* 文本框 */}
        <input type="text" value={this.state.txt} onChange={this.handleChange} />
        <br/>

        {/* 富文本框 */}
        <textarea value={this.state.content} onChange={this.handleContent}></textarea>
        <br/>

        {/* 下拉框 */}
        <select value={this.state.city} onChange={this.handleCity}>
          <option value="sh">上海</option>
          <option value="bj">北京</option>
          <option value="gz">广州</option>
        </select>
        <br/>

        {/* 复选框 */}
        <input type="checkbox" checked={this.state.isChecked} onChange={this.handleChecked} />
      </div>
    )
  }
}

// 渲染组件
ReactDOM.render(<App />,  document.getElementById('root'))
- 优化后:
import React from 'react'
import ReactDOM from 'react-dom'

/*
  受控组件示例
*/

class App extends React.Component {
  state = {
    txt: '',
    content: '',
    city: 'bj',
    isChecked: false
  }

  handleForm = e => {
    // 获取当前DOM对象
    const target = e.target

    // 根据类型获取值
    const value = target.type === 'checkbox'
      ? target.checked
      : target.value

    // 获取name
    const name = target.name

    this.setState({
      [name]: value
    })
  }

  render() {
    return (
      <div>
        {/* 文本框 */}
        <input type="text" name="txt" value={this.state.txt} onChange={this.handleForm} />
        <br/>

        {/* 富文本框 */}
        <textarea name="content" value={this.state.content} onChange={this.handleForm}></textarea>
        <br/>

        {/* 下拉框 */}
        <select name="city" value={this.state.city} onChange={this.handleForm}>
          <option value="sh">上海</option>
          <option value="bj">北京</option>
          <option value="gz">广州</option>
        </select>
        <br/>

        {/* 复选框 */}
        <input type="checkbox" name="isChecked" checked={this.state.isChecked} onChange={this.handleForm} />
      </div>
    )
  }
}

// 渲染组件
ReactDOM.render(<App />,  document.getElementById('root'))
7.2 非受控组件(DOM方式)
- 说明:借助于 ref,使用原生 DOM 方式来获取表单元素值
- ref 的作用:获取 DOM 或组件
- 使用步骤:
- 调用 React.createRef() 方法创建一个 ref 对象
constructor() {
super()
this.txtRef = React.createRef()
}
- 将创建好的 ref 对象添加到文本框中
 <input type="text" ref={this.txtRef} />
 <button onClick={this.getTxt}>获取文本框的值</button>
- 通过 ref 对象获取到文本框的值
  getTxt = () => {
    console.log('文本框值为:', this.txtRef.current.value);
  }
四. React 组件通信
1. 组件通讯介绍
目标:了解为什么需要组件通讯
- 组件是独立且封闭的单元,默认情况下,只能使用组件自己的数据
- 在组件化过程中,通常会将一个完整的功能拆分成多个组件,以更好的完成整个应用的功能
- 而在这个过程中,多个组件之间不可避免的要共享某些数据
- 为了实现这些功能,就需要打破组件的独立封闭性,让其与外界沟通。这个过程就是组件通讯。
- 组件中的状态是私有的,也就是说,组件的状态只能在组件内部使用,无法直接在组件外使用
2. 组件的props
目标: 能够使用组件的props实现传递数据和接收数据
- 组件是封闭的,要接收外部数据应该通过 props 来实现
- props的作用:接收传递给组件的数据
- 传递数据:给组件标签添加属性
- 接收数据:
- 函数组件通过参数props接收数据,
- 类组件通过
this.props接收数据
2.1 函数组件获取props
- 函数组件通过参数props接收数据
- 子组件
// 接收数据:
// props 的值就是:{ name: 'jack', age: 19 }
function Childen(props) {
    return (
	<div>
            <h4>子组件(Childen)</h4>
            <p>接收到的数据: 姓名:{props.name} 年龄:{props.age}</p>
	</div>
	);
}
- 父组件
// 传递数据:
// 可以把传递数据理解为调用函数 Hello,即:Hello({ name: 'jack', age: 19 })
<h4>函数组件获取props</h4>
<Childen name="张三疯" age="99" />
2.2 类组件获取props
- 类组件通过
this.props接收数据 - 子组件
// 接收数据:
// class 组件需要通过 this.props 来获取
// 注意:this.porps 属性名是固定的!!!
class Child extends React.Component {
	render() {
		return (
			<div>
				<h4>类子组件(Child)</h4>
				<p>接收到的数据: 姓名:{this.props.name} 年龄:{this.props.age}</p>
			</div>
		);
	}
}
- 父组件
<h4>类组件获取props</h4>
<Child name="类组件" age="99" />
2.3 props的注意点
目标: 了解props的特点,知道什么是单向数据流
- props 是只读对象,也就是说:只能读取对象中的属性,无法修改
- 单向数据流,也叫做:自顶而下(自上而下)的数据流
- 表示:父组件中的数据可以通过 props 传递给子组件,并且,当父组件中的数据更新时,子组件就会自动接收到最新的数据
- 类比:就像瀑布的水一样只能从上往下流动,并且,当上游的水变浑浊,下游的水也会受到影响
- 可以传递任意数据(数字 字符串 布尔类型 数组 对象 函数 jsx)
3. props 深入
3.1 children 属性
**目标:**掌握props中children属性的用法
- children 属性:表示该组件的子节点,只要组件有子节点,props就有该属性
- children 属性与普通的 props 一样,值可以是任意值(文本、React元素、组件,甚至是函数)
const Hello = props => {
  return (
    <div>
      该组件的子节点:{props.children}
    </div>
  )
}

<Hello>我是子节点</Hello>
- 练习:实现标题栏组件
//App.js 中:
const NavBar = props => {
return (
<div className="nav-bar">
<span><</span>
<div className="title">{props.children}</div>
</div>
)
}
export default class App extends Component {
render() {
return (
<div>
<NavBar>标题</NavBar>
<br />
<NavBar>商品</NavBar>
<br />
<NavBar>
<span style={{ color: 'red' }}>花哨的标题</span>
</NavBar>
</div>
)
}
}
//App.css 中:
.nav-bar {
  display: flex;
  position: relative;
  background-color: #9696dc;
  padding: 5px;
  text-align: center;
}

.title {
  position: absolute;
  width: 100%;
  height: 100%;
}
3.2 props 校验
**目标:**校验接收的props的数据类型,增加组件的健壮性
- 对于组件来说,props 是外来的,无法保证组件使用者传入什么格式的数据
- 如果传入的数据格式不对,可能会导致组件内部报错
- 关键问题:组件的使用者不知道明确的错误原因
// 假设,这是 小明 创建的 List 组件
const List = props => {
  const arr = props.colors
  const lis = arr.map((item, index) => <li key={index}>{item.name}</li>)
	return (
		<ul>{lis}</ul>
	)
}

// 小红使用小明创建的 List 组件
<List colors={19} />
- props 校验:允许在创建组件的时候,就指定 props 的类型、格式等
- 作用:捕获使用组件时因为props导致的错误,给出明确的错误提示,增加组件的健壮性
// 约定 List 组件的 colors 属性是数组类型
// 如果不是数组就会报错,增加组件的健壮性
App.propsTypes = {
  colors: PropTypes.array
}
- 此时,代码同样会报错,但是,我们可以拿到更加明确的错误提示:
1. 使用步骤
- 安装包 prop-types (yarn add prop-types / npm i props-types)
- 导入 prop-types 包
- 使用
组件名.propTypes = {}来给组件的props添加校验规则 - 校验规则通过 PropTypes 对象来指定
import PropTypes from 'prop-types'
function App(props) {
return (
<h1>Hi, {props.colors}</h1>
) }
App.propTypes = {
// 约定colors属性为array类型
// 如果类型不对,则报出明确错误,便于分析错误原因
colors: PropTypes.array
}
2. 约束规则
- 常见类型:array、bool、function、number、object、string
- React元素类型:element
- 必填项:isRequired
- 特定结构的对象:shape({ })
// 常见类型
optionalFunc: PropTypes.func,
// 必选
requiredFunc: PropTypes.func.isRequired,
// 特定结构的对象
optionalObjectWithShape: PropTypes.shape({
color: PropTypes.string,
fontSize: PropTypes.number
})
//-----------------------------------------------------
// 添加props校验
// 属性 a 的类型:      数值(number)
// 属性 fn 的类型:     函数(func)并且为必填项
// 属性 tag 的类型:    React元素(element)
// 属性 filter 的类型: 对象({area: '上海', price: 1999})
App.propTypes = {
  a: PropTypes.number,
  fn: PropTypes.func.isRequired,
  tag: PropTypes.element,
  filter: PropTypes.shape({
    area: PropTypes.string,
    price: PropTypes.number
  })
}
3. props 的默认值
**目标:**给组件的props提供默认值
- 场景:分页组件 => 每页显示条数
- 作用:给 props 设置默认值,在未传入 props 时生效
- 通过
defaultProps可以给组件的props设置默认值,在未传入props的时候生效
function App(props) {
  return (
  <div>
  此处展示props的默认值:{props.pageSize}
  </div>
  ) }
  // 设置默认值
  App.defaultProps = {
  pageSize: 10
  }

  // 不传入pageSize属性
  <App />
4. 类的静态属性-static
**目标:**能够通过类的static语法简化props校验和默认值
- 实例成员:通过实例对象调用的属性或者方法,叫做实例成员(属性或者方法)
- 静态成员:通过类或者构造函数本身才能访问的属性或者方法
class Person {
	name = 'zs'; // 实例属性

	sayHi() {
		console.log('哈哈'); // 实例方法
	}

	static age = 18; // 静态属性

	static goodBye() {
		console.log('byebye'); // 静态方法
	}
}
const p = new Person();

console.log(p.name); // 访问实例属性
p.sayHi(); // 调用实例方法

console.log(Person.age); // 访问静态属性
Person.goodBye(); // 调用静态方法
class List extends Component {
  static propTypes = {
    colors: PropTypes.array,
    gender: PropTypes.oneOf(['male', 'female']).isRequired
  }

  static defaultProps = {
		gender: ''
  }

  render() {
    const arr = this.props.colors
    const lis = arr.map((item, index) => <li key={index}>{item.name}</li>)
    return <ul>{lis}</ul>
  }
}
4. 组件通讯的三种方式
4.1 父传子
目标:将父组件的数据传递给子组件
- 父组件提供要传递的state数据
- 给子组件标签添加属性,值为 state 中的数据
- 子组件中通过 props 接收父组件中传递的数据
- 父组件提供数据并且传递给子组件
class Parent extends React.Component {
  state = {
    money: 10000
  }
  render() {
    const { money } = this.state
    return (
      <div>
        <h1>我是父组件:{money}</h1>
        {/* 将数据传递给子组件 */}
        <Child money={money} />
      </div>
    )
  }
}
- 子组件接收数据
function Child(props) {
	return (
  	<div>
      {/* 接收父组件中传递过来的数据 */}
    	<h3>我是子组件 -- {props.money}</h3>
    </div>
  )
}
4.2 子传父
目标: 能够将子组件的数据传递给父组件
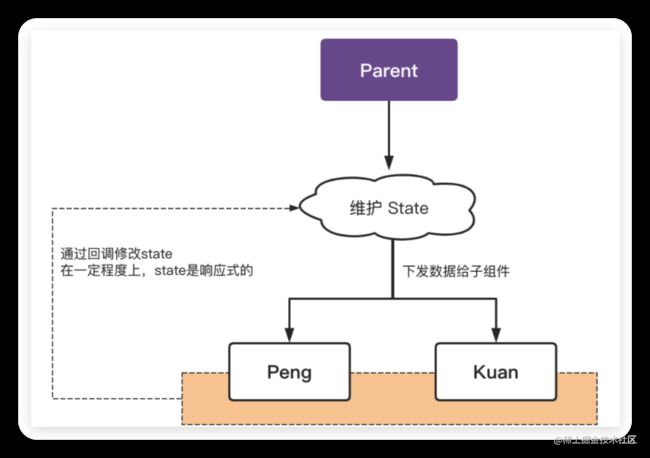
- 思路:利用回调函数来实现,父组件提供回调,子组件调用回调,将要传递的数据作为回调函数的参数
- 步骤:
- 父组件提供一个回调函数(用于接收数据)
- 将该函数作为属性的值,传递给子组件
- 子组件通过 props 调用回调函数
- 将子组件的数据作为参数传递给回调函数
- 父组件提供函数并且传递给子组件
class Parent extends React.Component {
  state = {
    money: 10000
  }
	// 回调函数
        //1.  父组件提供一个回调函数(用于接收数据)
	buyPhone = price => {
    this.setState({
      money: this.state.money - price
    })
  }
  render() {
    const { money } = this.state
    return (
      <div>
        <h1>我是父组件:{money}</h1>
        {/* 2.将该函数作为属性的值,传递给子组件 */}
        <Child money={money} buyPhone={this.buyPhone} />
      </div>
    )
  }
}
- 子组件接收函数并且调用
//3.  子组件通过 props 调用回调函数
const Child = (props) => {
  const handleClick = () => {
    // 子组件调用父组件传递过来的回调函数,
    //4.  将子组件的数据作为参数传递给回调函数
		props.buyPhone(100)
  }
  return (
    <div>
      <h3>我是子组件 -- {props.money}</h3>
      <button onClick={handleClick}>买手机</button>
    </div>
  )
}
4.3 兄弟组件
目标: 能够理解什么是状态提升,并实现兄弟组件之间的组件通讯
- 将共享状态提升到最近的公共父组件中,由公共父组件管理这个状态
- 思想:状态提升
- 要通讯的子组件只需通过 props 接收状态或操作状态的方法
- 公共父组件职责:
- 提供共享状态
- 提供操作共享状态的方法
index.js
import React, { Component } from 'react'
import ReactDOM from 'react-dom'

// 导入两个子组件
import Jack from './Jack'
import Rose from './Rose'

// App 是父组件
class App extends Component {
  // 1. 状态提升到父组件
  state = {
    msg: '',
  }

  changeMsg = msg => {
    this.setState({
      msg,
    })
  }

  render() {
    return (
      <div>
        <h1>我是App组件</h1>
        {/* 兄弟组件 1 */}
        <Jack say={this.changeMsg}></Jack>
				{/* 兄弟组件 2 */}
        <Rose msg={this.state.msg}></Rose>
      </div>
    )
  }
}

// 渲染组件
ReactDOM.render(<App />, document.getElementById('root'))
Jack.js
import React, { Component } from 'react'

export default class Jack extends Component {
  say = () => {
    // 修改数据
    this.props.say('you jump i look')
  }
  render() {
    return (
      <div>
        <h3>我是Jack组件</h3>
        <button onClick={this.say}>说</button>
      </div>
    )
  }
}
Rose.js
import React, { Component } from 'react'

export default class Rose extends Component {
  render() {
    return (
      <div>
        {/* 展示数据 */}
        <h3>我是Rose组件-{this.props.msg}</h3>
      </div>
    )
  }
}
5. Context组件通讯
**目标:**通过context实现跨级组件通讯
- 使用步骤:
- 调用
React. createContext()创建 Provider(提供数据) 和 Consumer(消费数据) 两个组件。
//Provider(提供数据) 和 Consumer(消费数据)
const { Provider, Consumer } = React.createContext()
- 使用 Provider 组件作为父节点。
<Provider>
    <div className="App">
        <Child1 />
    </div>
</Provider>
- 设置 value 属性,表示要传递的数据。
<Provider value="pink">
- 调用 Consumer 组件接收数据。
<Consumer>
    {data => <span>data参数表示接收到的数据 -- {data}</span>}
</Consumer>
五. 组件的生命周期
**目的:**能够理解什么是组件的生命周期以及为什么需要研究组件的生命周期
1. 组件的生命周期概述
- 生命周期:一个事物从创建到最后消亡经历的整个过程
- 组件的生命周期:组件从被创建到挂载到页面中运行,再到组件不用时卸载的过程
- 意义:理解组件的生命周期有助于理解组件的运行方式、完成更复杂的组件功能、分析组件错误原因等
- 钩子函数的作用:为开发人员在不同阶段操作组件提供了时机
- 注意:只有 类组件 才有生命周期。
2. 生命周期的三个阶段
import React from 'react'
import ReactDOM from 'react-dom'

/*
  组件生命周期
*/

class App extends React.Component {
  constructor (props) {
    super(props)

    // 初始化state
    this.state = {
      count: 0
    }
    // 处理this指向问题

    console.warn('生命周期钩子函数: constructor')
  }

  // 1 进行DOM操作
  // 2 发送ajax请求,获取远程数据
  componentDidMount () {
    // axios.get('http://api.....')

    // const title = document.getElementById('title')
    // console.log(title)
    console.warn('生命周期钩子函数: componentDidMount')
  }

  render () {
    // 错误演示!!! 不要在render中调用setState()
    // this.setState({
    //   count: 1
    // })
    console.warn('生命周期钩子函数: render')

    return (
      <div>
        <h1 id="title">统计豆豆被打的次数:</h1>
        <button id="btn">打豆豆</button>
      </div>
    )
  }
}

ReactDOM.render(<App />, document.getElementById('root'))
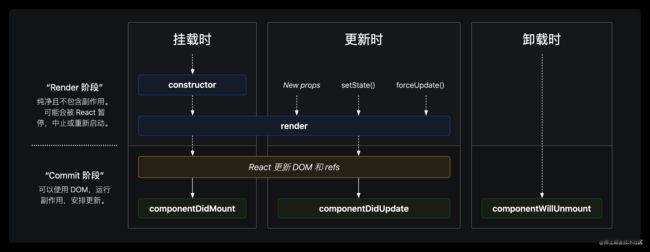
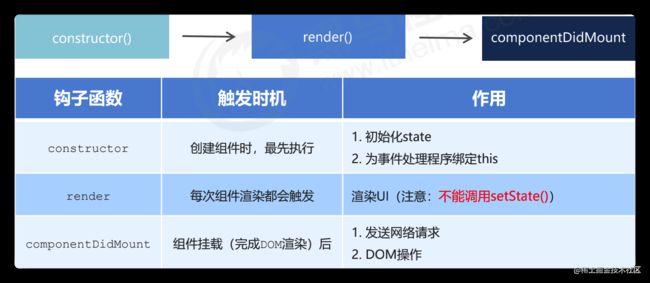
2.1 创建时(挂载阶段)
- 执行时机:组件创建时(页面加载时)
- 执行顺序:
| 钩子函数 | 触发时机 | 作用 |
|---|---|---|
| constructor | 创建组件时,最先执行 | 1. 初始化state 2. 创建 Ref 3. 使用 bind 解决 this 指向问题等 |
| render | 每次组件渲染都会触发 | 渲染UI(注意: 不能调用setState() ) |
| componentDidMount | 组件挂载(完成DOM渲染)后 | 1. 发送网络请求 2.DOM操作 |
import React from 'react'
import ReactDOM from 'react-dom'

/*
  组件生命周期
*/

class App extends React.Component {
  constructor(props) {
    super(props)

    // 初始化state
    this.state = {
      count: 0
    }
  }

  // 打豆豆
  handleClick = () => {
    // this.setState({
    //   count: this.state.count + 1
    // })

    // 演示强制更新:
    this.forceUpdate()
  }

  render() {
    console.warn('生命周期钩子函数: render')
    return (
      <div>
        <Counter count={this.state.count} />
        <button onClick={this.handleClick}>打豆豆</button>
      </div>
    )
  }
}

class Counter extends React.Component {
  render() {
    console.warn('--子组件--生命周期钩子函数: render')
    return <h1>统计豆豆被打的次数:{this.props.count}</h1>
  }
}

ReactDOM.render(<App />, document.getElementById('root'))
2.2 更新时(更新阶段)
- 执行时机:
- setState()
- forceUpdate()
- 组件接收到新的props
- 说明:以上三者任意一种变化,组件就会重新渲染
- 执行顺序:
import React from 'react'
import ReactDOM from 'react-dom'

/*
  组件生命周期
*/

class App extends React.Component {
  constructor(props) {
    super(props)

    // 初始化state
    this.state = {
      count: 0
    }
  }

  // 打豆豆
  handleClick = () => {
    this.setState({
      count: this.state.count + 1
    })
  }

  render() {
    return (
      <div>
        <Counter count={this.state.count} />
        <button onClick={this.handleClick}>打豆豆</button>
      </div>
    )
  }
}

class Counter extends React.Component {
  render() {
    console.warn('--子组件--生命周期钩子函数: render')
    return <h1 id="title">统计豆豆被打的次数:{this.props.count}</h1>
  }

  // 注意:如果要调用 setState() 更新状态,必须要放在一个 if 条件中
  // 因为:如果直接调用 setState() 更新状态,也会导致递归更新!!!
  componentDidUpdate(prevProps) {
    console.warn('--子组件--生命周期钩子函数: componentDidUpdate')

    // 正确做法:
    // 做法:比较更新前后的props是否相同,来决定是否重新渲染组件
    console.log('上一次的props:', prevProps, ', 当前的props:', this.props)
    if (prevProps.count !== this.props.count) {
      // this.setState({})
      // 发送ajax请求的代码
    }

    // 错误演示!!!
    // this.setState({})

    // 获取DOM
    // const title = document.getElementById('title')
    // console.log(title.innerHTML)
  }
}

ReactDOM.render(<App />, document.getElementById('root'))
2.3 卸载时(卸载阶段)
- 执行时机:组件从页面中消失
import React from 'react'
import ReactDOM from 'react-dom'

/*
  组件生命周期
*/

class App extends React.Component {
  constructor(props) {
    super(props)

    // 初始化state
    this.state = {
      count: 0
    }
  }

  // 打豆豆
  handleClick = () => {
    this.setState({
      count: this.state.count + 1
    })
  }

  render() {
    return (
      <div>
        {this.state.count > 3 ? (
          <p>豆豆被打死了~</p>
        ) : (
          <Counter count={this.state.count} />
        )}
        <button onClick={this.handleClick}>打豆豆</button>
      </div>
    )
  }
}

class Counter extends React.Component {
  componentDidMount() {
    // 开启定时器
    this.timerId = setInterval(() => {
      console.log('定时器正在执行~')
    }, 500)
  }

  render() {
    return <h1>统计豆豆被打的次数:{this.props.count}</h1>
  }

  componentWillUnmount() {
    console.warn('生命周期钩子函数: componentWillUnmount')

    // 清理定时器
    clearInterval(this.timerId)
  }
}

ReactDOM.render(<App />, document.getElementById('root'))
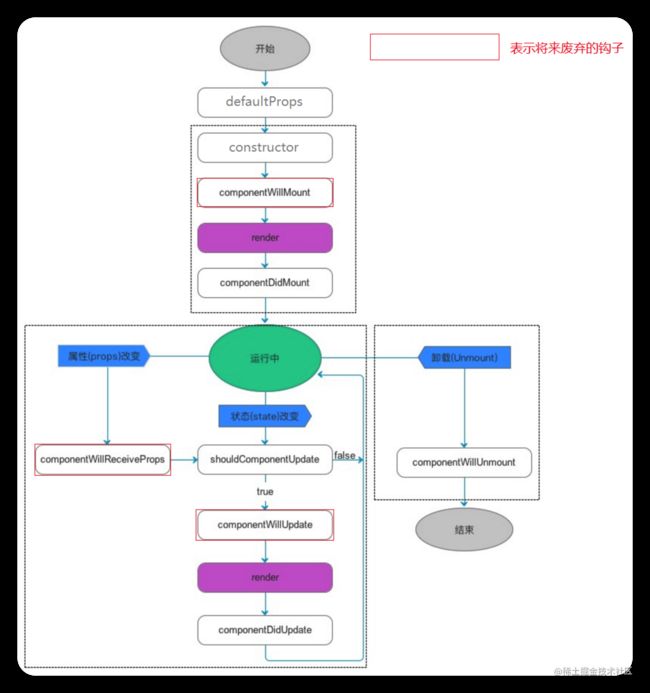
3. 不常用钩子函数介绍
- 旧版生命周期钩子函数(知道):
- 新版完整生命周期钩子函数(知道):
六. React Hooks
1. React Hooks 介绍
1.1 Hooks是什么?
目标:能够说出 React Hooks是什么?
-
Hooks:钩子、钓钩、钩住 -
Hooks是 React v16.8 中的新增功能 -
作用:
- 为函数组件提供状态、生命周期等原本 class 组件中提供的 React 功能
- 可以理解为通过 Hooks 为函数组件钩入 class 组件的特性
-
注意:Hooks 只能在函数组件中使用,自此,函数组件成为 React 的新宠儿
-
React v16.8 版本前后,组件开发模式的对比:
-
React v16.8 以前:
class 组件(提供状态) + 函数组件(展示内容) -
React v16.8 及其以后:
- class 组件(提供状态) + 函数组件(展示内容)
- Hooks(提供状态) + 函数组件(展示内容)
- 混用以上两种方式:部分功能用 class 组件,部分功能用 Hooks+函数组件
总结:
-
注意1:虽然有了 Hooks,但 React 官方并没有计划从 React 库中移除 class
-
注意2:有了 Hooks 以后,不能再把函数组件称为
无状态组件了,因为 Hooks 为函数组件提供了状态
1.2 为什么要有 Hooks
目标:能够说出为什么要有 Hooks 以及 Hooks 能解决什么问题
两个角度
- 组件的状态逻辑复用:
- 在 Hooks 之前,组件的状态逻辑复用经历了:
mixins(混入)、HOCs(高阶组件)、render-props 等模式 - (早已废弃)mixins 的问题:
1. 数据来源不清晰2. 命名冲突 - HOCs、render-props 的问题:
重构组件结构,导致组件形成 JSX 嵌套地狱问题
- 在 Hooks 之前,组件的状态逻辑复用经历了:
- class 组件自身的问题:
- 选择:函数组件和 class 组件之间的区别以及使用哪种组件更合适
- 需要理解 class 中的 this 是如何工作的
- 相互关联且需要对照修改的代码被拆分到不同生命周期函数中
- 相比于函数组件来说,不利于代码压缩和优化,也不利于 TS 的类型推导
总结:
- 正是由于 React 原来存在的这些问题,才有了 Hooks 来解决这些问题
1.3 hooks渐进策略
目标:能够理解在react中什么场景应该使用hooks
-
react没有计划从React中移除 class 文档
-
Hooks 和现有代码可以同时工作,你可以渐进式地使用他们
- 不推荐直接使用 Hooks 大规模重构现有组件
- 推荐:新功能用 Hooks,复杂功能实现不了的,也可以继续用 class
- 找一个功能简单、非核心功能的组件开始使用 hooks
-
之前的react语法并不是以后就不用了
- class 组件相关的 API 在hooks中可以不用
- class 自身语法,比如,constructor、static 等
- 钩子函数,
componentDidMount、componentDidUpdate、componentWillUnmount this相关的用法
-
原来学习的 React 内容还是要用的
- JSX:
{}、onClick={handleClick}、条件渲染、列表渲染、样式处理等 - 组件:函数组件、组件通讯
- React 开发理念:
单向数据流、状态提升等 - 解决问题的思路、技巧、常见错误的分析等
总结:
- JSX:
- react没有计划从React中移除class
- react将继续为 class 组件提供支持
- 可以在项目中同时使用hooks和class
2. useState hook
2.1 useState-基本使用
目标:能够使用
useState为函数组件提供状态
useState使用场景:当你想要在函数组件中,使用组件状态时,就要使用 useState Hook 了useState作用:为函数组件提供状态(state)useState语法:const [变量,设置变量的函数] = useState(初始值)
  // const [变量,设置变量的函数] = useState(初始值)
     const [stateArray, setStateArray] = useState([1, 2, 3, 4, 5]);
- 步骤:
- 导入
useStatehook - 调用
useState函数,并传入状态的初始值 - 从
useState函数的返回值中,拿到状态和修改状态的函数 - 在 JSX 中展示状态
- 在按钮的点击事件中调用修改状态的函数,来更新状态
- 导入
import React from 'react';
import './index.css';
// 1.  导入 `useState` hook
import { useState } from 'react';

function App() {
	// 参数:状态初始值
	// 返回值:stateArray 是一个数组
	// const [变量,设置变量的函数] = useState(初始值)
	// 1.简单类型
  // 2.  调用 `useState` 函数,并传入状态的初始值
	const [ count, setCount ] = useState(0);
	console.log(count);
	const [ isShow, setShow ] = useState(false);
	console.log(isShow);
	// 2.复杂类型
	const [ stateArray, setStateArray ] = useState([ 1, 2, 3, 4, 5 ]);

	console.log(stateArray, setStateArray);
	// 索引 0 表示:状态值(state)
	const state = stateArray[0];
	console.log(state);
	// 索引 1 表示:修改状态的函数(setState)
	const setState = stateArray[1];
	console.log(setState);
	const [ stateObj, setStateObj ] = useState({ name: '张三疯', age: 18 });
	console.log(stateObj, setStateObj);
	return (
		<div className="App">
			<h1>useState hook</h1>
			<h2>useState-基本使用</h2>
			<p>useState使用场景:当你想要在函数组件中,使用组件状态时,就要使用 useState Hook 了</p>
			<p>useState作用:为函数组件提供状态(state)</p>

{/* 展示状态值 */}

			<p>{count}</p>

 {/* 点击按钮,让状态值 +1 */}
			<button onClick={() => setCount(count + 1)}>+1</button>
			<p>{isShow ? '加载中' : '加载完成'}</p>
			<button
				onClick={() => {
					setShow(!isShow);
				}}
			>
				修改isShow
			</button>
			<p>
				姓名:{stateObj.name} ---- 年龄:{stateObj.age}
			</p>
		</div>
	);
}
export default App;
- 参数:状态初始值。比如,传入 0 表示该状态的初始值为 0
- 注意:此处的状态可以是任意值(比如,数值、字符串等),而 class 组件中的 state 必须是对象
2.2 useState-使用数组解构简化
**目标:**能够使用数组解构简化useState的使用
- 数组解构语法的说明,比如,要获取数组中的元素:
- 原始方式:索引访问
const arr = ['aaa', 'bbb']

const a = arr[0]  // 获取索引为 0 的元素
const b = arr[1]  // 获取索引为 1 的元素
- 简化方式:数组解构
- 相当于创建了两个变量(可以是任意的变量名称)分别获取到对应索引的数组元素
const arr = ['aaa', 'bbb']

const [a, b] = arr
// a => arr[0]
// b => arr[1]

// 解构出来的名称,可以是任意变量名
const [state, setState] = arr
- 使用数组解构简化
useState的使用
import { useState } from 'react'

const Count = () => {
  // 解构:
  const [count, setCount] = useState(0)

  return (
    <div>
      <h1>计数器:{state}</h1>
      <button onClick={() => setState(state + 1)}>+1</button>
    </div>
  )
}
- 约定:修改状态的函数名称以 set 开头,后面跟上状态的名称
- 根据不同的功能,可以在解构时起不同的名称:
// 解构出来的名称可以是任意名称,比如:

const [state, setState] = useState(0)
const [age, setAge] = useState(0)
const [count, setCount] = useState(0)
- 注意:多次调用 useState 多个状态和修改状态的函数之间不会相互影响
2.3 useState-状态的读取和修改
目标:能够在函数组件中获取和修改状态
- 读取状态:
useState提供的状态,是函数内部的局部变量,可以在函数内的任意位置使用
const Counter = () => {
  const [user, setUser] = useState({ name: 'jack', age: 18 })

  return (
    <div>
    	<p>姓名:{user.name}</p>
	<p>年龄:{user.age}</p>
    </div>
  )
}
- 修改状态:
setCount(newValue)是一个函数,参数表示:新的状态值- 调用该函数后,将使用新的状态值
替换旧值 - 修改状态后,因为状态发生了改变,所以,该组件会重新渲染
const Counter = () => {
  const [user, setUser] = useState({ name: 'jack', age: 18 })

  const onAgeAdd = () => {
    setUser({
      ...user,
      age: user.age + 1
    })
  }

  return (
  	<div>
    	<p>姓名:{user.name}</p>
			<p>年龄:{user.age}</p>
     	<button onClick={onAgeAdd}>年龄+1</button>
    </div>
  )
}
总结:
- 修改状态的时候,一定要使用新的状态替换旧的状态
2.4 useState-组件的更新过程
**目标:**能够说出使用功能
useState之后,组件的更新过程
- 函数组件使用 useState hook 后的执行过程,以及状态值的变化:
- 组件第一次渲染:
- 从头开始执行该组件中的代码逻辑
- 调用
useState(0)将传入的参数作为状态初始值,即:0 - 渲染组件,此时,获取到的状态 count 值为: 0
- 组件第二次渲染:
- 点击按钮,调用
setCount(count + 1)修改状态,因为状态发生改变,所以,该组件会重新渲染 - 组件重新渲染时,会再次执行该组件中的代码逻辑
- 再次调用
useState(0),此时 React 内部会拿到最新的状态值而非初始值,比如,该案例中最新的状态值为 1 - 再次渲染组件,此时,获取到的状态 count 值为:1
- 点击按钮,调用
- 注意:useState 的初始值(参数)只会在组件第一次渲染时生效。
- 也就是说,以后的每次渲染,useState 获取到都是最新的状态值。React 组件会记住每次最新的状态值!
import { useState } from 'react'

const Count = () => {
  const [count, setCount] = useState(0)

  return (
    <div>
      <h1>计数器:{count}</h1>
      <button onClick={() => setCount(count + 1)}>+1</button>
    </div>
  )
}
2.5 useState-使用规则
**目标:**能够为函数组件提供多个状态
-
如何为函数组件提供多个状态?
- 调用
useStateHook 多次即可,每调用一次 useState Hook 可以提供一个状态 useState Hook多次调用返回的 [state, setState],相互之间,互不影响
- 调用
-
useState 等 Hook 的使用规则:
- React Hooks 只能直接出现在 函数组件 中
- React Hooks不能嵌套在 if/for/其他函数 中
- 原理:React 是按照 Hooks 的调用顺序来识别每一个 Hook,如果每次调用的顺序不同,导致 React 无法知道是哪一个 Hook
-
可以通过开发者工具进行查看组件的 hooks:
3. useEffect hook
3.1 useEffect-副作用介绍
**目标:**能够说出什么是副作用
-
side effect使用场景:当你想要在函数组件中,处理副作用(side effect)时,就要使用 useEffect Hook 了
-
作用:处理函数组件中的副作用(side effect)
-
问题:副作用(side effect)是什么?
- 回答:在计算机科学中,如果一个函数或其他操作修改了其局部环境之外的状态变量值,那么它就被称为有副作用
-
类比,对于 999 感冒灵感冒药来说:
- (主)作用:用于感冒引起的头痛,发热,鼻塞,流涕,咽痛等
- 副作用:可见困倦、嗜睡、口渴、虚弱感
-
理解:副作用是相对于主作用来说的,一个功能(比如,函数)除了主作用,其他的作用就是副作用 对于 React 组件来说,主作用就是根据数据(state/props)渲染 UI,除此之外都是副作用(比如,手动修改 DOM)
-
常见的副作用(side effect):数据(Ajax)请求、手动修改 DOM、localStorage、console.log 操作等
总结: -
对于react组件来说,除了渲染UI之外的其他操作,都可以称之为副作用
const Count = () => {
const [count, setCount] = useState(0)
const handleClick = () => {
setCount(count + 1)
}
axios.post('http://xxx')
return (
计数器:{count}
)
}
3.2 useEffect-基本使用
**目标:**能够在函数组件中操作DOM(处理副作用)
-
使用场景:当你想要在函数组件中,处理副作用(side effect)时就要使用 useEffect Hook 了
-
useEffect作用:处理函数组件中的一些副作用(side effect)
-
注意:在实际开发中,副作用是不可避免的。因此,react 专门提供了 useEffect Hook 来处理函数组件中的副作用
-
语法:
- 参数:回调函数(称为 effect),就是在该函数中写副作用代码
- 执行时机:该 effect 会在组件第一次渲染以及每次组件更新后执行
- 相当于 componentDidMount + componentDidUpdate
import { useEffect } from 'react'

const Counter = () => {
  const [count, setCount] = useState(0)

  useEffect(() => {
    console.log('callback回调函数执行了', count + 1);
    document.title = `当前已点击 ${count} 次`
  })

  return (
  	<div>
    	<h1>计数器:{count}</h1>
      <button onClick={() => setCount(count + 1)}>+1</button>
    </div>
  )
}
3.3 useEffect-依赖
**目标:**能够设置 useEffect 的依赖只在 count 变化时执行相应的 effect
-
问题:如果组件中有另外一个状态,另一个状态更新时,刚刚的 effect 回调也会执行
-
默认情况:只要状态发生更新 useEffect 的 effect 回调就会执行
-
性能优化:跳过不必要的执行,只在 count 变化时,才执行相应的 effect
-
语法:
- 第二个参数:可选,也可以传一个数组,数组中的元素可以成为依赖项(deps)
- 该示例中表示:只有当 count 改变时,才会重新执行该 effect
 useEffect(() => {
    document.title = `当前已点击 ${count} 次`
  }, [count])
3.4 useEffect-不要对依赖项撒谎
**目标:**能够理解不正确使用依赖项的后果
- useEffect 回调函数(effect)中用到的数据(比如,count)就是依赖数据,就应该出现在依赖项数组中
- 如果 useEffect 回调函数中用到了某个数据,但是,没有出现在依赖项数组中,就会导致一些 Bug 出现!
- 所以,不要对 useEffect 的依赖撒谎
const App = () => {
  const [count, setCount] = useState(0)

  // 错误演示:
  useEffect(() => {
    document.title = '点击了' + count + '次'
  }, [])

  return (
    <div>
      <h1>计数器:{count}</h1>
      <button onClick={() => setCount(count + 1)}>+1</button>
    </div>
  )
}
useEffect完全指南:https://overreacted.io/zh-hans/a-complete-guide-to-useeffect/
3.5 useEffect-依赖是一个空数组
**目标:**能够设置useEffect的依赖,让组件只有在第一次渲染后会执行
-
useEffect 的第二个参数,还可以是一个空数组([]) ,表示只在组件第一次渲染后执行 effect
-
使用场景:
- 事件绑定
- 发送请求获取数据等
-
语法:
- 该 effect 只会在组件第一次渲染后执行,因此,可以执行像事件绑定等只需要执行一次的操作
- 此时,相当于 class 组件的 componentDidMount 钩子函数的作用
-
注意:
- 跟 useState Hook 一样,一个组件中也可以调用 useEffect Hook 多次
- 推荐:一个 useEffect 只处理一个功能,有多个功能时,使用多次 useEffect
3.6 useEffect-清理工作
**目标:**能够在组件卸载的时候清除注册的事件
-
effect 的返回值是可选的,可省略。也可以返回一个清理函数,用来执行事件解绑等清理操作
-
清理函数的执行时机:
- 清理函数会在组件卸载时以及下一次副作用回调函数调用的时候执行,用于清除上一次的副作用。
- 如果依赖项为空数组,那么会在组件卸载时会执行。相当于组件的
componetWillUnmount
useEffect(() => {
  const handleResize = () => {}
  window.addEventListener('resize', handleResize)

  // 这个返回的函数,会在该组件卸载时来执行
  // 因此,可以去执行一些清理操作,比如,解绑 window 的事件、清理定时器 等
  return () => window.removeEventListener('resize', handleResize)
}, [])
3.7 useEffect-4 种使用使用方式
**目标:**能够说出useEffect的 4 种使用使用方式
// 1
// 触发时机:1 第一次渲染会执行 2 每次组件重新渲染都会再次执行
// componentDidMount + ComponentDidUpdate
useEffect(() => {});

// 2(使用频率最高)
// 触发时机:只在组件第一次渲染时执行
// componentDidMount
useEffect(() => {}, []);

// 3(使用频率最高)
// 触发时机:1 第一次渲染会执行 2 当 count 变化时会再次执行
// componentDidMount + componentDidUpdate(判断 count 有没有改变)
useEffect(() => {}, [ count ]);

// 4
useEffect(() => {
	// 返回值函数的执行时机:组件卸载时
	// 在返回的函数中,清理工作
	return () => {
		// 相当于 componentWillUnmount
	};
}, []);

useEffect(
	() => {
		// 返回值函数的执行时机:1 组件卸载时 2 count 变化时
		// 在返回的函数中,清理工作
		return () => {};
	},
	[ count ]
);
3.8 useEffect应用-发送请求
**目的:**能够在函数组件中通过useEffect发送ajax请求
-
在组件中,可以使用 useEffect Hook 来发送请求(side effect)获取数据
-
注意:effect 只能是一个同步函数,不能使用 async
-
因为如果 effect 是 async 的,此时返回值是 Promise 对象。这样的话,就无法保证清理函数被立即调用
-
为了使用 async/await 语法,可以在 effect 内部创建 async 函数,并调用
-
// 错误演示:不要给 effect 添加 async
useEffect(async () => {
  const res = await axios.get('http://xxx')
  return () => {}
}, [])

// 正确使用
useEffect(() => {
  const loadData = async () => {
    const res = await axios.get('http://xxx')
  }
  loadData()

  return () => {}
}, [])
3.9 useState 和 class 状态对比
-
- class 组件中的修改状态的函数:
class Counter extends React.Component {
  state = {
    count: 0
  }

	handleClick = () => {
    // 1 第一个参数是对象
    this.setState({
      count: this.state.count + 1
    })

    // 2 第一个参数是回调函数
    this.setState(prevState => {
      return {
        count: prevState.count + 1
      }
    })

    // 3 可以有第二个参数
    this.setState({
      count: this.state.count + 1
    }, () => {})
  }
}
- hooks 中修改状态的函数:
const [count, setCount] = useState(0)

// 此处的  setCount 和 class 中的 this.setState 作用是相同的,都是用来更新状态

// 1 参数就是要更新的状态值
setCount(count + 1)

// 2 参数是回调函数。回调函数的参数,表示:上一次的状态值(count 上一次的值)
setCount(prevCount => prevCount + 1)
4. React Hooks进阶
4.1 自定义hooks
**目标:**能够使用自定义hooks实现状态的逻辑复用
- 除了使用内置的 Hooks 之外,还可以创建自己的 Hooks(自定义 Hooks)。
- 使用场景:将组件状态逻辑提取到可重用的函数(自定义 Hooks)中,实现状态逻辑复用。
内置 Hooks 为函数组件赋予了 class 组件的功能;在此之上,自定义 Hooks 针对不同组件实现不同状态逻辑复用。
- 注意:
- 自定义 Hooks 是一个函数,约定函数名称必须以 use 开头,React 就是通过函数名称是否以 use 开头来判断是不是 Hooks
- Hooks 只能在函数组件中或其他自定义 Hooks 中使用,否则,会报错!
- 自定义 Hooks 用来提取组件的状态逻辑,根据不同功能可以有不同的参数和返回值(就像使用普通函数一样)
4.2 useContext-使用
**目标:**能够通过useContext hooks实现跨级组件通讯
- 作用:在函数组件中,获取 Context 中的值。要配合 Context 一起使用。
- 语法:
- useContext 的参数:Context 对象,即:通过 createContext 函数创建的对象
- useContext 的返回值:Context.Provider 中提供的 value 数据
- 步骤:
- 导入
useContexthook - 创建
Context对象 - 在
App.jsx中,使用useContexthook,获取Context对象
- 导入
import { useContext } from 'react'
const { color } = useContext(ColorContext)
useContext Hook与- useContext:在 JS 代码中获取 Context 的数据
const ColorContext = createContext()

const Child = () => {
  // 在普通的 JS 代码中:
  const { color } = useContext(ColorContext)

  return (
    <div>
      useContext 获取到的 color 值:{ color }
      {/* 在 JSX 中: */}
    	<ColorContext.Consumer>
        {color => <span>共享的数据为:{color}</span>}
      </ColorContext.Consumer>
    </div>
  )
}
4.3 useRef-操作DOM
**目标:**能够使用useRef操作DOM
- 使用场景:在 React 中进行 DOM 操作时,用来获取 DOM
- 作用:返回一个带有 current 属性的可变对象,通过该对象就可以进行 DOM 操作了。
// inputRef => { current }
const inputRef = useRef(null)
- 解释:
- 参数:在获取 DOM 时,一般都设置为 null(获取 DOM 对象时,如果拿不到 DOM 对象,此时,获取到的值就是 null)
- 返回值:包含 current 属性的对象。
- 注意:只要在 React 中进行 DOM 操作,都可以通过 useRef Hook 来获取 DOM(比如,获取 DOM 的宽高等)
- 注意:useRef不仅仅可以用于操作DOM,还可以操作组件
import { useRef } from 'react'

const App = () => {
  // 1 使用useRef能够创建一个ref对象
  const inputRef = useRef(null)

  const add = () => {
    // 3 通过 inputRef.current 来访问对应的 DOM
    console.log(inputRef.current.value)
    inputRef.current.focus()
  }

  return (
    <section className="todoapp">
      {/* 2 将 ref 对象设置为 input 的 ref 属性值。目的:将 ref 对象关联到 input 对应的 DOM 对象上 */}
      <input type="text" placeholder="请输入内容" ref={inputRef} />
      <button onClick={add}>添加</button>
    </section>
  )
}

export default App
七. Redux基础
1. redux基本介绍
1.1 为什么要用 Redux
目标:能够说出为什么需要使用redu
redux 中文文档
redux 英文文档
- Redux 是 React 中最常用的状态管理工具(状态容器)
- React 只是 DOM 的一个抽象层(UI 库),并不是 Web 应用的完整解决方案。因此 React 在涉及到数据的处理以及组件之间的通信时会比较复杂
- 对于大型的复杂应用来说,这两方面恰恰是最关键的。因此,只用 React,写大型应用比较吃力
- 背景介绍:
- 2014 年 Facebook 提出了 Flux 架构的概念(前端状态管理的概念),引发了很多的实现
- 2015 年,Redux 出现,将 Flux 与函数式编程结合一起,很短时间内就成为了最热门的前端架构
- Flux 是最早的前端的状态管理工具,它提供了状态管理的思想,也提供对应的实现
- 除了 Flux、Redux 之外,还有:Mobx 等状态管理工具
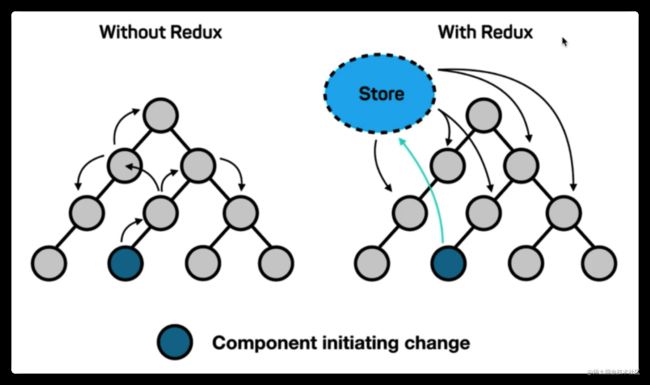
- 为什么要用 Redux?
-
主要的区别:组件之间的通讯问题
-
不使用 Redux (图左边) :
- 只能使用父子组件通讯、状态提升等 React 自带机制
- 处理远房亲戚(非父子)关系的组件通讯时乏力
- 组件之间的数据流混乱,出现 Bug 时难定位
-
使用 Redux (图右边):
- 集中式存储和管理应用的状态
- 处理组件通讯问题时,无视组件之间的层级关系
- 简化大型复杂应用中组件之间的通讯问题
- 数据流清晰,易于定位 Bug
1.2 Redux 开发环境准备
目标:能够在react项目中准备redux开发环境
- 使用 React CLI 来创建项目,并安装 Redux 包即可:
- 创建 React 项目:
npx create-react-app redux-basic - 启动项目:
yarn start - 安装 Redux 包:
yarn add redux
- 创建 React 项目:
2. redux核心概念
2.1 Redux 概述
目标:能够理解redux三个核心概念的职责
-
Redux 代码被分为三个核心概念:
action/reducer/store- action(动作):描述要做的事情
- reducer(函数):更新状态
- store(仓库):整合 action 和 reducer
-
类比生活中的例子来理解三个核心概念:
- action:相当于公司中要做的事情,比如软件开发、测试,打扫卫生等
- reducer:相当于公司的员工,负责干活的
- store:相当于公司的老板
2.2 Redux-action
目标:能够定义一个最基本的action
- action:描述要做的事情,项目中的每一个功能都是一个 action
- 语法:
{type:'命令', payload:'载荷'}- 只描述做什么
- JS 对象,必须带有
type属性,用于区分动作的类型 - 根据功能的不同,可以携带额外的数据(比如,
payload有效载荷,也就是附带的额外的数据),配合该数据来完成相应功能
  const Add = 'add'
  const Sub = 'sub'

  function add () {
    return {
      type: Add
    }
  }
  function sub () {
    return {
      type: Sub
    }
  }
2.3 Redux-action creator
目标:能够使用函数去创建一个action
语法: (payload)=>({type:'命令', payload:'载荷'})
- Action Creator 指的是:使用函数创建 action 对象
- 目的:简化多次使用 action 时,重复创建 action 对象
// 加/减
// 命令:动作
const ADD = 'ADD', SUB = 'SUB'

// 修改state状态会使用
export function addAction (payload) {
  return {
    type: ADD,
    payload
  }
}

export function subAction (payload) {
  return {
    type: SUB,
    payload
  }
}
2.4 Redux-reducer
目标:能够掌握reducer的基本写法
- reducer:函数,用来处理 action 并更新状态,是 Redux 状态更新的地方
- 语法:函数签名为:
(prevState, action) => newState - 接收上一次的状态和 action 作为参数,根据 action 的类型,执行不同操作,最终返回新的状态
- 特点:
- 注意:该函数一定要有返回值,即使状态没有改变也要返回上一次的状态
- 约定:reducer 是一个纯函数,并且不能包含 side effect 副作用(比如,不能修改函数参数、不能修改函数外部数据、不能进行异步操作等)
- 对于 reducer 来说,为了保证 reducer 是一个纯函数,不要:
- 不要直接修改参数 state 的值(也就是:不要直接修改当前状态,而是根据当前状态值创建新的状态值)
- 不要使用 Math.random() / new Date() / Date.now() / ajax 请求等不纯的操作
- 不要让 reducer 执行副作用(side effect)
- reducer创建store使用
- 创建store的时候,需要传入一个reducer函数
- reducer函数接收两个参数,state和action
- state是store的当前状态,action是一个action对象
- reducer函数返回一个新的state
- reducer函数返回值
- 如果reducer函数没有返回值,则返回state
- 如果reducer函数返回的是一个对象,则返回这个对象
- 如果reducer函数返回的是一个数字,则返回这个数字
- 如果reducer函数返回的是一个字符串,则返回这个字符串
- 如果reducer函数返回的是一个布尔值,则返回这个布尔值
- 如果reducer函数返回的是一个函数,则返回这个函数
- 如果reducer函数返回的是一个数组,则返回这个数组
- 如果reducer函数返回的是一个对象,则返回这个对象
- 如果reducer函数返回的是一个null,则返回这个null
- 如果reducer函数返回的是一个undefined,则返回这个undefined
- 如果reducer函数返回的是一个NaN,则返回这个NaN
- 如果reducer函数返回的是一个Infinity,则返回这个Infinity
- 如果reducer函数返回的是一个-Infinity,则返回这个-Infinity
- 如果reducer函数返回的是一个正无穷大,则返回这个正无穷大
- 如果reducer函数返回的是一个负无穷大,则返回这个负无穷大
// 初始值
const initialState = {
  num: 0
}
export function numReducer (state = initialState, action) {
  let newState = { ...state }
  switch (action.type) {
    case ADD:
      newState.num++
      return newState
    case SUB:
      newState.num--
      return newState
    default:
      return state
  }
}
2.5 Redux-store
目标:通过store关联action和reducer
-
store:仓库,Redux 的核心,整合 action 和 reducer
-
特点:
- 一个应用只有一个 store
- 维护应用的状态,获取状态:
store.getState() - 发起状态更新时,需要分发 action:
store.dispatch(action) - 创建 store 时接收 reducer 作为参数:
const store = createStore(reducer)
-
其他 API:
- 订阅(监听)状态变化:
const unSubscribe = store.subscribe(() => {}) - 取消订阅状态变化:
unSubscribe()
- 订阅(监听)状态变化:
2.6 纯函数的介绍
目标:了解纯函数的特点
-
函数式编程,是一种编程范式。主要思想是:把运算过程尽量写成一系列嵌套的函数调用
-
纯函数是函数式编程中的概念,对于纯函数来说,相同的输入总是得到相同的输出
-
参考资料:函数式编程初探
-
纯函数的演示:
- 对于纯函数来说,不要执行不纯的操作,比如:不能使用 Date.now()、Math.random()、异步请求等操作,因为每次会得到不一样的结果
// == 纯函数 ==
const add = () => {
  return 123
}
add() // 123
add() // 123

const add = (num1, num2) => {
  return num1 + num2
}
add(1, 2) // 3
add(1, 2) // 3

// == 不是纯函数 ==
const add = () => {
  return Math.random()
}

add() // 0.12311293827497123
add() // 0.82239841238741814
- 副作用的演示:
- 如果一个函数或其他操作修改了其局部环境之外的状态变量值,那么它就被称为有副作用
// 无副作用
const add = (num1, num2) => {
  return num1 + num2
}
add(1, 3)

// 有副作用:
let c = 0
const add = (num1, num2) => {
  // 函数外部的环境产生了影响,所以是有副作用的
  c = 1
  return num1 + num2
}
add(1, 3)

// 有副作用
const add = (num1, num2) => {
  // 因为该操作,会让浏览器控制额外的打印一些内容
  console.log('add')
  return num1 + num2
}
add(1, 3)
3. redux的执行过程
目标:能够说出 redux 代码的执行流程
- 创建 store 时,Redux 就会先调用一次 reducer,来获取到默认状态
- 分发动作
store.dispatch(action)更新状态 - Redux store 调用 reducer 传入:上一次的状态(当前示例中就是:
10)和 action({ type: 'ADD' }),计算出新的状态并返回 - reducer 执行完毕后,将最新的状态交给 store,store 用最新的状态替换旧状态,状态更新完毕
import { createStore } from 'redux'

// 初始值
const initialState = {
  num: 10
}

// 2. 干活:reducer创建store使用
export function numReducer (state = initialState, action) {
  let newState = { ...state }
  // console.log('默认执行一次:', newState)
  switch (action.type) {
    case ADD:
      newState.num++
      return newState
    case SUB:
      newState.num -= action.params
      return newState
    default:
      return state
  }
}

// 3. 创建 store
// 参数为:reducer 函数
const store = createStore(numReducer)

console.log('状态值为:', store.getState()) // 10

// 发起更新状态:
// 参数: action 对象
store.dispatch({ type: 'ADD' })
// 相当于: reducer(10, { type: 'increment' })

console.log('更新后:', store.getState()) // 11
4. react-redux的使用
4.1 React-Redux介绍
目标:能够说出为什么需要使用react-redux
- 问题:为什么要使用 React-Redux 绑定库?
- 回答:React 和 Redux 是两个独立的库,两者之间职责独立。因此,为了实现在 React 中使用 Redux 进行状态管理 ,就需要一种机制,将这两个独立的库关联在一起。这时候就用到 React-Redux 这个绑定库了。
- 作用:为 React 接入 Redux,实现在 React 中使用 Redux 进行状态管理。
- react-redux 库是 Redux 官方提供的 React 绑定库。
4.2 React-Redux-基本使用
目标:使用react-redux库在react中使用redux管理状态
react-redux 文档
- react-redux 的使用分为两大步:
- 全局配置(只需要配置一次)
- 组件接入(获取状态或修改状态)
- 全局配置(只需要配置一次)
- 安装 react-redux:
yarn add react-redux - 从 react-redux 中导入 Provider 组件
- 导入创建好的 redux 仓库
- 使用 Provider 包裹整个应用
- 将导入的 store 设置为 Provider 的 store 属性值
- 安装 react-redux:
// 导入 Provider 组件
import { Provider } from 'react-redux'
// 导入创建好的 store
import store from './store'

ReactDOM.render(
  <Provider store={store}>
    <App />
  </Provider>,
  document.querySelector('#root')
)
4.3 React-Redux-获取状态useSelector
目标:能够使用 useSelector hook 获取redux中共享的状态
useSelector:获取 Redux 提供的状态数据- 参数:selector 函数,用于从 Redux 状态中筛选出需要的状态数据并返回
- 返回值:筛选出的状态
import { useSelector } from 'react-redux'

// 计数器案例中,Redux 中的状态是数值,所以,可以直接返回 state 本身
const count = useSelector(state => state)

// 比如,Redux 中的状态是个对象,就可以:
const list = useSelector(state => state.list)
- App.js 中:
import { useSelector } from 'react-redux'

const App = () => {
  const count = useSelector(state => state)

  return (
  	<div>
    	<h1>计数器:{count}</h1>
      <button>数值增加</button>
			<button>数值减少</button>
    </div>
  )
}
4.4 React-Redux-分发动作useDispatch
- 目标:能够使用 useDispatch hook 修改redux中共享的状态
useDispatch:拿到 dispatch 函数,分发 action,修改 redux 中的状态数据- 语法:
import { useDispatch } from 'react-redux'

// 调用 useDispatch hook,拿到 dispatch 函数
const dispatch = useDispatch()

// 调用 dispatch 传入 action,来分发动作
dispatch( action )
- App.js 中:
import { useDispatch } from 'react-redux'

const App = () => {
  const dispatch = useDispatch()

  return (
  	<div>
    	<h1>计数器:{count}</h1>
      {/* 调用 dispatch 分发 action */}
      <button onClick={() => dispatch(increment(2))}>数值增加</button>
			<button onClick={() => dispatch(decrement(5))}>数值减少</button>
    </div>
  )
}
4.5 理解 Redux 数据流
目标:能够说出redux数据流动过程
- 任何一个组件都可以直接接入 Redux,也就是可以直接:
- 修改 Redux 状态
- 接收 Redux 状态
- 并且,只要 Redux 中的状态改变了,所有接收该状态的组件都会收到通知,也就是可以获取到最新的 Redux 状态
- 这样的话,两个组件不管隔得多远,都可以直接通讯了
4.6 Redux应用-代码结构
目标:能够组织redux的代码结构
-
在使用 Redux 进行项目开发时,不会将 action/reducer/store 都放在同一个文件中,而是会进行拆分
-
可以按照以下结构,来组织 Redux 的代码:
/store        --- 在 src 目录中创建,用于存放 Redux 相关的代码
  /actions    --- 存放所有的 action
  /reducers   --- 存放所有的 reducer
  index.js    --- redux 的入口文件,用来创建 store
4.7 Redux应用-ActionType的使用
目标:能够知道为什么要抽离 action type
-
Action Type 指的是:action 对象中 type 属性的值
-
Redux 项目中会多次使用 action type,比如,action 对象、reducer 函数、dispatch(action) 等
-
目标:集中处理 action type,保持项目中 action type 的一致性
-
action type 的值采用:
'domain/action'(功能/动作)形式,进行分类处理,比如- 计数器:
'counter/increment'表示 Counter 功能中的 increment 动作 - 登录:
'login/getCode'表示登录获取验证码的动作 - 个人资料:
'profile/get'表示获取个人资料
- 计数器:
-
步骤:
- 在 store 目录中创建
actionTypes目录或者constants目录,集中处理 - 创建常量来存储 action type,并导出
- 将项目中用到 action type 的地方替换为这些常量,从而保持项目中 action type 的一致性和可维护性
- 在 store 目录中创建
// actionTypes 或 constants 目录:

const add = 'counter/increment'
const sub = 'counter/decrement'

export { add, sub }

// --

// 使用:
// actions/index.js
import * as types from '../acitonTypes'

// reducers/index.js
import * as types from '../acitonTypes'
const reducer = (state, action) => {
  switch (action.type) {
    case types.add:
      return state + 1
    case types.sub:
      return state - action.payload
    default:
      return state
  }
}
- 注:额外添加 Action Type 会让项目结构变复杂,此操作可省略。但,
domain/action命名方式强烈推荐!
4.8 Redux应用-Reducer的分离与合并
目标:能够合并redux的多个reducer为一个根reducer
-
随着项目功能变得越来越复杂,需要 Redux 管理的状态也会越来越多
-
此时,有两种方式来处理状态的更新:
- 使用一个 reducer:处理项目中所有状态的更新
- 使用多个 reducer:按照项目功能划分,每个功能使用一个 reducer 来处理该功能的状态更新
-
推荐:使用多个 reducer(第二种方案) ,每个 reducer 处理的状态更单一,职责更明确
-
此时,项目中会有多个 reducer,但是 store 只能接收一个 reducer,因此,需要将多个 reducer 合并为一根 reducer,才能传递给 store
-
合并方式:使用 Redux 中的
combineReducers函数 -
注意:合并后,Redux 的状态会变为一个对象,对象的结构与 combineReducers 函数的参数结构相同
- 比如,此时 Redux 状态为:
{ a: aReducer 处理的状态, b: bReducer 处理的状态 }
- 比如,此时 Redux 状态为:
import { combineReducers } from 'redux'

// 计数器案例,状态默认值为:0
const aReducer = (state = 0, action) => {}
// Todos 案例,状态默认值为:[]
const bReducer = (state = [], action) => {}

// 合并多个 reducer 为一个 根reducer
const rootReducer = combineReducers({
  a: aReducer,
  b: bReducer
})

// 创建 store 时,传入 根reducer
const store = createStore(rootReducer)

// 此时,合并后的 redux 状态: { a: 0, b: [] }
-
注意:虽然在使用
combineReducers以后,整个 Redux 应用的状态变为了对象,但是,对于每个 reducer 来说,每个 reducer 只负责整个状态中的某一个值-
也就是:每个reducer只负责自己要处理的状态
-
举例:
- 登录功能:
loginReducer处理的状态只应该是跟登录相关的状态 - 个人资料:
profileReducer处理的状态只应该是跟个人资料相关的状态
- 登录功能:
-
-
合并 reducer 后,redux 处理方式:只要合并了 reducer,不管分发什么 action,所有的 reducer 都会执行一次。各个 reducer 在执行的时候,能处理这个 action 就处理,处理不了就直接返回上一次的状态。所以,我们分发的某一个 action 就只能被某一个 reducer 来处理,也就是最终只会修改这个 reducer 要处理的状态,最终的表现就是:分发了 action,只修改了 redux 中这个 action 对应的状态!
4.9 Redux应用-redux管理哪些状态
目标:能够知道什么状态可以放在redux中管理
不同状态的处理方式:
-
将所有的状态全部放到 redux 中,由 redux 管理
-
只将某些状态数据放在 redux 中,其他数据可以放在组件中,比如:
- 如果一个状态,只在某个组件中使用(比如,表单项的值),推荐:放在组件中
- 需要放到 redux 中的状态:
- 在多个组件中都要使用的数据【涉及组件通讯】
- 通过 ajax 请求获取到的接口数据【涉及到请求相关逻辑代码放在哪的问题】
5. Redux 中间件
5.1 中间件概述
目标: 能够理解为什么需要redux中间件
- 默认情况下,Redux 自身只能处理同步数据流。但是在实际项目开发中,状态的更新、获取,通常是使用异步操作来实现。
- 问题:如何在 Redux 中进行异步操作呢?
- 回答:通过 Redux 中间件机制来实现
- Redux 中间件作用:处理具有副作用(side effect)的功能,比如,异步操作就是最常见的 side effect
- 中间件说明:
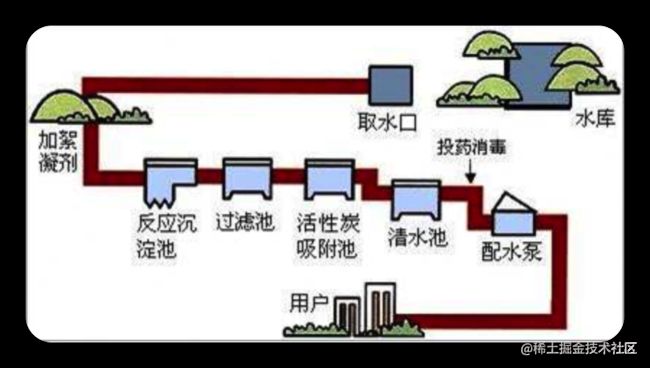
- 中间件,可以理解为处理一个功能的中间环节
- 下图中,自来水从水库到用户家庭中的每一个环节都是一个中间件
- 中间件的优势:可以串联、组合,在一个项目中使用多个中间件
- Redux 中间件用来处理 状态 更新,也就是在 状态 更新的过程中,执行一系列的相应操作
5.2 中间件的触发时机
目标:能够理解中间件的触发时机
-
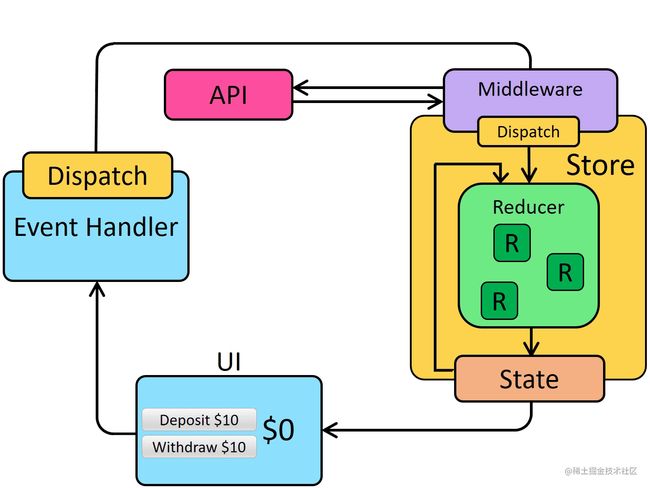
Redux 中间件执行时机:在 dispatching action 和到达 reducer 之间。
-
使用中间件:
dispatch(action) => 执行中间件代码 => reducer
- 原理:封装了 redux 自己的 dispatch 方法
- 没有中间件:
store.dispatch()就是 Redux 库自己提供的 dispatch 方法,用来发起状态更新 - 使用中间件:
store.dispatch()就是中间件封装处理后的 dispatch,但是,最终一定会调用 Redux 自己的 dispatch 方法发起状态更新
- 没有中间件:
5.3 redux-logger中间件
目标:能够使用redux-logger中间件记录日志
- 使用步骤:
- 安装:
yarn add redux-logger - 导入 redux-logger 中间件
- 从 redux 中导入
applyMiddleware函数 - 调用 applyMiddleware() 并传入 logger 中间件作为参数
- 将 applyMiddleware() 调用作为 createStore 函数的第二个参数
- 然后,调用 store.dispatch() 查看 console 中 logger 中间件记录的日志信息
- 安装:
- store/index.js 中:
 import { createStore, applyMiddleware } from 'redux'
 import logger from 'redux-logger'
import rootReducer from './reducers'

 const store = createStore(
 rootReducer,
 applyMiddleware(logger)
 )
5.4 redux-thunk中间件
目标:能够使用redux-thunk中间件处理异步操作
redux-thunk中间件可以处理函数形式的 action。因此,在函数形式的 action 中就可以执行异步操作- 语法:
- thunk action 是一个函数
- 函数包含两个参数:1 dispatch 2 getState
// 函数形式的 action
const thunkAction = () => {
  return (dispatch, getState) => {}
}

// 解释:
const thunkAction = () => {
  // 注意:此处返回的是一个函数,返回的函数有两个参数:
	// 第一个参数:dispatch 函数,用来分发 action
  // 第二个参数:getState 函数,用来获取 redux 状态
  return (dispatch, getState) => {
    setTimeout(() => {
      // 执行异步操作
      // 在异步操作成功后,可以继续分发对象形式的 action 来更新状态
    }, 1000)
  }
}
- 使用
redux-thunk中间件前后对比:- 不使用 redux-thunk 中间件,action 只能是一个对象
// 1 普通 action 对象
{ type: 'counter/increment' }
dispatch({ type: 'counter/increment' })

// 2 action creator
const increment = payload => ({ type: 'counter/increment', payload })
dispatch(increment(2))
- 使用 redux-thunk 中间件后,action 既可以是对象,又可以是函数
// 1 对象:
// 使用 action creator 返回对象
const increment = payload => ({ type: 'counter/increment', payload })
// 分发同步 action
dispatch(increment(2))

// 2 函数:
// 使用 action creator 返回函数
const incrementAsync = () => {
  return (dispatch, getState) => {
    // ... 执行异步操作代码
  }
}
// 分发异步 action
dispatch(incrementAsync())
-
使用步骤
- 安装:
yarn add redux-thunk - 导入 redux-thunk
- 将 thunk 添加到 applyMiddleware 函数的参数(中间件列表)中
- 创建函数形式的 action,在函数中执行异步操作
- 安装:
-
store/index.js 中:
// 导入 thunk 中间件
import thunk from 'redux-thunk'
// 将 thunk 添加到中间件列表中
// 知道:如果中间件中使用 logger 中间件,logger 中间件应该出现在 applyMiddleware 的最后一个参数
const store = createStore(rootReducer, applyMiddleware(thunk, logger))
- actions/index.js 中:
export const clearDoneAsync = () => {
  return (dispatch) => {
    // 处理异步的代码:1 秒后再清理已完成任务
    setTimeout(() => {
      dispatch(clearDone())
    }, 1000)
  }
}
- App.js 中:
import { clearDoneAsync } from '../store/actions/todos'

const TodoFooter = () => {
	return (
    // ...
  	<button
      className="clear-completed"
      onClick={() => dispatch(clearDoneAsync())}
    >
      Clear completed
    </button>
  )
}
5.5 redux-devtools-extension中间件
目标:能够使用chrome开发者工具调试跟踪redux状态
- redux-devtools-exension 文档
- 先给 Chrome 浏览器安装 redux 开发者工具,然后,就可以查看 Redux 状态了
- 使用步骤:
- 安装:
yarn add redux-devtools-extension - 从该中间件中导入 composeWithDevTools 函数
- 调用该函数,将 applyMiddleware() 作为参数传入
- 打开 Chrome 浏览器的 redux 开发者工具并使用
- 安装:
import thunk from 'redux-thunk'
+ import { composeWithDevTools } from 'redux-devtools-extension'

- const store = createStore(rootReducer, applyMiddleware(logger, thunk))

+ const store = createStore(reducer, composeWithDevTools(applyMiddleware(logger, thunk)))

export default store
5.6 了解:redux 中间件原理
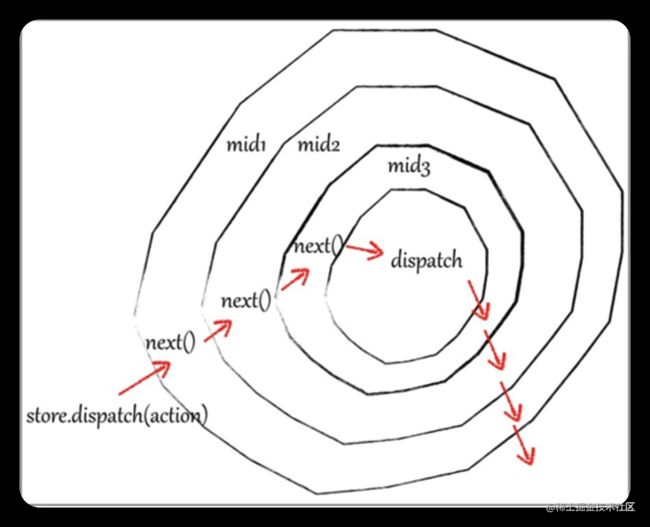
- Redux 中间件原理:创建一个函数,包装 store.dispatch,使用新创建的函数作为新的 dispatch
- 比如下图,logger 就是一个中间件,使用该中间件后 store.dispatch 就是包装后的新 dispatch
- 中间件修改了 store.dispatch,在分发动作和到达 reducer 之间提供了扩展
- redux 中间件采用了 洋葱模型 来实现
- 自己实现记录日志的 redux 中间件:
// 简化写法:
// store 表示:redux 的 store
// next 表示:下一个中间件,如果只使用一个中间,那么 next 就是 store.dispatch(redux 自己的 dispatch 函数)
// action 表示:要分发的动作
const logger = store => next => action => {
  console.log('prev state:', store.getState()) // 更新前的状态
  // 记录日志代码
  console.log('dispatching', action)
  // next 表示原始的 dispatch
  // 也就是:logger中间件包装了 store.dispatch
  let result = next(action)
  // 上面 next 代码执行后,redux 状态就已经更新了,所以,再 getState() 拿到的就是更新后的最新状态值
  // 记录日志代码
  console.log('next state', store.getState()) // 更新后的状态
  return result
}

// 完整写法:
const logger = store => {
  return next => {
    return action => {
      // 中间件代码写在这个位置:
    }
  }
}
5.7 理解Redux异步数据流
- 中间件处理异步请求(副作用),获取response结果,最终调用dispatch分发
八. React 路由
1. React路由介绍
- 现代的前端应用大多都是 SPA(单页应用程序),也就是只有一个 HTML 页面的应用程序。
- 因为它的用户体验更好、对服务器的压力更小,所以更受欢迎。
- 为了有效的使用单个页面来管理原来多页面的功能,前端路由应运而生。
- 前端路由的功能:让用户从一个视图(页面)导航到另一个视图(页面)
- 前端路由是一套映射规则,在React中,是 URL路径 与 组件 的对应关系
- 使用 React 路由简单来说就是:配置路径和组件(配对)
2. 路由的基本使用
目标:能够使用 react 路由切换页面
2.1 基本使用步骤
- 安装:
yarn add [email protected] - 导入路由的三个核心组件:Router / Route / Link
// 2.  导入路由的三个核心组件:Router / Route / Link
import { BrowserRouter as Router, Route, Link } from 'react-router-dom';
- 使用 Router 组件包裹整个应用
// 3 使用Router组件包裹整个应用
const App = () => (
  <Router>
    <div>
      <h1>React路由基础</h1>
      {/* 4 指定路由入口 */}
      <Link to="/first">页面一</Link>
      {/* 5 指定路由出口 */}
      <Route path="/first" component={First} />
    </div>
  </Router>
)
- 使用 Link 组件作为导航菜单(路由入口)
  {/* 4 指定路由入口 */}
  <Link to="/first">页面一</Link>
- 使用 Route 组件配置路由规则和要展示的组件(路由出口)
  {/* 5 指定路由出口 */}
  <Route path="/first" component={First} />
2.2 常用组件说明
目标:能够知道 react 路由有两种模式
-
Router 组件:包裹整个应用,一个 React 应用只需要使用一次
-
两种常用 Router:
HashRouter
- HashRouter:使用 URL 的哈希值实现http://localhost:3000/#/first)
- 原理:监听 window 的
hashchange事件来实现的
BrowserRouter
- BrowserRouter:使用 H5 的 history.pushState() API 实现(http://localhost:3000/first)
- 原理:监听 window 的
popstate事件来实现的
import { BrowserRouter, HashRouter} from 'react-router-dom'

const App = () => {
  return (
    // hash模式(history模式使用BrowserRouter包裹)
    <HashRouter>
			// 配置路由规则...
    </HashRouter>
 	)
}
- Link 组件:用于指定导航链接(a 标签)
// to属性:浏览器地址栏中的pathname(location.pathname)
 <Link to="/first">页面一</Link>
- Route 组件:指定路由展示组件相关信息
path属性,指定路由规则component属性,指定要渲染的组件children子节点,指定要渲染的组件
// path属性:路由规则
// component属性:展示的组件
// Route组件写在哪,渲染出来的组件就展示在哪

// 用法一:使用 component 属性指定要渲染的组件
<Route path="/search" component={Search} />

// 用法二:使用 children 指定要渲染的组件
<Route path="/search">
	<Search />
</Route>
-
注意:对于 Route 来说,如果路由规则匹配成功,那么,就会渲染对应组件;否则,渲染 null 或者说不渲染任何内容
-
对于 Route 组件来说,
path属性是可选的:如果 Route 组件没有 path 属性,表示:该路由永远匹配成功,一定会渲染该组件
3. 路由的执行过程
目标:能够说出 react 路由切换页面的执行过程
- 切换页面时,执行过程如下:
- 点击 Link 组件(a标签),修改了浏览器地址栏中的 url
- React 路由监听到地址栏 url 的变化 hashchange popstate
- React 路由内部遍历所有 Route 组件,使用路由规则(path)与 pathname(hash)进行匹配
- 当路由规则(path)能够匹配地址栏中的 pathname(hash) 时,就展示该 Route 组件的内容
4. 编程式导航
目标:能够按钮的点击事件中跳转路由
场景:点击登录按钮,登录成功后,通过代码跳转到后台首页,如何实现?
- 编程式导航:通过 JS 代码来实现页面跳转
- 可以通过
useHistoryhook 来拿到路由提供的 history 对象,用于获取浏览器历史记录的相关信息。 - 用history.push,和history.go或者replace其他方式去改变当前的location有什么特别的区别?
- history.push 这个方法会向history栈里面添加一条新记录,这个时候用户点击浏览器的回退按钮可以回到之前的路径。
history.push(path:string | {pathname:string, state:object})
- history.go 这个方法的参数是一个整数,意思是在 history 记录中向前或者后退多少步,类似 window.history.go(n)
- history.replace 跟 history.push 很像,唯一的不同就是,它不会向 history 添加新记录,而是跟它的方法名一样 —— 替换掉当前的 history 记录。
history.replace(path:string | {pathname:string, state:object})
import { useHistory } from 'react-router-dom'

const Login = () => {
  const history = useHistory()

	const onLogin = () => {
    // ...
    history.push('/home')
  }
  return (
  	<button onClick={onLogin}>登录</button>
  )
}
5. 默认路由
- 问题:现在的路由都是点击导航菜单后展示的,如何在进入页面的时候就展示呢?
- 默认路由:表示进入页面时就会匹配的路由
- 默认路由path为:/
<Route path="/" component={Home} />
6. 匹配模式
目标:能够说出路由的两种匹配模式
6.1 模糊匹配(默认)
- 问题:当 Link组件的 to 属性值为 “/login”时,为什么 默认路由 也被匹配成功?
- 默认情况下,React 路由是模糊匹配模式
- 模糊匹配规则:只要 pathname(浏览器地址栏中的地址) 以 path 开头就会匹配成功
<Link to="/login">登录页面</Link> // 匹配成功
<Route path="/" component={Home} /> // 匹配成功
6.2 精确匹配
问题:默认路由任何情况下都会展示,如何避免这种问题?
- 给 Route 组件添加
exact属性,让其变为精确匹配模式 - 精确匹配:只有当 path 和 pathname 完全匹配时才会展示该路由
// 此时,该组件只能匹配 pathname=“/” 这一种情况
<Route exact path="/" component=... />
- 推荐:给默认路由(‘/’)添加 exact 属性
