树莓派Pico使用MicroPython实现0.96OLED显示
1、首先要下载pico支持的microPython的包MicroPython固件
2、下载Pycharm安装配置好记得也需要Python的环境(教程太多自行百度食用)
3、下载插件
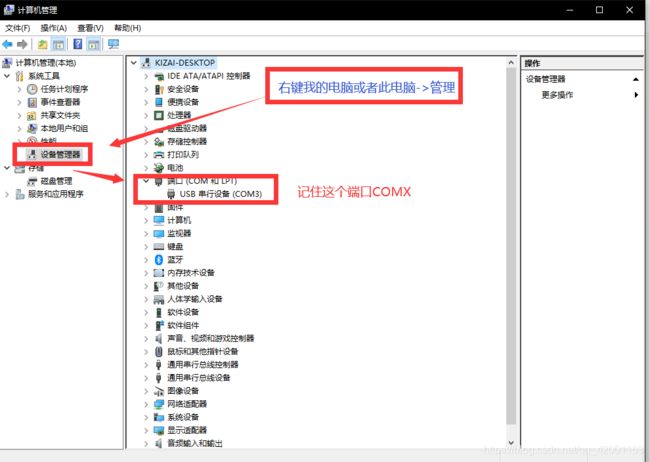
4、配置端口设置
5、新建工程>导包>新建pythonfile>代码
# _*_ coding utf-8 _*_
# 作者:KiZai
# 开发时间: 2021/3/10 17:59
# 文件名: main .py
# 开发工具: PyCharm

# MicroPython SSD1306 i2c OLED driver and example application

from micropython import const
import framebuf
from machine import I2C, Pin
import utime

# register definitions
SET_CONTRAST = const(0x81)
SET_ENTIRE_ON = const(0xA4)
SET_NORM_INV = const(0xA6)
SET_DISP = const(0xAE)
SET_MEM_ADDR = const(0x20)
SET_COL_ADDR = const(0x21)
SET_PAGE_ADDR = const(0x22)
SET_DISP_START_LINE = const(0x40)
SET_SEG_REMAP = const(0xA0)
SET_MUX_RATIO = const(0xA8)
SET_COM_OUT_DIR = const(0xC0)
SET_DISP_OFFSET = const(0xD3)
SET_COM_PIN_CFG = const(0xDA)
SET_DISP_CLK_DIV = const(0xD5)
SET_PRECHARGE = const(0xD9)
SET_VCOM_DESEL = const(0xDB)
SET_CHARGE_PUMP = const(0x8D)


# Subclassing FrameBuffer provides support for graphics primitives 子类化FrameBuffer支持图形原语
# http://docs.micropython.org/en/latest/pyboard/library/framebuf.html
# buffer is set to width (128) x pages = 64/8 = 8 => buffer = 1024
class SSD1306(framebuf.FrameBuffer):
    def __init__(self, width, height, external_vcc):
        self.width = width
        self.height = height
        self.external_vcc = external_vcc
        self.pages = self.height // 8  # Height = 64 => pages = 8
        self.buffer = bytearray(self.pages * self.width)
        super().__init__(self.buffer, self.width, self.height, framebuf.MONO_VLSB)
        self.init_display()

    def init_display(self):
        for cmd in (
                SET_DISP | 0x00,  # off
                # address setting
                SET_MEM_ADDR,
                0x00,  # horizontal
                # resolution and layout
                SET_DISP_START_LINE | 0x00,
                SET_SEG_REMAP | 0x01,  # column addr 127 mapped to SEG0
                SET_MUX_RATIO,
                self.height - 1,
                SET_COM_OUT_DIR | 0x08,  # scan from COM[N] to COM0
                SET_DISP_OFFSET,
                0x00,
                SET_COM_PIN_CFG,
                0x02 if self.width > 2 * self.height else 0x12,
                # timing and driving scheme
                SET_DISP_CLK_DIV,
                0x80,
                SET_PRECHARGE,
                0x22 if self.external_vcc else 0xF1,
                SET_VCOM_DESEL,
                0x30,  # 0.83*Vcc
                # display
                SET_CONTRAST,
                0xFF,  # maximum
                SET_ENTIRE_ON,  # output follows RAM contents
                SET_NORM_INV,  # not inverted
                # charge pump
                SET_CHARGE_PUMP,
                0x10 if self.external_vcc else 0x14,
                SET_DISP | 0x01,
        ):  # on
            self.write_cmd(cmd)
        self.fill(0)
        self.show()

    def poweroff(self):
        self.write_cmd(SET_DISP | 0x00)

    def poweron(self):
        self.write_cmd(SET_DISP | 0x01)

    def contrast(self, contrast):
        self.write_cmd(SET_CONTRAST)
        self.write_cmd(contrast)

    def invert(self, invert):
        self.write_cmd(SET_NORM_INV | (invert & 1))

    def show(self):
        x0 = 0
        x1 = self.width - 1
        if self.width == 64:
            # displays with width of 64 pixels are shifted by 32
            x0 += 32
            x1 += 32
        self.write_cmd(SET_COL_ADDR)
        self.write_cmd(x0)
        self.write_cmd(x1)
        self.write_cmd(SET_PAGE_ADDR)
        self.write_cmd(0)
        self.write_cmd(self.pages - 1)
        self.write_data(self.buffer)


class SSD1306_I2C(SSD1306):
    def __init__(self, width, height, i2c, addr=0x3C, external_vcc=False):
        self.i2c = i2c
        self.addr = addr
        self.temp = bytearray(2)
        self.write_list = [b"\x40", None]  # Co=0, D/C#=1
        super().__init__(width, height, external_vcc)

    def write_cmd(self, cmd):
        self.temp[0] = 0x80  # Co=1, D/C#=0
        self.temp[1] = cmd
        self.i2c.writeto(self.addr, self.temp)

    def write_data(self, buf):
        self.write_list[1] = buf
        self.i2c.writevto(self.addr, self.write_list)

led1 = Pin(25,Pin.OUT)
led2 = Pin(16,Pin.OUT)
key1 = Pin(18,Pin.IN)
sda = Pin(4)  # physical pin 6
scl = Pin(5)  # physical pin 7
i2c = I2C(id=0, sda=sda, scl=scl, freq=100000)
ssd = SSD1306_I2C(128, 64, i2c)
ssd.fill(0)
# FrameBuffer.text(s, x, y[, c]) c = colour(optional) x,y = coordinates
# characters always 8x8 => 128/8 => 16 chars
#         1234567890123456
ssd.text("RaspberryPi Pico", 0, 10, 1)
ssd.text("2021-3-10", 0, 30, 1)
ssd.text("kizai", 0, 50, 2)
ssd.show()
utime.sleep(2.5)
count = 0

led1(1)
led2(1)

while True:
    if(key1.value()==0):
        led1(0)
        utime.sleep(1)
        led1(1)
    txt = str(count)
    print(txt)
    ssd.fill(0)
    ssd.text(txt, 0, 20, 1)
    ssd.show()
    count += 1
    utime.sleep(1.5)

print("Oops done?")
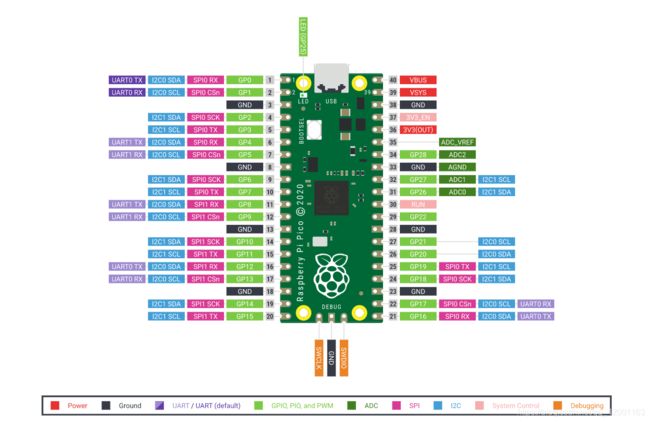
6、管脚图与实现效果
觉得可以麻烦一键三连喔!!!!


