ElasticSearch——分布式搜索和分析引擎
ElasticSearch——分布式搜索和分析引擎
二. 部署
安装ES集群
#################################################################################
# 官网 =========================================================================
http://elastic.co/

# 首先进行版本兼容性分析===========================================================
在安装ES之前,首先要对软件进行兼容性分析。保持ES, Kibana, Logstash 版本要一致。进入官网查看即可:https://www.elastic.co/cn/support/matrix

# 版本选择 =====================================================================
ES-7.10.1
Kibana-7.10.1
Logstash-7.10.1
openjdk-11-jdk: sudo apt install openjdk-11-jdk

# 开始安装 ====================================================================
#参考
https://blog.csdn.net/m0_61418822/article/details/127497471

#下载软件
	https://www.elastic.co/downloads/past-releases/elasticsearch-7-10-1
	https://www.elastic.co/downloads/past-releases/kibana-7-10-1
	https://www.elastic.co/downloads/past-releases/Logstash-7-10-1

#解压ES
tar -zxvf xxxxx

#集群模式配置
【如下:config/elasticsearch.yml】

#启动集群的每个节点
./bin/elasticsearch -d

#检查节点健康
http://10.168.1.216:9203/_cat/nodes
http://10.168.1.216:9203/_cat/health

#配置集群密码
参考:https://blog.csdn.net/m0_61418822/article/details/127497471
在config/elasticsearch.yml中添加如下配置,以下配置用于设置密码访问ES集群,如不需要可以不用
-----------------------------------
xpack.security.enabled: true
xpack.license.self_generated.type: basic
xpack.security.transport.ssl.enabled: true
xpack.security.transport.ssl.verification_mode: certificate
xpack.security.transport.ssl.keystore.path: elastic-certificates.p12
xpack.security.transport.ssl.truststore.path: elastic-certificates.p12
-----------------------------------
#开始设置密码
step1:在某个节点下执行:
	bin/elasticsearch-certutil cert -out config/elastic-certificates.p12 -pass ""
step2:重启所有节点

step3:把刚刚生产的config/elastic-certificates.p12复制到每个节点的对应目录下

step4:在某个节点下执行
	bin/elasticsearch-setup-passwords interactive
随后按照提示依次输入elastic、apm_system、kibana、logstash_system、beats_system、remote_monitoring_user这6个用户的密码,完成后数据会自动同步至其他2个节点。
config/elasticsearch.yml
# ======================== Elasticsearch Configuration =========================
#
# NOTE: Elasticsearch comes with reasonable defaults for most settings.
#       Before you set out to tweak and tune the configuration, make sure you
#       understand what are you trying to accomplish and the consequences.
#
# The primary way of configuring a node is via this file. This template lists
# the most important settings you may want to configure for a production cluster.
#
# Please consult the documentation for further information on configuration options:
# https://www.elastic.co/guide/en/elasticsearch/reference/index.html
#
# ---------------------------------- Cluster -----------------------------------
#
# Use a descriptive name for your cluster:
#
cluster.name: ln-es-cluster
#
# ------------------------------------ Node ------------------------------------
#
# Use a descriptive name for the node:
#
node.name: es1
#
# Add custom attributes to the node:
#
#node.attr.rack: r1
#
node.master: true
node.data: true
# ----------------------------------- Paths ------------------------------------
#
# Path to directory where to store the data (separate multiple locations by comma):
#
#path.data: /path/to/data
#
# Path to log files:
#
#path.logs: /path/to/logs
#
# ----------------------------------- Memory -----------------------------------
#
# Lock the memory on startup:
#
#bootstrap.memory_lock: true
#
# Make sure that the heap size is set to about half the memory available
# on the system and that the owner of the process is allowed to use this
# limit.
#
# Elasticsearch performs poorly when the system is swapping the memory.
#
# ---------------------------------- Network -----------------------------------
#
# Set the bind address to a specific IP (IPv4 or IPv6):
#
network.host: 0.0.0.0
#
# Set a custom port for HTTP:
#
http.port: 9201
transport.tcp.port: 9301
transport.tcp.compress: true

#
# For more information, consult the network module documentation.
#运行跨域访问
http.cors.enabled: true
http.cors.allow-origin: "*"
# --------------------------------- Discovery ----------------------------------
#
# Pass an initial list of hosts to perform discovery when this node is started:
# The default list of hosts is ["127.0.0.1", "[::1]"]
#
discovery.seed_hosts: ["10.168.1.216:9301", "10.168.1.216:9302", "10.168.1.216:9303"]
#
# Bootstrap the cluster using an initial set of master-eligible nodes:
#
cluster.initial_master_nodes: ["es1", "es2", "es3"]
#
# For more information, consult the discovery and cluster formation module documentation.
#
# ---------------------------------- Gateway -----------------------------------
#
# Block initial recovery after a full cluster restart until N nodes are started:
#
#gateway.recover_after_nodes: 3
#
# For more information, consult the gateway module documentation.
#
# ---------------------------------- Various -----------------------------------
#
# Require explicit names when deleting indices:
#
#action.destructive_requires_name: true
注意:在生产环境下,data和log请务必修改,因为数据和日志分别存在这两个目录下,如果设计到环境升级,很可能会把覆盖掉,这样太危险了。
安装kibana
-
Head插件安装
功能是方便观察集群中节点状况。
#安装node========================================================
#官网:https://nodejs.org/en/download/, https://nodejs.org/dist/
	注意node的版本。刚开始我用最新版不可以,然后换成node-v0.12.0-linux-x64就可以了。
	下载解压即可。
#检查版本
	node -V

#配置环境变量
	export NODE_HOME=/home/ln/node-v18.12.1-linux-x64
	export PATH=$PATH:$NODE_HOME/bin


#安装grunt======================================================
	apt install grunt
	grunt -version

#安装Head插件====================================================
#下载head
	https://github.com/mobz/elasticsearch-head
	[git clone https://github.com/mobz/elasticsearch-head.git]
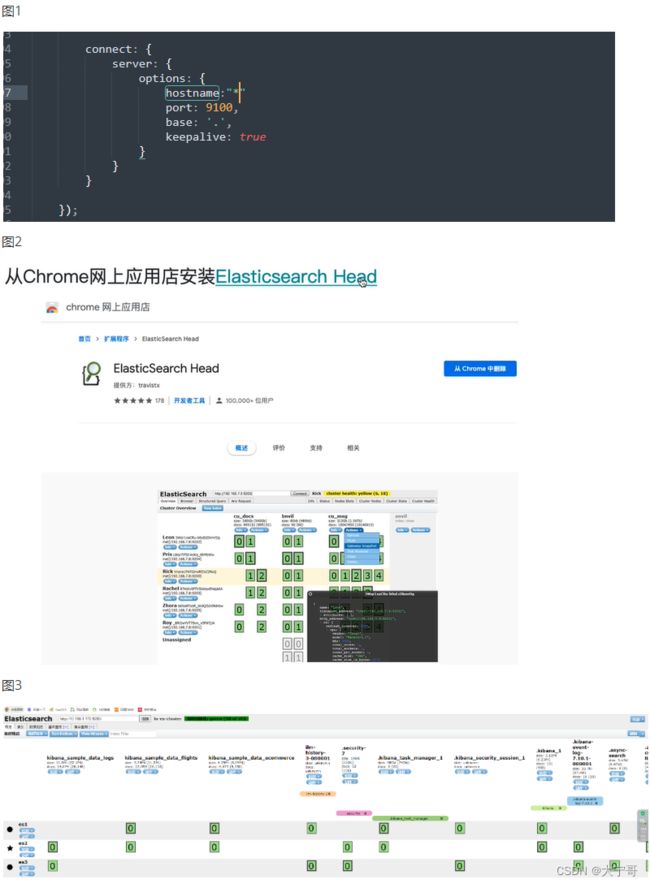
#进去elasticsearch-head,修改Gruntfile.js
	下图1
#cd elasticsearch-head 进去执行:
	npm install
#启动
	npm run start

#验证:http://xxxxx:9100

#如果没法发现ES节点
	尝试在ES配置中配置
	http:cors.enabled:true
	http:cods.allow-origin:"*"


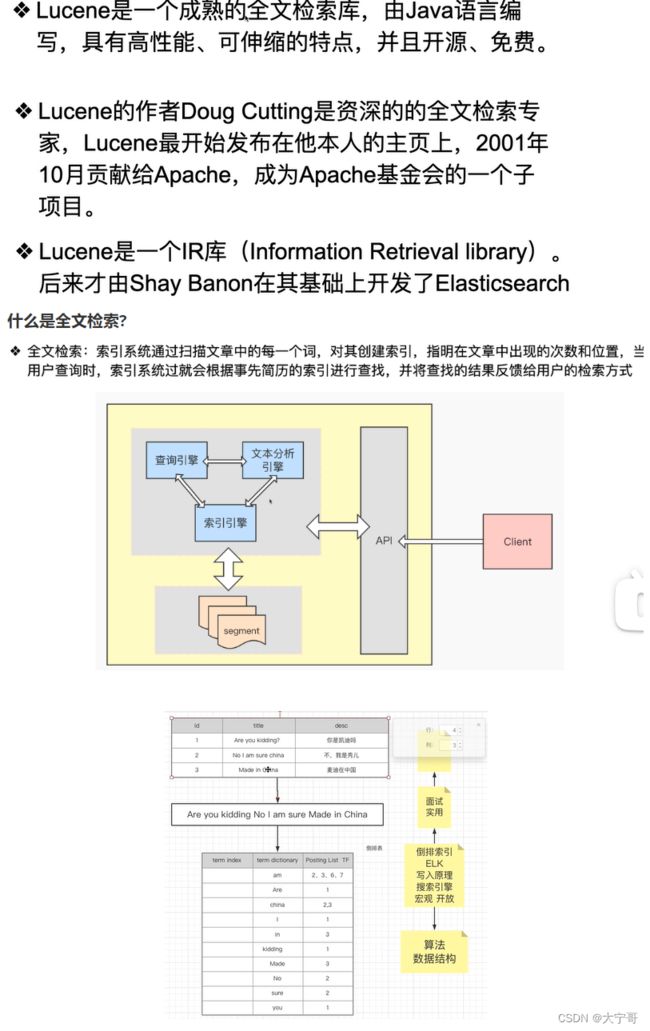
另外,这个Elasticsearch-head可以在谷歌浏览器插件中直接安装,但是需要外网。!!!!


#补充:elasticsearch-head访问带密码的elasticsearch
https://blog.csdn.net/java_cpp_/article/details/126244511
先配置es:
    #配置开启跨域
    http.cors.enabled: true
    #配置允许任何域名访问
    http.cors.allow-origin: "*"
    #设置密码后的访问配置
    http.cors.allow-headers: Authorization,X-Requested-With,Content-Length,Content-Type
然后head链接的时候在url中加入密码账号.
	http://IP:9100/?auth_user=用户名&auth_password=密码

#链接成功
	图3
集群健康值检查
返回参数结果解析:
epoch     					时间戳
timestamp 					当前时间
cluster       				集群名称
status 						集群状态
node.total 					节点个数
node.data 					数据节点数(存放数据的节点)
shards						分片总数(=主分片+从分片)
pri 						主分片数
relo 						在迁移中的分片数量
init 						在初始化中的分片数量
unassign 					未分配的分片数量
pending_tasks 				准备要执行的任务数
max_task_wait_time 			最大任务等待时间
active_shards_percent		当前活跃的分片站的百分比
[外链图片转存失败,源站可能有防盗链机制,建议将图片保存下来直接上传(img-clE7qNq3-1671367006872)(out.assets/image-20221218154215952.png)]
返回参数结果解析:
参数和 _cat/health 一样的
集群健康值使用演示
### 倒排索引

#### 倒排索引的原理

[外链图片转存失败,源站可能有防盗链机制,建议将图片保存下来直接上传(img-lqfYzGte-1671367006875)(out.assets/image-20221218193907316.png)]
上图, "小米"这个单词在id 为1,2…中都有出现,所以:倒排索引表PostingList中记录了这些id, 左下图这个表就可以理解为倒排索引表.
term index : 词项索引
term dictionaary : 词项字典
Posting List : 倒排表
#### 倒排索引的数据结构
[外链图片转存失败,源站可能有防盗链机制,建议将图片保存下来直接上传(img-YbXxMUqK-1671367006876)(out.assets/image-20221218194300916.png)]
### FOR压缩算法和RBM压缩算法
在倒排索引的数据结构中,我们可以知道倒排表中存储着对应词项的索引. 当这个索引数组非常大的时候,例如某一个元素的倒排表有比百多万个,那么就需要对这个倒排表进行压缩. 倒排索引所使用的压缩算法有两个分别是 Frame Of Reference和Roaring Bitmaps
#### Frame Of Reference(FOR)
[外链图片转存失败,源站可能有防盗链机制,建议将图片保存下来直接上传(img-b9g1kxLv-1671367006876)(out.assets/image-20221218195355799.png)]
deltas list: 理解为倒排表中,后一个数字和前一个数字的差值.
所以就会根据原倒排表得到了一个 新的数组(元素和倒排表想同), 但是deltas list相比较于倒排表数组最大值减小了.
补充知识: 数组的存储,每个元素所占用的bit,由素组中最大的值所占用比特决定. 例如:
[73, 300, 302, 332, 343, 372] 每个数值占用4Bit, 所以共计4Byte * 6 = 24Byte
得到的deltas list [73 227, 2, 30, 11, 29] 73和227用8bits存储, 2,30,11,29用5bit来存储.
所以deltas最后所占空间约等于7B(Bytes). 这里的计算看下面根据bits计算bytes
疑问:为啥不把这个数组继续往下拆分呢?
答: 因为继续往下拆是可以拆,但是在解压的时候,就会很痛苦啦. 并且拆分越多,就需要保存数据被拆分的bits数,反而也增加了存储. 所以找到一个这种的值.这个折中值是动态的,
根据bits计算bytes:
bytes是常用的存储单位,不用有人用位(bits)去计量存储.
1Bytes = 8Bits. 理解为一个Bytes就是一个箱子,里面可以放8个bits.
例如2,30,11,29需要4 * 5 = 20bits来存放,那么需要82+4 也就是三个"箱子来存放"
所以上面最后需要7Bytes是这样计算来的:
1(存8bit这个标签) + 12(存73,227这两个数据) + 1(存5bites这个标签) + 3(存2,30,11,29这四个数据) = 7


