DolphinScheduler跨版本升级1.3.8至3.0.1
DolphinScheduler跨版本升级1.3.8至3.0.1
- Refer
- 背景
-
- 基础环境
- 依赖版本升级
-
- 修改pom.xml
- 问题解决
- MYSQL升级
-
- 1.文件替换
- 2.修改表结构
-
- t_ds_process_definition
- t_ds_alert
- t_ds_process_instance
- 3.时间参数修改
- 4.数据库升级
- DOLPHIN安装
-
- zookeeper集群
- 创建用户
- dolphinscheduler_env.sh
- install_env.sh
- 安装
- 登录
- 问题
-
- 1.迁移后任务报错
-
- 示例
- 2.存储未启用
Refer
- 遵循历史,依然要感谢各位在网上的输出!升级前还在考虑是否有可参考的文档呢,结果还真有大哥在做,给到了很多支持,感谢!
dolphinscheduler版本1.3跨版本升级到3.0
dolphinscheduler3.0.1官方文档(伪集群部署)
Apache DolphinScheduler v3.0.1 使用手册
- 注:官网给的备注是集群部署参照伪集群部署
背景
- 上次安装Dolphin的时候工具只更新到了2.0.3版本,而且更新时间较新,出于稳定性考虑选择了1.3.8版本,该版本对于流程的优化和调度任务的类型都较少(但大致是够用的)。Dolphin的更新迭代一直都很快速,所以其实3.X的版本新增了很多任务支持,包括对于任务的数据质量监控都是集成工具中比较亮眼的功能。所以在原本的基础上预期将1.3.8版本升级到3.X版本。
- 主要更新的是MySQL,由1.X到3.X的数据变化还是很大的
- 其余相关升级操作可以参考官方文档,也可以参考该文档,相对的我这里会给出一些我的问题的解决办法哈
基础环境
- dolphinscheduler2.0.0(两个版本都需要,有一些信息互补)
- dolphinscheduler3.0.1(两个版本都需要,有一些信息互补)
- MySQL8.0.16
- mysql-connector-java8.0.16(手动下载连接器后添加到master,api、,tools,worker的libs下)
- JDK1.8
- ZooKeeper3.4.7 (3.4.6+)
- 进程树分析:macOS安装pstree;Fedora/Red/Hat/CentOS/Ubuntu/Debian安装psmisc
- DolphinScheduler 本身不依赖 Hadoop、Hive、Spark,但如果你运行的任务需要依赖他们,就需要有对应的环境支持
| 192.168.0.1 | 192.168.0.2 | 192.168.0.3 | |
|---|---|---|---|
| master服务 | √ | √ | |
| worker服务 | √ | √ | |
| alertServer报警服务 | √ | ||
| 后端api服务 | √ |
依赖版本升级
- 总体来说Dolphin这边的git项目拉下来在本地一般都不修改太多,依照自己的需求进行修改即可
修改pom.xml
// 3.0.1内含的POM文件中的基础组件版本,如果有版本区别,建议修改版本后重新打包部署
// 例如hadoop和hive的版本
// 注意:由于mysql-connector的版本在打包中要求的是8.0.16,建议下载8.0.16的驱动
    <properties>
		……
        <zookeeper.version>3.4.14</zookeeper.version>
        <spring.version>5.3.12</spring.version>
        <spring.boot.version>2.5.6</spring.boot.version>
        <java.version>1.8</java.version>
        ……
        <hadoop.version>2.7.3</hadoop.version>
        ……
        <mysql.connector.version>8.0.16</mysql.connector.version>
        ……
        <hive.jdbc.version>2.1.0</hive.jdbc.version>
        ……
    </properties>
版本变更后可以直接maven打包
mvn -U clean package -Prelease -Dmaven.test.skip=true
问题解决
- 我个人的话在打包过程中出现了Strings.isNotEmpty报错没有对应的包,这种都比较好解决
- 报错位置:src/main/java/org/apache/dolphinscheduler/tools/datasource/dao/ResourceDao.java
- 报错解决:在dolphinscheduler-tools这个module的pom.xml中添加对应的依赖即可
        <dependency>
           <groupId>org.apache.directory.api</groupId>
           <artifactId>api-all</artifactId>
           <version>1.0.0-M20</version>
       </dependency>
MYSQL升级
1.文件替换
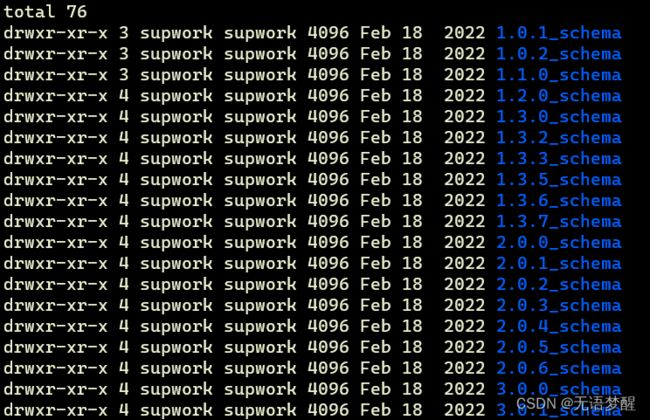
- 通过3.0.1版本的升级文件夹可以看出每个版本的dolphin都对数据库进行了一些schema的修改,由上面引用的CSDN描述可以发现,2.0版本的和3.0版本中的对应2.0版本位置的配置文件是有区别的,所以进行替换,主要是一些字段的类型变化和增删
- 位置:/apache-dolphinscheduler-3.0.1-bin/tools/sql/sql/upgrade

- 示例

- 命令
## 防止直接粘贴报错,我用了中文哈,记得修改对应位置为本地自己环境的路径
## 文件夹名称有区别也记得修改
cp 你自己的路径/apache-dolphinscheduler-2.0.0-bin/sql/upgrade/2.0.0_schema/mysql/do*  你自己的路径/apache-dolphinscheduler-3.0.1-bin/tools/sql/sql/upgrade/2.0.0_schema/mysql/

cp 你自己的路径/apache-dolphinscheduler-3.0.1-bin/tools/sql/sql/upgrade/2.0.0_schema/mysql/dolphinscheduler_dml.sql 你自己的路径/apache-dolphinscheduler-3.0.1-bin/tools/sql/sql/upgrade/2.0.1_schema/mysql/
2.修改表结构
- 在下述的三个表中添加下述内容
t_ds_process_definition
# vim 你自己的路径/apache-dolphinscheduler-3.0.1-bin/tools/sql/sql/upgrade/2.0.0_schema/mysql/dolphinscheduler_ddl.sql
# 找到t_ds_process_definition添加下面sql
alter table t_ds_process_definition_log add `execution_type` tinyint(4) DEFAULT '0' COMMENT 'execution_type 0:parallel,1:serial wait,2:serial discard,3:serial priority';
alter table t_ds_process_definition add `execution_type` tinyint(4) DEFAULT '0' COMMENT 'execution_type 0:parallel,1:serial wait,2:serial discard,3:serial priority';
t_ds_alert
# vim 你自己的路径/apache-dolphinscheduler-3.0.1-bin/tools/sql/sql/upgrade/3.0.0_schema/mysql/dolphinscheduler_ddl.sql
# 注释原有t_ds_alert添加字段操作(原始数据结构中存在该字段)
--ALTER TABLE `t_ds_alert` ADD COLUMN `alert_type` int DEFAULT NULL COMMENT 'alert_type';
ALTER TABLE `t_ds_alert` change `alert_type` `alert_type` int DEFAULT NULL COMMENT 'alert_type';
t_ds_process_instance
#vim 你自己的路径/apache-dolphinscheduler-3.0.1-bin/tools/sql/sql/upgrade/2.0.0_schema/mysql/dolphinscheduler_ddl.sql
alter table t_ds_process_instance add next_process_instance_id int(11) DEFAULT '0' COMMENT 'serial queue next processInstanceId';
3.时间参数修改
- 这个我目前没有特意尝试
## 你自己的路径/apache-dolphinscheduler-3.0.1-bin/bin/env/dolphinscheduler_env.sh
export SPRING_JACKSON_TIME_ZONE=${SPRING_JACKSON_TIME_ZONE:-GMT+8}
export SPRING_DATASOURCE_URL="jdbc:mysql://x.x.x.x:3306/dolphinscheduler3?&characterEncoding=UTF-8&allowMultiQueries=true&serverTimezone=GMT%2B8"
4.数据库升级
修改 ./bin/env/dolphinscheduler_env.sh 中的如下配置({user}和{password}改成你数据库的用户名和密码),然后运行升级脚本
export DATABASE=${DATABASE:-mysql}
export SPRING_PROFILES_ACTIVE=${DATABASE}
export SPRING_DATASOURCE_URL="jdbc:mysql://127.0.0.1:3306/dolphinscheduler?useUnicode=true&characterEncoding=UTF-8&useSSL=false"
export SPRING_DATASOURCE_USERNAME={user}
export SPRING_DATASOURCE_PASSWORD={password}

执行数据库升级脚本:sh ./tools/bin/upgrade-schema.sh
DOLPHIN安装
- 只需要在主节点配置,无需进行分发,在后续安装过程中会将对应信息scp到对应位置
zookeeper集群
- zk集群的安装和启动,我就不赘述了,启动!
./bin/zkServer.sh start
创建用户
可以如官方文档所言,创建dolphinscheduler新用户,并配置免密,也可以使用本地环境中的符合条件的用户,我这里为了方便,直接使用了大数据集群的用户
# 创建用户需使用 root 登录
useradd dolphinscheduler
 # 添加密码
echo "dolphinscheduler" | passwd --stdin dolphinscheduler

# 登陆相关用户
su  dolphinscheduler
# 生成密钥
ssh-keygen -t rsa
# 远程cp到目标机器
ssh-copy-id -i 192.168.0.1
ssh-copy-id -i 192.168.0.2
ssh-copy-id -i 192.168.0.3


# 修改目录权限,使得部署用户对二进制包解压后的 apache-dolphinscheduler-*-bin 目录有操作权限
chown -R dolphinscheduler:dolphinscheduler apache-dolphinscheduler-*-bin
dolphinscheduler_env.sh
- 配置基本数据环境,如MySQL,ZooKeeper和各类使用的大数据环境的环境变量的base地址
- 一些任务类型外部依赖路径或库文件,如 JAVA_HOME 和 SPARK_HOME都是在这里定义的
- 注册中心zookeeper
- 服务端相关配置,比如缓存,时区设置等
# JAVA_HOME, will use it to start DolphinScheduler server
export JAVA_HOME=${JAVA_HOME:-/usr/local/jdk/}

# Database related configuration, set database type, username and password
export DATABASE=${DATABASE:-mysql}
export SPRING_PROFILES_ACTIVE=${DATABASE}
export SPRING_DATASOURCE_URL='jdbc:mysql://XXXXXXXXXXX:3306/dpscheduler?useUnicode=true&characterEncoding=UTF-8&useSSL=false&allowPublicKeyRetrieval=true'
export SPRING_DATASOURCE_USERNAME=XXXXXXX
export SPRING_DATASOURCE_PASSWORD=XXXXXXXXXXXXX

# DolphinScheduler server related configuration
export SPRING_CACHE_TYPE=${SPRING_CACHE_TYPE:-none}
export SPRING_JACKSON_TIME_ZONE=${SPRING_JACKSON_TIME_ZONE:-UTC}
export MASTER_FETCH_COMMAND_NUM=${MASTER_FETCH_COMMAND_NUM:-10}

# Registry center configuration, determines the type and link of the registry center
export REGISTRY_TYPE=${REGISTRY_TYPE:-zookeeper}
export REGISTRY_ZOOKEEPER_CONNECT_STRING=${REGISTRY_ZOOKEEPER_CONNECT_STRING:-192.168.0.1:2181,-192.168.0.2:2181,-192.168.0.3:2181}

# Tasks related configurations, need to change the configuration if you use the related tasks.
#export HADOOP_HOME=${HADOOP_HOME:-/opt/soft/hadoop}
#export HADOOP_CONF_DIR=${HADOOP_CONF_DIR:-/opt/soft/hadoop/etc/hadoop}
#export SPARK_HOME1=${SPARK_HOME1:-/opt/soft/spark1}
#export SPARK_HOME2=${SPARK_HOME2:-/opt/soft/spark2}
#export PYTHON_HOME=${PYTHON_HOME:-/opt/soft/python}
#export HIVE_HOME=${HIVE_HOME:-/opt/soft/hive}
#export FLINK_HOME=${FLINK_HOME:-/opt/soft/flink}
#export DATAX_HOME=${DATAX_HOME:-/opt/soft/datax}

export HADOOP_HOME=${HADOOP_HOME:-/usr/hadoop}
export HADOOP_CONF_DIR=${HADOOP_CONF_DIR:-/usr/hadoop/etc/hadoop}
#export SPARK_HOME1=${SPARK_HOME1:-/opt/soft/spark1}
export SPARK_HOME2=${SPARK_HOME2:-/usr/spark}
export PYTHON_HOME=${PYTHON_HOME:-/opt/anaconda3/bin/python}
export HIVE_HOME=${HIVE_HOME:-/usr/hive}
export FLINK_HOME=${FLINK_HOME:-/usr/flink}
export SQOOP_HOME=${FLINK_HOME:-/usr/sqoop}
#export DATAX_HOME=${DATAX_HOME:-/opt/soft/datax}


#export PATH=$HADOOP_HOME/bin:$SPARK_HOME1/bin:$SPARK_HOME2/bin:$PYTHON_HOME/bin:$JAVA_HOME/bin:$HIVE_HOME/bin:$FLINK_HOME/bin:$DATAX_HOME/bin:$PATH


export PATH=$HADOOP_HOME/bin:$SPARK_HOME2/bin:$PYTHON_HOME/bin:$JAVA_HOME/bin:$HIVE_HOME/bin:$FLINK_HOME/bin:$SQOOP_HOME/bin:$PATH
install_env.sh
- 主要配置DolphinScheduler每台机器对应安装哪些服务
- 注:deployUser记得修改为你本地配置的可SSH免密的用户名称
# ---------------------------------------------------------
# INSTALL MACHINE
# ---------------------------------------------------------
# A comma separated list of machine hostname or IP would be installed DolphinScheduler,
# including master, worker, api, alert. If you want to deploy in pseudo-distributed
# mode, just write a pseudo-distributed hostname
# Example for hostnames: ips="ds1,ds2,ds3,ds4,ds5", Example for IPs: ips="192.168.8.1,192.168.8.2,192.168.8.3,192.168.8.4,192.168.8.5"
ips=${ips:-"192.168.0.1,192.168.0.2,192.168.0.3"}

# Port of SSH protocol, default value is 22. For now we only support same port in all `ips` machine
# modify it if you use different ssh port
sshPort=${sshPort:-"22"}

# A comma separated list of machine hostname or IP would be installed Master server, it
# must be a subset of configuration `ips`.
# Example for hostnames: masters="ds1,ds2", Example for IPs: masters="192.168.8.1,192.168.8.2"
masters=${masters:-"192.168.0.1,192.168.0.2"}

# A comma separated list of machine : or :.All hostname or IP must be a
# subset of configuration `ips`, And workerGroup have default value as `default`, but we recommend you declare behind the hosts
# Example for hostnames: workers="ds1:default,ds2:default,ds3:default", Example for IPs: workers="192.168.8.1:default,192.168.8.2:default,192.168.8.3:default"
workers=${workers:-"192.168.0.1:default,192.168.0.3:default"}

# A comma separated list of machine hostname or IP would be installed Alert server, it
# must be a subset of configuration `ips`.
# Example for hostname: alertServer="ds3", Example for IP: alertServer="192.168.8.3"
alertServer=${alertServer:-"192.168.0.2"}

# A comma separated list of machine hostname or IP would be installed API server, it
# must be a subset of configuration `ips`.
# Example for hostname: apiServers="ds1", Example for IP: apiServers="192.168.8.1"
apiServers=${apiServers:-"192.168.0.2"}

# The directory to install DolphinScheduler for all machine we config above. It will automatically be created by `install.sh` script if not exists.
# Do not set this configuration same as the current path (pwd). Do not add quotes to it if you using related path.
installPath=${installPath:-"/opt/dolphinscheduler"}

# The user to deploy DolphinScheduler for all machine we config above. For now user must create by yourself before running `install.sh`
# script. The user needs to have sudo privileges and permissions to operate hdfs. If hdfs is enabled than the root directory needs
# to be created by this user
deployUser=${deployUser:-"hadoop"}

# The root of zookeeper, for now DolphinScheduler default registry server is zookeeper.
zkRoot=${zkRoot:-"/dolphinscheduler"}
安装
- 配置完成后就可以正式安装了,部署后的运行日志将存放在对应服务的logs文件夹内
- 看到这里的应该也有一个疑问,为啥没有集群分发的步骤,实际上在install中就会做scp操作,配置目录在install_env.sh的installPath中,会在子节点中创建同名文件夹
- 路径:./bin/install.sh
登录
- 由于是迁移,用户信息也会带过去,下边是安装的默认用户名密码哈,迁移的直接使用对应账号密码即可!
浏览器访问地址 http://localhost:12345/dolphinscheduler/ui
默认用户名:admin
默认密码:dolphinscheduler123
问题
1.迁移后任务报错
- 安装完可以快乐启动,但是要注意,由于是迁移,所以任务状态和定时任务都是上线状态,并且原有的节点信息会复刻,那!!!一定要先把所有任务停止一下,避免由于在同环境集群升级导致的节点信息报错,这是次要的,避免数据错误啊!
示例
2.存储未启用
- ISSUE:https://github.com/apache/dolphinscheduler/issues/11404
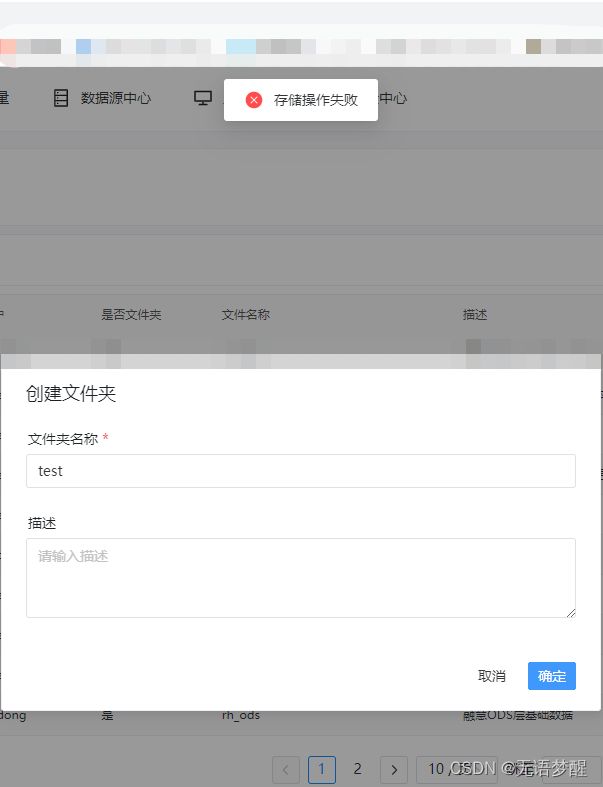
- 按照官网的安装后我的api-server等服务是启动了的,但是由于官网并没有过多描述对于环境的配置导致,嗯,我的hadoop等服务其实是不可用的,最明显的就是资源创建失败,如下


- 这里就需要修改一些配置
- 路径:你自己的路径/dolphinscheduler/tools/conf/common.properties
- 用户:一定要用同上边安装启动统一的用户,避免由于权限问题导致的重复操作!
- 其他文件:为了配置hadoop,要把HDFS的配置文件core-site.xml和hdfs-site.xml放在上边的同级目录下,也就是你自己的路径/dolphinscheduler/tools/conf/下(这里做过hadoop接口开发的应该都明白哈,这个比较清晰)
- common.properties内容
在这里插入代码片
### 注释就都省略了哈

# user data local directory path, please make sure the directory exists and have read write permissions
# 预期的配置数据路径
data.basedir.path=/opt/software/dolphinscheduler/data

# resource view suffixs
#resource.view.suffixs=txt,log,sh,bat,conf,cfg,py,java,sql,xml,hql,properties,json,yml,yaml,ini,js

# resource storage type: HDFS, S3, NONE
# 预期使用的存储方式
resource.storage.type=HDFS
# resource store on HDFS/S3 path, resource file will store to this base path, self configuration, please make sure the directory exists on hdfs and have read write permissions. "/dolphinscheduler" is recommended
# 预期使用的存储目录,如果是迁移,一定要跟之前保持一致!!!
# 例如我这边配置的目录在报错后发现是/user/hdfs/resources/XXXXXXXX,由于原始用户是hdfs,原始路径是/user/XXXXX/resources/,所以配置的数据目录要保持一致
resource.storage.upload.base.path=/user

# s3的目录按需配置

# if resource.storage.type=HDFS, the user must have the permission to create directories under the HDFS root path
# 预期配置使用的用户
resource.hdfs.root.user=hadoop
# if resource.storage.type=S3, the value like: s3a://dolphinscheduler; if resource.storage.type=HDFS and namenode HA is enabled, you need to copy core-site.xml and hdfs-site.xml to conf dir
# 如果是单NameNode节点,则是使用对应的ip:port,如果是HA,就用namespace,不需要加端口
resource.hdfs.fs.defaultFS=hdfs://XXXXXXXXX
