更多内容,点击了解: https://how2j.cn/k/springboot/springboot-vue/1788.html

目录

步骤 1 : 教程说明

步骤 2 : 数据库准备

步骤 3 : 准备表

步骤 4 : 先运行,看到效果,再学习

步骤 5 : 模仿和排错

步骤 6 : 新建 springboot 项目

步骤 7 : pom.xml

步骤 8 : application.properties

步骤 9 : Application.java

步骤 10 : 分页配置

步骤 11 : 异常处理

步骤 12 : 实体类

步骤 13 : Mapper

步骤 14 : Hero.xml

步骤 15 : Service 接口

步骤 16 : Service 实现类

步骤 17 : Controller 类

步骤 18 : js 文件

步骤 19 : 模板文件

步骤 20 : 启动测试


步骤 1 : 教程说明

这个教程比较复杂,涉及到了多方面的知识点,包括 Vue.js Springboot, Restful风格, 分页 PageHelper 的使用, Thymeleaf 模板。
对任何一个知识点不熟悉,都可以通过下载区(点击进入)搜索找到相关教程。

步骤 2 : 数据库准备

首先准备数据库 how2java

create database how2java

步骤 3 : 准备表

准备 Hero 表和相关数据

USE `how2java`;

CREATE TABLE `hero` (

  `id` int(11) NOT NULL AUTO_INCREMENT,

  `name` varchar(30) DEFAULT NULL,

  `hp` float DEFAULT NULL,

  PRIMARY KEY (`id`)

) ENGINE=InnoDB AUTO_INCREMENT=6194 DEFAULT CHARSET=utf8;

INSERT INTO `hero` VALUES (6094,'name0',0);

INSERT INTO `hero` VALUES (6095,'name1',1);

INSERT INTO `hero` VALUES (6096,'name2',2);

INSERT INTO `hero` VALUES (6097,'name3',3);

INSERT INTO `hero` VALUES (6098,'name4',4);

INSERT INTO `hero` VALUES (6099,'name5',5);

INSERT INTO `hero` VALUES (6100,'name6',6);

INSERT INTO `hero` VALUES (6101,'name7',7);

INSERT INTO `hero` VALUES (6102,'name8',8);

INSERT INTO `hero` VALUES (6103,'name9',9);

INSERT INTO `hero` VALUES (6104,'name10',10);

INSERT INTO `hero` VALUES (6105,'name11',11);

INSERT INTO `hero` VALUES (6106,'name12',12);

INSERT INTO `hero` VALUES (6107,'name13',13);

INSERT INTO `hero` VALUES (6108,'name14',14);

INSERT INTO `hero` VALUES (6109,'name15',15);

INSERT INTO `hero` VALUES (6110,'name16',16);

INSERT INTO `hero` VALUES (6111,'name17',17);

INSERT INTO `hero` VALUES (6112,'name18',18);

INSERT INTO `hero` VALUES (6113,'name19',19);

INSERT INTO `hero` VALUES (6114,'name20',20);

INSERT INTO `hero` VALUES (6115,'name21',21);

INSERT INTO `hero` VALUES (6116,'name22',22);

INSERT INTO `hero` VALUES (6117,'name23',23);

INSERT INTO `hero` VALUES (6118,'name24',24);

INSERT INTO `hero` VALUES (6119,'name25',25);

INSERT INTO `hero` VALUES (6120,'name26',26);

INSERT INTO `hero` VALUES (6121,'name27',27);

INSERT INTO `hero` VALUES (6122,'name28',28);

INSERT INTO `hero` VALUES (6123,'name29',29);

INSERT INTO `hero` VALUES (6124,'name30',30);

INSERT INTO `hero` VALUES (6125,'name31',31);

INSERT INTO `hero` VALUES (6126,'name32',32);

INSERT INTO `hero` VALUES (6127,'name33',33);

INSERT INTO `hero` VALUES (6128,'name34',34);

INSERT INTO `hero` VALUES (6129,'name35',35);

INSERT INTO `hero` VALUES (6130,'name36',36);

INSERT INTO `hero` VALUES (6131,'name37',37);

INSERT INTO `hero` VALUES (6132,'name38',38);

INSERT INTO `hero` VALUES (6133,'name39',39);

INSERT INTO `hero` VALUES (6134,'name40',40);

INSERT INTO `hero` VALUES (6135,'name41',41);

INSERT INTO `hero` VALUES (6136,'name42',42);

INSERT INTO `hero` VALUES (6137,'name43',43);

INSERT INTO `hero` VALUES (6138,'name44',44);

INSERT INTO `hero` VALUES (6139,'name45',45);

INSERT INTO `hero` VALUES (6140,'name46',46);

INSERT INTO `hero` VALUES (6141,'name47',47);

INSERT INTO `hero` VALUES (6142,'name48',48);

INSERT INTO `hero` VALUES (6143,'name49',49);

INSERT INTO `hero` VALUES (6144,'name50',50);

INSERT INTO `hero` VALUES (6145,'name51',51);

INSERT INTO `hero` VALUES (6146,'name52',52);

INSERT INTO `hero` VALUES (6147,'name53',53);

INSERT INTO `hero` VALUES (6148,'name54',54);

INSERT INTO `hero` VALUES (6149,'name55',55);

INSERT INTO `hero` VALUES (6150,'name56',56);

INSERT INTO `hero` VALUES (6151,'name57',57);

INSERT INTO `hero` VALUES (6152,'name58',58);

INSERT INTO `hero` VALUES (6153,'name59',59);

INSERT INTO `hero` VALUES (6154,'name60',60);

INSERT INTO `hero` VALUES (6155,'name61',61);

INSERT INTO `hero` VALUES (6156,'name62',62);

INSERT INTO `hero` VALUES (6157,'name63',63);

INSERT INTO `hero` VALUES (6158,'name64',64);

INSERT INTO `hero` VALUES (6159,'name65',65);

INSERT INTO `hero` VALUES (6160,'name66',66);

INSERT INTO `hero` VALUES (6161,'name67',67);

INSERT INTO `hero` VALUES (6162,'name68',68);

INSERT INTO `hero` VALUES (6163,'name69',69);

INSERT INTO `hero` VALUES (6164,'name70',70);

INSERT INTO `hero` VALUES (6165,'name71',71);

INSERT INTO `hero` VALUES (6166,'name72',72);

INSERT INTO `hero` VALUES (6167,'name73',73);

INSERT INTO `hero` VALUES (6168,'name74',74);

INSERT INTO `hero` VALUES (6169,'name75',75);

INSERT INTO `hero` VALUES (6170,'name76',76);

INSERT INTO `hero` VALUES (6171,'name77',77);

INSERT INTO `hero` VALUES (6172,'name78',78);

INSERT INTO `hero` VALUES (6173,'name79',79);

INSERT INTO `hero` VALUES (6174,'name80',80);

INSERT INTO `hero` VALUES (6175,'name81',81);

INSERT INTO `hero` VALUES (6176,'name82',82);

INSERT INTO `hero` VALUES (6177,'name83',83);

INSERT INTO `hero` VALUES (6178,'name84',84);

INSERT INTO `hero` VALUES (6179,'name85',85);

INSERT INTO `hero` VALUES (6180,'name86',86);

INSERT INTO `hero` VALUES (6181,'name87',87);

INSERT INTO `hero` VALUES (6182,'name88',88);

INSERT INTO `hero` VALUES (6183,'name89',89);

INSERT INTO `hero` VALUES (6184,'name90',90);

INSERT INTO `hero` VALUES (6185,'name91',91);

INSERT INTO `hero` VALUES (6186,'name92',92);

INSERT INTO `hero` VALUES (6187,'name93',93);

INSERT INTO `hero` VALUES (6188,'name94',94);

INSERT INTO `hero` VALUES (6189,'name95',95);

INSERT INTO `hero` VALUES (6190,'name96',96);

INSERT INTO `hero` VALUES (6191,'name97',97);

INSERT INTO `hero` VALUES (6192,'name98',98);

INSERT INTO `hero` VALUES (6193,'name99',99);

步骤 4 : 先运行,看到效果,再学习

老规矩,先下载下载区(点击进入)的可运行项目,配置运行起来,确认可用之后,再学习做了哪些步骤以达到这样的效果。 
运行下面类的主方法启动项目

com.how2java.springboot.Application


然后访问测试地址:

http://127.0.0.1:8080/listHero


这就是前后端分离的 CRUD 了。
没有套用 bootstrap 美化界面,尽量要足够少的知识来展现本教程的核心内容,以免被分散精力。

Vue.js + Restful + PageHelper + Thymeleaf + Springboot 前后端分离 增删改查 CRUD 教程_第1张图片

步骤 5 : 模仿和排错

在确保可运行项目能够正确无误地运行之后,再严格照着教程的步骤,对代码模仿一遍。 
模仿过程难免代码有出入,导致无法得到期望的运行结果,此时此刻通过比较正确答案 ( 可运行项目 ) 和自己的代码,来定位问题所在。 
采用这种方式,学习有效果,排错有效率,可以较为明显地提升学习速度,跨过学习路上的各个槛。 
推荐使用diffmerge软件,进行文件夹比较。把你自己做的项目文件夹,和我的可运行项目文件夹进行比较。 
这个软件很牛逼的,可以知道文件夹里哪两个文件不对,并且很明显地标记出来 
这里提供了绿色安装和使用教程:diffmerge 下载和使用教程

步骤 6 : 新建 springboot 项目

新建一个 springboot 项目,新建方式在前面教程已经讲解过了,这里不赘述Eclipse 方式创建 Springboot 项目IDEA 方式创建 Springboot 项目

步骤 7 : pom.xml

pom.xml 中的相关导包,各个部分都做了注释

xml version="1.0" encoding="UTF-8"?>

<project xmlns="http://maven.apache.org/POM/4.0.0" xmlns:xsi="http://www.w3.org/2001/XMLSchema-instance"

    xsi:schemaLocation="http://maven.apache.org/POM/4.0.0 http://maven.apache.org/xsd/maven-4.0.0.xsd">

    <modelVersion>4.0.0modelVersion>

  <groupId>com.how2javagroupId>

  <artifactId>springbootartifactId>

  <version>0.0.1-SNAPSHOTversion>

  <name>springbootname>

  <description>springbootdescription>

  <packaging>warpackaging>

    <parent>

        <groupId>org.springframework.bootgroupId>

        <artifactId>spring-boot-starter-parentartifactId>

        <version>1.5.9.RELEASEversion>

    parent>

    <dependencies>


        <dependency>

            <groupId>org.springframework.bootgroupId>

            <artifactId>spring-boot-starter-webartifactId>

        dependency>


        <dependency>

            <groupId>org.springframework.bootgroupId>

            <artifactId>spring-boot-starter-tomcatartifactId>

        dependency>


        <dependency>

            <groupId>org.springframework.bootgroupId>

            <artifactId>spring-boot-starter-thymeleafartifactId>

        dependency>


        <dependency>

            <groupId>net.sourceforge.nekohtmlgroupId>

            <artifactId>nekohtmlartifactId>

            <version>1.9.22version>

        dependency>        


        <dependency>

              <groupId>junitgroupId>

              <artifactId>junitartifactId>

              <version>3.8.1version>

              <scope>testscope>

        dependency>


        <dependency>

            <groupId>com.github.pagehelpergroupId>

            <artifactId>pagehelperartifactId>

            <version>4.1.6version>

        dependency>    


        <dependency>

            <groupId>org.mybatis.spring.bootgroupId>

            <artifactId>mybatis-spring-boot-starterartifactId>

            <version>1.1.1version>

        dependency>        


        <dependency>

               <groupId>org.apache.tomcat.embedgroupId>

               <artifactId>tomcat-embed-jasperartifactId>

        dependency>    


        <dependency>

            <groupId>org.springframework.bootgroupId>

            <artifactId>spring-boot-devtoolsartifactId>

            <optional>trueoptional>

        dependency>


        <dependency>

            <groupId>mysqlgroupId>

            <artifactId>mysql-connector-javaartifactId>

            <version>5.1.21version>

        dependency>

    dependencies>

    <properties>

        <java.version>1.8java.version>

    properties>

    <build>

        <plugins>

            <plugin>

                <groupId>org.springframework.bootgroupId>

                <artifactId>spring-boot-maven-pluginartifactId>

            plugin>

        plugins>

    build>

project>

步骤 8 : application.properties

在 src/main/resources 下新建 application.properties 文件
配置文件指定了 数据库参数, mybatis 参数 和 thymeleaf 参数
其中 LEGACYHTML5 表示使用传统模式,比起 HTML5 来对 html的校验更宽松点,符合大家(懒散)的开发习惯。。。

application.properties

#database

spring.datasource.url=jdbc:mysql://127.0.0.1:3306/how2java?characterEncoding=UTF-8

spring.datasource.username=root

spring.datasource.password=admin

spring.datasource.driver-class-name=com.mysql.jdbc.Driver

#mybatis

mybatis.mapper-locations=classpath:mapper/*.xml

mybatis.type-aliases-package=com.how2java.springboot.pojo

#thymeleaf

spring.thymeleaf.mode=LEGACYHTML5

spring.thymeleaf.encoding=UTF-8

spring.thymeleaf.content-type=text/html

spring.thymeleaf.cache=false

步骤 9 : Application.java

启动类

package com.how2java.springboot;

import org.springframework.boot.SpringApplication;

import org.springframework.boot.autoconfigure.SpringBootApplication;

@SpringBootApplication

public class Application {

    public static void main(String[] args) {

        SpringApplication.run(Application.class, args);

    }

}

步骤 10 : 分页配置

package com.how2java.springboot.config;

import java.util.Properties;

import org.springframework.context.annotation.Bean;

import org.springframework.context.annotation.Configuration;

import com.github.pagehelper.PageHelper;

@Configuration

public class PageHelperConfig {

    @Bean

    public PageHelper pageHelper() {

        PageHelper pageHelper = new PageHelper();

        Properties p = new Properties();

        p.setProperty("offsetAsPageNum""true");

        p.setProperty("rowBoundsWithCount""true");

        p.setProperty("reasonable""true");

        pageHelper.setProperties(p);

        return pageHelper;

    }

}

步骤 11 : 异常处理

package com.how2java.springboot.exception;

import javax.servlet.http.HttpServletRequest;

import org.springframework.web.bind.annotation.ControllerAdvice;

import org.springframework.web.bind.annotation.ExceptionHandler;

import org.springframework.web.servlet.ModelAndView;

@ControllerAdvice

public class GlobalExceptionHandler {

    @ExceptionHandler(value = Exception.class)

    public ModelAndView defaultErrorHandler(HttpServletRequest req, Exception e) throws Exception {

        ModelAndView mav = new ModelAndView();

        mav.addObject("exception", e);

        mav.addObject("url", req.getRequestURL());

        mav.setViewName("errorPage");

        return mav;

    }

}

步骤 12 : 实体类

package com.how2java.springboot.pojo;

public class Hero {

    private int id;

    private String name;

    private int hp;

    public int getHp() {

        return hp;

    }

    public void setHp(int hp) {

        this.hp = hp;

    }

    public int getId() {

        return id;

    }

    public void setId(int id) {

        this.id = id;

    }

    public String getName() {

        return name;

    }

    public void setName(String name) {

        this.name = name;

    }

    @Override

    public String toString() {

        return "Hero [id=" + id + ", name=" + name + ", hp=" + hp + "]";

    }

}

步骤 13 : Mapper

package com.how2java.springboot.mapper;

import java.util.List;

import org.apache.ibatis.annotations.Mapper;

import com.how2java.springboot.pojo.Hero;

@Mapper

public interface HeroMapper {

    public int add(Hero hero);

    public void delete(int id);

    public Hero get(int id);

    public int update(Hero hero); 

    public List list();

}

步骤 14 : Hero.xml

这个文件就放在 src/main/resources/mapper 目录下

Hero.xml

xml version="1.0" encoding="UTF-8"?>

    PUBLIC "-//mybatis.org//DTD Mapper 3.0//EN"

    "http://mybatis.org/dtd/mybatis-3-mapper.dtd">

    <mapper namespace="com.how2java.springboot.mapper.HeroMapper">

        <insert id="add" parameterType="Hero" >

            insert into hero ( name,hp ) values (#{name},#{hp})  

        insert>

        <delete id="delete" parameterType="Hero" >

            delete from hero where id= #{id} 

        delete>

        <select id="get" parameterType="_int" resultType="Hero">

            select * from   hero  where id= #{id}  

        select>

        <update id="update" parameterType="Hero" >

            update hero set name=#{name}, hp = #{hp} where id=#{id}  

        update>

        <select id="list" resultType="Hero">

            select * from   hero    

        select

    mapper>

步骤 15 : Service 接口

package com.how2java.springboot.service;

import java.util.List;

import com.how2java.springboot.pojo.Hero;

public interface HeroService {

    public int add(Hero hero);

    public void delete(int id);

    public Hero get(int id);

    public int update(Hero hero); 

    public List list();

}

步骤 16 : Service 实现类

package com.how2java.springboot.service.impl;

import java.util.List;

import org.springframework.beans.factory.annotation.Autowired;

import org.springframework.stereotype.Service;

import com.how2java.springboot.mapper.HeroMapper;

import com.how2java.springboot.pojo.Hero;

import com.how2java.springboot.service.HeroService;

@Service

public class HeroServiceImpl implements HeroService{

    @Autowired HeroMapper heroMapper;

    @Override

    public int add(Hero hero) {

        return heroMapper.add(hero);

    }

    @Override

    public void delete(int id) {

        heroMapper.delete(id);

    }

    @Override

    public Hero get(int id) {

        return heroMapper.get(id);

    }

    @Override

    public int update(Hero hero) {

        return heroMapper.update(hero);

    }

    @Override

    public List list() {

        return heroMapper.list();

    }

}

步骤 17 : Controller 类

首先 HeroController 分为两部分:
1. restful 部分
2. 页面跳转部分
restful 就提供 CRUD 等等操作
页面跳转主要用来跳转到 thymeleaf 对应的 html 文件

package com.how2java.springboot.web;

import java.util.List;

import org.springframework.beans.factory.annotation.Autowired;

import org.springframework.web.bind.annotation.DeleteMapping;

import org.springframework.web.bind.annotation.GetMapping;

import org.springframework.web.bind.annotation.PathVariable;

import org.springframework.web.bind.annotation.PostMapping;

import org.springframework.web.bind.annotation.PutMapping;

import org.springframework.web.bind.annotation.RequestBody;

import org.springframework.web.bind.annotation.RequestMapping;

import org.springframework.web.bind.annotation.RequestMethod;

import org.springframework.web.bind.annotation.RequestParam;

import org.springframework.web.bind.annotation.RestController;

import org.springframework.web.servlet.ModelAndView;

import com.github.pagehelper.PageHelper;

import com.github.pagehelper.PageInfo;

import com.how2java.springboot.pojo.Hero;

import com.how2java.springboot.service.HeroService;

@RestController

public class HeroController {

    @Autowired HeroService heroService;

    /*restful 部分*/

    @GetMapping("/heroes")

    public PageInfo list(@RequestParam(value = "start", defaultValue = "1") int start,@RequestParam(value = "size", defaultValue = "5") int size) throws Exception {

        PageHelper.startPage(start,size,"id desc");

        List hs=heroService.list();

        System.out.println(hs.size());

        PageInfo page = new PageInfo<>(hs,5); //5表示导航分页最多有5个,像 [1,2,3,4,5] 这样

        return page;

    }

    @GetMapping("/heroes/{id}")

    public Hero get(@PathVariable("id") int id) throws Exception {

        System.out.println(id);

        Hero h=heroService.get(id);

        System.out.println(h);

        return h;

    }

    @PostMapping("/heroes")

    public String add(@RequestBody Hero h) throws Exception {

        heroService.add(h);

        return "success";

    }

    @DeleteMapping("/heroes/{id}")

    public String delete(Hero h) throws Exception {

        heroService.delete(h.getId());

        return "success";

    }

    @PutMapping("/heroes/{id}")

    public String update(@RequestBody Hero h) throws Exception {

        heroService.update(h);

        return "success";

    }

    /*页面跳转 部分*/

    @RequestMapping(value="/listHero", method=RequestMethod.GET)

    public ModelAndView listHero(){

        ModelAndView mv = new ModelAndView("listHero");

        return mv;

    }

    @RequestMapping(value="/editHero", method=RequestMethod.GET)

    public ModelAndView editHero(){

        ModelAndView mv = new ModelAndView("editHero");

        return mv;

    }   

}

步骤 18 : js 文件

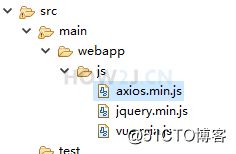
在 src/main/webapp 下新建 js 目录,里面放上3个要用到的 第三方 js 库: axios.min.js, jquery.min.js, vue.min.js
这3个文件压缩了在下载区(点击进入)下载

Vue.js + Restful + PageHelper + Thymeleaf + Springboot 前后端分离 增删改查 CRUD 教程_第2张图片

步骤 19 : 模板文件

在 resources 下新建 templates 目录,创建3个模板文件

Vue.js + Restful + PageHelper + Thymeleaf + Springboot 前后端分离 增删改查 CRUD 教程_第3张图片

  • listHero.html
  • editHero.html
  • errorPage.html

<html xmlns:th="http://www.thymeleaf.org">

<head>

    <meta http-equiv="Content-Type" content="text/html; charset=utf-8">

    <script src="./js/jquery.min.js">script>

    <script src="./js/vue.min.js">script>

    <script src="./js/axios.min.js">script>   

    <style type="text/css">

        td{

            border:1px solid gray;

        }

        table{

            border-collapse:collapse;

        }

        div#app{

            margin:20px auto;

            width:400px;

            padding:20px;

        }     

        div#pagination{

            text-align: center;

            line-height: 100px;

        }

        div#pagination a{

            text-decoration:none;

        }

        .disableHref{

            cursor:default;

            color:#E5E0E0;

            text-decoration:none;       

        }

    style>

    <script>

        $(function(){

            $("a.disableHref").click(function(event){

                return false;

//                event.preventDefault();

            });

        });

    script>

head>

<body>

    <div id="app">

            <table id="heroListTable" >

                    <tr>

                        <td colspan="3">

                            <div id="pagination" >

                                <a :class="{ disableHref: pagination.pageNum==1 }" href="#nowhere" @click="jump('first')">[first]a>

                                <a :class="{ disableHref: !pagination.hasPreviousPage }" href="#nowhere" @click="jump('pre')">[pre]a>

                                <a href="#nowhere" :class="{disableHref:pagination.pageNum==i}"  v-for="i in pagination.navigatepageNums" @click="jumpByNumber(i)" >

                                    {{i}}

                                a>

                                <a :class="{ disableHref: !pagination.hasNextPage }" href="#nowhere" @click="jump('next')">[next]a>

                                <a :class="{ disableHref: pagination.pageNum==pagination.pages }" href="#nowhere"@click="jump('last')">[last]a>

                            div>

                        td>

                    tr>

                    <tr>

                        <td>英雄名称td>

                        <td>血量td>

                        <td>操作td>

                    tr>

                    <tr v-for="hero in heros ">

                        <td>{{hero.name}}td>

                        <td>{{hero.hp}}td>

                        <td>

                            <a :href="'editHero?id=' + hero.id ">编辑a>

                            <a href="#nowhere" @click="deleteHero(hero.id)">删除a>

                        td>

                    tr>

                    <tr>

                        <td colspan="3">

                            <br>

                            英雄名称:

                            <input type="text"    v-model="hero4Add.name" />

                            <br>

                            血量:

                            <input type="number"    v-model="hero4Add.hp" />

                            <br>

                            <br>

                            <button type="button"  v-on:click="add">增加button>

                            <br>

                         td>                 

                    tr>

            table>

    div>

    <script type="text/javascript">

    var data4Vue = {

            heros: [],

            hero4Add: { id: 0, name: '', hp: '0'},

            pagination:{}

    };

    //ViewModel

    var vue = new Vue({

        el: '#app',

        data: data4Vue,

        mounted:function(){ //mounted 表示这个 Vue 对象加载成功了

            this.list(1);

        },       

        methods: {     

            list:function(start){

                var url = "heroes?start="+start;

                axios.get(url).then(function(response) {

                    vue.pagination = response.data;

                    console.log(vue.pagination);

                    vue.heros = response.data.list;

                })    

            },         

            add: function (event) {

                var url = "heroes";

                axios.post(url,this.hero4Add).then(function(response){

                    vue.list(1);

                    vue.hero4Add = { id: 0, name: '', hp: '0'}

                });

            },

            deleteHero: function (id) {

                var url = "heroes/"+id;

                axios.delete(url).then(function(response){

                    vue.list(1);

                });

            },

            jump: function(page){

                if('first'== page && 1!=vue.pagination.pageNum)

                    vue.list(1);

                else if('pre'== page && vue.pagination.hasPreviousPage )

                    vue.list(vue.pagination.prePage);

                else if('next'== page && vue.pagination.hasNextPage)

                    vue.list(vue.pagination.nextPage);                 

                else if('last'== page && vue.pagination.pageNum!=vue.pagination.pages)

                    vue.list(vue.pagination.pages);

            },

            jumpByNumber: function(start){

                if(start!=vue.pagination.pageNum)

                    vue.list(start);

            }

        }

    });

    script>

body>

html>

<html xmlns:th="http://www.thymeleaf.org">

<head>

    <meta http-equiv="Content-Type" content="text/html; charset=utf-8">

    <script src="./js/jquery.min.js">script>

    <script src="./js/vue.min.js">script>

    <script src="./js/axios.min.js">script>   

    <style type="text/css">

        div#app{

            margin:20px auto;

            width:400px;

            padding:20px;

        }     

    style>

head>

<body>

    <div id="app">

            <div id="div4Update">

                            英雄名称:

                            <input type="text"    v-model="hero4Update.name" />

                            <br>

                            血量:

                            <input type="number"    v-model="hero4Update.hp" />                      

                            <input type="hidden"    v-model="hero4Update.id" />                      

                            <br>

                            <button type="button"  v-on:click="update">修改button>               

                            <button type="button"  v-on:click="cancel">取消button>               

            div>

    div>

    <script type="text/javascript">

    //获取地址栏参数的函数

    function getUrlParms(name){

           var reg = new RegExp("(^|&)"+ name +"=([^&]*)(&|$)");

           var r = window.location.search.substr(1).match(reg);

           if(r!=null)

               return unescape(r[2]);

           return null;

    }

    var data4Vue = {

            heros: [],

            hero4Update: { id: 0, name: '', hp: '0'}

    };     

    //ViewModel

    var vue = new Vue({

        el: '#app',

        data: data4Vue,

        mounted:function(){ //mounted 表示这个 Vue 对象加载成功了

            this.get();

        },       

        methods: {

            get:function(){

                var id = getUrlParms("id");

                var url = "heroes/"+id;

                console.log(url);

                axios.get(url).then(function(response) {

                    vue.hero4Update = response.data;

                })    

            },

            update:function (event) {

                var url = "heroes/"+vue.hero4Update.id;

                axios.put(url,vue.hero4Update).then(function(response){

                    location.href="listHero";

                });

            },

            cancel:function(){

                location.href="listHero";

            }

        }

    });

    script>

body>

html>

<html xmlns:th="http://www.thymeleaf.org">

<body>

    <div style="width:500px;border:1px solid lightgray;margin:200px auto;padding:80px">

        系统 出现了异常,异常原因是:

        <div th:text="${exception}">div>

        出现异常的地址是:

        <div th:text="${url}">div>

    div>

body>

html>

步骤 20 : 启动测试

运行下面类的主方法启动项目

com.how2java.springboot.Application


然后访问测试地址:

http://127.0.0.1:8080/listHero


这就是前后端分离的 CRUD 了。
没有套用 bootstrap 美化界面,尽量要足够少的知识来展现本教程的核心内容,以免被分散精力。

Vue.js + Restful + PageHelper + Thymeleaf + Springboot 前后端分离 增删改查 CRUD 教程_第4张图片


更多内容,点击了解: https://how2j.cn/k/springboot/springboot-vue/1788.html