NIIT实训(春季 git + Maven + Springboot + MyBatis + Vue)第二次
文章目录
-
- DAY3
-
- 创建SpringBoot项目:
- 知识点:
- 注释
- RESTful 风格
- DAY4
-
- 端口占用解决方案:
- 静态资源访问:
- 配置文件:
- java里面读取配置文件
- 小技巧
- DAY5
-
- MyBatis
- 项目结构:
- DAY6
-
- 驼峰配置
- 别名配置:
- 接受参数
DAY3
创建SpringBoot项目:
创建一个springboot项目,他其实就是一个maven项目,不过选的时候要注意版本,2.7.9,springboot版本。再就是java版本,也要与其对应,这里1.8就可以的。需要注意。
知识点:
主启动项;
// 主启动类
@SpringBootApplication
public class DemoApplication {

    public static void main(String[] args) {
        SpringApplication.run(DemoApplication.class, args);
    }

}
项目跑起来的时候可以通过控制台看到里面内嵌一个tomcat,所以不需要我们进行配置。
注释
@Controller          //将其变为控制器类,浏览器可以与其关联

@ResponseBody        //让其返回的是实体一类的,否则他回去找对应的页面

//@RestController  //等价于@Controller 和 @RestController

@RequestMapping("/stuinfo")    //使其与浏览器地址进行匹配,从而进入对应方法

有安全风险,不建议,requestmapping支持所有方法,get, post等等。

@GetMapping   //等于只限定与get方法,其他的类似
RESTful 风格
就是将传统的访问方式进行修改。
RESTful一种风格
当初                       现在
getUserById?id=1          user/1 ->get请求方式   获取

saveUser                  user/  ->post方式      保存

deleteUser?id=1           user/1  ->delete请求方式    删除

updateUser                user     ->put请求        更新
代码:
    @RequestMapping("/getStudentById") //传统设计方式
    public Student getStudent(HttpServletRequest request){
        String id = request.getParameter("id");
        System.out.println("学生ID =  " + id);
        Student student = new Student();
        student.setStuName("Tom");
        student.setStuCode("12019242337");

        return student;
    }

    @RequestMapping("/student/{id}") //RESTful风格
    public Student getStudentWithRest(@PathVariable("id") String id){
        System.out.println("学生ID =  " + id);
        Student student = new Student();
        student.setStuName("Tom(RESTful)");
        student.setStuCode("12019242337");

        return student;
    }
可以看见书写方式不同,再就是地址栏访问方式也不同, 以后书写尽量使用RESTful风格。
创建类的时候用大驼峰命名法,其他的一般都是小驼峰。
有时候因为版本问题以及缓存问题,会造成404,所以可以使用mvn clean 和mvn compile进行使用。
DAY4
端口占用解决方案:
可以改变端口,也可以将其杀掉或者重启。
netstat -ano | findstr 8080

taskkill /f /pid 20256
状态栏进入系统管理器,或者CLRT+SHIFT+ESC进入之后关闭。
静态资源访问:
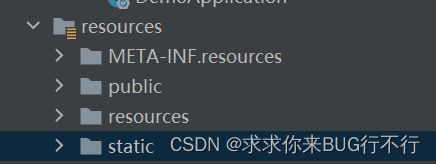
static是自动生成,其他三个创建之后都可以访问,META-INF文件夹创建之后再在他下面创建resources目录即可。

配置文件:
properties里面书写方式
# key.key=value
server.port=8082

yml
server:
  port: 8081
java里面读取配置文件
实体类:
@Component  //表示该类已交由spring管理,Spring加载的过程中会对bean进行初始化,实例化
public class User {
        @Value("${user.custom.email}")
        private String email;
        @Value("${user.custom.phone}")
        private String phone;
        @Value("${user.custom.name}")
        private String name;

@Autowired  //将User自动注入到当前类,他会从容器里面去找一个实体
private User user;

// User user = new User();  //new 之后是无参的
第二种方式:
@Component  //表示该类已交由spring管理,Spring加载的过程中会对bean进行初始化,实例化
@ConfigurationProperties(prefix = "user.custom") //直接从配置文件读取
public class Customer {

    private String email;
    private String phone;
    private String name;

@Autowired
private Customer custom;
小技巧
使用lombok简化实体类里面的getter setter等方法
        <dependency>
            <groupId>org.projectlombok</groupId>
            <artifactId>lombok</artifactId>
        </dependency>


之后在实体类上面添加注解
@NoArgsConstructor
@AllArgsConstructor
@Data
public class Student {

    private String stuCode;
    private String stuName;

}
DAY5
MyBatis
创建表
2003-Can't connect to MySql

这个错误是没有开始MySql服务,进入计算机管理开启服务即可
注意:
创建项目的时候,最好是关闭当前的,重头开始创建。当我们在一个文件夹下面创建项目时,他会扫描根项目,寻找pom,但本来就没有,所以会导致错误。
配置文件:
 <!--MyBatis整合springboot起步依赖-->
        <dependency>
            <groupId>org.mybatis.spring.boot</groupId>
            <artifactId>mybatis-spring-boot-starter</artifactId>
            <version>2.2.2</version>
        </dependency>

properties

#连接数据库信息#时区注意配置
#MySQL6以上就要使用com.mysql.cj.jdbc,Driver
spring.datasource.driver-class-name=com.mysql.jdbc.Driver
#这里是连接MySQL,端口号,springjdbc为数据库名,后面为一些基本配置,一般都需要。
spring.datasource.url=jdbc:mysql://localhost:3306/MyBatis?serverTimezone=Asia/Shanghai&useUnicode=true&characterEncoding=utf8&useSSL=false
#下面是连接数据库的用户名和密码
spring.datasource.username=root
spring.datasource.password=niit1234

###MyBatis的核心配置
#配置MyBatis的 mapper 映射文件的加载路径
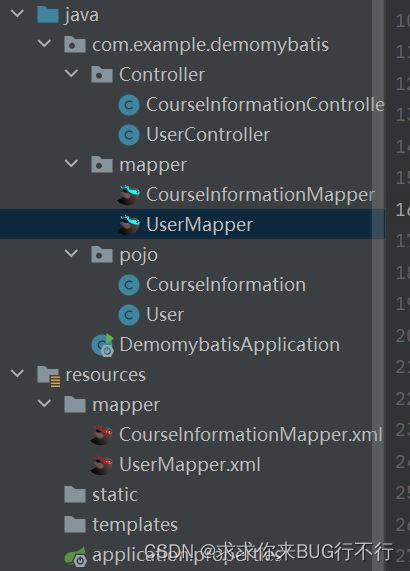
mybatis.mapper-locations=classpath:mapper/*Mapper.xml

#配置MyBatis设置别名的包名,别名的设置会将指定包中的类映射为类型,而无需编写类的全名
#mybatis.type-aliases-package=cn.niit.entity.domain
项目结构:
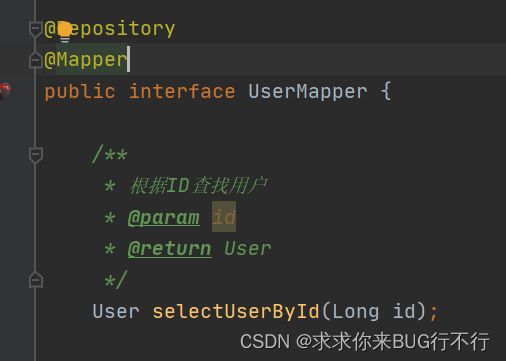
@Repository //将其交给springboot管理

UserMapper.XML文件
<?xml version="1.0" encoding="UTF-8" ?>
<!DOCTYPE mapper
        PUBLIC "-//mybatis.org//DTD Mapper 3.0//EN"
        "http://mybatis.org/dtd/mybatis-3-mapper.dtd">

<!-- namespace 将 XxxMapper.java 接口类与 XxxMapper.xml 做映射 -->
<mapper namespace="com.example.demomybatis.mapper.UserMapper">

    <!--根据ID查找用户-->
    <select id="selectUserById" resultType="com.example.demomybatis.pojo.User">

        select * from tb_user where id=123

    </select>


</mapper>
DAY6
驼峰配置
将数据库a_column 映射到Java实体aColumn

mybatis.configuration.map-underscore-to-camel-case=true
别名配置:
    <!--根据ID查找课程信息-->
    <select id="selectCourseInformationById" resultType="com.example.demomybatis.pojo.CourseInformation">

        select * from course_information where id=12345

    </select>
一直使用com.example.demomybatis.pojo.CourseInformation比较麻烦而且多。

在实体上给一个别名
@Alias("CourseInformation")
public class CourseInformation {

------>

    <!--根据ID查找课程信息-->
    <select id="selectCourseInformationById" resultType="CourseInformation">
        select * from course_information where id=12345
    </select>
    目前只有IDEA认识,但是spring不认识,会导致不能自动注入
在上面加一个@Component
之后还是报错。
注意取得别名不能重复
后面还需要在配置文件里面进行配置
#别名配置
mybatis.type-aliases-package=com.example.demomybatis.pojo
这样就可以了
如果不在实体上面加备注,那么就直接实体名即可,大小写不敏感。
接受参数
CourseInformation selectCourseInformationById(Long id);
接受参数 #{参数名},为传过来的参数名
select * from tb_user where id=#{id}
传过来一个的时候,直接传到占位符,不管名字是否匹配
select * from tb_user where id=#{name} 其他名字都行
多个参数时
    <!--多个简单类型
    1、默认使用方法中的参数变量名;
    2、可以使用param1、param2 按照顺序依次接收;
    3、 [推荐]在方法的参数前使用@Param注解, 给该参数一 个自定义的变量名,供占位符中使用。
    例如: @Param( "username") String userName, 占位符中即可使用: username=#{username}
    也可以使用:
    select * from tb_user where username=#{param1} and password=#{param2};
    -->
    <select id="selectUserByUsernamePassword" resultType="User">

        select * from tb_user where username=#{username} and password=#{password};

    </select>
传入类型是实体类
因为如果改了某个实体类,那么你后面需要改的东西就一连串,为了解决这个问题,就引入实体类。
@Test
    public void testSelectUserByUser(){
        User paramUser = new User( ) ;
        paramUser.setUsername( "1233");
        paramUser.setPassword("123");
        paramUser.setPhone( "123");
        paramUser.setEmail("123");
        User user = userMapper.selectUserByUser(paramUser);
        System.out.println("多个简单类型,testSelectUserByUsernamePassword = "
                + user);
    }

Mapper里面方法
User selectUserByUser(User user);

SQL语句:
    <select id="selectUserByUser" resultType="User" parameterType="User">

        select * from tb_user where username=#{username}
            and password=#{password}
            and phone=#{phone}
            and email=#{email}

    </select>


