前端之Web API
前端之Web API
- API
-
- 它们是基于对象的
- 客户端 JS中API
- 操作文档
-
- 文档对象模型
- DOM操作
- 移动和删除元素
- 操作样式
-
- 任意时刻,窗口占满;
- 网页实例:[动态购物清单](https://chen110s.github.io/learn.github.io/shopping-list.html)
- 从服务器获取数据的API
-
- 基本的Ajax请求 XHR和 Fetch
-
- XMLHttpRequest
- fetch
-
- 响应失败防范措施:
- 第三方 API
- 绘制2D图形 canvas
-
- 填充颜色
- 绘制线条
- 绘制路径
-
- 画线填充
- 画圆
- 绘制文本
- 绘制图片
-
- 网页实例:[动画实例](https://chen110s.github.io/learn.github.io/project/bouncing-balls-start2/index.html)
- 网页实例:[动画实例](https://chen110s.github.io/learn.github.io/canvas-draw-animation.html)
- 3D
- 视频和音频 API
- 设备API
- 客户端存储
-
- HTTP cookie (Web cookie)
-
- 示例
- Cookie 的作用域
Web APIs
API
API:应用程序接口,可以通过提供的接口直接使用某种功能。相当于插座上的接口。
它们是基于对象的
对象是API使用的数据(包含在对象属性中)的容器以及API提供的功能(包含在对象方法中)。
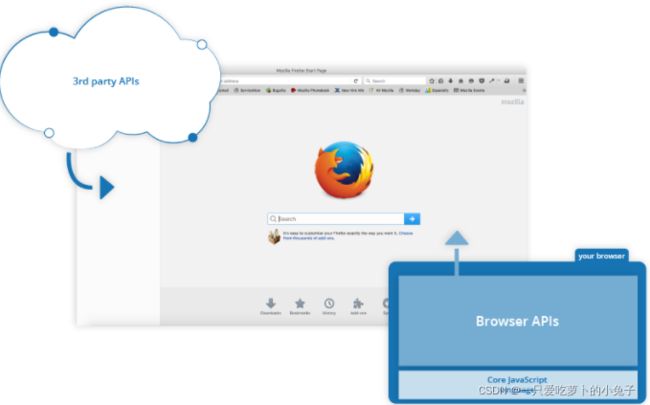
客户端 JS中API
不是JS的一部分,但是是在JS的基础上构建的。
种类:
操作文档
使用文档对象模型Document Object Model (DOM)操作WEB文档。
作用:使用Document对象 操作文档结构,操作HTML和CSS — 创建、移除以及修改HTML,动态地应用新样式。
navigator表示浏览器存在于web上的状态和标识(即用户代理)。
可以用这个对象获取一些信息,比如来自用户摄像头的地理信息、用户偏爱的语言、多媒体流等等。
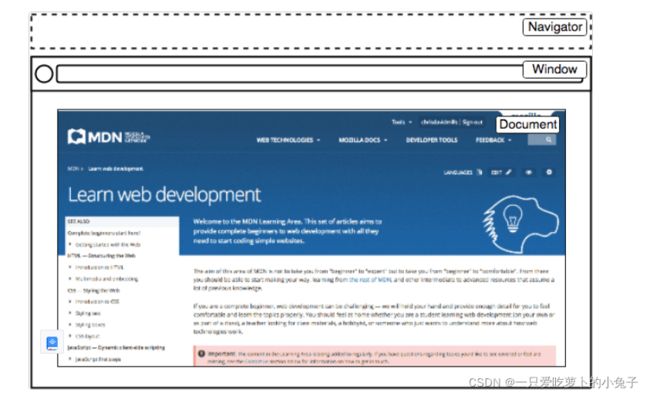
window是载入浏览器的标签
窗口大小:Window.innerWidth和Window.innerHeight
document(在浏览器中用DOM表示)是载入窗口的实际页面。
用这个对象来返回和操作文档中HTML和CSS上的信息。获取DOM中一个元素的引用,修改其文本内容,并应用新的样式,创建新的元素并添加为当前元素的子元素,甚至把他们一起删除。
文档对象模型
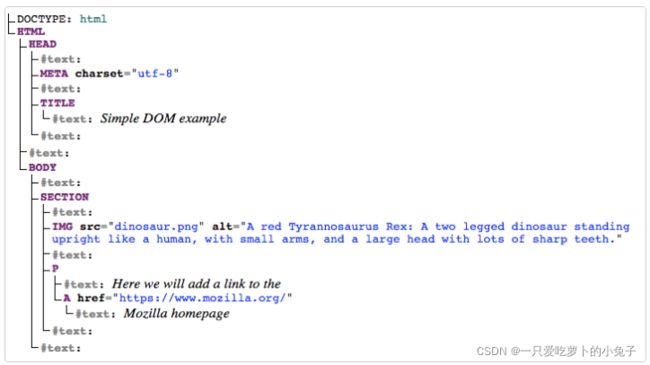
DOM(文档对象模型)是W3C组织推荐的处理可扩展置标语言的标准编程接口。它是一种与平台和语言无关的应用程序接口(API),它可以动态地访问程序和脚本。
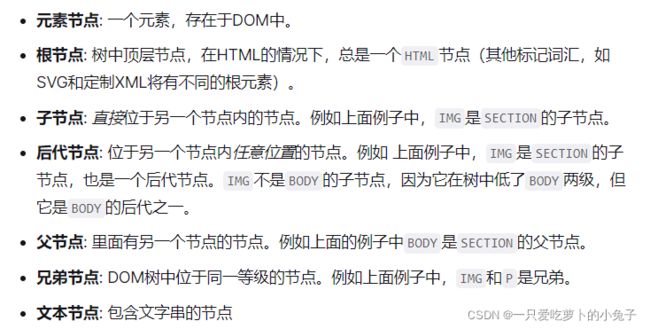
DOM树整个文档的以 “树结构” 的形式呈现。
DOM操作
- 修改节点内容
- 元素引用:选择要操作的元素,并将它的引用存储在对象中(const 或 var);
- 根据元素属性进行修改
- 创建新结点
- document.create()创建一个段落节点, 添加结点内容,追加到文档(网页)后方 appendChild().
- 创建文本节点 document.createTextNode()
移动和删除元素
- 移动到末尾:
父元素.appendChild(元素引用);
- 删除节点:
删除节点.parentNode.removeChild(删除节点);
操作样式
- 动态设置样式 – 内联样式
元素引用.style.属性 = '';
属性名的规则是小驼峰命名法.
para.style.color = 'white';
para.style.backgroundColor = 'black';
para.style.padding = '10px';
para.style.width = '250px';
para.style.textAlign = 'center';
- 设置元素属性 – 类(更加正式,没有css,js混合)
Element.setAttribute();
eg:
<style>
.highlight {
  color: white;
  background-color: black;
  padding: 10px;
  width: 250px;
  text-align: center;
}
</style>

para.setAttribute('class', 'highlight');
任意时刻,窗口占满;
        // 元素引用
        var div = document.querySelector('div');
        // 窗口大小
        var WIDTH = window.innerWidth;
        var HEIGHT = window.innerHeight;

        // 改变div宽高
        div.style.width = WIDTH + 'px';
        div.style.height = HEIGHT + 'px';

        // 窗口改变大小时,触发
        window.onresize = function() {
            winWidth = window.innerWidth;
            winHeight = window.innerHeight;
            div.style.width = winWidth + 'px';
            div.style.height = winHeight + 'px';
        }
网页实例:动态购物清单
支持回车添加item。
从服务器获取数据的API
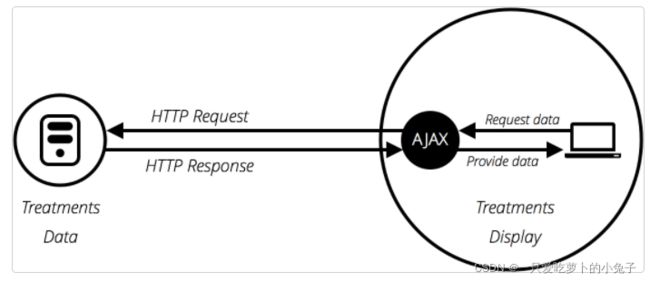
API:包括XMLHttpRequest和Fetch API。(Ajax)
作用:更新网页的一小部分。
最初:

缺点: 更新网页的任何一部分都需要,重新加载整个网页.
后来 :
使用AJAX更新页面的一部分 :
- 不刷新页面更新网页;
- 在页面加载后从服务器请求数据;
- 在页面加载后从服务器接收数据;
- 在后台向服务器发送数据;
AJAX 代表异步 JavaScript 和 XML
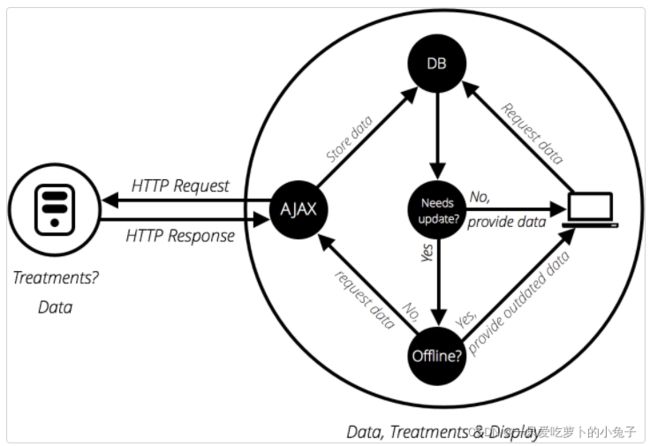
为了进一步提高速度,有些网站还会在首次请求时将某些存储在用户的计算机上,如下图 :
基本的Ajax请求 XHR和 Fetch
body:
    <h1>Ajax的起点h1>

    <form>
        <label for="verse-choose">选择一个节label>
        <select id="verse-choose" name="verse-choose">
            <option>Verse 1option>
            <option>Verse 2option>
            <option>Verse 3option>
            <option>Verse 4option>
        select>
    form>

    <h2>征服蠕虫,<em>埃德加·爱伦·坡,1843年em>h2>

    <pre>

    pre>
XMLHttpRequest
        const verseChoose = document.querySelector('select');
        const poemDisplay = document.querySelector('pre');

        verseChoose.onchange = function() {
            const verse = verseChoose.value;
            updateDisplay(verse);
        };

        function updateDisplay(verse) {
            verse = verse.replace(" ", "");
            verse = verse.toLowerCase();
            let url = verse + '.txt';

            let request = new XMLHttpRequest();
            request.open('GET', url);
            request.responseType = 'text';

            // 从网络获取资源是一个 "异步" 操作,等他结束才能继续操作
            request.onload = function() {
                poemDisplay.textContent = request.response;
            }

            request.send();

            // --------------------------------------------------
            // fetch(url)
            //     .then(response => response.text())
            //     .then((text) => {
            //         poemDisplay.textContent = text;
            //     })
        }

        updateDisplay('Verse 1');
        verseChoose.value = 'Verse 1';
fetch
fetch() 返回一个解析HTTP响应的promise, 你在 .then() 中定义的任何函数会被自动给与一个响应作为一个参数,这个参数可以取任何名字。
- fetch的响应:response.ok表示响应是否成功。
2.响应失败, 响应的网络状态和描述性消息分别包含在response.status和response.statusText属性中。 - 响应成功,响应结果的类型:response.blob()图像或视频,text(),json();
        const verseChoose = document.querySelector('select');
        const poemDisplay = document.querySelector('pre');

        verseChoose.onchange = function() {
            const verse = verseChoose.value;
            updateDisplay(verse);
        };

        function updateDisplay(verse) {
            verse = verse.replace(" ", "");
            verse = verse.toLowerCase();
            let url = verse + '.txt';

            // let request = new XMLHttpRequest();
            // request.open('GET', url);
            // request.responseType = 'text';

            // // 从网络获取资源是一个 "异步" 操作,等他结束才能继续操作
            // request.onload = function() {
            //     poemDisplay.textContent = request.response;
            // }

            // request.send();

            // --------------------------------------------------
            fetch(url)
                .then(response => response.text())
                .then((text) => {
                    poemDisplay.textContent = text;
                })
        }

        updateDisplay('Verse 1');
        verseChoose.value = 'Verse 1';
响应失败防范措施:
        fetch(url)
            .then(response => {
                if (!response.ok) {
                    throw new Error(`HTTP error: ${response.status}`);
                }
                return response.blob();
            })
            .then(blob => showProduct(blob, product))
            .catch(err => console.error(`Fetch problem: ${err.message}`));
第三方 API
许多大型网站和服务提供的API就是第三方API,他们允许开发者使用他们的数据或服务。
第三方API,从某种角度讲,植根于第三方服务器上。
-
组织url
-
请求头
-
请求响应成功(是/否)
-
数据处理
-
使用数据
绘制2D图形 canvas
作用:以编程方式更新包含在HTML
浏览器包含强大的图形编程工具, 如:可缩放矢量图形 (SVG)到
填充颜色
fill填充
画布实例:
- 在 HTML 中插入一个
<canvas class="myCanvas">
  <p>添加恰当的反馈信息。p>
canvas>
2.JS
        // 画布的基础设置
        // 1.对画布元素进行引用
        const canvas = document.querySelector('.myCanvas');

        // 2设置画布宽高
        var width = canvas.width = window.innerWidth;
        var height = canvas.height = window.innerHeight;

        // 3.对画布的上下文引用并设置格式,用来绘图
        const ctx = canvas.getContext('2d');

        // 画布api
        // 4.填充样式
        ctx.fillStyle = 'rgb(0,0,0)';

        // 5.填充矩形
        ctx.fillRect(0, 0, width, height);

		// 自适应浏览器窗口
        // window.onresize = function() {
        //     let width = canvas.width = window.innerWidth;
        //     let height = canvas.height = window.innerHeight;
        //     ctx.fillRect(0, 0, width, height);
        // }
ctx.fillRect(0, 0, width, height):
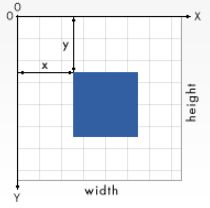
注意:
新层覆盖旧层,绘制顺序十分重要。
绘制线条
stroke绘制边框
        // 6.线条颜色,宽度
        ctx.strokeStyle = 'rgb(255,0,255)'
        ctx.lineWidth = 10;

        // 绘制图形
        ctx.strokeRect(25, 25, 175, 200);
        // 画布的基础设置
        // 1.对画布元素进行引用
        const canvas = document.querySelector('.myCanvas');

        // 2设置画布宽高
        var width = canvas.width = window.innerWidth;
        var height = canvas.height = window.innerHeight;

        // 3.对画布的上下文引用并设置格式,用来绘图
        const ctx = canvas.getContext('2d');

        // 画布api
        // 4.填充样式
        // ctx.fillStyle = 'rgba(0,0,0,0.75)';

        // 5.填充矩形
        // ctx.fillRect(0, 0, width, height);

        // 绘制线条
        // 6.线条颜色,宽度
        ctx.strokeStyle = 'rgb(255,0,255)'
        ctx.lineWidth = 10;

        // 7.绘制图形
        ctx.strokeRect(25, 25, 175, 200);
绘制路径
beginPath():在钢笔当前所在位置开始绘制,默认情况下, 钢笔起始位置为 (0, 0)。
moveTo():不留痕迹的将钢笔“跳”至新位置。
fill():通过为当前所绘制路径的区域填充颜色来绘制一个新的填充形状。
stroke():通过为当前绘制路径的区域描边,来绘制一个只有边框的形状。
路径也可和矩形一样使用 lineWidth 和 fillStyle / strokeStyle 等功能。
画线填充
DOCTYPE html>
<html lang="en">

<head>
    <meta charset="UTF-8">
    <meta http-equiv="X-UA-Compatible" content="IE=edge">
    <meta name="viewport" content="width=device-width, initial-scale=1.0">
    <title>绘制路径title>
    <style>
        body {
            margin: 0;
            overflow: hidden;
        }
    style>
head>

<body>
    <canvas class="myCanvas">
        <p>Add suitable fallback here.p>
    canvas>

    <script>
        const canvas = document.querySelector('.myCanvas');
        const width = canvas.width = window.innerWidth;
        const height = canvas.height = window.innerHeight;
        const ctx = canvas.getContext('2d');

        ctx.fillStyle = 'rgb(0,0,0)';
        ctx.fillRect(0, 0, width, height);

        // 准备颜色
        ctx.fillStyle = 'rgb(255, 0, 0)';
        // 放入钢笔 -- 开始
        ctx.beginPath();
        //更换钢笔落笔位置
        ctx.moveTo(50, 50);
        // lineTo 移动到
        ctx.lineTo(150, 50);
        var triHeight = 50 * Math.tan(degToRad(60));
        ctx.lineTo(100, 50 + triHeight);
        ctx.lineTo(50, 50);
        // 绘制路径 -- 结束并填充颜色
        ctx.fill();

        // js使用弧度值
        // 函数:角度转弧度
        function degToRad(degrees) {
            return degrees * Math.PI / 180;
        }
    script>
body>

html>
画圆
<!DOCTYPE html>
<html lang="en">

<head>
    <meta charset="UTF-8">
    <meta http-equiv="X-UA-Compatible" content="IE=edge">
    <meta name="viewport" content="width=device-width, initial-scale=1.0">
    <title>绘制路径</title>
    <style>
        body {
            margin: 0;
            overflow: hidden;
        }
    </style>
</head>

<body>
    <canvas class="myCanvas">
        <p>Add suitable fallback here.</p>
    </canvas>

    <script>
        // 1.准备画板
        const canvas = document.querySelector('.myCanvas');
        const width = canvas.width = window.innerWidth;
        const height = canvas.height = window.innerHeight;
        const ctx = canvas.getContext('2d');

        ctx.fillStyle = 'rgb(0,0,0)';
        ctx.fillRect(0, 0, width, height);

        // 2.准备颜色
        ctx.fillStyle = 'rgb(0, 0, 255)';
        // 3.放入画笔
        ctx.beginPath();

        // 4.画圆,圆心,半径,弧度起点,弧度终点,逆时针方向(弧度为零的点是时钟三的位置)
        ctx.arc(100, 100, 100, degToRad(0), degToRad(-90), true);

        // 6.绘制路径,提笔填充线围成的图形
        ctx.fill();

        ctx.fillStyle = 'yellow';
        ctx.beginPath();
        ctx.arc(100, 100, 50, degToRad(0), degToRad(90), false);
        ctx.lineTo(100, 100);
        ctx.fill();

        // js使用弧度值
        // 函数:角度转弧度
        function degToRad(degrees) {
            return degrees * Math.PI / 180;
        }
    </script>
</body>

</html>
绘制文本
fillText() :绘制有填充色的文本。
strokeText():绘制文本外边框(描边)。
        // 文本外边框 -- 描边
        ctx.strokeStyle = 'white';
        ctx.lineWidth = 1;
        ctx.font = '36px arial';
        ctx.strokeText('Canvas text', 50, 50);

        // 文字
        ctx.fillStyle = 'red';
        ctx.font = '48px georgia';
        ctx.fillText('Canvas text', 50, 150);
绘制图片
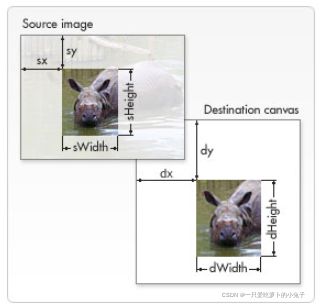
            // 绘制图片1:图片对象,起点,图片宽高
            // ctx.drawImage(image, 50, 50, 100, 100);
            // 绘制图片2:图片对象,裁剪图片(图片的左上角默认0,0),裁剪尺寸,绘制的位置,200尺寸
            ctx.drawImage(image, 20, 30, 400, 250, 50, 100, 300, 200);
<body>
    <canvas class="myCanvas">
        <p>Add suitable fallback here.</p>
    </canvas>

    <script>
        // 1.准备画板
        const canvas = document.querySelector('.myCanvas');
        const width = canvas.width = window.innerWidth;
        const height = canvas.height = window.innerHeight;
        const ctx = canvas.getContext('2d');

        ctx.fillStyle = 'rgb(0,0,0)';
        ctx.fillRect(0, 0, width, height);

        // 将相片嵌入画布
        var image = new Image();
        image.src = './images/tea.jpg';
        image.onload = function() {
            // 绘制图片1:图片对象,起点,图片宽高
            // ctx.drawImage(image, 50, 50, 100, 100);
            // 绘制图片2:图片对象,裁剪图片(图片的左上角默认0,0),裁剪尺寸,绘制的位置,200尺寸
            ctx.drawImage(image, 20, 30, 400, 250, 50, 100, 300, 200);
        }
    </script>
</body>
网页实例:动画实例
网页实例:动画实例
3D
视频和音频 API
HTML5提供了
    <video controls>
        <source src="./video/475829081-1-112.mp4" type="video/mp4" />
        <source src="./video/475829081-1-112.webm" type="video/webm" />
        <p>
            你的浏览器不支持HTML5的视频,请<a href="rabbit320.mp4">点击链接</a>
            观看。
        </p>
    </video>
video标签内的段落在浏览器不支持video标签事才显示
controls属性会启用默认的播放控件,但是跨浏览器的支持方面存在问题。可以通过删除controls属性,使用HTMLMediaElement API来控制视频和音频的功能。
设备API
对网络应用程序有用的方式操作和检索现代设备硬件中的数据的API。如:地理定位API
客户端存储
在用户电脑web客户端存放数据的方法,可以保留自己的个性化配置,如主题、是否登录过,线下访问
HTTP cookie (Web cookie)
示例
示例1:
Set-Cookie: <cookie名>=<cookie值>
示例2:
Set-Cookie: id=a3fWa; Expires=Wed, 21 Oct 2015 07:28:00 GMT;
过期时间,以客户端时间为准。
示例3:
Set-Cookie: id=a3fWa; Expires=Wed, 21 Oct 2015 07:28:00 GMT; Secure; HttpOnly
secure : 可以预防 man-in-the-middle 攻击者的攻击
HttpOnly : 此类 Cookie 仅作用于服务器。
Cookie 的作用域
Domain 和 Path 标识定义了Cookie的作用域:即允许 Cookie 应该发送给哪些URL。
Domain:
不写,默认origin,不包含子域名。
如果指定Domain,通常包含域名。如
Domain=mozilla.org,则 Cookie 也包含在子域名中(如developer.mozilla.org)。
Path:
Path 标识指定了主机下的哪些路径可以接受 Cookie(该 URL 路径必须存在于请求 URL 中)。如
Path=/docs
以下地址也会包含在内
/docs
/docs/Web/
/docs/Web/HTTP
SameSite :
SameSite Cookie 允许服务器要求某个 cookie 在跨站请求时不会被发送,可以阻止跨站请求伪造攻击(CSRF)。
Set-Cookie: key=value; SameSite=Strict
SameSite 的三种值
None。浏览器会在同站请求、跨站请求下继续发送 cookies,不区分大小写。
Strict。浏览器将只在访问相同站点时发送 cookie。(在原有 Cookies 的限制条件上的加强,如上文 “Cookie 的作用域” 所述)
Lax。与 Strict 类似,但用户从外部站点导航至URL时(例如通过链接)除外。 在新版本浏览器中,为默认选项,Same-site cookies 将会为一些跨站子请求保留,如图片加载或者 frames 的调用,但只有当用户从外部站点导航到URL时才会发送
Cookie曾经用于客户端数据的存储,由于每次向服务端发送请求时都会携带cookie,带来性能的下降,所以现在渐渐被淘汰。取而代之的是用 Web storage API (本地存储和会话存储)或 IndexedDB 。
Web storage 用于存储少量数据;
indexedDB 用于存储大量结构化数据;
Web storage :
sessionStorage 存储的数据在浏览器打开期间都可以用,包括重新加载和恢复。
localStorage 浏览器关闭后重新打开,数据仍然存在。
indexedDB :
