Asp.Net WebAPI is a framework for building RESTful HTTP services which can be used across a wide range of clients including web, phone and desktop applications. With WebAPI we can use XML and JSON to send and retrieve data from the service. The use of Json or XML makes it quite flexible to be used across a variety of devices.
Although WebAPI ships and installs with ASP.Net MVC 4, it can be used in normal Web Forms application as well.
In this example, we will use WebAPI with a traditional Web Forms application for adding and displaying a list of User Information. We will be using Visual Studio 2012 and .Net 4.5.
Creating the Project
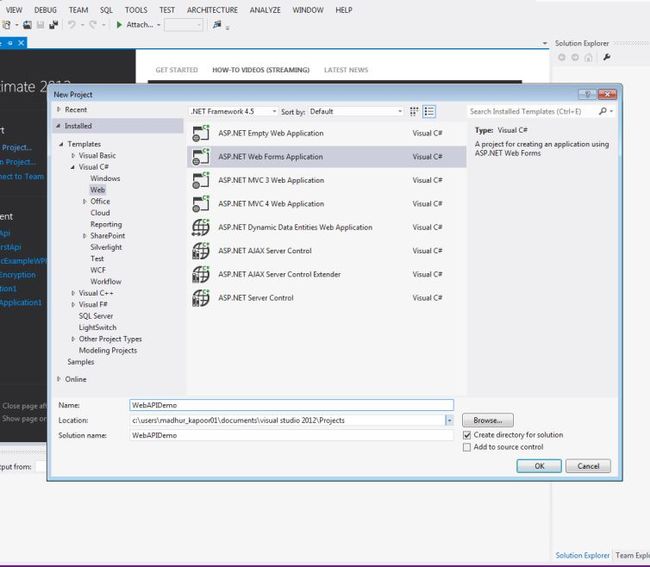
Open Visual Studio 2012, Go To New -> Project. Select Visual C# -> Web from the left hand navigation and select project type as ASP.Net Web Forms Application. Enter the project name as WebAPIDemo
A new project will be created with a default template and our solution will show the following structure
Adding Model Class
We will then add a Model Class to our project. The Model class will represent the data in our application. We will add a model class called Users in our project
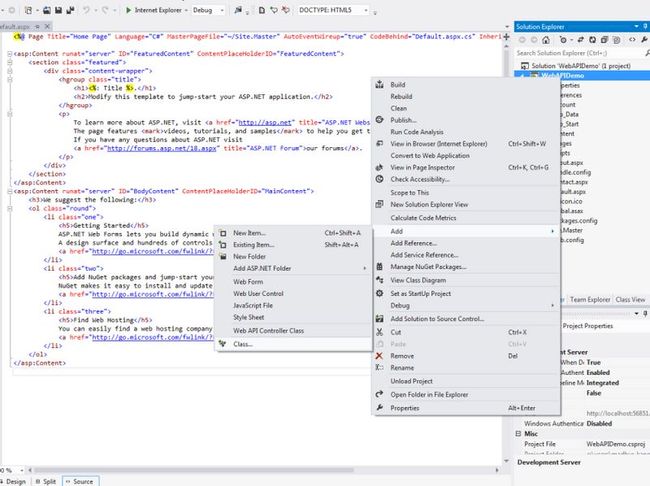
Right Click the Project in the Solution Explorer, Select Add -> Class from the Context Menu. The name of the class will be “Users” and it will have the following properties
namespace WebAPIDemo
{
    public class Users { public int Id { get; set; } public string FirstName { get; set; } public string LastName { get; set; } public string Company { get; set; } public string Email { get; set; } public string PhoneNo { get; set; } } }
The WebAPI can automatically serialize the model as JSON or XML object and will write the data in the body of the HTTP response. If the clients can read the serialize data, they will be able to deserialize it. Most of the clients are able to read the XML or JSON data. The clients can also specify the format it wants by setting the “Accept Header” property in the request message.
Creating The Repository
Ideally in a production scenario, we should be storing our data in some sort of persistent storage like database but to keep this demo simple, we will storing it in local memory.
To keep our storage implementation separate from the application code, we will be using Repository pattern. This way we can change our storage implementation at any future data without many changes to the application code.
We will start by creating a generic repository interface. Add a new class to the project and call it“IUserRepository”. It will have the following code
namespace WebAPIDemo
{
    public interface IUserRepository { IEnumerable<Users> GetAllUsers(); string AddUser(Users user); Users GetUserById(int id); void DeleteUser(int id); } }
The “GetAllUsers” function return a list of the all the users. The “AddUser” function will add a new user and“GetUserById” will return a particular user based on the id that has been passed.
Add a Class to the solution called “UserRepository”. The class will implement the “IUserRepository” and will have the following implementation.
namespace WebAPIDemo
{
public class UserRepository : IUserRepository { private List<Users> userList = new List<Users>(); private int _id = 3; public UserRepository() { userList.Add(new Users { Id = 1, FirstName = "Madhur", LastName = "Kapoor", Company = "ABC", Email = "[email protected]", PhoneNo = "65431546" }); userList.Add(new Users { Id = 2, FirstName = "Alan", LastName = "Wake", Company = "XYZ Corp", Email = "[email protected]", PhoneNo = "64649879" }); } public IEnumerable<Users> GetAllUsers() { return userList; } public string AddUser(Users user) { user.Id = _id++; userList.Add(user); return "User added"; } public Users GetUserById(int id) { var user = userList.FirstOrDefault<Users>((p) => p.Id == id); if (user == null) { throw new HttpResponseException(HttpStatusCode.NotFound); } return user; } public void DeleteUser(int id) { var user = userList.FirstOrDefault<users>((p) => p.Id == id); if (user == null) { throw new HttpResponseException(HttpStatusCode.NotFound); } userList.Remove(user); } }</users>
In the class, we are using a local variable “userList” to store all the users. In the constructor, we are adding a few records to the list.
The “AddUser” function adds a new user to the list with a new Id.
The “GetUserByID” function uses a LINQ query to return the user with the specified id. If the user is not found, an HTTPResponseException is thrown which is interpreted by browser as “404” error.
You will need to add a reference to the “System.Web.Http” for the HttpResponseException class to work.
Creating The WebAPI Controller
We will now add a WebAPI controller to the solution. A WebAPI controller is a class that handles the HTTP request by the clients. WebAPI Controllers are similar to MVC Controllers except they derive from “ApiController” class instead of “Controller” class.
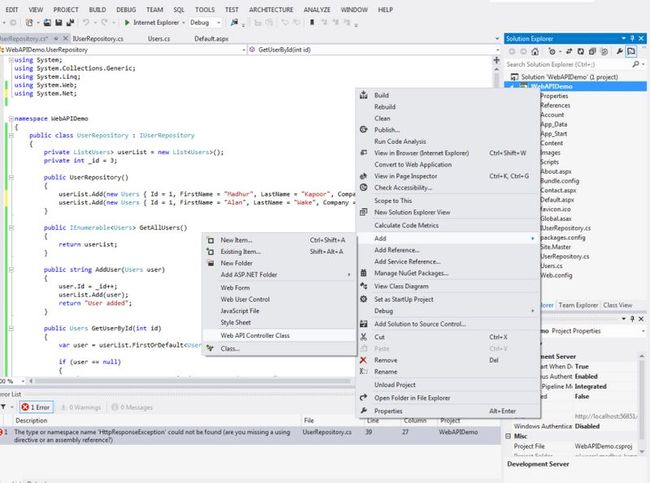
Right Click the solution, select Add -> Web API Controller Class. Name the Controller class as “UserController”.
The controller class will have some default function for Get, Put, Delete etc. Delete those functions and add the following functions so the code will look like below.
namespace WebAPIDemo
{
    public class UserController : ApiController { static IUserRepository repository = new UserRepository(); public IEnumerable<Users> GetAllUsers() { var users = repository.GetAllUsers(); return users; } public Users GetUserById(int id) { var user = repository.GetUserById(id); return user; } public string AddUser(Users user) { var response = repository.AddUser(user); return response; } public void DeleteUser(int id) { repository.DeleteUser(id); } } }
Adding Route in Global.asax
For the controller to handle requests of a particular type, we will have to define a route in the Global.asax file.
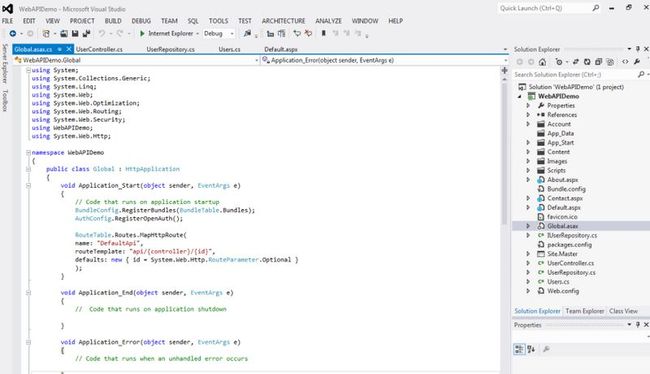
Open global.asax file and add the following code in the “Application_Start” method
RouteTable.Routes.MapHttpRoute(
            name: "DefaultApi", routeTemplate: "api/{controller}/{id}", defaults: new { id = System.Web.Http.RouteParameter.Optional } );
The controller will now be able to handle request of type “api/User/”
Testing The WebAPI
We will now Test our WebAPI by running it in the browser. Run the Web Application by pressing “Ctrl + F5” or going to “Debug -> Start Debugging” from the Visual Studio menu.
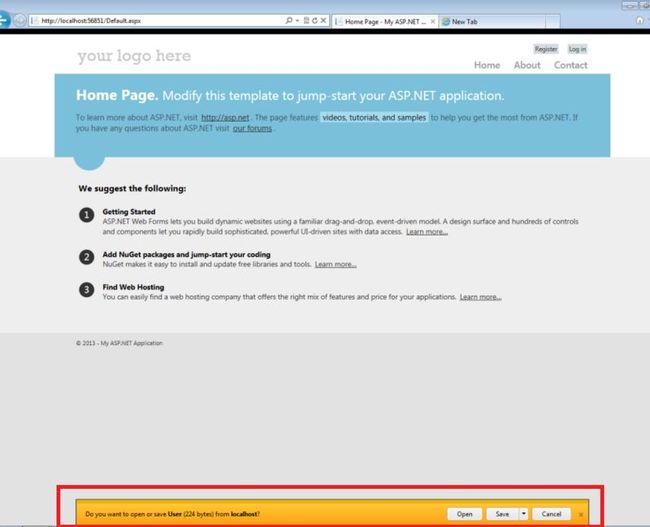
On running the application, the “Default.aspx” page will open. The URL will be something likehttp://localhost:56851/Default.aspx where 56851 will be port number.
To Test the WebAPI, we will have to use the URL as defined in the Route. Enter the following URL in the browserhttp://localhost:56851/api/User/ (Replace 56851 with your port number)
The result will depend upon the type of browser you are using. In Internet Explorer, you will be prompted to save a file named “User”.
The file contains the Http response. Select “Open” and in the “Open with” dialog, select “Notepad” to open the file.
The Notepad will show the data in the JSON format which has been returned by the WebAPI.
[{"Id":1,"FirstName":"Madhur","LastName":"Kapoor","Company":"ABC","Email":"[email protected]","PhoneNo":"65431546"},{"Id":1,"FirstName":"Alan","LastName":"Wake","Company":"XYZ Corp","Email":"[email protected]","PhoneNo":"64649879"}]
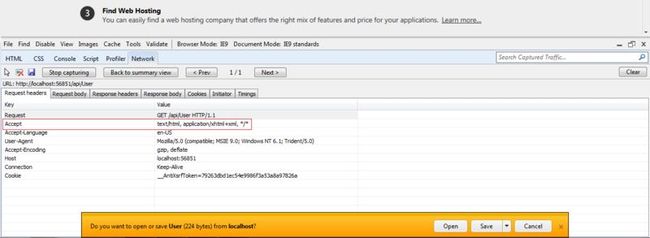
If you are using Chrome or Firefox, you are likely to get a XML representation of the data. This is because Internet Explorer and Firefox send different “Accept Header” with the request and so the WebAPI returns different content type.
If you are using Internet Explorer with Developer tools, you can check the Request header that is being sent by the browser.
Just Open the Developer tools by pressing F12, go to network option and Enable “Start Capturing” and then with developer tools open, enter the WebAPI URL in the browser and press enter
If you use the following URL “ http://localhost:56851/api/User/1 (Replace 56851 with your port number)”
It will return the user whose ID is ‘1’. Typing an ID that does not exist will result in a “Page Not Found” error.
Calling WebAPI with JQuery
Now we will call the WebAPI using JQuery and will display the result in a web page.
In the “Default.aspx” file, we will use the following code for the body section to display the data
<asp:Content runat="server" ID="BodyContent" ContentPlaceHolderID="MainContent"> <h2>My Address Book</h2> <br /> <table> <thead> <tr> <td>Id</td> <td>Full Name</td> <td>Company</td> <td>Phone</td> <td>Email</td> </tr> </thead> <tbody id="usersection"> </tbody> </table> <br /> <br /> <h2> Add A Contact</h2> <table> <tr> <td>First Name</td> <td> <asp:TextBox runat="server" ID="txtFirstName" /></td> </tr> <tr> <td>Last Name</td> <td> <asp:TextBox runat="server" ID="txtLastName" /></td> </tr> <tr> <td>Company</td> <td> <asp:TextBox runat="server" ID="txtCompany" /></td> </tr> <tr> <td>Phone</td> <td> <asp:TextBox runat="server" ID="txtPhone" /></td> </tr> <tr> <td>Email</td> <td> <