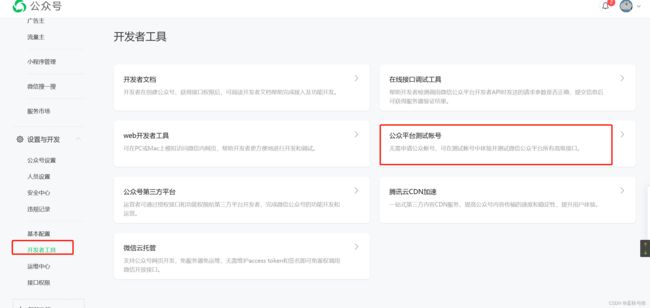
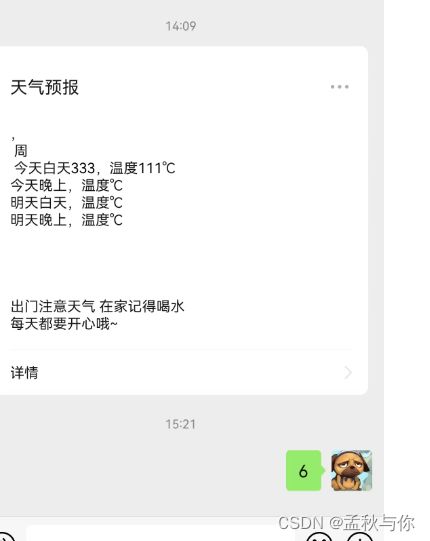
【java】java天气消息推送至微信公众号详细教程
文章目录
- 读前必看
- 测试号推送
- 天气接口获取数据
谁说程序员不懂浪漫? 将你的关心 推送至微信公众号 给女朋友及时的关怀~(这位同学 你女朋友呢?)
读前必看
关于微信开发平台,小程序和公众号是不一样的,而公众号又会区分订阅号、服务号、测试号,服务号会比订阅号拥有更多权限,而订阅号又区分是否个人主体,很不幸博主一开始在捣鼓的是个人主体的订阅号,试了半天,然后看到了文档 发现这类公众号什么权限都没有:
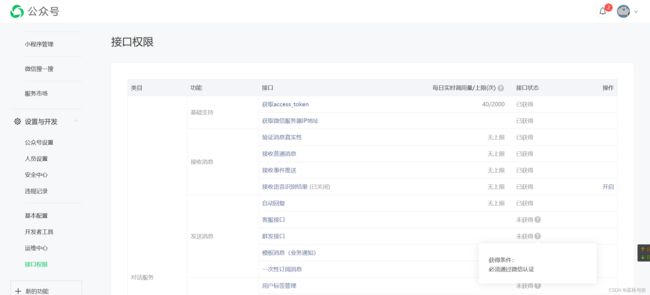
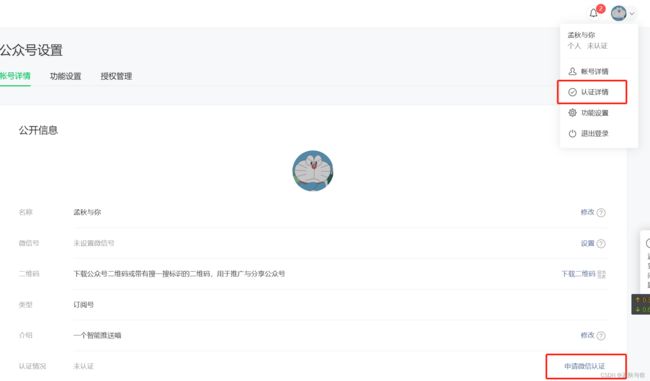
干得漂亮 … 当然 如果不是个人主体的订阅号 或者是服务号的同学,是可以在这页面继续认证的

那既然这个什么都干不了,我们可以转战测试号,测试号有个很明显的弊端就是公众号名称很难看 还改不了。。。
当然 相信同学们的对象(new Object() ) 是不会嫌弃的
本文主要介绍测试号如何推送,当然 如果你的订阅号不是个人主体 也可以参考一下 基本是差不多的,但如果是个人主体,调用没权限的接口就会报48001。
测试号推送
这里需要注意的是 URL需要公网,如果没有服务器域名,我们可以使用免费的内网穿透软件 博主这里使用的是natapp,natapp可以将本地ip端口映射到公网域名
如下图 http://xxxx.xxfree.cc 其实就是127.0.0.1:8080(项目地址)映射的
/wx 是我们项目中的路径 也就是@RequestMapping(“/wx”)
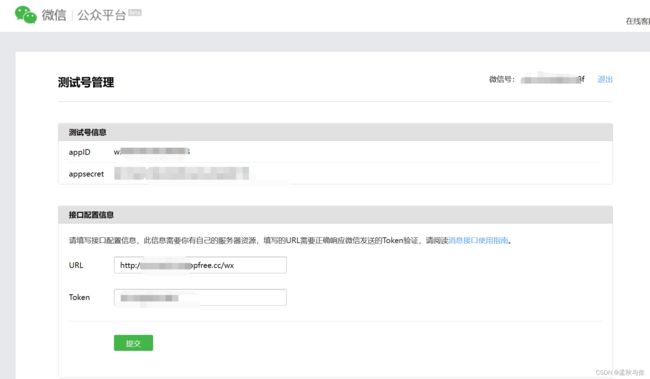
在提交前 我们需要服务端已经写好了接口 用于校验URL 代码如下:
import org.apache.commons.io.IOUtils;
import org.springframework.beans.factory.annotation.Autowired;
import org.springframework.stereotype.Controller;
import org.springframework.web.bind.annotation.GetMapping;
import org.springframework.web.bind.annotation.PostMapping;
import org.springframework.web.bind.annotation.RequestMapping;

import javax.servlet.ServletInputStream;
import javax.servlet.http.HttpServletRequest;
import javax.servlet.http.HttpServletResponse;
import java.util.List;

@Controller
@RequestMapping("/wx")
public class WeChatUrlController {


    /**
     * 用于微信公众号平台URL校验
     * @param req
     * @param response
     * @throws Exception
     */
    @GetMapping
    public void weChatConnect(HttpServletRequest req, HttpServletResponse response) throws Exception {
        Signature sg = new Signature(
                req.getParameter("signature"),
                req.getParameter("timestamp"),
                req.getParameter("nonce"),
                req.getParameter("echostr"));

        ServletInputStream inputStream = req.getInputStream();
        String s = IOUtils.toString(inputStream, "UTF-8");
        System.out.println(s);
        String method = req.getMethod();
        // 如果是微信发过来的GET请求
        if ("GET".equals(method)) {
            if (CheckUtil.checkSignature(sg)) {
                System.out.println("微信连接成功!");
                response.setCharacterEncoding("UTF-8");
                response.getWriter().write(sg.getEchostr());
            }
        }

    }


}
public class Signature {
    private String signature;
    private String timestamp;
    private String nonce;
    private String echostr;

    public Signature() {
        super();
        // TODO Auto-generated constructor stub
    }

    public Signature(String signature, String timestamp, String nonce, String echostr) {
        super();
        this.signature = signature;
        this.timestamp = timestamp;
        this.nonce = nonce;
        this.echostr = echostr;
    }

    public String getSignature() {
        return signature;
    }

    public void setSignature(String signature) {
        this.signature = signature;
    }

    public String getTimestamp() {
        return timestamp;
    }

    public void setTimestamp(String timestamp) {
        this.timestamp = timestamp;
    }

    public String getNonce() {
        return nonce;
    }

    public void setNonce(String nonce) {
        this.nonce = nonce;
    }

    public String getEchostr() {
        return echostr;
    }

    public void setEchostr(String echostr) {
        this.echostr = echostr;
    }

    @Override
    public String toString() {
        return "Signature [signature=" + signature + ", timestamp=" + timestamp + ", nonce=" + nonce + ", echostr="
                + echostr + "]";
    }
}
import java.security.MessageDigest;
import java.util.Arrays;

public class CheckUtil {

	// 换成你自己定义的token
    private static final String token = "xxxx";

    public static boolean checkSignature(Signature sg) {

        String[] arr = new String[] { token, sg.getTimestamp(), sg.getNonce() };
        // 排序
        Arrays.sort(arr);
        // 生成字符串
        StringBuffer content = new StringBuffer();
        for (int i = 0; i < arr.length; i++) {
            content.append(arr[i]);
        }

        // sha1加密
        String temp = getSha1(content.toString());
        // 比较
        return temp.equals(sg.getSignature());
    }

    // 加密算法
    public static String getSha1(String str) {
        if (str == null || str.length() == 0) {
            return null;
        }

        char hexDigits[] = { '0', '1', '2', '3', '4', '5', '6', '7', '8', '9', 'a', 'b', 'c', 'd', 'e', 'f' };
        try {
            MessageDigest mdTemp = MessageDigest.getInstance("SHA1");
            mdTemp.update(str.getBytes("UTF-8"));
            byte[] md = mdTemp.digest();
            int j = md.length;
            char buf[] = new char[j * 2];
            int k = 0;

            for (int i = 0; i < j; i++) {
                byte byte0 = md[i];
                buf[k++] = hexDigits[byte0 >>> 4 & 0xf];
                buf[k++] = hexDigits[byte0 & 0xf];
            }

            return new String(buf);
        } catch (Exception e) {
            return null;
        }

    }
}
-
提交成功后 第二步就是获取用户的openId了
我们可以引入一个starter 大幅度简化代码 不用再手动去调用url了
            com.github.binarywang
            wx-java-mp-spring-boot-starter
            4.0.0
获取openId的方法 我们同样写在WeChatUrlController, 完整代码变为如下:
import me.chanjar.weixin.mp.api.WxMpService;
import me.chanjar.weixin.mp.api.WxMpUserService;
import me.chanjar.weixin.mp.bean.result.WxMpUserList;
import org.apache.commons.io.IOUtils;
import org.springframework.beans.factory.annotation.Autowired;
import org.springframework.stereotype.Controller;
import org.springframework.web.bind.annotation.GetMapping;
import org.springframework.web.bind.annotation.PostMapping;
import org.springframework.web.bind.annotation.RequestMapping;
import javax.servlet.ServletInputStream;
import javax.servlet.http.HttpServletRequest;
import javax.servlet.http.HttpServletResponse;
import java.util.List;
@Controller
@RequestMapping("/wx")
public class WeChatUrlController {
@Autowired
private WxMpService wxMpService;
/**
* 用于微信公众号平台URL校验
* @param req
* @param response
* @throws Exception
*/
@GetMapping
public void weChatConnect(HttpServletRequest req, HttpServletResponse response) throws Exception {
Signature sg = new Signature(
req.getParameter("signature"),
req.getParameter("timestamp"),
req.getParameter("nonce"),
req.getParameter("echostr"));
ServletInputStream inputStream = req.getInputStream();
String s = IOUtils.toString(inputStream, "UTF-8");
System.out.println(s);
String method = req.getMethod();
// 如果是微信发过来的GET请求
if ("GET".equals(method)) {
if (CheckUtil.checkSignature(sg)) {
System.out.println("微信连接成功!");
response.setCharacterEncoding("UTF-8");
response.getWriter().write(sg.getEchostr());
}
}
}
/**
* 获取用户的 openId
* @param req
* @param response
* @throws Exception
*/
@PostMapping
public void getUserInfo(HttpServletRequest req, HttpServletResponse response) throws Exception {
// 方式一 获取所有关注该公众号的用户的openId
WxMpUserService userService = wxMpService.getUserService();
WxMpUserList wxMpUserList = userService.userList("");
List<String> openIds = wxMpUserList.getOpenids();
System.out.println(openIds);
// 方式二 让用户在微信公众号发消息 会进入此接口 (POST请求 和我们设置的URL /wx 对应)
ServletInputStream inputStream = req.getInputStream();
String s = IOUtils.toString(inputStream, "UTF-8");
// 打印结果中的 FromUserName节点
import com.alibaba.fastjson.JSONObject;
import com.qiuhuanhen.sendforyou.entity.WeChatTemplateMsg;
import lombok.extern.slf4j.Slf4j;
import org.springframework.http.ResponseEntity;
import org.springframework.stereotype.Component;
import org.springframework.web.bind.annotation.GetMapping;
import org.springframework.web.client.RestTemplate;

import javax.annotation.PostConstruct;
import java.util.HashMap;
import java.util.Map;

@Slf4j
@Component
public class Message {

    @PostConstruct
    @GetMapping("/sendMessage")
    public  String sendMessage() {
        // 模板参数
        Map<String, WeChatTemplateMsg> sendMag = new HashMap<String, WeChatTemplateMsg>();
		// 需要替换成你自己的三个参数
        // openId代表一个唯一微信用户,即微信消息的接收人
        String openId = "x-xxx";
        // 消息模板id
        String templateId = "xxxx";
        // 微信的基础accessToken
        String accessToken =
                "x-xx-xxx";
        String url = "https://api.weixin.qq.com/cgi-bin/message/template/send?access_token=" + accessToken;

      	/**
      	 *  key和模板id相对应 这里取了两个key做测试
      	 **/
        sendMag.put("temperatureDay", new WeChatTemplateMsg("111"));
        sendMag.put("weatherDay", new WeChatTemplateMsg("333"));
        RestTemplate restTemplate = new RestTemplate();
        //拼接base参数
        Map<String, Object> sendBody = new HashMap<>();
        sendBody.put("touser", openId);               // openId
        sendBody.put("url", "www.baidu.com");         // 点击模板信息跳转地址
        sendBody.put("topcolor", "#FF0000");          // 顶色
        sendBody.put("data", sendMag);                   // 模板参数
        sendBody.put("template_id", templateId );      // 模板Id
        ResponseEntity<String> forEntity = restTemplate.postForEntity(url, sendBody, String.class);
        log.info("结果是: {}",forEntity.getBody());
        JSONObject jsonObject = JSONObject.parseObject(forEntity.getBody());
        // 0
        String messageCode = jsonObject.getString("errcode");
        // 2431260672639467520
        String msgId = jsonObject.getString("msgid");
        System.out.println("messageCode : " + messageCode + ", msgId: " +msgId);
        return forEntity.getBody();
    }
}
import lombok.*;

@Data
@EqualsAndHashCode
@AllArgsConstructor
@NoArgsConstructor
public class WeChatTemplateMsg {
    /** msg **/
    private String value;
    private String color;

    public WeChatTemplateMsg(String value) {
        this.value = value;
    }
}
  /**
     * 获取接口访问凭证
     *
     * @param appid 凭证
     * @param appsecret 密钥
     * @return
     */
    public static AccessToken getToken(String appid, String appsecret) {
        AccessToken token = null;
        String requestUrl = tokenUrl.replace("APPID", appid).replace("APPSECRET", appsecret);
        // 发起GET请求获取凭证
        JSONObject jsonObject = httpsRequest(requestUrl, "GET", null);

        if (null != jsonObject) {
            try {
                token = new AccessToken();
                token.setAccessToken(jsonObject.getString("access_token"));
                token.setExpiresIn(jsonObject.getInteger("expires_in"));
            } catch (JSONException e) {
                token = null;
                // 获取token失败
                log.error("获取token失败 errcode:{} errmsg:{}", jsonObject.getInteger("errcode"), jsonObject.getString("errmsg"));
            }
        }
        return token;
    }
我们的推送内容 可以是天气预报等等,天气预报推荐用高德开放平台,步骤也比较简单。
天气接口获取数据
首先我们要去高德开放平台申请key
代码如下:
import lombok.Data;

@Data
public class Cast {
    private String date;
    private String week;
    private String dayWeather;
    private String nightWeather;
    private String dayTemp;
    private String nightTemp;
    private String dayWind;
    private String nightWind;
    private String dayPower;
    private String nightPower;
}
import lombok.Data;

import java.util.ArrayList;

@Data
public class Forecast {
    private String city;
    private String adCode;
    private String province;
    private String reportTime;
    private ArrayList<Cast> casts;
}
import lombok.Data;

import java.util.ArrayList;

@Data
public class WeatherDTO {
    private String status;
    private String count;
    private String info;
    private String infoCode;
    private ArrayList<Forecast> forecasts;
}
@Component
public class WeatherJob {


    /**
     * 高德开放平台key 需要替换成你自己的
     */
    String AMAP_KEY = "xxx";

    /**
     * city code (行政编码 身份证前6位)
     */
    String CITY_CODE = "440100";

    @Scheduled(cron = "0 0 10 * * ?")
    public void getWeather() throws IOException {

        String weatherUrl = "https://restapi.amap.com/v3/weather/weatherInfo?city=" + CITY_CODE + "&key=" + AMAP_KEY + "&extensions=all";
        StringBuffer result = new StringBuffer();
        BufferedReader in = null;
        try {
            URL url = new URL(weatherUrl);
            URLConnection connection = url.openConnection();
            in = new BufferedReader(new InputStreamReader(connection.getInputStream()));
            String line;
            while ((line = in.readLine()) != null) {
                result.append(line);
            }
            in.close();
        } catch (IOException e) {
            e.printStackTrace();
        } finally {
            if (null != in)
                in.close();

        }

        WeatherDTO weatherDTO = JSON.parseObject(result.toString(), WeatherDTO.class);
        System.out.println(weatherDTO);

        Forecast forecast = weatherDTO.getForecasts().get(0);
        String city = forecast.getCity();
        String reportTime = forecast.getReportTime();
        ArrayList<Cast> casts = weatherDTO.getForecasts().get(0).getCasts();
        Cast today = casts.get(0);
        String todayDayWeather = today.getDayWeather();
        String todayNightWeather = today.getDayWeather();
        String todayDayTemp = today.getDayTemp();
        String todayNightTemp = today.getDayTemp();
        String todayDayPower = today.getDayPower();
        String todayNightPower = today.getDayPower();

        String currentReport = "【" + city + "】: 当前时间" + reportTime + "\n" + "[今日天气]:" +
                "\n白天  " + todayDayWeather + " " + todayDayTemp + "°C" + " 风力" + todayDayPower + "级;" +
                "\n晚上  " + todayNightWeather + " " + todayNightTemp + "°C" + " 风力" + todayNightPower + "级";


}
