30分钟你也能搭建一个vue3.2+vite+pinia+Ts+element plus+axios的后台管理系统
demo
demo预览
最下面有相关文档链接, 此文章提供大致步骤与部分封装
开始
第一步初始化项目
//初始化项目
1、npm init vue@latest

2、选装 (空格输入yes或者no, 一路yes即可)

// 初始化包
3、npm install

//运行
4、npm run dev

//安装axios
5、npm install axios -D

//安装 element plus
6、npm install element-plus -D

//按需动态引入element 组件的([推荐,也可以全局安装](https://element-plus.gitee.io/zh-CN/guide/quickstart.html))
7、npm install unplugin-vue-components unplugin-auto-import unplugin-icons -D

//安装less (也可以安装scss)
8、npm install --save less

//mitt 使用  (兄弟组件通信)
9、npm install mitt -S

如遇安装失败 请改为cnpm安装
第二步删除修改乱七八糟没用的内容
- 删空 compoents里自带的组件(测试文件想要就要)
- views里的 两个文件里面的内容改成 (为了提高效率,可在vscode里添加代码片段)
//设置/用户代码片段
{
"Print to console": {
"prefix": "sc1",
"body": [
"",
" ",
" ",
"",
"",
"",
""
],
"description": "Log output to console"
}
}
在AboutView.vue/HomeView.vue里 输入sc1 ,点击tab
{{ name }}
- app.vue 改成
- router/index.ts 路由模式改成hash 引入统一改异步
import { createRouter,createWebHashHistory } from 'vue-router'

const router = createRouter({
 history: createWebHashHistory(import.meta.env.BASE_URL),
 routes: [
   {
     path: '/',
     name: 'home',
     component: () => import('../views/HomeView.vue')
   },
   {
     path: '/about',
     name: 'about',
     component: () => import('../views/AboutView.vue')
   }
 ]
})

export default router
- vite.config.js 改成
import { fileURLToPath, URL } from 'node:url'

import { defineConfig  } from 'vite'
import vue from '@vitejs/plugin-vue'
import vueJsx from '@vitejs/plugin-vue-jsx'
import AutoImport from 'unplugin-auto-import/vite';
import Components from 'unplugin-vue-components/vite';
import { ElementPlusResolver } from 'unplugin-vue-components/resolvers';

// https://vitejs.dev/config/
export default defineConfig({
//配置根目录, 跨域
 base: './',
 server: {
   proxy: {
     '/api': {
       target: 'http://httpbin.org',
       changeOrigin: true,
       rewrite: (path) => path.replace(/^\/api/, '')
     }
   }
 },
 plugins: [
   vue(),
   //动态按需引入element plus组件
   AutoImport({
     resolvers: [
       ElementPlusResolver(),
     ],
   }),
   Components({
     resolvers: [
       ElementPlusResolver(),
     ],
   }),
   vueJsx(),
 ],
 resolve: {
   alias: {
     '@': fileURLToPath(new URL('./src', import.meta.url))
   }
 },
 //打包配置
 build: {
   emptyOutDir: true,
 }
})
main.ts改为
import { createApp } from 'vue'
import { createPinia } from 'pinia'

import App from './App.vue'
import router from './router'

import './assets/base.css'
import 'element-plus/dist/index.css'

const app = createApp(App)
// 全局引入 element icons
import * as Icons from "@element-plus/icons-vue";
// 引入mitt
import mitt from 'mitt'

// 注册element Icons组件
for (const [key, component] of Object.entries(Icons)) {
 app.component(key, component)
}

// 注册Mit
const Mit = mitt()
declare module "vue" {
 export interface ComponentCustomProperties {
     $Bus: typeof Mit
 }
}
//挂载全局API
app.config.globalProperties.$Bus = Mit

app.use(createPinia())
app.use(router)

app.mount('#app')
公共样式assets/base.css添加
/* fade-transform */
.fade-transform-leave-active,
.fade-transform-enter-active {
   transition: all 0.2s;
}
.fade-transform-enter-from {
   opacity: 0;
   transition: all 0.2s;
   transform: translateX(-30px);
}
.fade-transform-leave-to {
   opacity: 0;
   transition: all 0.2s;
   transform: translateX(30px);
}
*{
 padding:0px;
 margin:0px;
}
.fl{
 float: left;
}
.fr{
 float: right;
}
.overflow{
 overflow: hidden;
}
.mb20{
 margin-bottom: 20px;
}
.mt20{
 margin-top: 20px;
}
.mr20{
 margin-right: 20px;
}
至此初始化完成, 现在打开运行的项目应该是这样的
第三步菜单配置
- 新建layouts文件夹内容如下

layouts/index.vue
stores文件删除没用的自带ts,新建index.ts
import { defineStore } from 'pinia'
// 建议抽出去写,然后在这里面import
interface GlobalState {
	token: any;
}
export const GlobalStore = defineStore('GlobalStore', {
  state: (): GlobalState => ({
    // 所有这些属性都将自动推断其类型
    token: localStorage.getItem("_vue3_token") != null ? localStorage.getItem("_vue3_token") : "",
  }),
  getters: {
  },
  actions: {
    setToken(token: string) {
      localStorage.setItem('_vue3_token', token)
      this.token = token
    },
    logOut() {
      localStorage.removeItem("_vue3_token")
      this.token = ""
    }
  },
})
左侧菜单aside/index.vue
LOGO
顶部导航header/index.vue
{{ store.token }}
{{ item.label }}
修改router/index.ts
import { createRouter, createWebHashHistory } from 'vue-router'
import Layouts from '@/layouts/index.vue'
import { GlobalStore } from '../stores'

const router = createRouter({
  history: createWebHashHistory(import.meta.env.BASE_URL),
  routes: [
    {
      path: '/login',
      name: 'login',
      component: () => import('@/views/login.vue')
    },
    {
      path: '/',
      name: '首页',
      component: Layouts,
      redirect: '/home',
      children: [
        {
          path: '/home',
          name: 'home',
          component: () => import('../views/HomeView.vue')
        },
        {
          path: '/about',
          name: 'about',
          component: () => import('../views/AboutView.vue')
        }
      ]
    },
    {
      path: '/:pathMatch(.*)*',
      name: 'notFound',
      component: () => import('@/views/notFound.vue')
    }
  ]
})
router.beforeEach(async (to, from, next) => {

  // 1.如果访问登录页,直接过
  if (to.path == '/login') return next();

  // 2.如果没有token,重定向到login
  const globalStore = GlobalStore()
  if (!globalStore.token) return next({
    path: '/login',
    replace: true
  })

  // 3.如果没有菜单列表,就重新请求菜单列表并添加动态路由
  // 4.正常访问页面
	next();
})
export default router
至此你的项目应该是这样

第四步添加登录
src下新建utils/snow.ts, 新建登录login.vue 404 notFound,vue

utils/snow.ts
export default function snow() {
  let canvas:any = document.getElementById('snow'),
    // 初始化画笔
    context = canvas.getContext('2d'),
    // 定义画布宽高
    w = window.innerWidth,
    h = window.innerHeight,
    // 定义雪花数量和位置及大小集合
    num = 200,
    snows: any[] = [];
  // 设置画布大小
  canvas.width = w;
  canvas.height = h-5;
  // 随机雪花位置及大小
  for (let i = 0; i < num; i++) {
    snows.push({
      x: Math.random() * w,
      y: Math.random() * h,
      r: Math.random() * 5+1
    })
  }
  // 半径[1,6), 大于6 从左往右飘,小于6从又往左飘, 上下推荐大于10
  let move = () => {
    for (let i = 0; i < num; i++) {
      let snow = snows[i];
      snow.y += (10-snow.r)/5
      snow.x += (8-snow.r)/5
      if (snow.x > w) snow.x = 0
      if (snow.y > h) snow.y = 0
    }
  }
  let draw = () => {
    context.clearRect(0, 0, w, h);
    context.beginPath();
    context.fillStyle = "rgba(255,255,255,.5)";
    context.shadowColor = "rgba(255,255,255,.5)";
    context.shadowBlur = 10;
    for (let i = 0; i < num; i++) {
      let snow = snows[i];
      context.moveTo(snow.x, snow.y)
      context.arc(snow.x, snow.y, snow.r, 0, Math.PI * 2)
    }
    context.fill();
    context.closePath();
    move()
  }
  draw()
  let timer = setInterval(draw, 50)
  return {
    timer:timer
  }
}
login.vue

登录
notFound.vue
404
抱歉,您访问的页面不存在
返回首页
第五步添加axios
src下新建request文件,api文件用来放接口,index.ts封装axiso

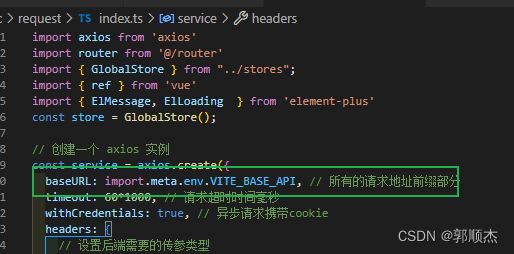
requers/index.ts
import axios from 'axios'
import router from '@/router'
import { GlobalStore } from "../stores";
import { ref } from 'vue'
import { ElMessage, ElLoading  } from 'element-plus'
const store = GlobalStore();

// 创建一个 axios 实例
const service = axios.create({
	baseURL: '/api', // 所有的请求地址前缀部分
	timeout: 60*1000, // 请求超时时间毫秒
	withCredentials: true, // 异步请求携带cookie
	headers: {
		// 设置后端需要的传参类型
		'Content-Type': 'application/json',
		'token': store.token||'',
		'X-Requested-With': 'XMLHttpRequest',
	},
})
// 全局加载
const ElLoadingNum = ref(0)
const Loading = ref("");

function startElLoading() {
  if (ElLoadingNum.value == 0) {
    Loading.value  = ElLoading.service({
      lock: true,
      text: "Loading",
      background: "rgba(0, 0, 0, 0.7)"
    });
  }
  ElLoadingNum.value++;
}

function endElLoading() {
  ElLoadingNum.value--;
  if (ElLoadingNum.value <= 0) {
    Loading.value.close();
  }
}
const toLogin = () => {
  router.replace({
    path: '/login'
  });
}
const errorHandle = (status:any, other:any) => {
  // 状态码判断
  switch (status) {
    // 401: 未登录状态,跳转登录页
    case 401:
      toLogin();
      break;
      // 清除token并跳转登录页
    case 403:
      ElMessage.error('登录过期,请重新登录');
      store.logOut();
      setTimeout(() => {
        toLogin();
      }, 1000);
      break;
    case 404:
      ElMessage.error('请求的资源不存在');
      break;
    case 405:
      ElMessage.error('请求405');
      break;
    case 504:
      ElMessage.error('请求504');
      break;
    default:
      ElMessage(other);
  }
}
// 添加请求拦截器
service.interceptors.request.use(
  (config) => {
    startElLoading()
		// 在发送请求之前做些什么
		return config
	},
	(error) => {
    startElLoading()
		// 对请求错误做些什么
		return Promise.reject(error)
	}
)

// 添加响应拦截器
service.interceptors.response.use(
  (response) => {
    // 对响应成功做点什么
    endElLoading()
    return Promise.resolve(response.data)
	},
  (error) => {
    endElLoading()
    if (error) {
      // 对响应错误做点什么
      errorHandle(error.response.status, error.message);
      return Promise.reject(error)
    } else {
        // 处理断网的情况
        if (!window.navigator.onLine) {
          ElMessage.error('网络异常');
        } else {
          ElMessage.error('数据加载失败,请稍后重试');
          return Promise.reject(error);
        }
    }
	}
)

export default service
api/index.ts
// 导入axios实例
import httpRequest from '../index'

// 定义接口的传参
interface UserInfoParam {
	userID: string,
}
// 获取用户信息
export function getUserInfo(param: UserInfoParam) {
    return httpRequest({
		url: '/post',
		method: 'post',
		data: param,
	})
}
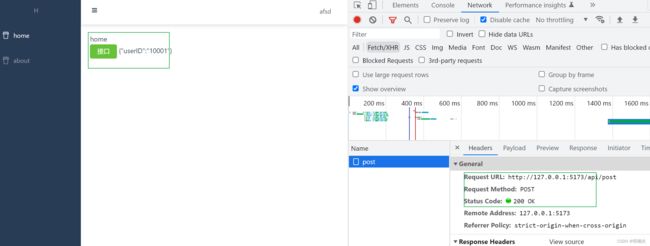
修改HomeView.vue 来做测试
{{ name }}
接口
{{ info.data }}
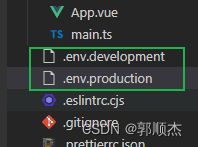
第六步多环境配置
根目录新建 .env.development .env.production , 等多个配置文件
.env.development
# 本地接口请求地址
VITE_BASE_API='/api'
.env.production
#生产
#接口请求地址
VITE_BASE_API=http://httpbin.org
你还可以继续建test测试啥的
package.json对应添加
 "build": "run-p type-check build-dev",
 "build:prod": "run-p type-check build-prod",
  .....

requerst/index.ts对应修改
build不通命令打包不同环境
总结
- 至此一个基础的vue3.2+vite+pinia+Ts+element plus+axios后台管理系统搭建结束
- demo已放到github
- 至于动态路由,i8n,全屏放大,面包屑,历史导航,皮肤切换等封装,可参考主页有写vue2.0的封装,可直接修改使用即可
- vue3语法使用, 主页也有写过一个vue3.0的一二三四五,里面有个人总结, 现在文档比较完善建议直接去看文档
- 有找不到文档具体在哪写着的可留言讨论
- 摸鱼一下午专门从零到1 新起一个项目,做一步写一步觉得有用的点个赞呗支持下,感谢
笔记
vue3中文文档
vite文档
pinia文档
element plus文档
github地址
个人主页