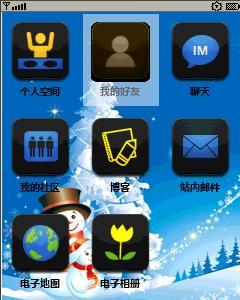
教你轻松实现LWUIT九宫格
网上关于LWUIT九宫格的代码是有不少,但是那些代码都是一样的。我最开始学习LWUIT时,也看了一下那份代码,但是看了几行就没看了,自己多半没有看懂,于是就放了一段时间。现在我做的项目也需要做九宫格,于是就又回头看那份代码,感觉代码还是不好看而且觉得有点多,也许很多初学者看着都会比较头疼。
其实网上九宫格的代码,可扩展性更好,更符合面向对象的思想。我现在提供的代码供初学者理解和学习(我本人也是初学者)。
首先我们需要理清整个思路:九宫格说白了就是几个按钮,摆的整整齐齐。既然是这样就先做个MainForm,采用GridLayout()布局,然后在Form里面做几个按钮,每一个按钮代表一个Form。
具体步骤如下:
1.在MainForm中以GridLayout形式排列九个按钮
2.建立一个BaseForm,添加一个BackCommand
3.创建9个Form继承自BaseForm。
      1

     public


     class

      MainForm

     extends

      Form

     implements

      ActionListener {


      2


     public


     static

      String currentText;


      3

      Command Option_CMD

     =


     new

      Command(

     "

     选项

     "

     ,

     0

     );


      4

      Command Exit_CMD

     =


     new

      Command(

     "

     退出

     "

     ,

     1

     );


      5


     public

      MainForm() {


      6


     //

     设置窗体翻转效果


      7


      Transition in

     =

      CommonTransitions.createSlide(CommonTransitions.SLIDE_HORIZONTAL,

     false

     ,

     300

     );


      8

      setTransitionInAnimator(in);


      9


     //

     设置这个currentText,是为了在点击某个按钮进入某个Form,然后回退时,焦点仍然在这个按钮上


      10


     if

      (currentText

     ==


     null

     ) {


      11

      currentText

     =


     "

     我的空间

     "

     ;


      12

      }


      13

      setLayout(

     new

      BorderLayout());


      14

      getTitleComponent().setVisible(

     false

     );


      15


     try

      {


      16


      17

      Resources r2

     =

      Resources.open(

     "

     /resources.res

     "

     );


      18

      String[] imgNames

     =


     new

      String[]{


      19


     "

     Space

     "

     ,


      20


     "

     Contacts

     "

     ,


      21


     "

     IM

     "

     ,


      22


     "

     Groups

     "

     ,


      23


     "

     Blog

     "

     ,


      24


     "

     Mail

     "

     ,


      25


     "

     Maps

     "

     ,


      26


     "

     Photos

     "


      27

      };


      28

      String[] texts

     =


     new

      String[]{


      29


     "

     个人空间

     "

     ,


      30


     "

     我的好友

     "

     ,


      31


     "

     聊天

     "

     ,


      32


     "

     我的社区

     "

     ,


      33


     "

     博客

     "

     ,


      34


     "

     站内邮件

     "

     ,


      35


     "

     电子地图

     "

     ,


      36


     "

     电子相册

     "

     ,};


      37


     /**


      38

      * 九宫格


      39


     */


      40


     /*


      41

      注意数组imgNames表示图片的名称


      42

      在我的资源文件中,比如我选中"我的空间"这个按钮时,按钮图片为Space_sel.png


      43

      当"我的空间"失去焦点时,按钮图片为Space.png


      44


     */


      45

      Container buttonContainer

     =


     new

      Container(

     new

      GridLayout(

     3

     ,

     3

     ));


      46


     for

      (

     int

      i

     =


     0

     ; i

     <

      texts.length; i

     ++

     ) {


      47

      Image unsel_img

     =

      r2.getImage(imgNames[i]

     +


     "

     .png

     "

     );


      48


     final

      Button b

     =


     new

      Button(texts[i], unsel_img);


      49


     //

     setRolloverIcon当按钮被选中时


      50


      b.setRolloverIcon(r2.getImage(imgNames[i]

     +


     "

     _sel.png

     "

     ));


      51

      b.setAlignment(Label.CENTER);


      52


     //

     设置文本在Button底部,Button继承自Label,所以是Label.BOTTOM


      53


      b.setTextPosition(Label.BOTTOM);


      54

      b.setUIID(

     "

     DemoButton

     "

     );


      55

      buttonContainer.addComponent(b);


      56

      b.addActionListener(

     new

      ButtonActionListener());


      57


     if

      (currentText.equals(b.getText())) {


      58


     this

     .setFocused(b);


      59

      }


      60

      }


      61

      addComponent(BorderLayout.CENTER, buttonContainer);


      62

      addCommand(Option_CMD);


      63

      addCommand(Exit_CMD);


      64

      addCommandListener(

     this

     );


      65

      show();


      66

      }

     catch

      (IOException ex) {


      67

      ex.printStackTrace();


      68

      }


      69

      }


      70


     //

     点击不同的按钮,分别进入不同的Form


      71


     public


     void

      showSubForm(String text) {


      72

      BaseForm form

     =


     null

     ;


      73


     if

      (text.equals(

     "

     个人空间

     "

     )) {


      74

      form

     =


     new

      MySpace();


      75

      }

     else


     if

      (text.equals(

     "

     我的好友

     "

     )) {


      76

      form

     =


     new

      MyContacts();


      77

      }

     else


     if

      (text.equals(

     "

     聊天

     "

     )) {


      78

      form

     =


     new

      MyChat();


      79

      }

     else


     if

      (text.equals(

     "

     我的社区

     "

     )) {


      80

      form

     =


     new

      MyGroups();


      81

      }

     else


     if

      (text.equals(

     "

     博客

     "

     )) {


      82

      form

     =


     new

      MyBlog();


      83

      }

     else


     if

      (text.equals(

     "

     站内邮件

     "

     )) {


      84

      form

     =


     new

      MyMail();


      85

      }

     else


     if

      (text.equals(

     "

     电子地图

     "

     )) {


      86

      form

     =


     new

      MyMaps();


      87

      }

     else


     if

      (text.equals(

     "

     电子相册

     "

     )) {


      88

      form

     =


     new

      MyPhotos();


      89

      }


      90

      currentText

     =

      text;


      91

      }


      92


     private


     class

      ButtonActionListener

     implements

      ActionListener {


      93


     public


     void

      actionPerformed(ActionEvent evt) {


      94


     try

      {


      95

      Button b

     =

      (Button) evt.getSource();


      96

      String text

     =

      b.getText();


      97

      showSubForm(text);


      98

      }

     catch

      (Exception ex) {


      99

      ex.printStackTrace();


     100

      }


     101

      }


     102

      }


     103

     }
然后我们来看BaseForm:
      1

     public


     class

      BaseForm

     extends

      Form

     implements

      ActionListener {


      2


     public

      Command Back_CMD

     =


     new

      Command(

     "

     返回

     "

     ,

     0

     );


      3


     public

      BaseForm() {


      4

      System.gc();


      5

      getTitleComponent().setVisible(

     false

     );


      6


      7


     //

     设置窗体翻转效果


      8


      Transition in

     =

      CommonTransitions.createSlide(CommonTransitions.SLIDE_HORIZONTAL,

     false

     ,

     500

     );


      9

      setTransitionInAnimator(in);


     10

      addCommand(Back_CMD);


     11

      setBackCommand(Back_CMD);


     12

      addCommandListener(

     this

     );


     13

      show();


     14

      }


     15


     public


     void

      actionPerformed(ActionEvent evt) {


     16


     int

      cmdId

     =

      evt.getCommand().getId();


     17


     if

      (cmdId

     ==


     0

     ) {


     18


     new

      MainForm();


     19

      }


     20

      }


     21

     }
每一个按钮所代表的Form都继承自BaseForm,我给出其中一个:
     1

     public


     class

      MyBlog

     extends

      BaseForm{


     2


     //

     你想在这个Form里面写什么就写什么


     3


     }
以上代码就足以实现九宫格了,然后再看看UI设计部分,也不麻烦,这是DemoButton的UI设置:

然后这里就是resources.res资源文件里面的图片,图片网上可以找到很多

最终效果图:
