Maven使用详解
一、详细讲解
1. 概述
项目构建:将源代码生成可执行应用程序的过程,而构建过程包括:清理、编译、测试、报告、打包、部署
构建工具:构建工具是一个把源代码生成可执行应用程序的过程自动化的程序
为什么使用项目构建工具
-
它可以方便将整个项目划分不同模块,模块和模块之间是有一定联系,具有依赖、聚合…等特点
-
它为我们的jar文件提供一个统一的仓库,极大的方便我们对Jar依赖的引入
-
目录结构不同,项目构建工具让我们的目录结构标准化
1.1. 主流的构建工具
-
Apache Ant:用于自动化软件构建过程的软件工具,源于 2000 年初的的 Apache Tomcat 项目。
-
Apache Maven:主要用于构建Java项目的自动化工具。
-
Gradle:一个开源的自动化构建系统,建立在 Apache Ant 和 Maven Apache 概念的基础上,并引入了基于 Groovy 的特定领域语言(DSL),而不是使用 Apache Maven 宣布的项目配置XML 形式。
1.2. 为什么是Maven
-
稳定可靠,插件众多。(这么多年版本一直维持在3.XX,而且很久才发布一次小更新,说明他稳定且bug较少)
-
配置简单,文档全面。学习成本低
1.3. 什么是maven
Maven是 Apache 下的一个纯 Java 开发的开源项目 ,是一个项目构建和管理的工具;它提供了帮助管理 构建、文档、报告、依赖、scms、发布、分发的方法。可以方便的编译代码、进行依赖管理、管理二进制库等等
2. 安装和运行Maven
-
官方网址:http://maven.apache.org
-
下载地址:http://maven.apache.org/download.cgi
-
历史版本:https://archive.apache.org/dist/maven/maven-3
注意:Maven3.3.x要求JDK版本必须是1.7及以上版本
2.1. 安装
因为Maven本身就是基于Java编写的,所以需要先配置Java的环境变量,如果已经配置过了可跳过本步,具体步骤如下
-
新建JAVA_HOME变量其变量值指向JDK的安装目录:此电脑—>右击—>属性—>高级系统设置—>环境变量—>系统变量—>新建
-
将新建的JAVA_HOME变量追加到Path变量的值中:Path=%JAVA_HOME%\bin
-
在任意目录下(非JDK安装目录的bin目录下)打开控制台,执行命令:
java -version,出现JDK的版本信息即为成功
将下载好的压缩包解压到任意目录下,解压路径中不要出现中文
配置M2_HOME环境变量,此步不是必须,如果需要在任意目录下执行Maven命令才需要配置
-
新建M2_HOME变量其变量值指向Maven的安装目录:此电脑—>右击—>属性—>高级系统设置—>环境变量—>系统变量—>新建
-
将新建的M2_HOME变量追加到Path变量的值中:Path=%M2_HOME%\bin
在任意目录下打开控制台,执行命令:mvn -v ,如果出现Maven的版本信息即为成功
2.2. 基础配置
Maven提倡的是约定大于配置,同时也为了消除各个开发工具目录的差异,所以对于项目的目录结果做了如下的标准
官方目录说明:http://maven.apache.org/guides/introduction/introduction-to-the-standard-directory-layout.html
| 目录名称 | 描述 |
|---|---|
src/main/java |
Application/Library sources |
src/main/resources |
Application/Library resources |
src/main/filters |
Resource filter files |
src/main/webapp |
Web application sources |
src/test/java |
Test sources |
src/test/resources |
Test resources |
src/test/filters |
Test resource filter files |
src/it |
Integration Tests (primarily for plugins) |
src/assembly |
Assembly descriptors |
src/site |
Site |
LICENSE.txt |
Project’s license |
NOTICE.txt |
Notices and attributions required by libraries that the project depends on |
README.txt |
Project’s readme |
在Maven中提出了3种仓库的概念,具体的作用如下
| 仓库名称 | 作用 |
|---|---|
| 本地仓库 | 相当于缓存,工程第一次会从远程仓库(互联网)去下载jar 包,将jar包存在本地仓库(在程序员的电脑上)。第二次不需要从远程仓库去下载。先从本地仓库找,如果找不到才会去远程仓库找。 |
| 中央仓库(远程仓库) | 是一种远程仓库,仓库中的jar包由专业团队(maven团队)统一维护。里面存放了全世界大多数流行开源软件jar包 |
| 私服(远程仓库) | 在公司内部架设一台私服,其它公司架设一台仓库,不对外公开。 |
关于坐标
项目名称		模块命名			版本号

Groupid		Artifactid		SNAPSHOT(快照)	RELEASE(稳定版、发布版)
版本号的约定俗称,一般由3组数字组成,例如:1.2.3,具体含义如下
1:表示重大的变动,比如架构级别的修改
2:功能的的变动
3:bug的修复次数
全局配置文件
-
Maven默认读取的配置文件为当前用户目录(USER_HOME)/.m2文件夹下settings.xml
-
将Maven安装目录下conf文件夹中的settings.xml复制到当前用户目录(USER_HOME)/.m2文件夹下
-
修改配置文件:.m2/settings.xml
指定本地仓库位置
<localRepository>D:/maven-repositorylocalRepository>
配置镜像提升下载速度
<mirrors>

    <mirror>
        <id>alimavenid>
        <mirrorOf>centralmirrorOf>
        <name>aliyun mavenname>
        <url>http://maven.aliyun.com/nexus/content/repositories/central/url>
    mirror>
mirrors>
配置这个阿里云的镜像仓库
central

center:表示所有向中央仓库的请求,都需要经过阿里云,如果请求的不是中央仓库,那么就不管,即此时不请求阿里的仓库
* = everything  : 如果是个* 表示所有的请求都需要经过阿里云的代理,阿里云请求的是中央仓库,此时请求别的仓库就会失败
external : 表示请求的除了本地仓库之外,都需要走阿里云的仓库
repository,repository1 : 中间用逗号隔开,这样表示客户端请求这两个仓库的时候,都需要经过阿里云的镜像仓库
*,!repository : 表示除了这个仓库之外所以的都需要经过阿里云的仓库
2.3. 创建Maven项目
使用Maven自带的骨架创建项目(注:仅仅做教学演示使用)
mvn archetype:generate -DgroupId=com.coder163 -DartifactId=demo -DarchetypeArtifactId=maven-archetype-quickstart
常用命令
| 命令 | 描述 |
|---|---|
| mvn compile | 编译项目 |
| mvn test | 编译项目并且进行单元测试 |
| mvn clean | 清除targe目录 |
| mvn package | 将项目进行编译、测试、打包 jar\war\pom |
| mvn install | 将项目进行编译、测试、打包、发布到仓库中 |
3. POM文件详解
    <build>


        <sourceDirectory />

        <testSourceDirectory />

        <outputDirectory />

        <testOutputDirectory />

        <scriptSourceDirectory />


        <resources>

            <resource>


                <targetPath />

                <filtering />

                <directory />

                <includes />

                <excludes />
            resource>
        resources>

        <testResources>

            <testResource>
                <targetPath />
                <filtering />
                <directory />
                <includes />
                <excludes />
            testResource>
        testResources>


        <pluginManagement>

            <plugins>

                <plugin>

                    <groupId />

                    <artifactId />

                    <version />


                    <extensions />

                    <executions>

                        <execution>

                            <id />

                            <phase />

                            <goals />

                            <inherited />

                            <configuration />
                        execution>
                    executions>

                    <dependencies>

                        <dependency>
                            ......
                        dependency>
                    dependencies>

                    <inherited />

                    <configuration />
                plugin>
            plugins>
        pluginManagement>

        <plugins>

            <plugin>
                <groupId />
                <artifactId />
                <version />
                <extensions />
                <executions>
                    <execution>
                        <id />
                        <phase />
                        <goals />
                        <inherited />
                        <configuration />
                    execution>
                executions>
                <dependencies>

                    <dependency>
                        ......
                    dependency>
                dependencies>
                <goals />
                <inherited />
                <configuration />
            plugin>
        plugins>


        <extensions>

            <extension>

                <groupId />
                <artifactId />
                <version />
            extension>
        extensions>


        <defaultGoal />

        <directory />

        <finalName />

        <filters />
build>
build标签
build标签定义了构建项目需要的信息,这部分信息对于定制化项目构建是非常重要的。这里会根据build的子元素的特点,简单地分类讲解。
        <sourceDirectory />

        <testSourceDirectory />

        <outputDirectory />

        <testOutputDirectory />

        <scriptSourceDirectory />
资源管理
        <resources>

            <resource>


                <targetPath />

                <filtering />

                <directory />

                <includes />

                <excludes />
            resource>
        resources>

        <testResources>

            <testResource>
                <targetPath />
                <filtering />
                <directory />
                <includes />
                <excludes />
            testResource>
        testResources>
3.1. 基本标签
| 标签名称 | 描述 |
|---|---|
|
maven的版本信息,固定值.不用管 |
|
项目名称 |
|
模块的名称 |
|
项目发布的版本:测试版、快照版本、稳定版(发布版) |
|
项目的打包方式:jar、war、pom(多模块开发的时候父项目的打包方式) |
|
意 |
|
仓库的地址,maven默认情况会先检查本地仓库,如果本地仓库没有所需要的jar,那么会去中央仓库下载 |
|
依赖,所有的依赖包都需要写在这个标签之内 |
|
具体的依赖 |
注意:Maven在仓库中是通过坐标进行jar文件定位的
3.2. 依赖范围
| scope的取值 | 描述 |
|---|---|
| compile | 默认值,表示编译依赖范围。即编译、测试、运行时都需要,会被打包;默认值compile表明该jar一直全程存在/需要 |
| test | 表示测试依赖范围。即测试时需要,编译和运行时不需要,不会被打包。比如:junit |
| provided | 表示已提供依赖范围。即编译、测试时需要,运行时不需要,不会被打包;比如:servlet-api和jsp-api被tomcat容器提供 |
| runtime | 表示运行时提供依赖范围。即编译时不需要,运行和测试时需要,会被打包。比如:jstl、jdbc驱动 |
| system | system范围依赖与provided类似,但是你必须显式的提供一个对于本地系统中JAR文件的路径,需要指定systemPath磁盘路径,system依赖不推荐使用 |
4. 插件
Maven的核心仅仅定义了抽象的生命周期,具体的任务都是交由插件完成的,每个插件都能实现多个功能,每个功能就是一个插件目标
Maven插件可以完成一些特定的功能。例如,集成jdk插件可以方便的修改项目的编译环境;集成tomcat插件后,无需安装tomcat服务器就可以运行tomcat进行项目的发布与测试。
在pom.xml中通过plugin标签引入maven的功能插件。
<plugins>


  <plugin>
    <groupId>org.apache.maven.pluginsgroupId>
    <artifactId>maven-surefire-pluginartifactId>
    <version>2.18.1version>
    <configuration>
      <skipTests>trueskipTests>
    configuration>
  plugin>

    <plugin>
        <artifactId>maven-compiler-pluginartifactId>
        <version>3.6.1version>
        <configuration>
            <source>1.8source>
            <target>1.8target>
        configuration>
    plugin>


    <plugin>
        <groupId>org.apache.maven.pluginsgroupId>
        <artifactId>maven-assembly-pluginartifactId>
        <configuration>
            <descriptorRefs>
                <descriptorRef>jar-with-dependenciesdescriptorRef>
            descriptorRefs>
            <archive>
            	<mainfest>

                	<mainClass>org.samp.APPmainClass>
                mainfest>
            archive>
        configuration>
        <executions>
            <execution>
                <id>make-assemblyid>

                <phase>packagephase>
                <goals>
                    <goal>singlegoal>
                goals>
            execution>
        executions>
    plugin>
plugins>
插件管理标签说明
        <pluginManagement>

            <plugins>

                <plugin>

                    <groupId />
                    <artifactId />
                    <version />


                    <extensions />

                    <executions>

                        <execution>

                            <id />

                            <phase />

                            <goals />

                            <inherited />

                            <configuration />
                        execution>
                    executions>

                    <dependencies>
                            ......
                    dependencies>

                    <inherited />

                    <configuration />
                plugin>
            plugins>
        pluginManagement>

        <plugins>
            ......
        plugins>
5. 1.生命周期
Maven生命周期就是为了对所有的构建过程进行抽象和统一
包括项目清理,初始化,编译,打包,测试,部署等几乎所有构建步骤
Maven三大生命周期,生命周期Maven有三套相互独立的生命周期
-
clean:在进行真正的构建之前进行一些清理工作
-
default:构建的核心部分,编译,测试,打包,部署等等
-
site:生成项目报告,站点,发布站点
5.1. clean生命周期
每套生命周期都由一组阶段(Phase)组成,我们平时在命令行输入的命令总会对应于一个特定的阶段。比如,运行mvn clean ,这个的clean是Clean生命周期的一个阶段。有Clean生命周期,也有clean阶段。Clean生命周期一共包含了三个阶段
- pre-clean 执行一些需要在clean之前完成的工作
- clean 移除所有上一次构建生成的文件
- post-clean 执行一些需要在clean之后立刻完成的工作
mvn clean 中的clean就是上面的clean,在一个生命周期中,运行某个阶段的时候,它之前的所有阶段都会被运行,也就是说,mvn clean 等同于 mvn pre-clean clean ,如果我们运行 mvn post-clean ,那么 pre-clean,clean 都会被运行。这是Maven很重要的一个规则,可以大大简化命令行的输入。
5.2. default生命周期
Default生命周期是Maven生命周期中最重要的一个,绝大部分工作都发生在这个生命周期中。这里,只解释一些比较重要和常用的阶段:
| 命令 | 描述 |
|---|---|
| process-resources | 复制并处理资源文件,至目标目录,准备打包。 |
| compile | 编译项目的源代码。 |
| process-test-resources | 复制并处理资源文件,至目标测试目录。 |
| test-compile | 编译测试源代码。 |
| test | 使用合适的单元测试框架运行测试。这些测试代码不会被打包或部署。 |
| package | 接受编译好的代码,打包成可发布的格式,如 JAR |
| install | 将包安装至本地仓库,以让其它项目依赖 |
| deploy | 将最终的包复制到远程的仓库,以让其它开发人员与项目共享。 |
- default生命周期中不包含clean,开发中如果修改代码后打包运行没有更改的效果,需要重新执行clean命令
- 运行任何一个阶段的时候,它前面的所有阶段都会被运行
5.3. site生命周期
pre-site 执行一些需要在生成站点文档之前完成的工作
site 生成项目的站点文档
post-site 执行一些需要在生成站点文档之后完成的工作,并且为部署做准备
site-deploy 将生成的站点文档部署到特定的服务器上
这里经常用到的是site阶段和site-deploy阶段,用以生成和发布Maven站点
6. 自定义骨架
虽然Maven官方通过插件给我们提供了大量的模板,但是这些模板或多或少的都存在一定的问题,无法满足我们实际的需求,所以我们需要根据自己的需求自定义模板出来
6.1. 生成模板
根据已经存在的项目创建骨架,需要在pom.xml文件所在目录执行
mvn archetype:create-from-project
切换到生成的骨架项目目录
cd target\generated-sources\archetype
向本地仓库中发布
mvn install
6.2. 使用模板
只要让我们的IDE能够找到archetype-catalog.xml文件即可
6.3. 删除模板
Eclipse把和Maven的settings.xml在一起的archetype-catalog.xml删掉就可以了
IDEA:主要是要删除UserArchetypes.xml文件的内容。不同操作系统的位置不一样。
Mac系统:
- 一般是在${…}/.IntelliJIdea2018.3/Maven/Indices/UserArchetypes.xml
Linux系统:
- 一般是在${…}/.IntelliJIdea2018.3/system/Maven/Indices/UserArchetypes.xml
Windows系统:
- 一般是在${…}/.IntelliJIdea2018.3/system/Maven/Indices/UserArchetypes.xml
7. 高级特性
7.1. 依赖
当一个工程依赖于另一工程时,可以将所依赖的工程发布到本地仓库中,在pom.xml添加依赖关系
<dependency>
  <groupId>jsxmgroupId>
  <artifactId>jsxm-userartifactId>
  <version>1.0-SNAPSHOTversion>
dependency>
7.2. 继承
子模块引入父模块,父模块的打包方式必须是POM
<parent>
   <groupId>jsxmgroupId>
   <artifactId>jsxm-userartifactId>
   <version>1.0-SNAPSHOTversion>
parent>
7.3. 聚合
父模块整合所有的子模块
<modules>
    <module>./../jsxm-factorymodule>
    <module>./../jsxm-usermodule>
modules>
注意:以当前模块的pom.xml为起点查找子模块中的pom.xml的位置
7.4 maven中的标签
<dependencyManagement>dependencyManagement>


<dependencies>dependencies>


<properties>properties>
8. 私服(nexus)
nexus是Maven仓库管理器(maven私服软件),通过nexus可以搭建maven私服仓库,同时nexus还提供强大的仓库管理功能等。
8.1. 安装
nexus下载地址:
-
3.x:https://help.sonatype.com/repomanager3/download
-
2.x:https://help.sonatype.com/repomanager2/download
nexus本身是一个免安装软件,所以不需要像普通的Windows软件一样安装,解压即可
nexus2.X 默认的账号为admin 默认密码为admin123
nexus3.x默认账号为admin,默认密码在${nexu_home}\sonatype-work\nexus\admin.password文件中存储
8.2. 手动更新索引
仅适用于2.x版本
nexus远程更新索引的速度太慢,所以需要我们手动更新
说明文档:http://maven.apache.org/repository/central-index.html
安装器下载地址:
https://repo.maven.apache.org/maven2/org/apache/maven/indexer/indexer-cli/5.1.1/indexer-cli-5.1.1.jar
索引包下载地址:
索引包:
- https://repo.maven.apache.org/maven2/.index/
需要下载的文件
-
nexus-maven-repository-index.gz
-
nexus-maven-repository-index.properties
把这几个文件放在同一个文件路径下面执行:java -jar indexer-cli-5.1.1.jar -u nexus-maven-repository-index.gz -d indexer
-
等待运行完后,在你运行那条命令的目录里面会出现:一个文件夹:indexer.
-
停止nexus服务,替换${nexu_home}\sonatype-work\nexus\indexer\central-ctx目录下的全部文件,然后启动nexus,到http://localhost:8081/nexus页面上就可以看到
8.3. 仓库类型
| 名称 | 描述 |
|---|---|
| hosted | 宿主仓库:,部署自己的jar到这个类型的仓库,包括releases和snapshot两部分Releases公司内部发布版本仓库Snapshots 公司内部测试版本仓库 |
| proxy | 代理仓库,用于代理远程的公共仓库,如maven中央仓库,用户连接私服,私服自动去中央仓库下载jar包或者插件 |
| group | 仓库组,用来合并多个hosted/proxy仓库,通常我们配置自己的maven连接仓库组 |
| virtual(虚拟) | 兼容Maven1 版本的jar或者插件 |
8.4. 项目发布到私服
对远程nexus的一个操作:url、用户名、密码都得有,后续上传就是围绕这三个信息进行;
然后执行mvn deploy命令
- Maven软件settings.xml中配置连接私服的用户名和密码(放在servers标签内)
<server>
      <id>releasesid>
      <username>adminusername>
      <password>admin123password>
 server>
 <server>
      <id>snapshotsid>
      <username>adminusername>
      <password>admin123password>
server>
- 配置项目的pom.xml
 <distributionManagement>
      <repository>
          <id>releasesid>
          <url>http://localhost:8081/nexus/content/repositories/releases/url>
      repository>
      <snapshotRepository>
          <id>snapshotsid>
          <url>http://localhost:8081/nexus/content/repositories/snapshots/url>
      snapshotRepository>
  distributionManagement>
pom.xml这里id 和 settings.xml 配置 id对应
把第三方依赖放入本地仓库或者私服
第三方依赖放入本地仓库
mvn install:install-file -Dfile=ojdbc14-10.2.0.4.0.jar -DgroupId=com.oracle -DartifactId=ojdbc14 -Dversion=10.2.0.4.0 -Dpackaging=jar
第三方依赖放入私服
maven的settings配置文件中配置第三方仓库的server信息
<server>
    <id>thirdpartyid>
    <username>adminusername>
    <password>admin123password>
server>
执行命令
mvn deploy:deploy-file -Dfile=ojdbc14-10.2.0.4.0.jar -DgroupId=com.oracle -DartifactId=ojdbc14 -Dversion=10.2.0.4.0 -Dpackaging=jar -Durl=http://localhost:8081/nexus/content/repositories/thirdparty/ -DrepositoryId=thirdparty
8.5. 私服上下载依赖
在maven的settings.xml文件中配置下载模板(放在profiles标签内)
<profile>

<id>devid>
<repositories>
  <repository>

    <id>nexusid>

    <url>http://localhost:8081/nexus/content/groups/public/url>

    <releases>
      <enabled>trueenabled>
    releases>

    <snapshots>
      <enabled>trueenabled>
    snapshots>
  repository>
repositories>
 <pluginRepositories>

    <pluginRepository>

        <id>publicid>
        <name>Public Repositoriesname>
        <url>http://localhost:8081/nexus/content/groups/public/url>
    pluginRepository>
pluginRepositories>
profile>
激活
  <activeProfiles>
    <activeProfile>devactiveProfile>
  activeProfiles>
9. 打包资源文件
<build>

    <resources>
        <resource>
            <directory>src/main/resourcesdirectory>
            <includes>
                <include>**/*.propertiesinclude>
                <include>**/*.xmlinclude>
            includes>
            <filtering>falsefiltering>
        resource>
        <resource>
            <directory>src/main/javadirectory>
            <includes>
                <include>**/*.propertiesinclude>
                <include>**/*.xmlinclude>
            includes>
            <filtering>falsefiltering>
        resource>
    resources>
build>
10、maven和idea结合
可以在idea的runner这种添加一个参数用以加快项目的构建,在vmOptions
# 表示优先使用本地的仓库中的jar,这样构建项目的时候能加快速度
-DarchetypeCatalog=local
11、linux中搭建maven私服
用nexus进行搭建,版本为3.19.1-01
补充:maven的命令功能
- clean:清除maven项目下的target目录中的class和本地仓库中已打包的文件。
- validate:验证工程是否正确,所有需要的资源是否可用。
- compile:即编译项目中的java文件,并存放在项目的编译目录。
- test: 即运行项目中的测试用例文件,如果测试用例未通过,也会打包失败,另,这里的test过程可以在pom中通过配置跳过。
- package:将本地编译好的文件打包为war 或者jar。
- verify: 运行任何检查,验证包是否有效且达到质量标准。
- install:将打包的代码存放到本地maven仓库,可供本地其它项目依赖使用。
- site:生成项目报告,站点,发布站点。
- deploy:将打包在本地仓库中的项目发布到服务器,供他人依赖使用。
1、下载对应的nexus安装包
[外链图片转存失败,源站可能有防盗链机制,建议将图片保存下来直接上传(img-i3t9tGSy-1661525840907)(D:\有道云笔记文件存储\[email protected]\30b75e25271743e889b81b63e876709e\clipboard.png)]
[外链图片转存失败,源站可能有防盗链机制,建议将图片保存下来直接上传(img-sPLQ5m8U-1661525728851)(D:/%E6%9C%89%E9%81%93%E4%BA%91%E7%AC%94%E8%AE%B0%E6%96%87%E4%BB%B6%E5%AD%98%E5%82%A8/[email protected]/b6c37c88db8442a8b5cfb024380c68ab/attachment.png)]
2、在linux中选择一个文件夹 解压缩到文件夹里面
drwxr-xr-x 9 root root 189 Aug 10 17:03 nexus-3.19.1-01 drwxr-xr-x 3 root root 20 Aug 8 14:12 sonatype-work
解压后会产生两个文件夹 一个是软件启动文件目录
一个是方jar包的目录
3、启动
进入解压后的文件夹/hin中
启动
[root@hadoop100 bin]# ./nexus start
WARNING: ******************** WARNING: Detected execution as "root" user.  This is NOT recommended! WARNING: ******************** Starting nexus 查看启动状态
[root@hadoop100 bin]# ./nexus status WARNING: ******************** WARNING: Detected execution as "root" user.  This is NOT recommended! WARNING: ******************** nexus is running. 关闭
[root@hadoop100 bin]# ./nexus stop WARNING: ******************** WARNING: Detected execution as "root" user.  This is NOT recommended! WARNING: ******************** Shutting down nexus Stopped.
4、防火墙的配置
开放8081端口即可
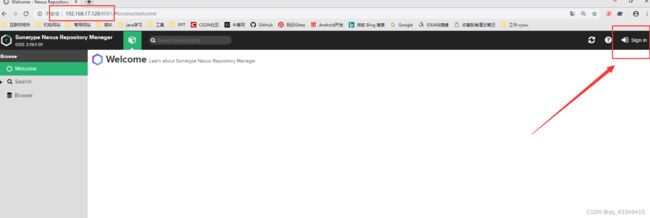
5、浏览器访问 ip地址+8081端口号

这有个登录 账户是admin 密码在sonatype-work/nexus3/admin.password文件中
登录进去之后会直接进行修改密码的操作,一般都把密码修改为admin123,方便使用
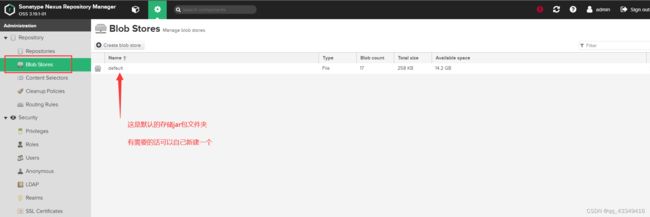
6、里面具体的配置
7、一些配置说明
component name的一些说明:
1)maven-central:maven中央库,默认从https://repo1.maven.org/maven2/拉取jar
2)maven-releases:私库发行版jar
3)maven-snapshots:私库快照(调试版本)jar
4)maven-public:仓库分组,把上面三个仓库组合在一起对外提供服务,在本地maven基础配置settings.xml中使用。
Nexus默认的仓库类型有以下四种:
1)group(仓库组类型):又叫组仓库,用于方便开发人员自己设定的仓库;
2)hosted(宿主类型):内部项目的发布仓库(内部开发人员,发布上去存放的仓库);
3)proxy(代理类型):从远程中央仓库中寻找数据的仓库(可以点击对应的仓库的Configuration页签下Remote Storage Location属性的值即被代理的远程仓库的路径);
4)virtual(虚拟类型):虚拟仓库(这个基本用不到,重点关注上面三个仓库的使用);
Policy(策略):表示该仓库为发布(Release)版本仓库还是快照(Snapshot)版本仓库;
Public Repositories下的仓库
1)3rd party: 无法从公共仓库获得的第三方发布版本的构件仓库,即第三方依赖的仓库,这个数据通常是由内部人员自行下载之后发布上去;
2)Apache Snapshots: 用了代理ApacheMaven仓库快照版本的构件仓库
3)Central: 用来代理maven中央仓库中发布版本构件的仓库
4)Central M1 shadow: 用于提供中央仓库中M1格式的发布版本的构件镜像仓库
5)Codehaus Snapshots: 用来代理CodehausMaven 仓库的快照版本构件的仓库
6)Releases: 内部的模块中release模块的发布仓库,用来部署管理内部的发布版本构件的宿主类型仓库;release是发布版本;
7)Snapshots:发布内部的SNAPSHOT模块的仓库,用来部署管理内部的快照版本构件的宿主类型仓库;snapshots是快照版本,也就是不稳定版本
所以自定义构建的仓库组代理仓库的顺序为:Releases,Snapshots,3rd party,Central。也可以使用oschina放到Central前面,下载包会更快。

8、在项目中pom.xml文件中的配置
本地的maven尽量不要配置,或者说本地的maven中的settings.xml文件尽量不要修改,特别是里面的mirror镜像地址,如果有添加的阿里云或者其他的,那么有可能会对pom中的配置进行覆盖从而不走maven私服拿jar包
<distributionManagement>
<repository>

<id>cyou-dependencyid>

<url>http://mvnrepository.cyou-inc.com:8081/repository/cyou-dependency/url>     repository>     <snapshotRepository>         <id>cyou-dependency-snapshotid>                  <url>http://mvnrepository.cyou-inc.com:8081/repository/cyou-dependency-snapshot/url>     snapshotRepository> distributionManagement>
这里需要的是两个host仓库,按照7的具体说明 在nexus界面新建两个仓库
cyou-dependency 存放version类型为Releases的jar包
cyou-dependency-snapshot 存放version类型为snapshot的jar包
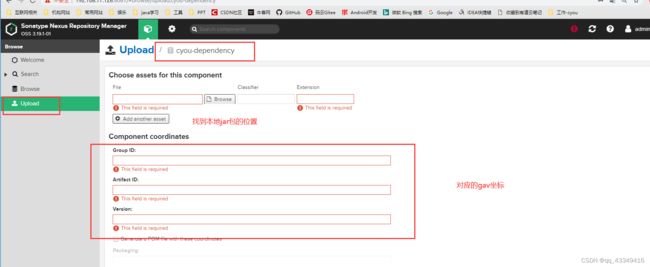
9、jar包上传
可以用命令上传也可以在nexus的界面进行上传
二、maven详细解析
引用network
1、maven项目的目录结构
pom文件定于了一个maven项目的maven配置,一般pom文件的放在项目或者模块的根目录下。
2、根元素和必要配置
<project xmlns = "http://maven.apache.org/POM/4.0.0"
    xmlns:xsi = "http://www.w3.org/2001/XMLSchema-instance"
    xsi:schemaLocation = "http://maven.apache.org/POM/4.0.0
    http://maven.apache.org/xsd/maven-4.0.0.xsd">

<modelVersion>4.0.0modelVersion>


<groupId>com.companyname.project-groupgroupId>


<artifactId>projectartifactId>


<version>1.0version>


<packaging>jarpackaging>
project>
project是pom文件的根元素,project下有modelVersion、groupId、artifactId、version、packaging等重要的元素。其中,groupId、artifactId、version三个元素用来定义一个项目的坐标,也就是说,一个maven仓库中,完全相同的一组groupId、artifactId、version,只能有一个项目。
project:整个pom配置文件的根元素,所有的配置都是写在project元素里面的;
modelVersion:指定了当前POM模型的版本,对于Maven2及Maven 3来说,它只能是4.0.0;
groupId:这是项目组的标识。它在一个组织或者项目中通常是唯一的。
artifactId:这是项目的标识,通常是工程的名称。它在一个项目组(group)下是唯一的。
version:这是项目的版本号,用来区分同一个artifact的不同版本。
packaging:这是项目产生的构件类型,即项目通过maven打包的输出文件的后缀名,包括jar、war、ear、pom等。
3、父项目和parent元素
    <parent>
    <artifactId>com.companyname.project-groupartifactId>

    <groupId>base-projectgroupId>

    <version>1.0.1-RELEASEversion>


    <relativePath>../pom.xmlrelativePath>
parent>
所有的pom都继承自一个父pom(Super POM)。父pom包含了一些可以被继承的默认设置,如果项目的pom中没有设置这些元素,就会使用父pom中设置。例如,Super POM中配置了默认仓库http://repo1.maven.org/maven2,这样哪怕项目的pom中没有配置仓库,也可以去这个默认仓库中去下载依赖。实际上,maven pom文件约定大于配置的原则,就是通过在Super POM中预定义了一些配置信息来实现的。
Maven使用effective pom(Super pom加上工程自己的配置)来执行相关的目标,它帮助开发者在pom.xml中做尽可能少的配置。当然,这些配置也可以被重写。
parent元素可以指定父pom。用户可以通过增加parent元素来自定义一个父pom,从而继承该pom的配置。parent元素中包含一些子元素,用来定位父项目和父项目的pom文件位置。
parent:用于指定父项目;
groupId:parent的子元素,父项目的groupId,用于定位父项目;
artifactId:parent的子元素,父项目的artifactId,用于定位父项目;
version:parent的子元素,父项目的version,用于定位父项目;
relativePath:parent的子元素,用于定位父项目pom文件的位置。
4、项目构建需要的信息
    <build>


        <sourceDirectory />

        <testSourceDirectory />

        <outputDirectory />

        <testOutputDirectory />

        <scriptSourceDirectory />


    <resources>

        <resource>


            <targetPath />

            <filtering />

            <directory />

            <includes />

            <excludes />
        resource>
    resources>

    <testResources>

        <testResource>
            <targetPath />
            <filtering />
            <directory />
            <includes />
            <excludes />
        testResource>
    testResources>


    <pluginManagement>

        <plugins>

            <plugin>

                <groupId />

                <artifactId />

                <version />


                <extensions />

                <executions>

                    <execution>

                        <id />

                        <phase />

                        <goals />

                        <inherited />

                        <configuration />
                    execution>
                executions>

                <dependencies>

                    <dependency>
                        ......
                    dependency>
                dependencies>

                <inherited />

                <configuration />
            plugin>
        plugins>
    pluginManagement>

    <plugins>

        <plugin>
            <groupId />
            <artifactId />
            <version />
            <extensions />
            <executions>
                <execution>
                    <id />
                    <phase />
                    <goals />
                    <inherited />
                    <configuration />
                execution>
            executions>
            <dependencies>

                <dependency>
                    ......
                dependency>
            dependencies>
            <goals />
            <inherited />
            <configuration />
        plugin>
    plugins>


    <extensions>

        <extension>

            <groupId />
            <artifactId />
            <version />
        extension>
    extensions>


    <defaultGoal />

    <directory />

    <finalName />

    <filters />
build>
build标签定义了构建项目需要的信息,这部分信息对于定制化项目构建是非常重要的。这里会根据build的子元素的特点,简单地分类讲解.
1、路径管理
```xml
路径管理定义了各种源码和编译结果的输出路径。如果遵循maven默认的路径约定,这里的几个元素是不需要配置的。这些元素包括:
sourceDirectory:项目源码目录,定义的是相对于pom文件的相对路径;
testSourceDirectory:项目单元测试源码目录,定义的也是是相对于pom文件的相对路径;
outputDirectory:被编译过的应用程序class文件存放的目录,也是是相对于pom文件的相对路径;
testOutoutDIrectory:被编译过的测试class文件存放的目录,也是是相对于pom文件的相对路径;
scriptSourceDirectory:项目脚本源码目录,也是是相对于pom文件的相对路径。由于脚本是解释性的语言,所以该目录下的内容,会直接被拷贝到输出目录,而不需要编译。
2、资源管理
 ```xml


 ```
这里的元素主要是对应用程序resource资源和单元测试部分resource资源的管理,分别通过resource标签和testResource标签管理两种资源。两个标签元素可选的子元素都是一样的。子元素包括:
targetPath:描述了资源的目标输出路径,该路径是相对于target/classes的路径;
filtering:对文件中的参数值进行过滤,需要被过滤的文件在filter中指定;
directory:描述打包前的资源的存放路径,这个路径是相对于pom文件所在目录的相对路径;
includes:包含的模式列表,例如*/.xml。只有符合条件的资源文件才会在打包的时候被放入到输出路径中;
excludes:排除的模式列表,例如**/*.xml,符合的资源文件不会在打包的时候会被过滤掉。
3、插件管理
插件管理相关的元素有两个,包括pluginManagement和plugins。pluginManagement中有子元素plugins,它和project下的直接子元素plugins的区别是,pluginManagement主要是用来声明子项目可以引用的默认插件信息,这些插件如果只写在pluginManagement中是不会被引入的。project下的直接子元素plugins中定义的才是这个项目中真正需要被引入的插件。
    <pluginManagement>

        <plugins>

            <plugin>

                <groupId />
                <artifactId />
                <version />


                <extensions />

                <executions>

                    <execution>

                        <id />

                        <phase />

                        <goals />

                        <inherited />

                        <configuration />
                    execution>
                executions>

                <dependencies>
                        ......
                dependencies>

                <inherited />

                <configuration />
            plugin>
        plugins>
    pluginManagement>

    <plugins>
        ......
    plugins>
4、构建扩展
extensions是在此构建中使用的项目的列表,它们将被包含在运行构建的classpath中。这些项目可以启用对构建过程的扩展,并使活动的插件能够对构建生命周期进行更改。简而言之,扩展是在构建期间激活的artifacts。扩展不需要实际执行任何操作,也不包含 Mojo。因此,扩展对于指定普通插件接口的多个实现中的一个是非常好的。
    <extensions>

        <extension>

            <groupId />
            <artifactId />
            <version />
        extension>
    extensions>
5、其他配置
build中还有一些配置,如下:
    <defaultGoal />

    <directory />

    <finalName />

    <filters />
5、项目依赖相关信息
pom文件中通过dependencyManagement来声明依赖,通过dependencies元素来管理依赖。dependencyManagement下的子元素只有一个直接的子元素dependencice,其配置和dependencies子元素是完全一致的;而dependencies下只有一类直接的子元素:dependency。一个dependency子元素表示一个依赖项目。
<dependencies>
    <dependency>


        <groupId>org.apache.mavengroupId>
        <artifactId>maven-artifactartifactId>
        <version>3.8.1version>


        <type>jartype>


        <classifier>classifier>


        <exclusions>
            <exclusion>
                <artifactId>spring-coreartifactId>
                <groupId>org.springframeworkgroupId>
            exclusion>
        exclusions>

        <optional>trueoptional>


        <scope>testscope>


        <systemPath>systemPath>
    dependency>
dependencies>


<dependencyManagement>
    <dependencies>

        <dependency>
            ......
        dependency>
    dependencies>
dependencyManagement>
这里也是根据元素的作用,简单的对dependency的子元素做了一下分类。下面按分类来看一下dependency的子元素:
1、依赖坐标
依然是通过groupId + artifactId + version来在仓库中定位一个项目:
groupId:parent的子元素,父项目的groupId,用于定位父项目;
artifactId:parent的子元素,父项目的artifactId,用于定位父项目;
version:parent的子元素,父项目的version,用于定位父项目;
2、依赖类型
这个分类主要包括两个元素,分别是依赖类型和依赖的分类器。同一个项目,即使打包成同一种类型,也可以有多个文件同时存在,因为它们的分类器可能是不同的。
type:依赖类型,默认是jar。通常表示依赖文件的扩展名,但也有例外。一个类型可以被映射成另外一个扩展名或分类器。类型经常和使用的打包方式对应,尽管这也有例外,一些类型的例子:jar,war,ejb-client和test-jar。如果设置extensions为true,就可以在plugin里定义新的类型。
classifier:依赖的分类器。分类器可以区分属于同一个POM,但不同构建方式的构件。分类器名被附加到文件名的版本号后面,如果想将项目构建成两个单独的JAR,分别使用Java 4和6编译器,就可以使用分类器来生成两个单独的JAR构件
3、依赖传递
依赖传递相关的子元素主要有两个,用于依赖排除的exclusions和设置依赖是否可选的optional。
exclusions:排除该项目中的一些依赖,即本项目A依赖该dependency指示的项目B,但是不依赖项目B中依赖的这些依赖;
optional:可选依赖,用于阻断依赖的传递性,即本项目不会依赖父项目中optional设置为true的依赖。
4、依赖范围
还有一些其他元素:
scope:依赖范围。在项目发布过程中,帮助决定哪些构件被包括进来
- compile:默认范围,用于编译; - provided:类似于编译,但支持jdk或者容器提供,类似于classpath
- runtime: 在执行时需要使用; - systemPath: 仅用于范围为system,提供相应的路径
- test: 用于test任务时使用; - system: 需要外在提供相应的元素,通过systemPath来取得
- optional: 当项目自身被依赖时,标注依赖是否传递。用于连续依赖时使用
systemPath:该元素为依赖规定了文件系统上的绝对路径。仅在scope设置成system时才会使用。不推荐使用这个元素。不推荐使用绝对路径,如果必须要用,推荐使用属性匹配绝对路径,例如${java.home}
6、生成文档相关的元素
   <name>project-mavenname>
<url>http://123.a.b/nsnxsurl>


<description>Description of this maven projectdescription>
备注:maven可以通过mvn site命令生成项目的相关文档。
和生成文档相关的元素,包括name,url,和description。
name:项目名称,maven生成文档会使用项目名;
url:项目主页的地址,maven生成文档的时候使用。
description:项目描述。如果可以使用HTML格式进行描述的时候,不推荐使用纯文本的描述。
7、远程仓库列表
远程仓库列表的配置,包括依赖和扩展的远程仓库配置,以及插件的远程仓库配置。在本地仓库找不到的情况下,maven下载依赖、扩展和插件就是从这里配置的远程仓库中进行下载。
需要注意的是release和snapshot两者的区别。release是稳定版本,一经发布不再修改,想发布修改后的项目,只能升级项目版本再进行发布;snapshot是不稳定的,一个snapshot的版本可以不断改变。项目在开发期间一般会使用snapshot,更方便进行频繁的代码更新;一旦发布到外部,或者开发基本完成,代码迭代不再频繁,则推荐使用release。
<repositories>

    <repository>

        <releases>

            <enabled />


            <updatePolicy />

            <checksumPolicy />
        releases>


        <snapshots>
            <enabled />
            <updatePolicy />
            <checksumPolicy />
        snapshots>


        <id>nanxs-repository-proxyid>

        <name>nanxs-repository-proxyname>

        <url>http://192.168.1.169:9999/repository/url>

        <layout>defaultlayout>
    repository>
repositories>


<pluginRepositories>

    <pluginRepository>
        ......
    pluginRepository>
pluginRepositories>
8、项目分发信息相关元素
<distributionManagement>

    <repository>

        <uniqueVersion />

        <id>nanxs-maven2id>
        <name>nanxsmaven2name>
        <url>file://${basedir}/target/deployurl>
        <layout />
    repository>

    <snapshotRepository>
        <uniqueVersion />
        <id>nanxs-maven2id>
        <name>Nanxs-maven2 Snapshot Repositoryname>
        <url>scp://svn.baidu.com/nanxs:/usr/local/maven-snapshoturl>
        <layout />
    snapshotRepository>

    <site>

        <id>nanxs-siteid>

        <name>business api websitename>

        <url>scp://svn.baidu.com/nanxs:/var/www/localhost/nanxs-weburl>
    site>


    <downloadUrl />

    <relocation>

        <groupId />

        <artifactId />

        <version />

        <message />
    relocation>


    <status />
distributionManagement>    项目分发信息的相关配置,在distributionManagement中设置。设置的内容包括:
repository和snapshotRepository:项目产生的构建/快照构建部署的远程仓库。如果不配置snapshotRepository,快照也会部署到repository中;
site:部署项目的网站需要的信息;
downloadUrl:项目下载页面的URL,这是为不在仓库中的构建提供的;
relocation:如果构件有了新的group ID和artifact ID(移到了新的位置),这里列出构件的新的信息;
status:给出该构件在远程仓库的状态,本地项目中不能设置该元素,这是工具自动更新的。
9、报表规范
报表规范描述的是使用mvn site命令时使用的一些配置。
<reporting>

    <excludeDefaults />

    <outputDirectory />

    <plugins>

        <plugin>

            <groupId />
            <artifactId />
            <version />


            <inherited />

            <configuration />


            <reportSets>

                <reportSet>

                    <id />

                    <configuration />

                    <inherited />

                    <reports />
                reportSet>
            reportSets>
        plugin>
    plugins>
reporting>
10、profile配置
    <profiles>

        <profile>

            <id />


            <activation>

                <activeByDefault />

                <jdk />

                <os>

                    <name>Windows XPname>

                    <family>Windowsfamily>

                    <arch>x86arch>

                    <version>5.1.2600version>
                os>


                <property>

                    <name>mavenVersionname>

                    <value>2.0.3value>
                property>


                <file>

                    <exists>/usr/local/abcd/abcd-home/jobs/maven-guide-zh-to-production/workspace/
                    exists>

                    <missing>/usr/local/abcd/abcd-home/jobs/maven-guide-zh-to-production/workspace/
                    missing>
                file>
            activation>

        <build />

        <repositories />

        <pluginRepositories />

        <dependencies />

        <reporting />

        <dependencyManagement />

        <distributionManagement />


        <reports />

        <modules />

        <properties />
    profile>
profiles>
11、邮件列表和持续集成配置
    <ciManagement>

        <system />

        <url />

        <notifiers>

            <notifier>

                <type />

                <sendOnError />

                <sendOnFailure />

                <sendOnSuccess />

                <sendOnWarning />

                <address />

                <configuration />
            notifier>
        notifiers>
    ciManagement>

<mailingLists>

    <mailingList>

        <name>Demoname>

        <post>[email protected]post>

        <subscribe>[email protected]subscribe>

        <unsubscribe>[email protected]unsubscribe>

        <archive>http:/a.b.c/nanxs/demo/dev/archive>
    mailingList>
mailingLists>
12、项目的描述性信息
<issueManagement>

    <system>jirasystem>

    <url>http://jira.baidu.com/nanxsurl>
issueManagement>

<inceptionYear />


<developers>

    <developer>

        <id>HELLO WORLDid>

        <name>nanxsname>

        <email>[email protected]email>

        <url />

        <roles>
            <role>Project Managerrole>
            <role>Architectrole>
        roles>

        <organization>demoorganization>

        <organizationUrl>http://a.b.com/nanxsorganizationUrl>

        <properties>
            <dept>Nodept>
        properties>

        <timezone>-5timezone>
    developer>
developers>


<contributors>

    <contributor>
        <name />
        <email />
        <url />
        <organization />
        <organizationUrl />
        <roles />
        <timezone />
        <properties />
    contributor>
contributors>


<licenses>

    <license>

        <name>Apache 2name>

        <url>http://a.b.com/nanxs/LICENSE-1.0.txturl>

        <distribution>repodistribution>

        <comments>A business-friendly OSS licensecomments>
    license>
licenses>


<scm>

    <connection>scm:svn:http://a.b.com/nanxsconnection>

    <developerConnection>scm:svn:http://a.b.com/nanxsdeveloperConnection>

    <tag />

    <url>http://a.b.com/nanxsurl>
scm>


<organization>

    <name>demoname>

    <url>http://a.b.com/nanxsurl>
organization>
13、其他配置
<prerequisites>

    <maven />
prerequisites>

<modules />


<name>valuename>。 -->
<properties />


<reports>reports>
自己总结了一些,部分内容来源于网上,仅供学习参考

