Git代码统计
目录
Git命令代码统计
gitstats工具统计Git仓库代码
1.使用Windows的子工具wsl操作
2.使用虚拟机的方式进行操作
Git命令代码统计
从仓库中克隆代码到指定的位置,进入到对应项目代码的路径后,使用git进行如下的操作:
1.查看git上的个人代码量(username为gitlab的账户名):
$ git log --author="username" --pretty=tformat: --numstat | awk '{ add += $1; subs += $2; loc += $1 - $2 } END { printf "added lines: %s, removed lines: %s, total lines: %s\n", add, subs, loc }' -2.统计每个人的增删行数:
$ git log --format='%aN' | sort -u | while read name; do echo -en "$name\t"; git log --author="$name" --pretty=tformat: --numstat | awk '{ add += $1; subs += $2; loc += $1 - $2 } END { printf "added lines: %s, removed lines: %s, total lines: %s\n", add, subs, loc }' -; done3.统计某段时间内所有人的代码量(修改起止时间,如果指定某一个人,将name更换为gitlab的账户名):
$ git log --format='%aN' | sort -u | while read name; do echo -en "$name\t"; git log --author="$name" --pretty=tformat: --since ==2021–10-01 --until=2021-10-30 --numstat | awk '{ add += $1; subs += $2; loc += $1 - $2 } END { printf "added lines: %s, removed lines: %s, total lines: %s\n", add, subs, loc }' -; done4.查看仓库提交者排名前5:
$ git log --pretty='%aN' | sort | uniq -c | sort -k1 -n -r | head -n 55.贡献值统计:
$ git log --pretty='%aN' | sort -u | wc -l6.提交数统计:
$ git log --oneline | wc -lgit log参数说明:
--author   指定作者
--stat   显示每次更新的文件修改统计信息,会列出具体文件列表
--shortstat    统计每个commit 的文件修改行数,包括增加,删除,但不列出文件列表:
--numstat   统计每个commit 的文件修改行数,包括增加,删除,并列出文件列表:

-p 选项展开显示每次提交的内容差异,用-2 则仅显示最近的两次更新,例如:git log -p  -2
--name-only 仅在提交信息后显示已修改的文件清单
--name-status 显示新增、修改、删除的文件清单
--abbrev-commit 仅显示 SHA-1 的前几个字符,而非所有的 40 个字符
--relative-date 使用较短的相对时间显示(比如,“2 weeks ago”)
--graph 显示 ASCII 图形表示的分支合并历史
--pretty 使用其他格式显示历史提交信息。可用的选项包括 oneline,short,full,fuller 和 format(后跟指定格式),例如: git log --pretty=oneline ; git log --pretty=short ; git log --pretty=full ; git log --pretty=fuller
--pretty=tformat:   可以定制要显示的记录格式,这样的输出便于后期编程提取分析
       例如:git log --pretty=format:""%h - %an, %ar : %s""
       下面列出了常用的格式占位符写法及其代表的意义。
       选项       说明
       %H      提交对象(commit)的完整哈希字串
       %h      提交对象的简短哈希字串
       %T      树对象(tree)的完整哈希字串
       %t      树对象的简短哈希字串
       %P      父对象(parent)的完整哈希字串
       %p      父对象的简短哈希字串
       %an     作者(author)的名字
       %ae     作者的电子邮件地址
       %ad     作者修订日期(可以用 -date= 选项定制格式)
       %ar     作者修订日期,按多久以前的方式显示
       %cn     提交者(committer)的名字
       %ce     提交者的电子邮件地址
       %cd     提交日期
       %cr     提交日期,按多久以前的方式显示
       %s      提交说明

--since  限制显示输出的范围,
       例如: git log --since=2.weeks    显示最近两周的提交
       选项 说明
       -(n)    仅显示最近的 n 条提交
       --since, --after 仅显示指定时间之后的提交。
       --until, --before 仅显示指定时间之前的提交。
       --author 仅显示指定作者相关的提交。
       --committer 仅显示指定提交者相关的提交。
gitstats工具统计Git仓库代码
环境要求:ubuntu18.04,python版本2.7
1.使用Windows的子工具wsl操作
使用管理员的身份运行Windows PowerShell 安装wsl子系统ubuntu,操作如下:
# 1.查看wsl子系统版本
PS C:\WINDOWS\system32> wsl --list --online
以下是可安装的有效分发的列表。
请使用“wsl --install -d <分发>”安装。

NAME            FRIENDLY NAME
Ubuntu          Ubuntu
Debian          Debian GNU/Linux
kali-linux      Kali Linux Rolling
openSUSE-42     openSUSE Leap 42
SLES-12         SUSE Linux Enterprise Server v12
Ubuntu-16.04    Ubuntu 16.04 LTS
Ubuntu-18.04    Ubuntu 18.04 LTS
Ubuntu-20.04    Ubuntu 20.04 LTS

# 2.下载安装对应的系统版本
PS C:\WINDOWS\system32> wsl --install -d Ubuntu-18.04


此时ubuntu 18.04会自动启动安装输入创建新用户及密码,在ubuntu18.04的终端进行操作如下:
Enter new UNIX username: xxxx
New password:
Retype new password:
passwd: password updated successfully
Installation successful!

# 设置并验证root用户的密码重置的操作如下:
xxxx@DESKTOP-3ITVP7C:~$ sudo passwd root
[sudo] password for xxxx:
New password:
Retype new password:
passwd: password updated successfully
xxxx@DESKTOP-3ITVP7C:~$ su root
Password:


# 以下使用root用户进行操作:
# 1.更换软件源,搜索ubuntu18.04软件源
$ vim /etc/apt/sources.list
# 2.更新软件源
$ apt-get update
# 3.安装python2
$ apt-get install python
# 4.查看python的版本
$ python -V
# 5.安装gitstats工具
$ apt-get install gitstats
# 6.拷贝git仓库的代码到ubuntu18.04中(原位置->新位置)
$ cp -r /mnt/f/code/django/ ~/
# 7.使用gitstats统计生成图标(代码位置->统计文件存放位置)
$ gitstats ~/django/ ~/data/
# 8.移动统计文件到Windows端
$ mv ~/data/ /mnt/f/
2.使用虚拟机的方式进行操作
在镜像下载的官方网站下载Ubuntu18.04的镜像,使用VM软件进行创建一个新的虚拟机。创建完成后进入到虚拟机中打开终端进行如下操作:
# 以下为非root权限用户进行操作
# 查看python的版本,默认的python的版本是python 3.6.8 及python 2.7的版本
$ sudo python -V
# 更新软件源
$ sudo apt-get update
# 克隆远程仓库的代码在虚拟机中
$ git clone git仓库地址
# 安装gitstats工具
$ sudo apt-get install gitstats
# 使用gitstats统计生成图标(代码位置->统计文件存放位置)
$ gitstats ~/django/ ~/data/
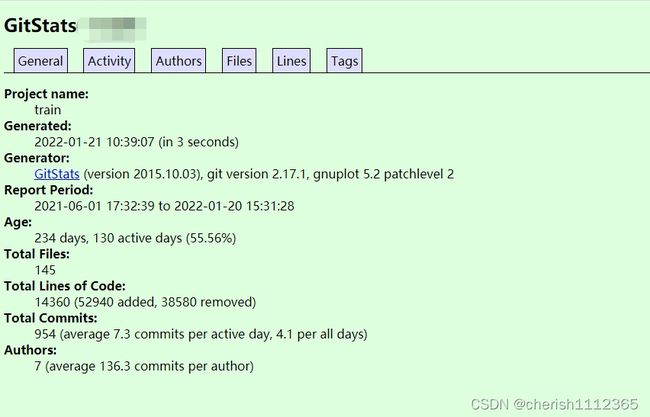
# 将虚拟机中生成的代码统计的文件复制到宿主机中最终代码统计的结果页面,如下: