Spring中Bean的作用域和生命周期
文章目录
- Bean的作用域
-
- 1. 作用域案例
- 2. Bean的6种作用域
- 3. 修改Bean的作用域
- 4.Spring Bean 大的执行流程
- 5.Bean的生命周期
- 6. 生命周期示例
Bean的作用域
Spring是一个IOC容器,它存储的就是一个个的Bean对象,那么Bean是Spring中最核心的资源,所以需要更深入了解一下Bean对象。
1. 作用域案例
假设现在有一个公共的Bean,提供给张三和李四两个程序员使用,在使用图中张三修改了公共Bean的数据,导致李四在使用时发生了预期之外的错误。
一般来说,我们预期的结果是公共的Bean可以在各自的类中被修改,但不能影响到其它类。
代码示例
公共的Bean对象
@Component
public class UserBean {


    @Bean
    public User getUser() {
        User user = new User();
        user.setId(1);
        user.setName("Java");
        user.setAge(20);

        return user;
    }
}
张三程序员调用Bean对象并修改
@Controller
public class UserController7 {

    @Resource(name = "getUser")
    private User user;

    public User myUser() {
        User myUser = user;
        myUser.setId(10);
        myUser.setName("老王");
        myUser.setAge(35);
        return user;
    }
}
李四程序员调用Bean对象
@Controller
public class UserController8 {

    @Resource(name = "getUser")
    private User user;

    public User myUser() {
        return user;
    }
}
运行代码
public static void main(String[] args) {
        ApplicationContext applicationContext = new ClassPathXmlApplicationContext("spring-config.xml");
        UserController7 userController7 = applicationContext.getBean("userController7",UserController7.class);
        System.out.println("UserController7:"+userController7.myUser());
        UserController8 userController8 = applicationContext.getBean("userController8",UserController8.class);
        System.out.println("UserController8:"+userController8.myUser());
    }
运行结果
UserController7:User{id=10, name='老王', age=35}
UserController8:User{id=10, name='老王', age=35}
通过运行结果,我们发现张三修改了公共的Bean对象,再有李四去调用公共的Bean对象的时候,发现信息已经不正确了,说明它们使用的是同一个Bean对象。
出现上面这种情况的原因是:Bean在默认情况下都是单例状态(singleton),也是在Spring中所有人的使用的都是同一个对象,如果了解过单例设计模式,使用单例设计模式可以提高程序的性能,所以在Sping中Bean的作用域默认是 singleton单例模式
2. Bean的6种作用域
作用域:限定程序中变量的可⽤范围叫做作⽤域,或者说在源代码中定义变量的某个区域就叫做作⽤域。⽽ Bean 的作⽤域是指 Bean 在 Spring 整个框架中的某种⾏为模式,⽐如 singleton 单例作⽤域,就表示 Bean 在整个 Spring 中只有⼀份,它是全局共享的,那么当其他⼈修改了这个值之后,那么另⼀个⼈读取到的就是被修改的值。
pring 容器在初始化⼀个 Bean 的实例时,同时会指定该实例的作⽤域。Spring有 6 种作⽤域,
最后四种是基于 Spring MVC ⽣效的:
- singleton:单例作⽤域(Spring默认选择的作用域)
- prototype:原型作⽤域(多例作⽤域)
- request:请求作⽤域
- session:会话作⽤域
- application:全局作⽤域
- websocket:HTTP WebSocket 作⽤域
注意:后 4 种状态是 Spring MVC 中的值,在普通的 Spring 项⽬中只有前两种 。
1.singleton (单例作⽤域)
● 描述:该作⽤域下的Bean在IoC容器中只存在⼀个实例:获取Bean(即通过
applicationContext.getBean等⽅法获取)及装配Bean(即通过@Autowired注⼊)都是同⼀
个对象。
● 场景:通常⽆状态的Bean使⽤该作⽤域。⽆状态表示Bean对象的属性状态不需要更新
● 备注:Spring默认选择该作⽤域
2.prototype (多例作⽤域)
● 描述:每次对该作⽤域下的Bean的请求都会创建新的实例:获取Bean(即通过
applicationContext.getBean等⽅法获取)及装配Bean(即通过@Autowired注⼊)都是新的
对象实例。
● 场景:通常有状态的Bean使⽤该作⽤域
3.request:(请求作⽤域)
● 描述:每次http请求会创建新的Bean实例,类似于prototype
● 场景:⼀次http的请求和响应的共享Bean
● 备注:限定SpringMVC中使⽤
4.session (会话作用域)
● 描述:在⼀个http session中,定义⼀个Bean实例
● 场景:⽤户回话的共享Bean, ⽐如:记录⼀个⽤户的登陆信息
● 备注:限定SpringMVC中使⽤
5.application(全局作⽤域)
● 描述:在⼀个http servlet Context中,定义⼀个Bean实例
● 场景:Web应⽤的上下⽂信息,⽐如:记录⼀个应⽤的共享信息
● 备注:限定SpringMVC中使⽤
6.websocket (HTTP WebSocket 作用域)较少使用(了解)
● 描述:在⼀个HTTP WebSocket的⽣命周期中,定义⼀个Bean实例
● 场景:WebSocket的每次会话中,保存了⼀个Map结构的头信息,将⽤来包裹客户端消息
头。第⼀次初始化后,直到WebSocket结束都是同⼀个Bean。
● 备注:限定Spring WebSocket中使⽤
单例作用域(singleton )和全局作用域/(application )的区别
● singleton 是 Spring Core 的作⽤域;application 是 Spring Web 中的作⽤域;
● singleton 作⽤于 IoC 的容器,⽽ application 作⽤于 Servlet 容器
3. 修改Bean的作用域
通过@Scope注解可以修改Bean的作用域,共有两种写法(枚举和名字)
@Scope(ConfigurableBeanFactory.SCOPE_PROTOTYPE)@Scope("prototype")@Scope可适用于方法注解也可以用作类注解
注意:如果是 @Bean + @Scope, @Scope 一定要放在方法上进行注解,不能放在类上
因为 @Bean 注入的对象是通过方法注入而不是类注入
通过枚举设置
@Component
public class UserBean {


    @Bean
    @Scope(ConfigurableBeanFactory.SCOPE_PROTOTYPE)
    public User getUser() {
        User user = new User();
        user.setId(1);
        user.setName("Java");
        user.setAge(20);

        return user;
    }
}
或者是直接通过类型名称设置
@Component
public class UserBean {
    @Bean
    @Scope("prototype")
    public User getUser() {
        User user = new User();
        user.setId(1);
        user.setName("Java");
        user.setAge(20);

        return user;
    }
}
添加注解后前面代码示例的运行结果
UserController7:User{id=10, name='老王', age=35}
UserController8:User{id=1, name='Java', age=20}
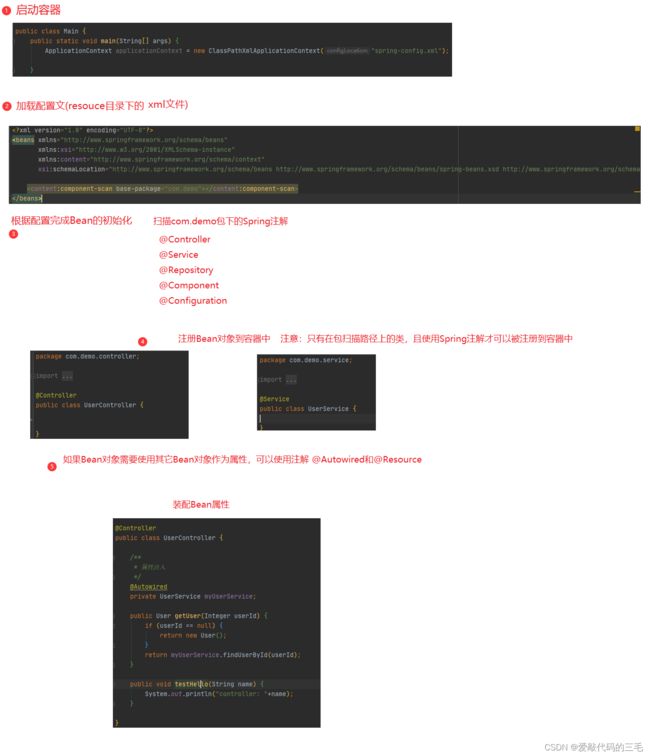
4.Spring Bean 大的执行流程
1.启动Spring容器
2. 加载Sping配置文件
3. 加载配置文件中的bean、或者是根据配置文件中的组件(Bean)根路径,进行Bean对象扫描,5大类注解、如果有注解直接加载
4. 加载的对象存到Spring
5. 其它需要使用Bean对象的地方就可以直接获取并使用
6. 执行完之后,执行销毁操作
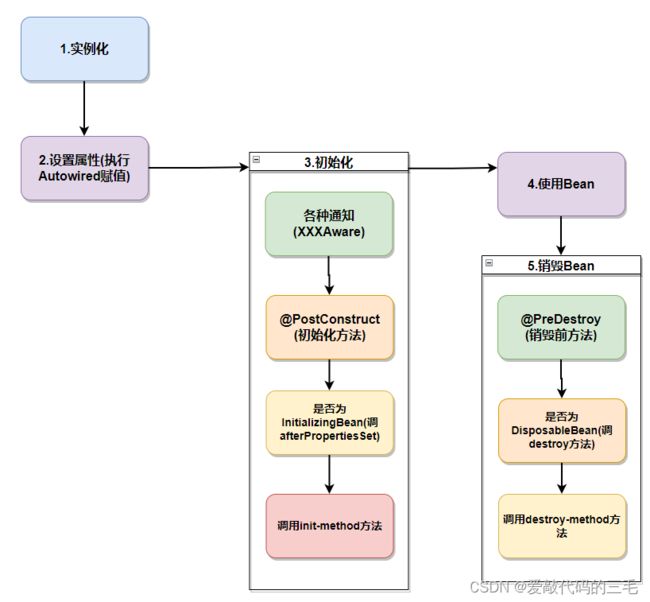
5.Bean的生命周期
- 实例化 Bean(为Bean对象分配内存空间)
- 设置属性(Bean进行初始化注入)
- 初始化(一系列准备工作的统称)
● 实现了各种 Aware 通知的⽅法,如 BeanNameAware、BeanFactoryAware、
ApplicationContextAware 的接⼝⽅法
● 执行初始化前置方法 BeanPostProcessor (如果有的话)
● 执行 @PostConstruct初始化方法
● 执行 init-method初始化方法(来源于 xml 时代)
● 执行BeanPostProcessor 初始化后置方法 - 使用Bean
- 销毁Bean
● @PreDestroy销毁前方法
● DisposableBean接口如果有实现方法
● destroy-method销毁前的执行方法(xml时代)
Bean 的⽣命流程看似繁琐,但咱们可以以⽣活中的场景来理解它,⽐如我们现在需要买⼀栋房⼦,那
么我们的流程是这样的:
- 先买房(实例化,从⽆到有)
- 装修(设置属性);
- 买家电,如洗⾐机、冰箱、电视、空调等([各种]初始化);
- ⼊住(使⽤ Bean);
- 卖出去(Bean 销毁)
实例化和初始化的区别
实例化和属性设置是 Java 级别的系统“事件”,其操作过程不可⼈⼯⼲预和修改;⽽初始化是给
开发者提供的,可以在实例化之后,类加载完成之前进⾏⾃定义“事件”处理,比如打印日志啥的。
6. 生命周期示例
@Controller
public class UserController9 implements BeanNameAware {
    // 这个方法要和xml中保持一致
    public void init() {
        System.out.println("执行 init() 方法");
    }

    public void destroy() {
        System.out.println("执行destroy方法");
    }

    @PreDestroy
    public void preDestroy() {
        System.out.println("执行@PreDestroy");
    }
    public void setBeanName(String s) {
        System.out.println("执行通知"+s);
    }

    // 初始化方法
    @PostConstruct
    public void PostConstruct() {
        System.out.println("执行初始化方法@PostConstruct");
    }


}
xml配置文件
<beans xmlns="http://www.springframework.org/schema/beans"
       xmlns:xsi="http://www.w3.org/2001/XMLSchema-instance"
       xmlns:content="http://www.springframework.org/schema/context"
       xsi:schemaLocation="http://www.springframework.org/schema/beans http://www.springframework.org/schema/beans/spring-beans.xsd http://www.springframework.org/schema/context https://www.springframework.org/schema/context/spring-context.xsd">

    <content:component-scan base-package="com.demo">content:component-scan>
    <beans>
        <bean id="userController9" class="com.demo.controller.UserController9" init-method="init" destroy-method="destroy">bean>
    beans>
beans>
调用代码
public static void main(String[] args) {
        ClassPathXmlApplicationContext context = new ClassPathXmlApplicationContext("spring-config.xml");
        UserController9 userController9 =  context.getBean("userController9",UserController9.class);
        context.destroy();
    }
执行结果
执行通知userController9
执行初始化方法@PostConstruct
执行 init() 方法
执行@PreDestroy
执行destroy方法
