Vue3.0实现自定义Message提示框
效果显示
有话要说
学习vue3.0的时候想到了,能不能自己写一个自定义的类似于element ui的this.$message的消息提示框,网上有很多是基于vue2.0的自定义提示框,那么我就来搞一个3.0版本的吧。
实现步骤
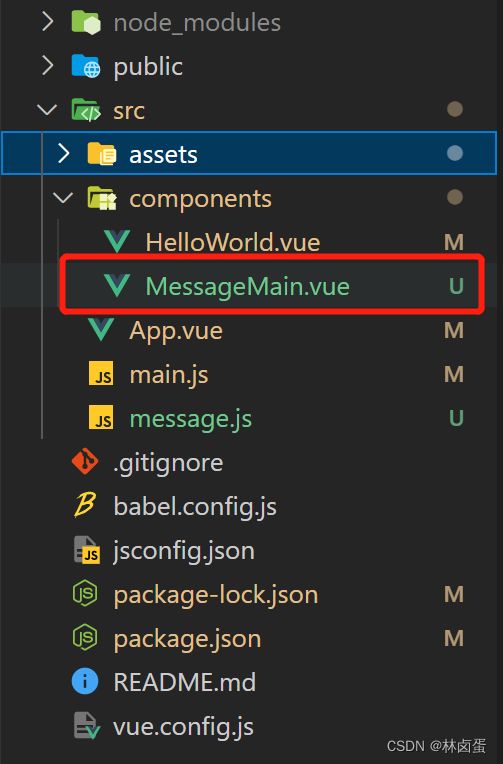
1. 创建MessageMain.vue
<template>
  <Transition name="down">
    <div class="message" :style="style[type]" v-show="visible">
      <!-- 上面绑定的是样式 -->
      <!-- 不同提示图标会变 -->
      <i class="iconfont" :class="[style[type].icon]"></i>
      <span class="text">{{ text }}</span>
    </div>
  </Transition>
</template>
<script>
import { onMounted, ref } from "vue";
export default {
  name: "MessageMain",
  props: {
    text: {
      type: String,
      default: "",
    },
    type: {
      type: String,
      // warn 警告  error 错误  success 成功
      default: "warn",
    },
  },
  setup() {
    // 定义一个对象,包含三种情况的样式,对象key就是类型字符串
    const style = {
      warn: {
        icon: "icon-error",
        color: "#fff",
        backgroundColor: "rgb(255, 126, 14)",
        borderColor: "rgb(250, 236, 216)",
      },
      error: {
        icon: "icon-error-",
        color: "#fff",
        backgroundColor: "#d13131",
        borderColor: "rgb(253, 226, 226)",
      },
      success: {
        icon: "icon-successed",
        color: "#fff",
        backgroundColor: "#03cda9",
        borderColor: "rgb(225, 243, 216)",
      },
    };
    const visible = ref(false);
    onMounted(() => {
      visible.value = true;
      setTimeout(() => {
        // visible.value = false
      }, 2000);
    });
    return { style, visible };
  },
};
</script>

<style scoped lang="less">
.message {
  position: fixed;
  top: 50px;
  left: 50%;
  transform: translateX(-50%);
  display: inline-flex;
  flex-direction: row;
  flex-wrap: nowrap;
  justify-content: center;
  align-items: center;
  margin: 0 auto;
  padding: 10px 20px;
  border-radius: 30px;
  color: #fff;
  .iconfont {
    font-size: 20px;
  }
  .text {
    padding: 0 15px;
  }
}

/* 动画进入开始时状态 */
.down-enter {
  opacity: 0;
  transform: translate(-50%, -100%);
}
.down-enter-to {
  transform: translate(-50%, 0%);
}
/* 动画进入过程动画效果 */
.down-enter-active {
  transition: all 0.4s ease;
}
/* 动画离开开始时状态 */
.down-leave {
  transform: translateY(0%);
}
/* 动画结束时动画 */
.down-leave-to {
  opacity: 0;
  transform: translate(-50%, -100%);
}
/* 动画离开过程动画效果 */
.down-leave-active {
  transition: all 0.4s ease;
}
</style>
2. 创建message.js
// 实现使用函数调用MessageMain组件的逻辑
//   引入 创建虚拟节点 和渲染方法
import { createVNode, render } from 'vue'
// 引入信息提示组件
import MessageMain from './components/MessageMain.vue'

// 准备dom容器
const div = document.createElement('div')
// 添加类名
div.setAttribute('class', 'message-container')
// 添加到body上
document.body.appendChild(div)

// 定时器标识
let timer = null

export default ({ type, text }) => {
  // 实现:根据MessageMain.vue渲染消息提示
  // 1. 导入组件
  // 2. 根据组件创建虚拟节点   第一个参数为要创建的虚拟节点  第二个参数为props的参数
  const vnode = createVNode(MessageMain, { type, text })
  // 3. 准备一个DOM容器
  // 4. 把虚拟节点渲染DOM容器中
  render(vnode, div)
  // 5. 开启定时器,移出DOM容器内容
  clearTimeout(timer)
  timer = setTimeout(() => {
    render(null, div)
  }, 2000)
}
3. 在需要展示插件的页面展示(这里我直接在Hello World.vue引用)
<template>
  <div class="hello">
    <h2>Custom Message</h2>
    <div>
      <button class="btn success" @click="successMessage()">success</button>
      <button class="btn error" @click="errorMessage()">error</button>
      <button class="btn warn" @click="warnMessage()">warn</button>
    </div>
  </div>
</template>

<script>
import MessageMainVue from "../message";
export default {
  name: "HelloWorld",
  props: {
    msg: String,
  },
  methods: {
    successMessage() {
      MessageMainVue({ type: "success", text: "恭喜你成功啦~" });
    },
    errorMessage() {
      MessageMainVue({ type: "error", text: "出错啦! 出错啦!" });
    },
    warnMessage() {
      MessageMainVue({ type: "warn", text: "警告! 警告!" });
    },
  },
};
</script>

<!-- Add "scoped" attribute to limit CSS to this component only -->
<style lang="less">
// 使用的icon是在iconfont-阿里巴巴矢量图标库下载的(https://www.iconfont.cn/)
@import url(//at.alicdn.com/t/c/font_2776228_jiohz625ow8.css);
.hello {
  .btn {
    height: 50px;
    width: 100px;
    margin: 15px;
    cursor: pointer;
    border: 1px solid #fff;
    border-radius: 8px;
    color: #fff;
    font-size: 18px;
  }
  .success {
    background-color: #03cda9;
  }
  .error {
    background-color: #d13131;
  }
  .warn {
    background-color: rgb(255, 126, 14);
  }
}
</style>
结尾
本来想结合element ui3.0版本的icon来使用,但不知道什么原因使得icon不生效,所以选用了iconfont的图标,不过选择性也变多了。
完整代码链接:码云
参考文章:1.Vue实现自定义Message
2.vue3.0手动封装消息提示框

