Vue项目实战之电商后台管理系统(三) 用户管理模块
前言
目录
- 前言
- 一、用户管理模块布局
-
- 1.1 新建用户列表组件
- 1.2 绘制用户列表基本结构
- 二、用户信息列表展示
-
- 2.1 请求用户列表数据
- 2.2 展示用户列表数据
- 2.3 实现分页展示用户列表
- 三、用户状态控制
- 四、搜索功能实现
- 五、添加用户
- 六、修改用户
- 七、删除用户
- 总结
一、用户管理模块布局
1.1 新建用户列表组件
在src/components/user/中新建Users.vue组件
在router.js中导入子级路由组件Users.vue,并设置路由规则
routes: [
	{
		path: '/home',
		component: Home,
		redirect: '/welcome',
		children: [
			{ path: '/welcome', component: Welcome },
			{ path: '/users', component: Users }
		]
	}
]
1.2 绘制用户列表基本结构
使用element-ui面包屑组件完成顶部导航路径,在src/plugins/element.js中导入组件Breadcrumb,BreadcrumbItem
使用element-ui卡片组件作为主体表格的容器,再使用element-ui输入框完成搜索框及搜索按钮,此时我们需要使用栅格布局来划分结构
在element.js中导入组件Card,Row,Col,然后再使用el-button制作添加用户按钮,代码如下:
<div>
	<!-- 面包屑导航 -->
	<el-breadcrumb separator="/">
		<el-breadcrumb-item :to="{ path: '/home' }">首页</el-breadcrumb-item>
		<el-breadcrumb-item>用户管理</el-breadcrumb-item>
		<el-breadcrumb-item>用户列表</el-breadcrumb-item>
	</el-breadcrumb>

	<!-- 卡片视图区域 -->
	<el-card>
		<!-- 搜索与添加区域 -->
		<el-row :gutter="20">
			<el-col :span="7">
				<el-input placeholder="请输入内容">
					<el-button slot="append" icon="el-icon-search"></el-button>
				</el-input>
			</el-col>
			<el-col :span="4">
				<el-button type="primary">添加用户</el-button>
			</el-col>
		</el-row>
	</el-card>
</div>
二、用户信息列表展示
2.1 请求用户列表数据
export default {
	data() {
		return {
			//获取查询用户信息的参数
			queryInfo: {
				query: '',
				pagenum: 1,
				pagesize: 2
			},
			//保存请求回来的用户列表数据
			userList:[],
			total:0
		}
	},
	created() {
		this.getUserList()
	},
	methods: {
		async getUserList() {
			//发送请求获取用户列表数据
			const { res: data } = await this.$http.get('users', {params: this.queryInfo})
			//如果返回状态为异常状态则报错并返回
			if (res.meta.status !== 200) return this.$message.error('获取用户列表失败')
			//如果返回状态正常,将请求的数据保存在data中
			this.userList = res.data.users;
			this.total = res.data.total;
		}
	}
}
2.2 展示用户列表数据
在得到后台返回的用户数据以后,我们需要使用element-ui表格组件来显示用户列表数据,在element.js中导入组件Table,TableColumn:
<el-table :data="userList" border stripe>
	<el-table-column type="index"></el-table-column>
	<el-table-column label="姓名" prop="username"></el-table-column>
	<el-table-column label="邮箱" prop="email"></el-table-column>
	<el-table-column label="电话" prop="mobile"></el-table-column>
	<el-table-column label="角色" prop="role_name"></el-table-column>
	<el-table-column label="状态">
		//在渲染展示状态时,会使用作用域插槽获取每一行的数据
		<template slot-scope="scope">
			//再使用switch开关组件展示状态信息,要记得在element.js中导入组件Switch
			<el-switch v-model="scope.row.mg_state"></el-switch>
		</template>
	</el-table-column>
	<el-table-column label="操作" width="180px">
		//渲染操作列时,也是使用作用域插槽来进行渲染的
		<template slot-scope="scope">
			<!-- 修改 -->
			<el-button type="primary" icon="el-icon-edit" size='mini'></el-button>
			<!-- 删除 -->
			<el-button type="danger" icon="el-icon-delete" size='mini'></el-button>
			<!-- 分配角色 -->
			//当我们把鼠标放到分配角色按钮上时希望能有一些文字提示,此时我们需要使用文字提示组件,在element.js中导入组件Tooltip,将分配角色按钮包含
			<el-tooltip class="item" effect="dark" content="分配角色" placement="top" :enterable="false">
				<el-button type="warning" icon="el-icon-setting" size='mini'></el-button>
			</el-tooltip>
		</template>
	</el-table-column>
</el-table>
2.3 实现分页展示用户列表
当我们使用表格来展示用户列表数据时,可以使用分页组件实现列表分页展示数据,在element.js中导入组件Pagination:

<!-- 分页导航区域
@size-change(pagesize改变时触发) @current-change(页码发生改变时触发) :current-page(设置当前页码)
:page-size(设置每页的数据条数) :total(设置总页数) -->
<el-pagination @size-change="handleSizeChange" @current-change="handleCurrentChange"
:current-page="queryInfo.pagenum" :page-sizes="[1, 2, 5, 10]" :page-size="queryInfo.pagesize"
layout="total, sizes, prev, pager, next, jumper" :total="total">
</el-pagination>

handleSizeChange(newSize) {
	//pagesize改变时触发,当pagesize发生改变的时候,我们应该以最新的pagesize来请求数据并展示数据
	this.queryInfo.pagesize = newSize;
	//重新按照pagesize发送请求,请求最新的数据
	this.getUserList();
},
handleCurrentChange( current ) {
	//页码发生改变时触发当current发生改变的时候,我们应该以最新的current页码来请求数据并展示数据
	this.queryInfo.pagenum = current;
	//重新按照pagenum发送请求,请求最新的数据
	this.getUserList();
}
三、用户状态控制
当用户点击列表中的switch组件时,用户的状态也要随之发生改变。
首先要监听用户点击switch组件的事件,并将当前状态保存到后台数据库中:
<el-switch v-model="scope.row.mg_state" @change="userStateChanged(scope.row)"></el-switch>

async userStateChanged(row) {
	//发送请求进行状态修改
	const { data: res } = await this.$http.put(`users/${row.id}/state/${row.mg_state}`)
	//如果返回状态为异常状态则报错并返回
	if (res.meta.status !== 200) {
		row.mg_state = !row.mg_state
		return this.$message.error('修改状态失败')
	}
	this.$message.success('更新状态成功')
},
四、搜索功能实现
添加数据绑定,添加搜索按钮的点击事件,当用户点击搜索按钮的时候,根据文本框内容重新请求用户列表数据
<el-col :span="7">
	//给搜索框添加一个一键清除关键字的功能,只需要给文本框添加clearable属性
	//清除关键字以后,还要添加clear事件,用来重新请求数据
	<el-input placeholder="请输入内容" v-model="queryInfo.query" clearable @clear="getUserList">
		<el-button slot="append" icon="el-icon-search" @click="getUserList"></el-button>
	</el-input>
</el-col>
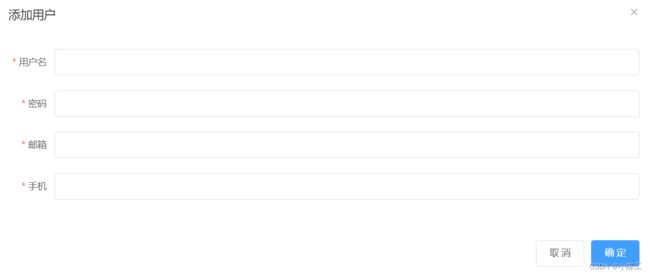
五、添加用户
当我们点击添加用户按钮的时候,需要弹出一个对话框来实现添加用户的功能,首先我们需要在element.js文件中引入Dialog组件
接下来我们要为“添加用户”按钮添加点击事件,在事件中将addDialogVisible设置为true,即显示对话框
布局代码如下:
<!-- 对话框组件 :visible.sync(设置是否显示对话框) width(设置对话框的宽度):before-close(在对话框关闭前触发的事件) -->
<el-dialog title="添加用户" :visible.sync="addDialogVisible" width="50%">
	<!-- 对话框主体区域 -->
	<el-form :model="addForm" :rules="addFormRules" ref="addFormRef" label-width="70px">
		<el-form-item label="用户名" prop="username">
			<el-input v-model="addForm.username"></el-input>
		</el-form-item>
		<el-form-item label="密码" prop="password">
			<el-input v-model="addForm.password"></el-input>
		</el-form-item>
		<el-form-item label="邮箱" prop="email">
			<el-input v-model="addForm.email"></el-input>
		</el-form-item>
		<el-form-item label="电话" prop="mobile">
			<el-input v-model="addForm.mobile"></el-input>
		</el-form-item>
	</el-form>
	<!-- 对话框底部区域 -->
	<span slot="footer" class="dialog-footer">
		<el-button @click="addDialogVisible = false">取 消</el-button>
		<el-button type="primary" @click="addDialogVisible = false">确 定</el-button>
	</span>
</el-dialog>
添加数据绑定和表单校验规则,代码如下:
data() {
	//验证邮箱的自定义规则
	var checkEmail = (rule, value, cb) => {
		const regEmail = /^\w+@\w+(\.\w+)+$/
		if (regEmail.test(value)) {
			return cb()
		}
		//返回一个错误提示
		cb(new Error('请输入合法的邮箱'))
	}
	//验证手机号码的规则
	var checkMobile = (rule, value, cb) => {
		const regMobile = /^1[34578]\d{9}$/
		if (regMobile.test(value)) {
			return cb()
		}
		//返回一个错误提示
		cb(new Error('请输入合法的手机号码'))
	}
	return {
		//是否显示添加用户弹出窗,默认不显示
		addDialogVisible: false,
		// 添加用户的表单数据
		addForm: {
			username: '',
			password: '',
			email: '',
			mobile: ''
		},
		// 添加表单的验证规则对象
		addFormRules: {
		username: [
			{ required: true, message: '请输入用户名称', trigger: 'blur' },
			{ min: 3, max: 10, message: '用户名在3~10个字符之间', trigger: 'blur'}
		],
		password: [
			{ required: true, message: '请输入密码', trigger: 'blur' },
			{ min: 6, max: 15, message: '用户名在6~15个字符之间', trigger: 'blur'}
		],
		email: [
			{ required: true, message: '请输入邮箱', trigger: 'blur' },
			{ validator:checkEmail, message: '邮箱格式不正确,请重新输入', trigger: 'blur'}
		],
		mobile: [
			{ required: true, message: '请输入手机号码', trigger: 'blur' },
			{ validator:checkMobile, message: '手机号码不正确,请重新输入', trigger: 'blur'}
		]
	}
}
当关闭对话框时,重置表单:
给el-dialog添加@close事件,在事件中添加重置表单的代码:
<el-dialog title="添加用户" :visible.sync="addDialogVisible" width="50%" @close="addDialogClosed">

addDialogClosed() {
	this.$refs.addFormRef.resetFields()
},
点击对话框中的确定按钮,发送请求完成添加用户的操作,代码如下:
<el-button type="primary" @click="addUser">确 定</el-button>

addUser(){
	//点击确定按钮,添加新用户
	//调用validate进行表单验证
	this.$refs.addFormRef.validate( async valid => {
		if(!valid) return this.$message.error("请填写完整用户信息");
		//发送请求完成添加用户的操作
		const {data:res} = await this.$http.post("users",this.addForm)
		//判断如果添加失败,就做提示
		if (res.meta.status !== 200) return this.$message.error('添加用户失败')
		//添加成功的提示
		this.$message.success("添加用户成功")
		//关闭对话框
		this.addDialogVisible = false
		//重新请求最新的数据
		this.getUserList()
	})
}
六、修改用户
修改用户的逻辑和添加用户大体相同,这里不做过多赘述
七、删除用户
在点击删除按钮的时候,需要弹窗让用户确认是否删除。
弹窗组件需要挂载到vue中才能使用,首先在elements.js中导入MessageBox组件
然后将MessageBox组件挂载到实例:Vue.prototype.$confirm = MessageBox.confirm

当用户点击确认删除按钮时,要根据id发送请求给后台删除对应的用户数据
代码如下:
<!-- 删除按钮 -->
<el-button type="danger" icon="el-icon-delete" size="mini" @click="removeUserById(scope.row.id)"></el-button>

async removeUserById(id){
	//弹出确定取消框,是否删除用户
	const confirmResult = await this.$confirm('请问是否要永久删除该用户','删除提示',{
		confirmButtonText:'确认删除',
		cancelButtonText:'取消',
		type:'warning'
	}).catch(err=>err)
	//如果用户点击确认,则confirmResult 为'confirm'
	//如果用户点击取消, 则confirmResult获取的就是catch的错误消息'cancel'
	if(confirmResult != "confirm"){
		return this.$message.info("已经取消删除")
	}
	//发送请求根据id完成删除操作
	const {data:res} = await this.$http.delete('users/'+id)
	//判断如果删除失败,就做提示
	if (res.meta.status !== 200) return this.$message.error('删除用户失败')
	//修改成功的提示
	this.$message.success('删除用户成功')
	//重新请求最新的数据
	this.getUserList()
}
总结
今天完成了用户管理模块的内容,包括获取用户列表,搜索,添加及删除用户功能,核心是通过前后端的交互获取动态数据

