【用vue开发微信小程序】(uni-app)
文章目录
- 前言
- 一、大体流程
-
- 1.uni-app项目搭建流程:
- 2.团队开发流程
- 二、遇到的些问题
-
- 1.插件的使用
-
- ①使用uni原生ui插件:
- ②使用SegmentedControl分段器
- ③使用uViewUI
- 2.组件之间的传参
-
- ①父子组件间传参
-
- 1.父向子传递参数:
- 2.子向父传递参数:
- ②VueX
-
- 1.配置步骤
- 2.基本用法
-
- state
- mutations
- actions
- getters
- ③Mixins
- 3.session_key
-
- ①wx.checkSession()
- 4.优化项目代码
-
- ①分包
- 5.实现些功能
-
- ①聊天界面
- ②平台环境判断
- ③实现滑动滚动
- ④实现缓存列表数据
- ⑤点击按钮 增添DIV
- ⑥点击按钮 删除DIV
- ⑦调用接口,传值返回数据
- ⑦带参跳转页面
前言
以前自己只练习过开发些原生微信小程序,改用uni框架试试,简单记录下流程以及遇到的些问题。
一、大体流程
1.uni-app项目搭建流程:
(1)先全局安装
npm install -g @vue/cli
(只需要安装一次,安装过后就不用安装了)
PS: 直接npm install -g@vue/cli 安装 可能会报错 问题其实不是webpack的问题。 把nodeJS的版本切换到12或者更低,就OK了.
- 卸载vuecli5.0版本: npm remove -g @vue/cli
- 安装vue4.5.15版本: npm install -g @vue/[email protected]
(2)创建项目
vue create -p dcloudio/uni-preset-vue my-project
(如果已有项目,cd后直接 npm install )
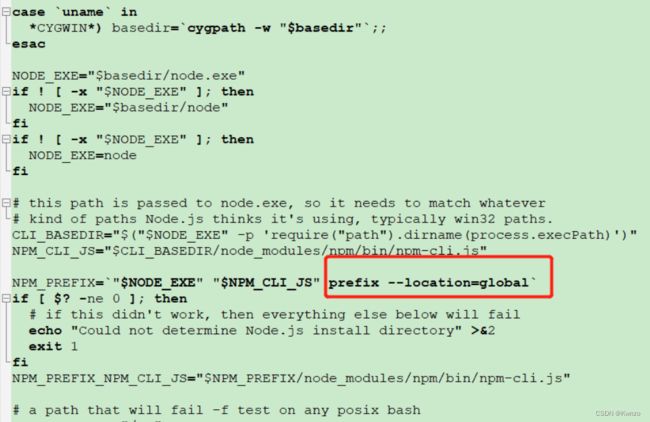
PS :npm WARN config global --global, --local are deprecated. Use `–location
解决方案:
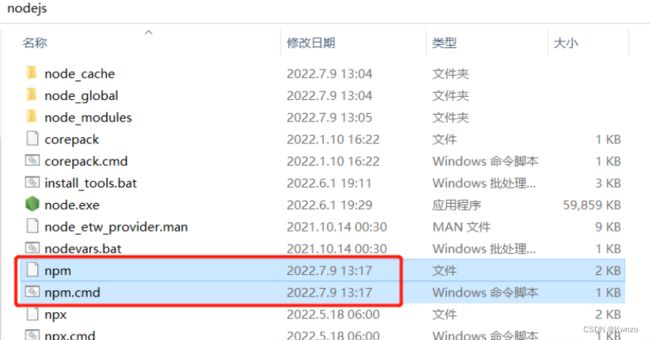
- 找到目录:打开nodejs,并打开要修改的2个配置文件(npm.cmd 和 npm)
- 进行修改:将prefix -g替换为prefix --location=global
- 检验问题:输入npm-v
(3)进入项目里
cd my-project
(4) 需要的话 先安装sass依赖
npm install sass-loader node-sass
安装后style标签中加入属性 < style lang = “scss” >
(5)运行项目
npm run dev:mp-weixin
(6)打开微信开发者工具 导入项目myproject—>dist—>dev—>mp-weixin
2.团队开发流程
(1)打开DCH,建立个人分支
(2)将项目导入到本地
(3)建立连接 打开VScode编译 同步个人分支
(4)提交代码后,打开Git Extensions 进行Push
二、遇到的些问题
1.插件的使用
①使用uni原生ui插件:
(1)项目搭建完,先安装sass 及 sass-loader
- npm i sass -D
- npm i [email protected] -D
(2)安装uni-ui
npm install @dcloudio/uni-ui
(3)在script中引用和注册组件
<script>
   import  {uniBadge}  from  '@dcloudio/uni-ui'
   export default  {
				components:   {uniBadge}
   }
</script>
(现在更多用uni_modules直接导入 会更加方便,详情见 uniapp:uni_modules组件开发与发布)
(4)在 template 中使用组件:
<template>
<uni-badge text="1"></uni-badge>
<uni-badge text="2" type="success" @click="bindClick"></uni-badge>
<uni-badge text="3" type="primary" :inverted="true"></uni-badge>
</template>
②使用SegmentedControl分段器
(1)SegmentedControl分段器也是Cloud团队开发的,先进行安装uni-ui(见①)
(2)然后打开插件市场,搜索你需要的插件,找到插件文档说明,比如uni-segmented-control插件文档
(3)迁移代码后,记得引用和注册组件。
代码片段示例:
<template>
    <view>
        <uni-segmented-control :current="current" :values="items" @clickItem="onClickItem" styleType="button" activeColor="#4cd964"></uni-segmented-control>
        <view class="content">
            <view v-show="current === 0">
                选项卡1的内容
            </view>
            <view v-show="current === 1">
                选项卡2的内容
            </view>
            <view v-show="current === 2">
                选项卡3的内容
            </view>
        </view>
    </view>
</template>

<script>
//引用和注册组件
import { uniSegmentedControl } from '@dcloudio/uni-ui'
export default {
	components: { uniSegmentedControl },

	data() {
		return {
			items: ['选项1', '选项2', '选项3'],
			current: 0
		};
	},
	methods: {
		onClickItem(e) {
			if (this.current != e.currentIndex) {
				this.current = e.currentIndex;
			}
		}
	}
}
</script>
③使用uViewUI
官方文档
实例项目
1.npm安装
- npm init -y //根目录没有package.json时执行
- npm install uview-ui //安装
- npm update uview-ui //更新
2.main.js引入uView库
import uView from 'uview-ui' ;
Vue.use(uView);
3.安装sass
4.App.vue引入样式
<style lang = "scss" >
@import "uview-ui/index.scss";
</style>
5.uni.scss引入全局scss变量文件
@import "uview-ui/theme.scss";
6.page.json配置easycom规则(按需引入)
//page.json
{
	"easycom":{
			  "^u-(.*)": "uview-ui/components/u-$1/u-$1.vue"
			  },
	 "pages": [
	          //......
	          ]
}
2.组件之间的传参
①父子组件间传参
1.父向子传递参数:
2.子向父传递参数:
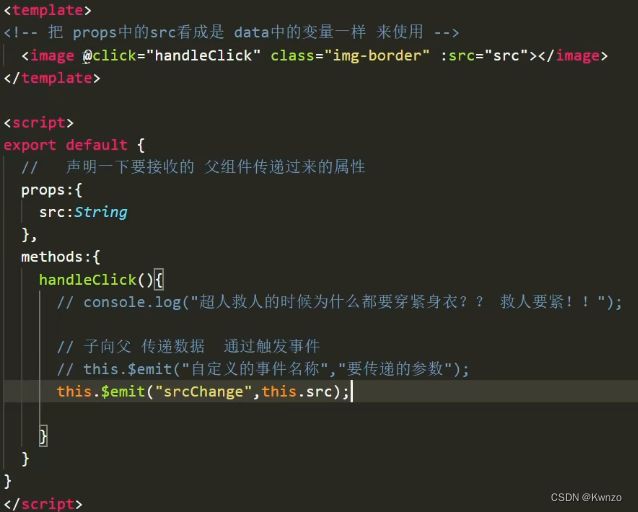
子传父,子组件通过触发事件传递,父组件通过监听事件接收
②VueX
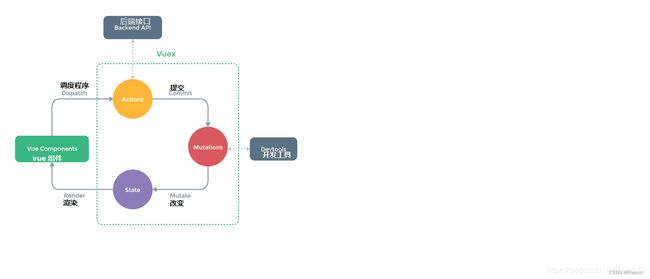
实际上,在组件的mounted钩子函数中就能进行数据的请求,父子组件之间,非父子组件之间进行传值也有一些方法,小型的项目也许这么做没事没问题,但是如果是进行大型项目,非父子之间传值,父子之间传值会出现混乱复杂的情况,如果使用vuex不止能把数据放在全局,组件无论在哪都能反问获取到,并且线路清晰,有利于维护。
vuex是基于vue框架的一个状态管理库。可以管理复杂应用的数据状态,比如兄弟组件的通信、多层嵌套的组件的传值等等。
vuex有这么几个核心概念——State、Getter、Mutation、Action、Module。
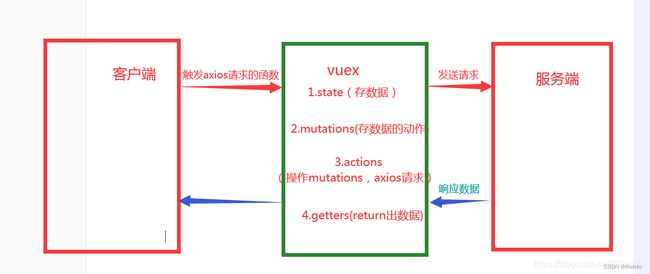
客户端要请求数据 ==>> 对接actions,在actions中进行axios请求 ==>> 请求过来的数据给mutations进行数据存储 ==>> 数据存在state中 ==>> getters将state中的数据进行返回 ==>> 客户端对接getters接收数据:
1.配置步骤
npm install vuex --save 先安装依赖
1、在项目根目录中创建 store 文件夹,专门用来存放 vuex 相关的模块
2、在 store 目录上鼠标右键,选择 新建 -> js文件,新建 store.js 文件

3、在 store.js 中按照如下 4 个步骤初始化 Store 的实例对象:
// 1. 导入 Vue 和 Vuex
import Vue from 'vue'
import Vuex from 'vuex'

// 2. 将 Vuex 安装为 Vue 的插件
Vue.use(Vuex)

// 3. 创建 Store 的实例对象
const store = new Vuex.Store({
  // TODO:挂载 store 模块
  modules: {},
  //State:{},Getter:{},Mutation:{},Action:{}
})

// 4. 向外共享 Store 的实例对象
export default store
4、在 main.js 中导入 store 实例对象并挂载到 Vue 的实例上:
// 1. 导入 store 的实例对象
import store from './store/store.js'

// 省略其它代码...

const app = new Vue({
  ...App,
  // 2. 将 store 挂载到 Vue 实例上
  store,
})
app.$mount()
2.基本用法
state
用来存储组件间共享的值
store.js定义:
import Vue from 'vue'
import Vuex from 'vuex'
Vue.use(Vuex)
const store =  new Vuex.Store({
    state: {
        count: 10,
    }
})
export default store
组件:
<template>
    <block>
        <view>当前最新的count值为: {{count}} </view>
    </block>
</template>
 <script>
    import { mapState } from 'vuex';
export default {
    data() {
        return {
        }
    },
    computed: {
        ...mapState(['count']),
    },
}
</script>
然后主页面正常引入插件就可以了
mutations
只有 mutations 中定义的函数,才有权力修改state值
store.js定义:
import Vue from 'vue'
import Vuex from 'vuex'
Vue.use(Vuex)
const store =  new Vuex.Store({
    state: {
        count: 10,
    },
    mutations: {
        sub(state){
            state.count--
        },
        subN(state,step){
            state.count-=step
        }
    },
})
export default store
组件:
<template>
    <block>
        <view>当前最新的count值为: {{count}} </view>
        <button @click="btnHandler1">-1</button>
        <!-- <button @click="btnHandler2">-N</button> -->
        <button @click="subN(4)">-N</button>  //可以直接引方法函数名,无需绑点击事件
    </block>
</template>
 <script>
    import { mapState,mapMutations } from 'vuex';
export default {
    data() {
        return {
        }
    },
    computed: {
        ...mapState(['count']),
    },
    methods: {
        ...mapMutations(['sub','subN']),
        btnHandler1(){
            this.sub()
        },
        // btnHandler2(){
        //     this.subN(5)
        // },
    },
}
</script>
actions
异步操作变更数据必须通过Actions,而不能使用Mutations
必须通过 context.commit() 触发某个mutation才行
store.js定义:
import Vue from 'vue'
import Vuex from 'vuex'
Vue.use(Vuex)
const store =  new Vuex.Store({
    state: {
        count: 10,
    },
    mutations: {
        sub(state){
            state.count--
        },
        subN(state,step){
            state.count-=step
        }
    },
    actions: {
         subAsync(context){
            setTimeout(() => {
                context.commit('sub')
            },1000)          //做个延时效果
         }
    },
})
export default store
组件:
<template>
    <block>
        <view>当前最新的count值为: {{count}} </view>
        <button @click="sub">-1</button>
        <button @click="subN(4)">-N</button>
        <button @click="subAsync">-1 Async</button>
    </block>
</template>
 <script>
    import { mapState,mapMutations,mapActions} from 'vuex';
export default {
    data() {
        return {
        }
    },
    computed: {
        ...mapState(['count']),
    },
    methods: {
        ...mapMutations(['sub','subN']),
        ...mapActions(['subAsync']),
    },
}
</script>
getters
用于对Store中的数据进行加工处理形成新的数据,不修改state
store.js定义:
import Vue from 'vue'
import Vuex from 'vuex'
Vue.use(Vuex)
const store =  new Vuex.Store({
    state: {
        count: 10,
    },
    mutations: {
        sub(state){
            state.count--
        },
        subN(state,step){
            state.count-=step
        }
    },
    actions: {
         subAsync(context){
            setTimeout(() => {
                context.commit('sub')
            },1000)
         }
    },
    getters:{
        showNum: state => {
            return '当前最新数量是【'+ state.count + '】'
        }
    }
})
export default store
组件:
<template>
    <block>
        <view>当前最新的count值为: {{count}} </view>
        <button @click="sub">-1</button>
        <button @click="subN(4)">-N</button>
        <button @click="subAsync">-1 Async</button>
        <view>{{showNum}} </view>
    </block>
</template>
 <script>
    import { mapState,mapMutations,mapActions,mapGetters } from 'vuex';
export default {
    data() {
        return {
        }
    },
    computed: {
        ...mapState(['count']),
        ...mapGetters(['showNum'])
    },
    methods: {
        ...mapMutations(['sub','subN']),
        ...mapActions(['subAsync']),
    },
}
</script>
③Mixins
-
与公共组件的区别
组件:在父组件中引入组件,相当于在父组件中给出一片独立的空间供子组件使用,然后根据props来传值,但本质上两者是相对独立的。
Mixins:则是在引入组件之后与组件中的对象和方法进行合并,相当于扩展了父组件的对象与方法,可以理解为形成了一个新的组件。 -
与vuex的区别
vuex:用来做状态管理的,里面定义的变量在每个组件中均可以使用和修改,在任一组件中修改此变量的值之后,其他组件中此变量的值也会随之修改。
Mixins:可以定义共用的变量,在每个组件中使用,引入组件中之后,各个变量是相互独立的,值的修改在组件中不会相互影响。 -
实例文档
3.session_key
功能说明 微信客户端通过wx.getUserInfo()获取用户的信息
后台有时候也需要获取微信客户端的用户信息,因此,就需要利用session_key这个秘钥来从微信平台中获取 [微信官方的链接]
-------> session_key 有什么用?
服务端给你的数据是加密的,如果你想解密就需要就需要sesison_key
--------> 怎么获取session_key ?
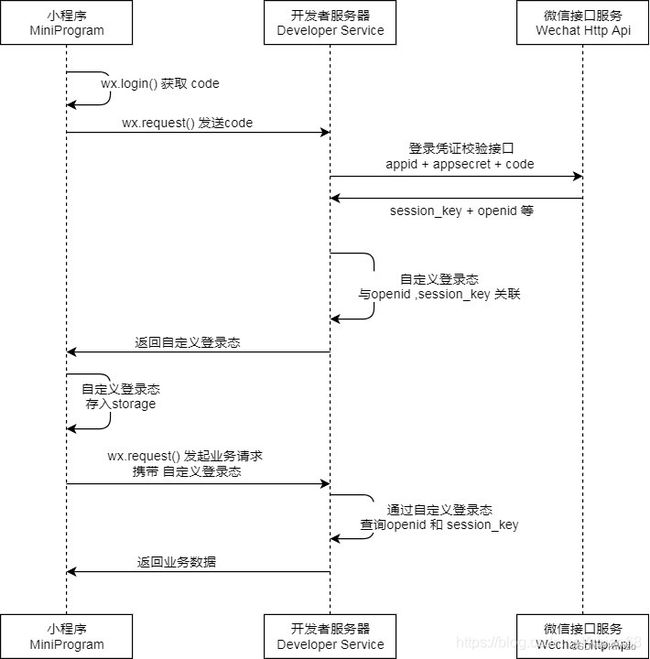
客户端通过 wx.login方法获取一个code(5 分钟内有效),把code 发送给自己的服务器,服务器通过另外的接口获取session-key
---------->如果我存储ssessiion-key 在自己的服务器,每次解析数据的时候就可以直接使用啦?
并不是,session-key 会过期。
----------> 那么我第一次登录的时候解析完数据,保存到服务器里,以后就不需要反复获取用户数据,获取sessionkey 并且解析数据啦?
可以,但是有个缺点,你保存的信息,是用户第一次登录时候的信息,如果用户修改了头像之类的,你数据库的信息不能够和微信的保持同步。
----------> 我想要自己的数据是最新的怎么办?
那么就每次进入小程序的时候调用登录接口,获取新的用户数据,获取sessonkey, 解析数据,然后展示数据。
----------->每次都要调用登录接口?
好像是这样,
---------->那么后台也要每次都获取sessionkey吗
不需要,你可以在前端通过checksessionkey 来检查sessionkey 是不是已经过期了,如果没有过期,那么就不需要重新获取。
---------> 每次都登录是不是有点麻烦?
我觉得也是,所以直接获取一次信息就好了,本地存储一个token ,除非用户删除小程序,不然的话,根本不需要登录。
微信登录过程
1.wx.login() 这个方法会返回一个code
2.后台根据 code + appid + appsecret 这个三个参数完成登录的认证,得到微信客户端的openid + session_key
①wx.checkSession()
有时候,我们会因为session_key不正确而导致解密或者校验签名失败。有几方面的原因:
1、因为wx.login()被调用时,用户的session_key会被更新导致就session_key失效。所以,在调用wx.login()的时候应该要明确需要登录之后再调用。
2、另外,微信不会把session_key的有效期告诉我们,用户越频繁使用微信,session_key的有效期就更长。
因为,就需要调用wx.checkSession()来校验当前用户的session_key是否有效。
onLoad: function () {
  wx.checkSession({
    success: function(res){
      console.log("处于登录态");
    },
    fail: function(res){
      console.log("需要重新登录");
      wx.login({})
    }
  })
}
4.优化项目代码
①分包
请点击该链接,这位博主归纳的很好,如果想加快小程序启动速度,可在pages.json里配置preloadrule
5.实现些功能
①聊天界面
链接1
链接2
②平台环境判断
判断环境:
if(process.env.NODE_ENV === 'development'){
					console.log('开发环境')
					}else{
					console.log('生产环境')
					}
判断平台:
switch(uni.getSystemInfoSync().platform){
  case 'android' :
  		console.log('运行在Android上')
  		break;
  case 'ios' :
  		console.log('运行在IOS上')
  		break;
  default :
  		console.log('运行在开发者工具上')
  		break;
  		}
③实现滑动滚动
<template>
	<scroll-view class="scroll" scroll-x>//1
		<view class = "group" >
			<view class = "item">测试数据</view>
			<view class = "item">测试数据</view>
			...
		</view>
	</scroll-view>
</template>
<style lang = "scss">
.scroll{
	border:1px solid red;
	box-sizing: border-box;             //2
	.group{
		  white-space: nowrap;          //3
		  .item{
			    width: 220rpx;
			    height: 220rpx;
			    background: bule;
			    display: inline-block;  //4
			    margin-right: 10rpx;
			   }
		  }
	    }
}
</style>
概念文档:1 2 3 4
④实现缓存列表数据
页面的缓存,我们需要用到vue的内置组件keep-alive,来缓存列表页面,同时配合路由选项来更改页面的数据。
从A页面跳转到B页面,返回A页面时 不会重新加载A页面数据
1.在路由选项中,router文件里配置meta属性
//router index.js path: '/pageA',
meta: {
        keepAlive:true  //添加作为标志符,表明该页面需要保留状态
        // isBack: false      //标示页面是否是从articleDetail页面返回的
      }
2.设置beforeRouteEnter判断从哪跳转的 如果是从详情页跳转的,则将当前路由对象的meta.isBack 设置为true,否则设为false
export default {
  data() {
    },
   // beforeRouteEnter(to, from, next) {
  //   if (from.path == "/pageB") {
  //     to.meta.isBack = true;
  //   } else {
  //   to.meta.isBack = false;
  //   }
  //   next();
  // },
  beforeRouteLeave(to,from,next){
      to.meta.keepAlive = true
      next(0)
    },
  }
3.为了在其他页面进入时,更新页面中的列表数据,我们将在activated钩子函数中挂载页面初次进入时的请求数据
//  activated() {
//  if (!this.$route.meta.isBack) {
//   this.List = [];
//   this.pageNum = 1;
//   this.getList();
//  }
//   this.$route.meta.isBack = false;
//  },
4.记得在App.vue声明一下
<keep-alive include="pageA">
      <router-view/>
</keep-alive>
⑤点击按钮 增添DIV
之前用innerhtml转义 那个办法挺笨的 有的判断无法识别 改为这种
⑥点击按钮 删除DIV
删除我参考的这个
⑦调用接口,传值返回数据
传入v.fourMCode返回后,赋值给res,再加入要使用的对象数组
let res = await this.$axiox.get('/api/ProMats/query/fourMCode?fourMCode=' + v.fourMCode, null, false)
      console.log(res.data)
      this.fourmList[i] = res.data
let res = await this.$axiox.post('/api/Content/checkDocumentVersion', this.fourMCodeList[i].fourthMCodeDocuments, 0)
      console.log('检查版本号', res.data)
如果是接手别人的项目。格式一般都看axios.js里是如何声明的
参考这篇文档
⑦带参跳转页面
传值:
 window.location.href = 'Url?id=' + 值   //在当前页面刷新
 window.open('Url?id=' + 值)            //另开新页面
接收:
    if(this.$commonJs.getHrefName('id')){
      接收参数 = this.$commonJs.getHrefName('id') // 接收传来的值
    }
调用common.js文件里的一个方法
// 获取指定querystring的值
  getHrefName(name) {
    let href = window.location.href.split('?')[1] || ''
    let hrefArray = href.split('&')
    for (let i = 0; i < hrefArray.length; i++) {
      if (name === hrefArray[i].split('=')[0]) {
        return hrefArray[i].split('=')[1]
      }
    }
  },
