vue-three.js基础篇(一)——引入
生命不息,学习不止
什么是Three?
Three官网
Three.js是基于原生WebGL封装运行的三维引擎,是一款运行在浏览器中的 3D 引擎,说到数字化与可视化,就得说到数字孪生,而3D模型在浏览器展示就是其中的一环,就是数字模型设计。使用CAD工具开发出满足技术规格的产品虚拟原型,精确记录产品的各种物理参数,以可视化的方式展示出来,并通过一系列验证手段来检验设计的精准程度。
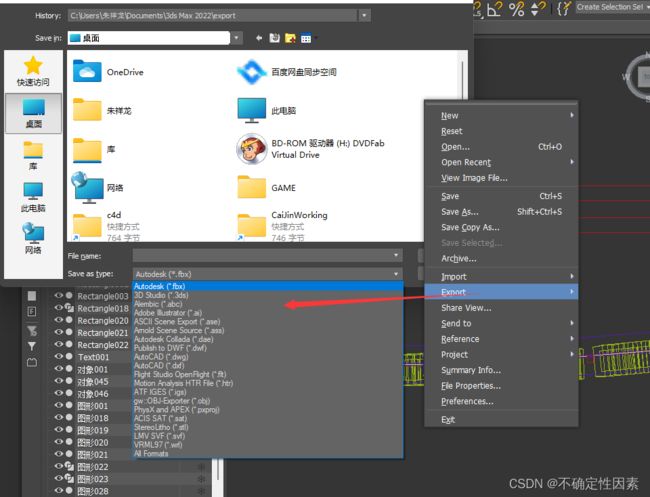
3DMAX支持转化在three展示的类型(其他软件没有了解过)
这边3D建模使用的是3DMAX,主要支持转化能在three中展示的类型有fbx、3ds、obj、stl、dae。

vue使用three安装步骤
three的使用需要安装以下内容
npm install --save three
npm install --save three-orbit-controls  轨道控件插件
npm i --save three-obj-mtl-loader  安装加载.obj和.mtl文件的插件
npm i --save three-css2drender  .安装渲染器插件
创建一个简单的展示模型
<template>
    <div>
      <div id="container"></div>
      <div class="controls-box">
        <section>
          <el-row>
            <div v-for="(item,key) in properties" :key="key">
              <div>
                <el-col :span="8">
                  <span class="vertice-span">{{item.name}}</span>
                </el-col>
                <el-col :span="13">
                  <el-slider v-model="item.value" :min="item.min" :max="item.max" :step="item.step" :format-tooltip="formatTooltip"></el-slider>
                </el-col>
                <el-col :span="3">
                  <span class="vertice-span">{{item.value}}</span>
                </el-col>
              </div>
            </div>
          </el-row>
        </section>
      </div>
    </div>
</template>

<script>
import * as Three from 'three'
import { OrbitControls } from 'three/examples/jsm/controls/OrbitControls.js'
import { SceneUtils } from 'three/examples/jsm/utils/SceneUtils.js'
export default {
  name: 'ThreeTest',
  data() {
    return {
      properties: {
        width: {
          name: 'width',
          value: 0.5,
          min: 0,
          max: 1,
          step: 0.01
        },
        height: {
          name: 'height',
          value: 0.5,
          min: 0,
          max: 1,
          step: 0.01
        },
        depth: {
          name: 'depth',
          value: 0.5,
          min: 0,
          max: 1,
          step: 0.01
        },
        widthSegments: {
          name: 'widthments',
          value: 8,
          min: 0,
          max: 40,
          step: 1
        },
        heightSegments: {
          name: 'heightments',
          value: 8,
          min: 0,
          max: 40,
          step: 1
        },
        depthSegments: {
          name: 'depthments',
          value: 8,
          min: 0,
          max: 40,
          step: 1
        }
      },
      camera: null,
      scene: null,
      renderer: null,
      mesh: null
    }
  },
  mounted() {
    this.init();
  },
  methods: {
    formatTooltip(val) {
      return val
    },
    init() {
      this.createScene() // 创建场景
      this.createMesh() // 创建网格模型
      this.createLight() // 创建光源
      this.createCamera() // 创建相机
      this.createRender() // 创建渲染器
      this.createControls() // 创建控件对象
      this.render() // 渲染
    },
    // 创建场景
    createScene() {
      this.scene = new THREE.Scene()
    },
    // 创建网格模型
    createMesh() {
      //创建图形
      let geometry = new Three.BoxGeometry(
        this.properties.width.value,
        this.properties.height.value,
        this.properties.depth.value,
        Math.round(this.properties.widthSegments.value),
        Math.round(this.properties.heightSegments.value),
        Math.round(this.properties.depthSegments.value)
      );
      // 创建材质
      const meshMaterial = new THREE.MeshNormalMaterial({
        side: THREE.DoubleSide
      })
      const wireFrameMat = new THREE.MeshBasicMaterial({ wireframe: true })

      // 添加组合材质
      this.mesh = SceneUtils.createMultiMaterialObject(geometry, [
        meshMaterial,
        wireFrameMat
      ])
      this.scene.add(this.mesh);
    },
    // 创建光源
    createLight() {

    },
    // 创建相机
    createCamera() {
      let container = document.getElementById('container');
      this.camera = new Three.PerspectiveCamera(70, container.clientWidth/container.clientHeight, 0.01, 10);
      this.camera.position.z = 1;
    },
    // 创建渲染器
    createRender() {
      let container = document.getElementById('container');
      this.renderer = new Three.WebGLRenderer({antialias: true});
      //setSize 设置大小
      this.renderer.setSize(container.clientWidth, container.clientHeight);
      container.appendChild(this.renderer.domElement);
    },
    // 更新属性
    updateFun() {
      const tempRotationY = this.mesh.rotation.y
      this.scene.remove(this.mesh)
      this.createMesh()
      this.mesh.rotation.y += tempRotationY + 0.01
    },
    render() {
      this.updateFun()
      this.renderer.render(this.scene, this.camera)
      requestAnimationFrame(this.render)
    },
    // 创建控件对象
    createControls() {
      this.controls = new OrbitControls(this.camera, this.renderer.domElement)
    }
  }
}
</script>
<style scoped>
#container {
  height: 400px;
}
.controls-box {
  position: absolute;
  left: 5px;
  top: 45%;
  width: 300px;
  padding: 10px;
  background-color: #fff;
  border: 1px solid #c3c3c3;
}
.vertice-span {
  line-height: 38px;
  padding: 0 2px 0 10px;
}
</style>

通过这个简单的模型,可以发现Three有个参数new Three.BoxGeometry()来创建图形,然后我就看了下,其他创建几何的three.js的参数,大概有那么多BoxGeometry(立方缓冲几何体)、CircleGeometry(圆形缓冲几何体)、ConeGeometry(圆锥缓冲几何体)、CylinderGeometry(圆柱缓冲几何体)、DodecahedronGeometry(十二面缓冲几何体)、EdgesGeometry(边缘几何体)、ExtrudeGeometry(挤压缓冲几何体)、IcosahedronGeometry(二十面缓冲几何体)、LatheGeometry(车削缓冲几何体)、OctahedronGeometry(八面缓冲几何体)、PlaneGeometry(平面缓冲几何体)、PolyhedronGeometry(多面缓冲几何体)、RingGeometry(圆环缓冲几何体)、ShapeGeometry(形状缓冲几何体)、SphereGeometry(球缓冲几何体)、TetrahedronGeometry(四面缓冲几何体)、TorusGeometry(圆环缓冲几何体)、TorusKnotGeometry(圆环缓冲扭结几何体)、TubeGeometry(管道缓冲几何体)、WireframeGeometry(网格几何体),
基于此,我又创建了一个关于球的例子:
<template>
  <div>
    <div id="container"></div>
    <div class="controls-box">
      <section>
        <el-row>
          <div v-for="(item,key) in properties" :key="key">
            <div>
              <el-col :span="8">
                <span class="vertice-span">{{item.name}}</span>
              </el-col>
              <el-col :span="13">
                <el-slider v-model="item.value" :min="item.min" :max="item.max" :step="item.step" :format-tooltip="formatTooltip"></el-slider>
              </el-col>
              <el-col :span="3">
                <span class="vertice-span">{{item.value}}</span>
              </el-col>
            </div>
          </div>
        </el-row>
      </section>
    </div>
  </div>
</template>

<script>
import * as THREE from 'three'
import { OrbitControls } from 'three/examples/jsm/controls/OrbitControls.js'
import { SceneUtils } from 'three/examples/jsm/utils/SceneUtils.js'
export default {
  data() {
    return {
      properties: {
        radius: {
          name: 'radius',
          value: 8,
          min: 0,
          max: 40,
          step: 1
        },
        widthSegments: {
          name: 'widthSeg',
          value: 10,
          min: 0,
          max: 20,
          step: 1
        },
        heightSegments: {
          name: 'heightSeg',
          value: 10,
          min: 0,
          max: 20,
          step: 1
        },
        phiStart: {
          name: 'phiStart',
          value: 0,
          min: 0,
          max: Math.PI * 2,
          step: 0.1
        },
        phiLength: {
          name: 'phiLength',
          value: Math.PI * 2,
          min: 0,
          max: Math.PI * 2,
          step: 0.1
        },
        thetaStart: {
          name: 'thetaStart',
          value: 0,
          min: 0,
          max: Math.PI * 2,
          step: 0.1
        },
        thetaLength: {
          name: 'thetaLength',
          value: Math.PI,
          min: 0,
          max: Math.PI * 2,
          step: 0.1
        }
      },
      mesh: null,
      camera: null,
      scene: null,
      renderer: null,
      controls: null
    }
  },
  mounted() {
    this.init()
  },
  methods: {
    formatTooltip(val) {
      return val
    },
    // 初始化
    init() {
      this.createScene() // 创建场景
      this.createMesh() // 创建网格模型
      this.createLight() // 创建光源
      this.createCamera() // 创建相机
      this.createRender() // 创建渲染器
      this.createControls() // 创建控件对象
      this.render() // 渲染
    },
    // 创建场景
    createScene() {
      this.scene = new THREE.Scene()
    },
    // 创建网格模型
    createMesh() {
      //创建三维球体
      const geom = new THREE.SphereGeometry(
        this.properties.radius.value,
        this.properties.widthSegments.value,
        this.properties.heightSegments.value,
        this.properties.phiStart.value,
        this.properties.phiLength.value,
        this.properties.thetaStart.value,
        this.properties.thetaLength.value
      )
      // 创建材质
      const meshMaterial = new THREE.MeshNormalMaterial({
        side: THREE.DoubleSide
      })
      const wireFrameMat = new THREE.MeshBasicMaterial({ wireframe: true })

      // 添加组合材质
      this.mesh = SceneUtils.createMultiMaterialObject(geom, [
        meshMaterial,
        wireFrameMat
      ])

      // 网格对象添加到场景中
      this.scene.add(this.mesh)
    },

    // 创建光源
    createLight() {
      // 环境光
      const ambientLight = new THREE.AmbientLight(0xffffff, 0.1) // 创建环境光
      this.scene.add(ambientLight) // 将环境光添加到场景

      const spotLight = new THREE.SpotLight(0xffffff) // 创建聚光灯
      spotLight.position.set(-40, 60, -10)
      spotLight.castShadow = true
      this.scene.add(spotLight)
    },
    // 创建相机
    createCamera() {
      const element = document.getElementById('container')
      const width = element.clientWidth // 窗口宽度
      const height = element.clientHeight // 窗口高度
      const k = width / height // 窗口宽高比
      // PerspectiveCamera( fov, aspect, near, far )
      this.camera = new THREE.PerspectiveCamera(35, k, 0.1, 1000)
      this.camera.position.set(-80, 60, 40) // 设置相机位置

      this.camera.lookAt(new THREE.Vector3(10, 0, 0)) // 设置相机方向
      this.scene.add(this.camera)
    },
    // 创建渲染器
    createRender() {
      const element = document.getElementById('container')
      this.renderer = new THREE.WebGLRenderer({ antialias: true, alpha: true })
      this.renderer.setSize(element.clientWidth, element.clientHeight) // 设置渲染区域尺寸
      this.renderer.shadowMap.enabled = true // 显示阴影
      this.renderer.shadowMap.type = THREE.PCFSoftShadowMap
      this.renderer.setClearColor(0x3f3f3f, 1) // 设置背景颜色
      element.appendChild(this.renderer.domElement)
    },

    // 更新属性
    updateFun() {
      const tempRotationY = this.mesh.rotation.y
      this.scene.remove(this.mesh)
      this.createMesh()
      this.mesh.rotation.y += tempRotationY + 0.01
    },
    render() {
      this.updateFun()
      this.renderer.render(this.scene, this.camera)
      requestAnimationFrame(this.render)
    },
    // 创建控件对象
    createControls() {
      this.controls = new OrbitControls(this.camera, this.renderer.domElement)
    }
  }
}
</script>
<style>
#container {
  position: absolute;
  width: 100%;
  height: 100%;
}
.controls-box {
  position: absolute;
  left: 5px;
  top: 45%;
  width: 300px;
  padding: 10px;
  background-color: #fff;
  border: 1px solid #c3c3c3;
}
.vertice-span {
  line-height: 38px;
  padding: 0 2px 0 10px;
}
</style>
总结
本次例子使用了element ui,参考three.js添加到vue实现的3D效果,只是简单的学习手记。
