Tensor变量创建-初始化-访问
文章目录
- 一、Tensor 创建
-
- 1、常量Tensor的创建
-
- 1.1 Constant Value Tensor
- 1.2 Sequences
- 1.3 Random Tensors
- 2、变量Tensor的创建
-
- 2.1 Class tf.Variable()
- 2.2 tf.get_variable()
- 2.3 initializer 参数的初始化
- 二、Tensor 的初始化及访问
-
- 1 初始化
- 2 Tensor访问
- 参考资料
一、Tensor 创建
1、常量Tensor的创建
1.1 Constant Value Tensor
import tensorflow as tf

sess = tf.Session()
产生全0的张量
- tf.zeros(shape, dtype=tf.float32, name=None)
tf.zeros_like(tensor, dtype=None, name=None)
# 产生全0的张量
# tf.zeros(shape, dtype=tf.float32, name=None)
a = tf.zeros([2,3], dtype=tf.float32, name="a")
print(a)
print(sess.run(a))
# tf.zeros_like(tensor, dtype=None, name=None)
b = tf.zeros_like(a, dtype=None, name="b")
print(b)
print(sess.run(b))
运行结果如下:

产生全1的张量
- tf.ones(shape, dtype=tf.float32, name=None)
tf.ones_like(tensor, dtype=None, name=None)
#产生全1的张量
#tf.ones(shape, dtype=tf.float32, name=None)
#tf.ones_like(tensor, dtype=None, name=None)
c = tf.ones([2,3], dtype=tf.float32,name="c")
print(c)
print(sess.run(c))
运行结果如下

Creates a tensor of shape and fills it with value
- tf.fill(dims, value, name=None)
# Creates a tensor of shape  and fills it with value
#tf.fill(dims, value, name=None)
d = tf.fill([2,3], 9)
print(d)
print(sess.run(d))
运行结果如下:

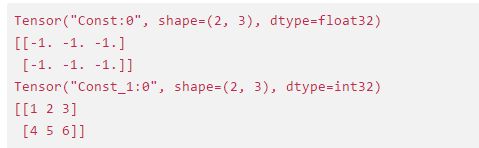
产生常量 Tensor, value 值可为 python 标准数据类型、Numpy 等
- tf.constant(value, dtype=None, shape=None, name=‘Const’)
e1 = tf.constant(-1.0, shape=[2,3])   # Note: 注意 shape 的用法(广播机制)
e2 = tf.constant([1,2,3,4,5,6], shape=[2,3])
print(e1)
print(sess.run(e1))
print(e2)
print(sess.run(e2))
运行结果如下:
1.2 Sequences
产生 num 个等距分布在 [start, stop] 间元素组成的数组,包括 start & stop (需为 float 类型) increase by (stop - start) / (num - 1)
- tf.linspace(start, stop, num, name=None)
f = tf.linspace(1.,10., 5, name="f1")
print(f)
print(sess.run(f))
运行结果如下:

- tf.range([start], limit, delta=1, dtype=None, name=‘range’)
[]为可选参数,步长 delta 默认为 1,start 默认为 0, limit 的值取不到,它产生一个数字序列
f2 = tf.range(start=3, limit=18, delta=3, dtype=tf.int32, name="f2")
print(f2)
print(sess.run(f2))
运行结果如下:

1.3 Random Tensors
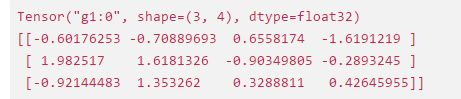
正态分布,默认均值为0,标准差为1.0,数据类型为float32
- tf.random_normal(shape, mean=0.0, stddev=1.0, dtype=tf.float32, seed=None, name=None)
g1 = tf.random_normal([3,4],name="g1")
print(g1)
print(sess.run(g1))
运行结果如下:
正态分布,但那些到均值的距离超过2倍标准差的随机数将被丢弃,然后重新抽取,直到取得足够数量的随机数为止, 随机数 x
的取值范围是 [ m e a n − 2 ∗ s t d d e v , m e a n + 2 ∗ s t d d e v ] [mean - 2*stddev, mean + 2*stddev] [mean−2∗stddev,mean+2∗stddev], 从而可以防止有元素与该张量中的其他元素显著不同的情况出现
- tf.truncated_normal(shape, mean=0.0, stddev=1.0, dtype=tf.float32, seed=None, name=None)
g2 = tf.truncated_normal([3,4],name="g2")
print(g2)
print(sess.run(g2))
运行结果如下:

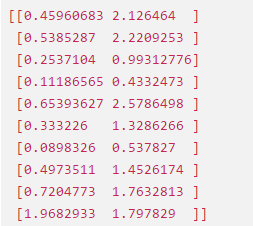
产生在[minval, maxval)之间形状为 shape 的均匀分布, 默认是[0, 1)之间形状为 shape 的均匀分布
- tf.random_uniform(shape, minval=0.0, maxval=1, dtype=tf.float32, seed=None, name=None)
g3 = tf.random_uniform(shape=(3,4), minval=-1, maxval=1, name="g3")
print(g3)
print(sess.run(g3))
运行结果如下:

Randomly crops a tensor to a given size 随机裁剪函数
- tf.random_crop(value, size, seed=None, name=None)
Note:If a dimension should not be cropped, pass the full size of that dimension.
For example, RGB images can be cropped with size = [crop_height, crop_width, 3]
c = tf.constant([[1,2],[3,4],[5,6]])
g4 = tf.random_crop(value=c, size=[2,2], name="g4")
print(g4)
print(sess.run(g4))
运行结果如下:

Randomly shuffles a tensor along its first dimension 随机洗牌函数
若要几个 op 以同样的顺序 shuffle,设置相同的 seed 即可
- tf.random_shuffle(value, seed=None, name=None)
c = tf.constant([[1,2],[3,4],[5,6]])
g5 = tf.random_shuffle(c,seed=1,name="g5")
print(g5)
print(sess.run(g5))
运行结果如下:

Sets the graph-level random seed 设置随机种子
- tf.set_random_seed(seed)
- To generate the same repeatable sequence for an op across sessions
set the seed for the op, a = tf.random_uniform([1], seed=1) - To make the random sequences generated by all ops be repeatable across sessions
set a graph-level seed, tf.set_random_seed(1234)
tf.set_random_seed(123)
g6 = tf.random_uniform([1])
g7 = tf.random_normal([1])
with tf.Session() as sess1:
    print(sess1.run(g6))
    print(sess.run(g7))

with tf.Session() as sess2:
    print(sess2.run(g6))
    print(sess2.run(g7))
运行结果如下:

其它
- tf.random_gamma(shape,alpha,beta=None,dtype=tf.float32,seed=None,name=None)
g8 = tf.random_gamma([10],[0.5,1.5])
print(sess.run(g8))
运行结果如下:
sess.close()
2、变量Tensor的创建
2.1 Class tf.Variable()
- tf.Variable()类
tf.constant 是 op,而 tf.Variable() 是一个类,初始化的对象有多个op
var_obj = tf.Variable(
initial_value,
dtype=None,
name=None,
trainable=True,
collections=None,
validate_shape=True)
初始化参数
-
initial_value:可由 Python 内置数据类型提供,也可由常量 Tensor 的内置 op 来快速构建,但所有这些 op 都需要提供 shape
-
trainable:指明了该变量是否可训练, 会加入
GraphKeys.TRAINABLE_VARIABLEScollection 中去。 -
collections: List of graph collections keys. The new variable is added to these collections. Defaults to [GraphKeys.GLOBAL_VARIABLES].
-
validate_shape: If False, allows the variable to be initialized with a value of unknown shape. If True, the default, the shape of initial_value must be known.
返回值
- 变量实例对象(Tensor-like)
# tf.Variable()函数
import tensorflow as tf

sess = tf.Session()
with tf.variable_scope("foo"):
    v = tf.Variable(tf.zeros([10]))
    sess.run(tf.global_variables_initializer()) #初始化所有变量
    print(v)
    print(sess.run(v))
运行结果如下:

2.2 tf.get_variable()
Gets an existing variable with these parameters or create a new one
tf.get_variable(
name,
shape=None,
dtype=None,
initializer=None,
trainable=True,
regularizer=None,
collections=None,
caching_device=None,
partitioner=None,
validate_shape=True,
use_resource=None,
custom_getter=None
)
初始化参数
-
name: The name of the new or existing variable.
-
shape: Shape of the new or existing variable.
-
dtype: Type of the new or existing variable (defaults to DT_FLOAT).
-
initializer: Initializer for the variable if one is created.
-
trainable: If True also add the variable to the graph collection tf.GraphKeys.TRAINABLE_VARIABLES.
-
regularizer: A (Tensor -> Tensor or None) function; the result of applying it on a newly created variable will be added to the collection tf.GraphKeys.REGULARIZATION_LOSSES and can be used for regularization.
-
collections: List of graph collections keys to add the Variable to. Defaults to [GraphKeys.GLOBAL_VARIABLES] (see tf.Variable).
返回值
The created or existing Variable, 拥有变量类的所有属性和方法。
Note:
- name 参数必须要指定,如果仅给出 shape 参数而未指定 initializer,那么它的值将由 tf.glorot_uniform_initializer 随机产生,数据类型为tf.float32;
- 另外,initializer 可以为一个张量,这种情况下,变量的值和形状即为此张量的值和形状(就不必指定shape 了)。
- 此函数经常和 tf.variable_scope() 一起使用,产生共享变量
value = [0,1,2,3,4,5,6,7]
init = tf.constant_initializer(value)
with tf.variable_scope("foo"):
    f = tf.get_variable("f", shape=[2,4], initializer=init)
    sess.run(tf.global_variables_initializer())
    print(f.name)
运行结果如下:
![]()
2.3 initializer 参数的初始化
- tf.constant_initializer()、tf.zeros_initializer()、tf.ones_initializer()
一般要在 tf.get_variable() 函数中指定 shape,因为initializer要用到。
tf.constant_initializer(
value=0,
dtype=dtypes.float32,
verify_shape=False
)
通常偏置项就是用它初始化的。由它衍生出的两个初始化方法:
I、tf.zeros_initializer()
II、tf.ones_initializer()
init = tf.constant_initializer(value=1.,dtype=tf.float32)
x = tf.get_variable(name='v_x', shape=[2,3], initializer=init) #必须指定shape
sess.run(x.initializer)
print(sess.run(x))
运行结果如下:

- tf.truncated_normal_initializer()、tf.random_normal_initializer()
生成截断正态分布的随机数,方差一般选0.01等比较小的数
tf.truncated_normal_initializer(
mean=0.0,
stddev=1.0,
seed=None,
dtype=tf.float32
)
生成标准正态分布的随机数,方差一般选0.01等比较小的数
tf.random_normal_initializer(
mean=0.0,
stddev=1.0,
seed=None,
dtype=tf.float32
)
init = tf.truncated_normal_initializer()
x1 = tf.get_variable(name='v_x1', shape=[2,3], initializer=init)
sess.run(x1.initializer)
print(sess.run(x1))
运行结果如下:

- tf.random_uniform_initializer()、tf.uniform_unit_scaling_initializer()
生成均匀分布的随机数
tf.random_uniform_initializer(
minval=0,
maxval=None,
seed=None,
dtype=tf.float32
)
init = tf.random_uniform_initializer(minval=2,maxval=5)
x2 = tf.get_variable(name='v_x22', shape=[2,3], initializer=init)
sess.run(x2.initializer)
print(sess.run(x2))
运行结果如下:

- tf.variance_scaling_initializer()
tf.variance_scaling_initializer(
scale=1.0,
mode=‘fan_in’,
distribution=‘normal’,
seed=None,
dtype=tf.float32
)
初始化参数
- scale: Scaling factor (positive float).
- mode: One of “fan_in”, “fan_out”, “fan_avg”.
- distribution: Random distribution to use. One of “normal”, “uniform”.
1、当 distribution=“normal” 的时候:
生成 truncated normal distribution(截断正态分布)的随机数,其中mean = 0, stddev = sqrt(scale / n),
n 的计算与 mode 参数有关:
- 如果mode = “fan_in”, n 为输入单元的结点数
- 如果mode = “fan_out”,n 为输出单元的结点数
- 如果mode = “fan_avg”,n 为输入和输出单元结点数的平均值
2、当distribution="uniform”的时候:
生成均匀分布的随机数,假设分布区间为[-limit, limit],则 limit = sqrt(3 * scale / n)
init = tf.variance_scaling_initializer()
x3 = tf.get_variable(name='v_x3', shape=[2,3], initializer=init)
sess.run(x3.initializer)
print(sess.run(x3))
运行结果如下:

- tf.glorot_uniform_initializer()、tf.glorot_normal_initializer()
为了使得在经过多层网络后,信号不被过分放大或过分减弱,我们尽可能保持每个神经元的输入和输出的方差一致! 从数学角度来讲,就是让权重满足均值为 0,方差为 2 f a n i n + f a n o u t \frac{2}{fan_{in}+ fan_{out}} fanin+fanout2,随机分布的形式可以为均匀分布或者高斯分布。
又称 Xavier uniform initializer
tf.glorot_uniform_initializer(
seed=None,
dtype=tf.float32
)
It draws samples from a uniform distribution within [a=-limit, b=limit]
- limit: sqrt(6 / (fan_in + fan_out))
- fan_in:the number of input units in the weight tensor
- fan_out:the number of output units in the weight tensor
- mean = (b + a) / 2
- stddev = (b - a)**2 /12
又称 Xavier normal initializer
tf.glorot_normal_initializer(
seed=None,
dtype=tf.float32
)
It draws samples from a truncated normal distribution centered on 0 with stddev = sqrt(2 / (fan_in + fan_out))
- fan_in:the number of input units in the weight tensor
- fan_out:the number of output units in the weight tensor
init = tf.glorot_uniform_initializer()
x4 = tf.get_variable(name='v_x4', shape=[2,3], initializer=init)
sess.run(x4.initializer)
print(sess.run(x4))
运行结果如下:

二、Tensor 的初始化及访问
1 初始化
- Constants 初始化
Constants are initialized when you call tf.constant, and their value can never change.
- Variables 初始化
Variables are not initialized when you call tf.Variable. To initialize all the variables in a TensorFlow program, you must explicitly call a special operation as follows:
变量使用前一定要初始化
init = tf.global_variables_initializer() # 初始化全部变量
sess.run(init)
使用变量的 initializer 属性初始化
sess.run(v.initializer)
由于tf.global_variables_initializer()是并行地初始化所有变量,所以直接使用另一个>- 在这种情况下需要使用另一个变量的initialized_value()方法。你可以直接把已初始化的值作为新变量的初始值,或者把它当做tensor计算得到一个值赋予新变量。
# Create a variable with a random value.
weights = tf.Variable(tf.random_normal([7, 2], stddev=0.35), name="weights")

# Create another variable with the same value as 'weights'.
w2 = tf.Variable(weights.initialized_value(), name="w2")

# Create another variable with twice the value of 'weights'
w_twice = tf.Variable(weights.initialized_value() * 0.2, name="w_twice")

sess.run(tf.global_variables_initializer())
print(sess.run(weights))
运行结果如下:

print(sess.run(w_twice))
运行结果如下:

print(sess.run(w2))
运行结果如下:

- 改变变量的值:通过 TF 中的赋值操作,update = tf.assign(old_variable, new_value) or v.assign(new_value)
w3 = tf.Variable(weights.initialized_value()*0.5, name="w3")
update = tf.assign(weights, w3)
sess.run(tf.global_variables_initializer())
print(sess.run(w3))
运行结果如下:

2 Tensor访问
- 索引
- 一维 Tensor 的索引和 Python 列表类似(可以逆序索引(arr[ : : -1])和负索引arr[-3])
- 二维 Tensor 的索引: arr[i, j] == arr[i][j]
- 在多维 Tensor 中,如果省略了后面的索引,则返回的对象会是一个维度低一点的ndarray(但它含有高一级维度上的某条轴上的所有数据)
条件索引:arr[conditon] # conditon 可以使用 & | 进行多条件组合
- 切片
- 一维 Tensor 的切片和 Python 列表类似
- 二维 Tensor 的索引:arr[r1:r2, c1:c2:step] # 也可指定 step 进行切片
- RGB 与 BGR 相互转换
- img_bgr = tf.reverse(img_rgb, axis=[-1])
- img_rgb = tf.reverse(img_bgr, axis=[-1])
参考资料
【1】https://tensorflow.google.cn/guide/tensors
【2】https://tensorflow.google.cn/api_docs/python/tf/dtypes/DType
【3】TensorFlow 的数据模型-----张量(Tensor): https://blog.csdn.net/mzpmzk/article/details/78636137