远程私有组件库实践指南
远程私有组件库实践指南
1、在coding.net创建一个私有库(用于索引)
https://git.coding.net/targetcloud/TGFMSpecs.git(需要用户名和密码)
[email protected]:targetcloud/TGFMSpecs.git(需要公钥私钥)
在这里我们使用ssh
复制其ssh链接
2、在命令行执行下面命令
pod repo add TGFMSpecs [email protected]:targetcloud/TGFMSpecs.git
创建除cocoapod默认的master以外的自己的TGFMSpecs索引库
注意
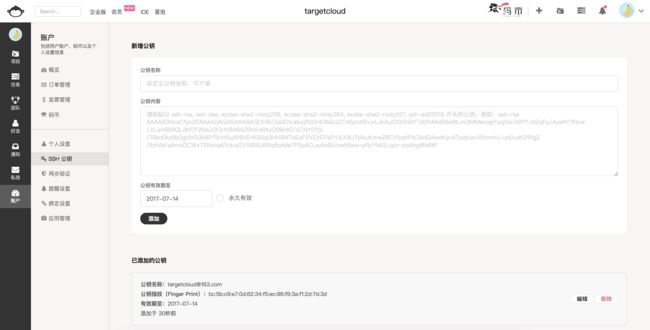
如果没有生成过ssh公钥私钥那么先用ssh-keygen生成,然后再到
/Users/targetcloud/.ssh目录中把id_rsa.pub内容copy到coding.net的ssh中去
如图
3、执行第2步中的命令后,再输pod repo命令查看结果
如图
或是你直接在Finder中前往个人查看
如图
4、在coding.net再创建上面提到的组件,如TGFMBase,这里放源码,前2步用来放索引,在此步里,主要用来放源码,还有tag标签
5、电脑上面创建一个目录remoteLib,进入这个目录,用命令创建模板pod lib create TGFMBase
替换TGFMBase\Classes目录里的文件为库(私有基础组件或私有功能组件或私有业务组件)文件(删除ReplaceMe.m的位置)
在Example目录里 pod install(测试安装、是引用TGFMBase\Classes里的源码)
5.1描述文件
修改TGFMBase.podspec
主要是s.source,其他如s.summary s.description s.homepage s.ios.deployment_target s.source_files适当修改
5.1.1
s.source改为第4步创建的,在coding.net上的私有组件仓库地址,这里用https https://git.coding.net/targetcloud/TGFMBase.git (注意不是https://git.coding.net/targetcloud/TGFMSpecs.git)
进入TGFMBase目录,验证TGFMBase.podspec
pod lib lint本地验证(当前目录下的podspec),不会验证tag
pod spec lint远程验证,会验证tag(此时不能过,在5.2步验证)
5.1.2
改tag对应的版本号s.version(0.1.0改为0.0.1)
5.2
进入remoteLib\TGFMBase目录,执行下面命令(把上面的模板库全部git到远程组件仓库中)
git init
git status
git add .
git commint -m 'TGFMBase'
git remote 查看关联(无关联)
git remote add origin https://git.coding.net/targetcloud/TGFMBase.git(注意不是https://git.coding.net/targetcloud/TGFMSpecs.git)
git remote 再查看关联(已经关联远程仓库origin)
git push origin master(提交master分支)
git tag (查看标签无)
git tag '0.0.1'(打标签)
git tag (再查看标签有)
git push origin 0.0.1(或者 git push —tags提交远程标签)
pod spec lint再次验证,通过
6、pod repo push TGFMSpecs TGFMBase.podspec(把本地TGFMBase.podspec推到本地TGFMSpecs,然后再推到远程coding.net上去)注意与我们普通提交到cocoapod轮子的podspec过程相反,提交轮子podspec是直接提交到公共索引库
而私交私有podspec组件则是先提交到本地repo(TGFMSpecs),然后更新到远程的TGFMSpecs,与第2步对应
7、pod search验证一下
8、使用
在宿主工程中的
podfile中加入source '[email protected]:targetcloud/TGFMSpecs.git' 这样就可以使用我们自己的私有组件库了
注意还要加上系统原来的(如何查看所有的url,用pod repo)
source 'https://github.com/CocoaPods/Specs.git’,这样就可以使用公共的cocoapod轮子(官方公开库)了,如AFN、SDWebImage...
(注意pod 后面的 :path =>不再需要了)像日常使用cocoapod时一样使用
8.1看安装是否成功
pod install
9、升级维护
9.1
在第5步的TGFMBase\Classes目录里增删改代码,在Example目录里 pod install测试安装
9.2
TGFMBase.podspec修改版本号(0.0.2),对应下面的tag
9.3
回到TGFMBase目录
git status
git add .
git commint -m 'TGFMBase'(提交到本地仓库)
git push origin master(提交到远程master分支)
git tag (查看标签)
git tag '0.0.2'(打新标签)
git tag (再查看标签多一个)
git push origin 0.0.2(或者 git push —tags提交远程标签)
pod spec lint再次验证,通过
9.4提交私有索引
pod repo push TGFMSpecs TGFMBase.podspec
去TGFMSpecs目录下查看TGFMBase是否多个一个新的索引
去宿主工程 pod update --no-repo-update测试一 下是不是能够拉到最新的私有组件库源码
其他
可能出现的问题
(1)、提示TGFMSpecs不干净,可能在.gitignore缺少东西,解决方法如下
到TGFMSpecs目录
先删除 pod repo remove TGFMSpecs
到.cocoapods目录
再添加自己私有的索引库 pod repo add TGFMSpecs [email protected]:targetcloud/TGFMSpecs.git
到TGFMSpecs目录
git status查看是否已经干净
修改.gitignore 加一句 .DS_Store
git add .
git commint -m 'TGFMBase'
git push origin master
(2)、私有组件库中引用到了cocoapods公共框架库
那么在.podspec中的s.dependency加上需要的轮子
(3)、子库的制作
在podspec中制作
s.subspec 'Base' do |b|
b.source_files = 'TGFMBase/classes/Base/**/*'
end
s.subspec 'Tool' do |t|
t.source_files = 'TGFMBase/classes/Tool/**/*'
end
s.subspec 'Network' do |n|
n.source_files = 'TGFMBase/classes/Network/**/*'
n.dependency = 'AFNetworking'
end
s.subspec 'Category' do |c|
c.source_files = 'TGFMBase/classes/Category/**/*'
end
使用
pod 'TGFMBase', :subspecs => ['Base','Category']
(4)、业务组件引用了基础组件时,除了在podspec里面加dependency,还需要在业务组件的模板库的podfile中加入source ,要加2个,一个是自己的,一个是官方的
涉及的bundle改为[[[NSBundle bundleForClass:self] loadNibNamed:@"???" owner:nil options:nil] firstObject];
涉及的图片资源放于模板目录的Assets中去(与Classes同级),同时修改podspec中的s.resource_bundles如下
s.resource_bundles = {
--若是有多种资源*.png改为*
}
即打开这段注释即可
在模板测试pod install时则会多出Resources目录,里面存放就是上面的资源
设置XIB里的图片名时要加上???.bundle/
代码里面 UIImage imageNamed改为 UIImage imageWithContentsOfFile
NSBundle *currentBundle = [NSBundle bundleForClass:[self class]];
NSString *bundleName = [currentBundle.infoDictionary[@"CFBundleName"] stringByAppendingString:@".bundle"];
NSString *path = [currentBundle pathForResource:@"[email protected]" ofType:nil inDirectory:bundleName];
UIImage *image = [UIImage imageWithContentsOfFile:path];
self.backgroundImage = image;
(5)、清理缓存 pod cache clean --all
(6)、忽略警告 pod repo add TGFMSpecs [email protected]:targetcloud/TGFMSpecs.git --allow-warnings


