mkdocs_使用MkDocs构建产品文档
mkdocs
There's a popular maxim that "a product is as good as its documentation". This holds true as much for software as it does for physical products.
有一个流行的格言,即“产品与其文档一样好”。 对于软件和对物理产品而言,这都适用。
As a small, indie developer who doesn't specialize in front-end design, I often hire a freelancer to build my product website—which, of course, usually includes a documentation section.
作为一个不专门从事前端设计的小型独立开发人员,我经常聘请自由职业者来构建我的产品网站-当然,该网站通常包括文档部分。
A documentation section can take quite a bit of time and money to build, even for a simple product, so it would be nice not to have to reinvent the wheel for every site. Fortunately, there is a way.
即使对于一个简单的产品,文档部分的构建也可能会花费大量的时间和金钱,因此不必为每个站点重新发明轮子会很好。 幸运的是,有一种方法。
介绍MkDocs (Introducing MkDocs)
MkDocs is a free, static site generator geared towards building project documentation. It can be used to generate a stand-alone site, or just a documentation section of a larger site.
MkDocs是一个免费的静态站点生成器,专门用于构建项目文档。 它可以用于生成独立站点,或者仅用于生成较大站点的文档部分。
Because MkDocs produces static files, your documentation is light-weight and easy to host—using free services such as GitHub Pages and Read The Docs—or of course on your own server.
由于MkDocs生成静态文件,因此您的文档重量轻且易于托管(使用GitHub Pages和Read The Docs等免费服务),当然也可以在您自己的服务器上。
In this article, I'll introduce MkDocs, showing you how to install it, build documentation with it and finally host the generated documentation on a web server.
在本文中,我将介绍MkDocs,向您展示如何安装它,使用它构建文档以及最终将生成的文档托管在Web服务器上。
To get a sense of the sort of documentation MkDocs produces, have a look at my ProfilePress WordPress plugin documentation, which is built with MkDocs using the Read the Docs theme.
要了解MkDocs生成的文档类型,请查看我的ProfilePress WordPress插件文档 ,该文档是使用MkDocs使用Read the Docs主题构建的。
MkDocs is written in Python. The documentation source files are written in Markdown, and configured with a single YAML configuration file.
MkDocs用Python编写。 文档源文件使用Markdown编写,并使用单个YAML配置文件进行配置。
To build documentation with MkDocs, you need to have it installed locally in your computer. So let's next look at how to install it.
要使用MkDocs构建文档,您需要将其本地安装在计算机中。 因此,让我们接下来看看如何安装它。
安装Python和MkDocs (Installing Python and MkDocs)
Static site generators like Jekyll (used mainly for blogging, and built on Ruby) and MkDocs do require some command-line chops, so be warned. However, to those not used to working with the command line, I encourage you to read on and give it a try, as it's not as bad as it looks!
静态站点生成器,例如Jekyll(主要用于撰写博客,并基于Ruby构建)和MkDocs确实需要一些命令行操作,因此请注意。 但是,对于不习惯使用命令行的用户,我建议您继续阅读并尝试一下,因为它并不像看起来那样糟糕!
安装Python和pip (Installing Python and pip)
To install MkDocs, you need to have Python and pip (a Python package manager) installed in your computer. They may already be installed on your computer. If you have Python 3.4 or later installed, you probably have pip installed. (See the Python installation guide for full instructions.)
要安装MkDocs,您需要在计算机中安装Python和pip (Python包管理器)。 它们可能已经安装在您的计算机上。 如果您安装了Python 3.4或更高版本,则可能已安装了pip 。 (有关完整说明,请参见Python安装指南 。)
To install Python on a Linux distribution such as Ubuntu, see this stackoverflow thread or do a Google search for your distribution.
要在Linux发行版(例如Ubuntu)上安装Python,请参见此stackoverflow线程,或在Google中搜索您的发行版。
For Windows, download your preferred version installer and run the file to install Python.
对于Windows,请下载您的首选版本安装程序并运行该文件以安装Python。
Alternatively, if you have the Chocolatey package manager installed in your machine, run choco install python.
另外,如果您的计算机中安装了Chocolatey软件包管理器,请运行choco install python 。
To verify that your Python distribution has pip installed, run the pip --version command. Otherwise, run python get-pip.py or choco install pip via Chocolatey to get it installed.
要验证您的Python发行版是否已安装pip ,请运行pip --version命令。 否则,通过Chocolatey运行python get-pip.py或choco install pip进行安装。
安装MkDocs (Installing MkDocs)
Now that Python and pip are installed, run pip install mkdocs to install MkDocs.
现在已经安装了Python和pip,请运行pip install mkdocs来安装MkDocs。
To confirm everything is fine, run mkdocs help to give mkdocs command a try.
要确认一切正常,请运行mkdocs help来尝试使用mkdocs命令。
If you are on Windows and the mkdocs command isn't alive, be sure to add C:\path-to-python-folder\Scripts to Path environmental variable.
如果您在Windows上并且mkdocs命令还没有运行,请确保将C:\path-to-python-folder\Scripts到Path环境变量。
建立文件 (Building the Documentation)
Now that you have Python and MkDocs set up, you can get on with your actual documentation.
既然已经设置了Python和MkDocs,则可以继续阅读实际的文档。
Firstly, create a project for the documentation (let's call it sp-doc) and navigate to the created folder:
首先,为文档创建一个项目(我们称其为sp-doc )并导航到创建的文件夹:
$ mkdocs new sp-doc
$ cd sp-doc
The generated project folder will contain a docs folder—where the Markdown files for the documentation will be stored—and the configuration file mkdocs.yml.
生成的项目文件夹将包含一个docs文件夹(用于存储文档的Markdown文件)和配置文件mkdocs.yml 。
Here is the directory structure:
这是目录结构:
|-- docs              # MD doc pages
    |-- index.md
|-- mkdocs.yml        # config file
Add the following bare-minimum configuration to mkdocs.yml file:
将以下最基本的配置添加到mkdocs.yml文件:
site_name: SitePoint Documentation
site_description: Description of the documentation
theme: readthedocs
pages:
- ['index.md', 'Index']
MkDocs ships with a number of themes—such as "MkDocs", "Read the Docs" and "Bootstrap". Say you intend to use the default theme. In that case, simply replace readthedocs with mkdocs in the code above.
MkDocs附带了许多主题 ,例如“ MkDocs”,“ Read the Docs”和“ Bootstrap”。 假设您打算使用默认主题。 在这种情况下,只需在上面的代码readthedocs mkdocs替换为mkdocs 。
The pages config is used to determine the set of pages that should be built for the documentation and the navigation menu.
pages配置用于确定应为文档和导航菜单构建的页面集。
Markdown files added to pages must be relative to the docs folder. For example, if you created a new folder called config inside the docs directory and added a setup.md file in it, here's how you would add it to pages in the mkdocs.yml file configuration:
添加到pages Markdown文件必须相对于docs文件夹。 例如,如果您在docs目录中创建了一个名为config的新文件夹,并在其中添加了setup.md文件,则可以按照以下方法将其添加到mkdocs.yml文件配置中的pages中:
site_name: SitePoint Documentation
site_description: Description of the description
theme: readthedocs
pages:
- ['index.md', 'Index']
- ['start.md', 'Get Started']
- ['config/setup.md', 'Configuration', 'Setup']
- ['config/debug.md', 'Configuration', 'Debug']
This creates some new pages that appear automatically in our documentation menu. Firstly, there's a start.md page, with the title "Get Started".
这将创建一些新页面,这些页面会自动显示在我们的文档菜单中。 首先,有一个start.md页面,标题为“ Get Started”。
We've also added a new section to the documentation menu called "Configuration", under which there's a link to new Setup and Debug pages.
我们还在文档菜单中添加了一个名为“配置”的新部分,在该菜单下有一个指向新的“设置”和“调试”页面的链接。
MkDocs includes a built-in web server, so you can preview your documentation locally as you work on it.
MkDocs包含一个内置的Web服务器,因此您可以在使用它时在本地预览文档。
To start the web server, ensure you are in the directory where mkdocs.yml config file resides, and then run the mkdocs serve command.
要启动Web服务器,请确保您位于mkdocs.yml配置文件所在的目录中,然后运行mkdocs serve命令。
Visit http://127.0.0.1:8000 in your browser to view the documentation:
在浏览器中访问http://127.0.0.1:8000以查看文档:
If you're satisfied with what you've created, run mkdocs build to generate the static files for the documentation which will be saved to site directory.
如果对创建的内容感到满意,请运行mkdocs build生成用于文档的静态文件,该文件将保存到site目录中。
You can copy the static files and host them on a web server of your choosing to take the documentation live.
您可以复制静态文件并将其托管在您选择的Web服务器上,以使文档生效。
In the next section, we'll learn how to deploy MkDocs to Read the Docs and GitHub Pages.
在下一节中,我们将学习如何部署MkDocs来阅读Docs和GitHub Pages 。
部署MkDocs (Deploying MkDocs)
Firstly, create a GitHub (or Bitbucket) repository to store the files.
首先,创建一个GitHub(或Bitbucket)存储库来存储文件。
Run the following commands to deploy to GitHub where https://github.com/Collizo4sky/sitepoint_mkdocs is my own MkDocs repo:
运行以下命令以将其部署到GitHub,其中https://github.com/Collizo4sky/sitepoint_mkdocs是我自己的MkDocs存储库:
$ git init

$ git remote add origin https://github.com/Collizo4sky/sitepoint_mkdocs.git

$ git add -A

$ git commit -a -m 'the genesis'

git push --set-upstream origin master
Let's now deploy our documentation files to Read the Docs, a free documentation service.
现在,让我们将文档文件部署到“免费阅读文档服务”文档中。
阅读文档 (Read the Docs)
Firstly, create an account if you don't have one and log in.
首先,如果您没有帐户,请创建一个帐户并登录。
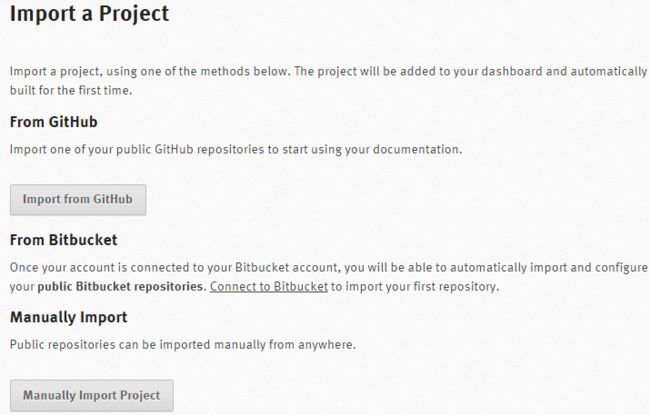
Click the Import a Project button or click the Add project menu item.
单击Import a Project按钮或单击Add project菜单项。
You can choose to connect your GitHub or Bitbucket account to Read the Docs to import your entire project. Instead, we'll go with the manual importation, by clicking the Manually Import Project button.
您可以选择连接GitHub或Bitbucket帐户以阅读文档以导入整个项目。 相反,我们将通过单击“ Manually Import Project按钮进行Manually Import Project 。
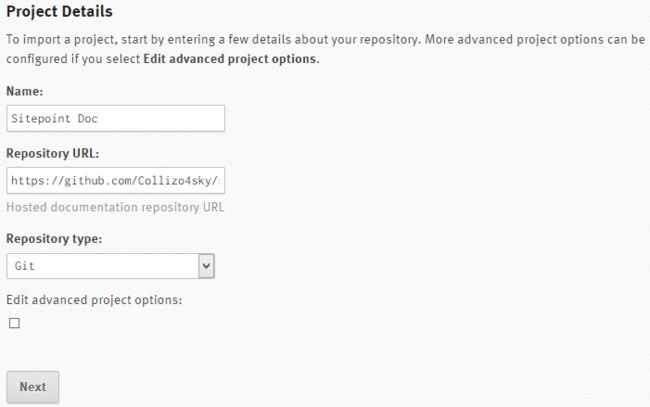
Fill the form as shown in the image below:
如下图所示填写表格:
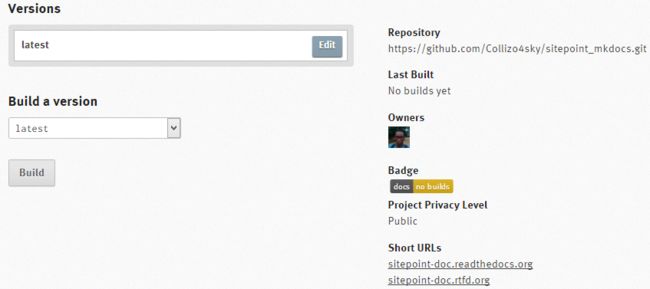
On successfully importing the docs from GitHub, you'll be redirected to project page:
从GitHub成功导入文档后,您将被重定向到项目页面:
You can view our generated documentation at http://sitepoint-doc.readthedocs.org/en/latest/.
您可以在http://sitepoint-doc.readthedocs.org/en/latest/上查看我们生成的文档。
If you want the documentation on a subdomain, point a CNAME record in your DNS to the subdomain for your project.
如果要将文档放在子域中,请在DNS中将CNAME记录指向项目的子域。
For example, to make the documentation available on docs.sitepoint.com, create a CNAME record pointing to sitepoint-doc.readthedocs.org.
例如,要使文档在docs.sitepoint.com上docs.sitepoint.com ,请创建一个指向sitepoint-doc.readthedocs.org的CNAME记录。
GitHub页面 (GitHub Pages)
Now let's look at how to host our documentation on GitHub Pages, another free hosting service.
现在让我们看一下如何在另一个免费的托管服务GitHub Pages上托管我们的文档。
Ensure you are on the working branch of the git repository—which is the master branch in our case.
确保您位于git存储库的工作分支上(在本例中为master分支)。
Run the command mkdocs gh-deploy --clean
运行命令mkdocs gh-deploy --clean
Behind the scenes, this command will build your docs and commit them to the gh-pages branch and then push the branch to GitHub.
在后台,此命令将构建您的文档并将其提交到gh-pages分支,然后将其推送到GitHub。
Here is a demo of our SitePoint docs on GitHub Pages.
这是GitHub Pages上的SitePoint文档的演示 。
其他提供者 (Other Providers)
Any hosting provider that can serve static files can be used to serve documentation generated by MkDocs. The following guidelines should provide some general assistance.
可以提供静态文件的任何托管提供程序都可以用于提供MkDocs生成的文档。 以下准则应提供一些一般帮助。
When you build your site using the mkdocs build command, all of the files are written to the directory assigned to the site_dir configuration option (defaults to "site") in your mkdocs.yaml config file.
当您使用建立您的网站mkdocs build命令,所有的文件被写入分配给该目录site_dir在配置选项(默认为“网站”) mkdocs.yaml配置文件。
Simply copy the contents of that directory to the root directory of your hosting provider's server and you are done. Or, if your docs will just be a subsection of your site, move the files to a designated subfolder.
只需将该目录的内容复制到托管服务提供商的服务器的根目录即可。 或者,如果您的文档只是您网站的一个子部分,请将文件移至指定的子文件夹。
摘要 (Summary)
In this tutorial, we learned how to build documentation with MkDocs, a Python static website generator, and also how to deploy and host the documentation for free on GitHub Pages and Read the Docs.
在本教程中,我们学习了如何使用Python静态网站生成器MkDocs构建文档,以及如何在GitHub Pages和Read Docs 上免费部署和托管文档 。
Have you used MkDocs before? If not, would you consider using it? How do you currently deal with serving documentation to your users? I'd love to hear your feedback or answer any questions you might have.
您以前使用过MkDocs吗? 如果没有,您会考虑使用它吗? 您目前如何处理向用户提供文件的问题? 我很想听听您的意见或回答您可能有的任何问题。
翻译自: https://www.sitepoint.com/building-product-documentation-mkdocs/
mkdocs


