Spring事务源码解析
spring事务源码分析分为三大块:
- 事务组件注册
- 获取class/method增强器
- 事务增强器
事务组件注册
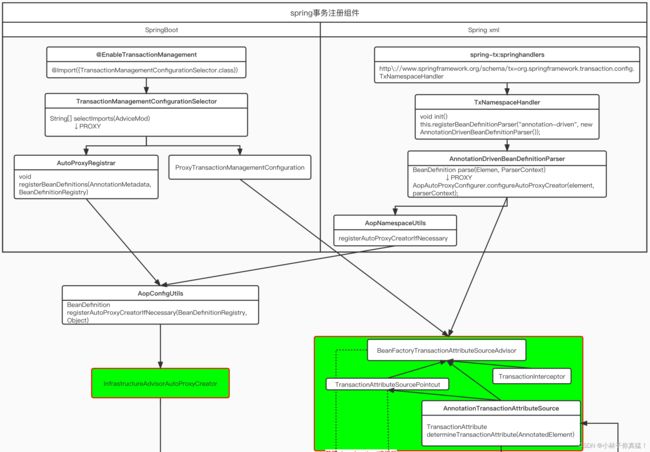
事务组件注册分为了两种方式,一种是比较老的spring xm风格注册,一种是springboot注解风格注册
注册方式大体流程参考下图:

先讲讲springboot注解风格:@EnableTransactionManagement
@Target({ElementType.TYPE})
@Retention(RetentionPolicy.RUNTIME)
@Documented
@Import({TransactionManagementConfigurationSelector.class})
public @interface EnableTransactionManagement {
    boolean proxyTargetClass() default false;

    AdviceMode mode() default AdviceMode.PROXY;

    int order() default 2147483647;
}
@Import注解@Import(TransactionManagementConfigurationSelector.class)注入了TransactionManagementConfigurationSelector类。
TransactionManagementConfigurationSelector间接实现了ImportSelector接口
ImportSelector接口只定义了一个方法selectImports(),用于指定需要注册为bean的Class名称。当在@Configuration标注的Class上使用@Import引入了一个ImportSelector实现类后,会把实现类中返回的Class名称都定义为bean。
我们再回来看TransactionManagementConfigurationSelector类的selectImports()方法返回了什么Class名称。
    protected String[] selectImports(AdviceMode adviceMode) {
        switch(adviceMode) {
        case PROXY:
            return new String[]{AutoProxyRegistrar.class.getName(), ProxyTransactionManagementConfiguration.class.getName()};
        case ASPECTJ:
            return new String[]{"org.springframework.transaction.aspectj.AspectJTransactionManagementConfiguration"};
        default:
            return null;
        }
    }
这里我们以默认的AdviceMode.PROXY模式为例,返回了两个bean的名称:
- AutoProxyRegistrar
- ProxyTransactionManagementConfiguration
先看一下 ProxyTransactionManagementConfiguration
内容比较简单,直接上源码
@Configuration
public class ProxyTransactionManagementConfiguration extends AbstractTransactionManagementConfiguration {
    public ProxyTransactionManagementConfiguration() {
    }

    @Bean(
        name = {"org.springframework.transaction.config.internalTransactionAdvisor"}
    )
    @Role(2)
    public BeanFactoryTransactionAttributeSourceAdvisor transactionAdvisor() {
        BeanFactoryTransactionAttributeSourceAdvisor advisor = new BeanFactoryTransactionAttributeSourceAdvisor();
        advisor.setTransactionAttributeSource(this.transactionAttributeSource());
        advisor.setAdvice(this.transactionInterceptor());
        advisor.setOrder((Integer)this.enableTx.getNumber("order"));
        return advisor;
    }

    @Bean
    @Role(2)
    public TransactionAttributeSource transactionAttributeSource() {
        return new AnnotationTransactionAttributeSource();
    }

    @Bean
    @Role(2)
    public TransactionInterceptor transactionInterceptor() {
        TransactionInterceptor interceptor = new TransactionInterceptor();
        interceptor.setTransactionAttributeSource(this.transactionAttributeSource());
        if (this.txManager != null) {
            interceptor.setTransactionManager(this.txManager);
        }

        return interceptor;
    }
}
上面的代码注册了三个bean:BeanFactoryTransactionAttributeSourceAdvisor、AnnotationTransactionAttributeSource、TransactionInterceptor,这三个bean支撑了整个的事务功能,他们的功能后面揭晓。
再看一下AutoProxyRegistrar里的registerBeanDefinitions方法
    public void registerBeanDefinitions(AnnotationMetadata importingClassMetadata, BeanDefinitionRegistry registry) {
        boolean candidateFound = false;
        Set<String> annoTypes = importingClassMetadata.getAnnotationTypes();
        Iterator i$ = annoTypes.iterator();

        while(i$.hasNext()) {
            String annoType = (String)i$.next();
            AnnotationAttributes candidate = MetadataUtils.attributesFor(importingClassMetadata, annoType);
            Object mode = candidate.get("mode");
            Object proxyTargetClass = candidate.get("proxyTargetClass");
            if (mode != null && proxyTargetClass != null && mode.getClass().equals(AdviceMode.class) && proxyTargetClass.getClass().equals(Boolean.class)) {
                candidateFound = true;
                if (mode == AdviceMode.PROXY) {
                //重点在这里
                    AopConfigUtils.registerAutoProxyCreatorIfNecessary(registry);
                    if ((Boolean)proxyTargetClass) {
                        AopConfigUtils.forceAutoProxyCreatorToUseClassProxying(registry);
                        return;
                    }
                }
            }
        }

        if (!candidateFound) {
            String name = this.getClass().getSimpleName();
            this.logger.warn(String.format("%s was imported but no annotations were found having both 'mode' and 'proxyTargetClass' attributes of type AdviceMode and boolean respectively. This means that auto proxy creator registration and configuration may not have occured as intended, and components may not be proxied as expected. Check to ensure that %s has been @Import'ed on the same class where these annotations are declared; otherwise remove the import of %s altogether.", name, name, name));
        }

    }
AopConfigUtils.registerAutoProxyCreatorIfNecessary(registry);一路点进去会看到一个方法:
    public static BeanDefinition registerAutoProxyCreatorIfNecessary(BeanDefinitionRegistry registry, Object source) {
        return registerOrEscalateApcAsRequired(InfrastructureAdvisorAutoProxyCreator.class, registry, source);
    }
上面这个函数主要目的是注册了InfrastructureAdvisorAutoProxyCreator类型的bean,那么注册这个类的目的是什么呢?
InfrastructureAdvisorAutoProxyCreator间接实现了SmartInstantiationAwareBeanPostProcessor,而SmartInstantiationAwareBeanPostProcessor又继承自InstantiationAwareBeanPostProcessor,也就是说在Spring中,所有bean实例化时Spring都会保证调用其postProcessAfterInitialization方法,其实现在是在父类AbstractAutoProxyCreator类中实现,看一下postProcessAfterInitialization方法
    public Object postProcessAfterInitialization(Object bean, String beanName) throws BeansException {
        if (bean != null) {
            Object cacheKey = this.getCacheKey(bean.getClass(), beanName);
            if (!this.earlyProxyReferences.containsKey(cacheKey)) {
                return this.wrapIfNecessary(bean, beanName, cacheKey);
            }
        }

        return bean;
    }
进入wrapIfNecessary方法
    protected Object wrapIfNecessary(Object bean, String beanName, Object cacheKey) {
        if (beanName != null && this.targetSourcedBeans.containsKey(beanName)) {
            return bean;
        } else if (Boolean.FALSE.equals(this.advisedBeans.get(cacheKey))) {
            return bean;
        } else if (!this.isInfrastructureClass(bean.getClass()) && !this.shouldSkip(bean.getClass(), beanName)) {
            Object[] specificInterceptors = this.getAdvicesAndAdvisorsForBean(bean.getClass(), beanName, (TargetSource)null);
            if (specificInterceptors != DO_NOT_PROXY) {
                this.advisedBeans.put(cacheKey, Boolean.TRUE);
                Object proxy = this.createProxy(bean.getClass(), beanName, specificInterceptors, new SingletonTargetSource(bean));
                this.proxyTypes.put(cacheKey, proxy.getClass());
                return proxy;
            } else {
                this.advisedBeans.put(cacheKey, Boolean.FALSE);
                return bean;
            }
        } else {
            this.advisedBeans.put(cacheKey, Boolean.FALSE);
            return bean;
        }
    }
wrapIfNecessary函数的功能实现起来很复杂,但是逻辑上理解起来还是相对简单的,在wrapIfNecessary函数中主要的工作如下:
- 找出指定的bean对应的增强器
- 根据找出的增强器创建代理
xml风格注册事务组件
spring-tx:XXX.jar中可以看到一个spring.handlers文件,内容如下:
http\://www.springframework.org/schema/tx=org.springframework.transaction.config.TxNamespaceHandler
spring会调用TxNamespaceHandler的init方法
    public void init() {
        this.registerBeanDefinitionParser("advice", new TxAdviceBeanDefinitionParser());
        //重点在这里
        this.registerBeanDefinitionParser("annotation-driven", new AnnotationDrivenBeanDefinitionParser());
        this.registerBeanDefinitionParser("jta-transaction-manager", new JtaTransactionManagerBeanDefinitionParser());
    }
根据自定义标签的使用规则以及上面的代码,可以知道,在遇到诸如
    public BeanDefinition parse(Element element, ParserContext parserContext) {
        String mode = element.getAttribute("mode");
        if ("aspectj".equals(mode)) {
            this.registerTransactionAspect(element, parserContext);
        } else {
            AnnotationDrivenBeanDefinitionParser.AopAutoProxyConfigurer.configureAutoProxyCreator(element, parserContext);
        }

        return null;
    }
而这里的AopAutoProxyConfigurer.configureAutoProxyCreator方法会注册同springboot注解风格相同的四个组件:InfrastructureAdvisorAutoProxyCreator、BeanFactoryTransactionAttributeSourceAdvisor、TransactionInterceptor、AnnotationTransactionAttributeSource
获取class/method增强器
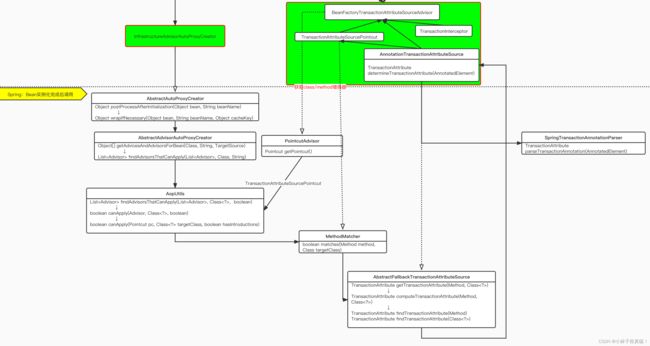
上获取增强器的流程图

之前wrapIfNecessary方法中调用getAdvicesAndAdvisorsForBean就是获取增强器的方法。
获取指定bean对应的增强器,其中包含两个关键字:增强器与对应。也就是说在getAdvicesAndAdvisorsForBean函数中,不但要找出增强器,而且还需要判断增强器是否满足要求。
    protected Object[] getAdvicesAndAdvisorsForBean(Class beanClass, String beanName, TargetSource targetSource) {
        List advisors = this.findEligibleAdvisors(beanClass, beanName);
        return advisors.isEmpty() ? DO_NOT_PROXY : advisors.toArray();
    }

    protected List<Advisor> findEligibleAdvisors(Class beanClass, String beanName) {
        List<Advisor> candidateAdvisors = this.findCandidateAdvisors();
        List<Advisor> eligibleAdvisors = this.findAdvisorsThatCanApply(candidateAdvisors, beanClass, beanName);
        this.extendAdvisors(eligibleAdvisors);
        if (!eligibleAdvisors.isEmpty()) {
            eligibleAdvisors = this.sortAdvisors(eligibleAdvisors);
        }

        return eligibleAdvisors;
    }
其实我们也渐渐地体会到了Spring中代码的优秀,即使是一个很复杂的逻辑,在Spring中也会被拆分成若干个小逻辑,然后在每个函数中实现,使得每个函数的逻辑简单到我们能快速地理解,而不会像有些人开发的那样,将一大堆的逻辑都罗列在一个函数中,给后期维护人员造成巨大的困扰。
同样,通过上面的函数,Spring又将任务进行了拆分,分成了获取所有增强器与增强器是否匹配两个功能点。
1.寻找候选增强器
在findCandidateAdvisors函数中完成的就是获取增强器的功能
    protected List<Advisor> findCandidateAdvisors() {
        return this.advisorRetrievalHelper.findAdvisorBeans();
    }

   public List<Advisor> findAdvisorBeans() {
        String[] advisorNames = null;
        synchronized(this) {
            advisorNames = this.cachedAdvisorBeanNames;
            if (advisorNames == null) {
                advisorNames = BeanFactoryUtils.beanNamesForTypeIncludingAncestors(this.beanFactory, Advisor.class, true, false);
                this.cachedAdvisorBeanNames = advisorNames;
            }
        }

        if (advisorNames.length == 0) {
            return new LinkedList();
        } else {
            List<Advisor> advisors = new LinkedList();
            String[] arr$ = advisorNames;
            int len$ = advisorNames.length;

            for(int i$ = 0; i$ < len$; ++i$) {
                String name = arr$[i$];
                if (this.isEligibleBean(name)) {
                    if (this.beanFactory.isCurrentlyInCreation(name)) {
                        if (logger.isDebugEnabled()) {
                            logger.debug("Skipping currently created advisor '" + name + "'");
                        }
                    } else {
                        try {
                            advisors.add(this.beanFactory.getBean(name, Advisor.class));
                        } catch (BeanCreationException var10) {
                            Throwable rootCause = var10.getMostSpecificCause();
                            if (rootCause instanceof BeanCurrentlyInCreationException) {
                                BeanCreationException bce = (BeanCreationException)rootCause;
                                if (this.beanFactory.isCurrentlyInCreation(bce.getBeanName())) {
                                    if (logger.isDebugEnabled()) {
                                        logger.debug("Skipping advisor '" + name + "' with dependency on currently created bean: " + var10.getMessage());
                                    }
                                    continue;
                                }
                            }

                            throw var10;
                        }
                    }
                }
            }

            return advisors;
        }
    }
上面函数首先是通过BeanFactoryUtils类提供的工具方法获取所有对应Advisor.class的类,获取办法无非是使用ListtableBeanFactory中提供的方法:
String[] getBeanNamesForType(Class<?> type,boolean includeNonSingleTons,boolean allowEagerInit);
而当我们知道增强器再容器中的beanName时,获取增强器已经不是问题了,在BeanFactory中提供了这样的方法,可以帮助我们快速定位对应的bean实例。
<T> T getBean(String name,Class<T> requiredType) throws BeansException;
之前我们注册了一个类型为BeanFactoryTransactionAttributeSourceAdvisor的bean,而再次bean中我们又注入了另外两个bean,那么此时这个bean就会被开始使用了。因为BeanFactoryTransactionAttributeSourceAdvisor同样也实现了Advisor接口,那么在获取所有增强器的时自然也会将次bean提取出来,并随着其他增强器一起在后续的步骤中被织入代理。
2.候选增强器中寻找到匹配项
当找出对应的增强器后,接下来的任务就是看这些增强器是否与对应的class匹配了,当然不只是class,class内部的方法如果匹配也可以通过验证。
    protected List<Advisor> findAdvisorsThatCanApply(List<Advisor> candidateAdvisors, Class beanClass, String beanName) {
        ProxyCreationContext.setCurrentProxiedBeanName(beanName);

        List var4;
        try {
            var4 = AopUtils.findAdvisorsThatCanApply(candidateAdvisors, beanClass);
        } finally {
            ProxyCreationContext.setCurrentProxiedBeanName((String)null);
        }

        return var4;
    }

public static List<Advisor> findAdvisorsThatCanApply(List<Advisor> candidateAdvisors, Class<?> clazz) {
        if (candidateAdvisors.isEmpty()) {
            return candidateAdvisors;
        } else {
            List<Advisor> eligibleAdvisors = new LinkedList();
            Iterator i$ = candidateAdvisors.iterator();

            while(i$.hasNext()) {
                Advisor candidate = (Advisor)i$.next();
                if (candidate instanceof IntroductionAdvisor && canApply(candidate, clazz)) {
                    eligibleAdvisors.add(candidate);
                }
            }

            boolean hasIntroductions = !eligibleAdvisors.isEmpty();
            Iterator i$ = candidateAdvisors.iterator();

            while(i$.hasNext()) {
                Advisor candidate = (Advisor)i$.next();
                if (!(candidate instanceof IntroductionAdvisor) && canApply(candidate, clazz, hasIntroductions)) {
                    eligibleAdvisors.add(candidate);
                }
            }

            return eligibleAdvisors;
        }
    }
    public static boolean canApply(Advisor advisor, Class<?> targetClass, boolean hasIntroductions) {
        if (advisor instanceof IntroductionAdvisor) {
            return ((IntroductionAdvisor)advisor).getClassFilter().matches(targetClass);
        } else if (advisor instanceof PointcutAdvisor) {
            PointcutAdvisor pca = (PointcutAdvisor)advisor;
            return canApply(pca.getPointcut(), targetClass, hasIntroductions);
        } else {
            return true;
        }
    }
当前的advisor就是之前查找出来的类型为BeanFactoryTransactionAttributeSourceAdvisor的bean实例,而通过类的层次结构我们又知道:BeanFactoryTransactionAttributeSourceAdvisor间接实现了PointcutAdvisor。因此,在canApply函数中的第二个if判断时就会通过判断,会将BeanFactoryTransactionAttributeSourceAdvisor中的getPointcut()方法返回值作为参数继续调用canApply方法,而getPoint()方法返回的是TransactionAttributeSourcePointcut类型的实例。对于transactionAttributeSourcePointcut这个属性是在解析自定义标签时注入进去的。
private final TransactionAttributeSourcePointcut pointcut = new TransactionAttributeSourcePointcut() {
        protected TransactionAttributeSource getTransactionAttributeSource() {
            return BeanFactoryTransactionAttributeSourceAdvisor.this.transactionAttributeSource;
        }
    };
那么,使用transactionAttributeSourcePointcut类型的实例作为函数参数继续跟踪canApply。
public static boolean canApply(Pointcut pc, Class<?> targetClass, boolean hasIntroductions) {
        Assert.notNull(pc, "Pointcut must not be null");
        if (!pc.getClassFilter().matches(targetClass)) {
            return false;
        } else {
            MethodMatcher methodMatcher = pc.getMethodMatcher();
            IntroductionAwareMethodMatcher introductionAwareMethodMatcher = null;
            if (methodMatcher instanceof IntroductionAwareMethodMatcher) {
                introductionAwareMethodMatcher = (IntroductionAwareMethodMatcher)methodMatcher;
            }

            Set<Class> classes = new HashSet(ClassUtils.getAllInterfacesForClassAsSet(targetClass));
            classes.add(targetClass);
            Iterator i$ = classes.iterator();

            while(i$.hasNext()) {
                Class<?> clazz = (Class)i$.next();
                Method[] methods = clazz.getMethods();
                Method[] arr$ = methods;
                int len$ = methods.length;

                for(int i$ = 0; i$ < len$; ++i$) {
                    Method method = arr$[i$];
                    if (introductionAwareMethodMatcher != null && introductionAwareMethodMatcher.matches(method, targetClass, hasIntroductions) || methodMatcher.matches(method, targetClass)) {
                        return true;
                    }
                }
            }

            return false;
        }
    }
通过上面函数大致可以理清大体脉络,首先获取对应类的所有接口并连同类本身一起遍历,遍历过程中又对类中的方法再次遍历,一旦匹配成功便认为这个类适用于当前增强器。
到这里我们不禁会有一问,对于事务的匹配不仅仅局限于函数上的配置,我们都知道,在类或接口上的配置可以延续到类中的每个函数,那么,如果针对每个函数进行检测,在类本身上配置的事务属性岂不是检测不到了吗?带着这个一问,我们继续探求matcher方法。
做匹配的时候methodMatcher.matches(method, targetClass)会使用TransactionAttributeSourcePointcut类的matches方法。
    public boolean matches(Method method, Class targetClass) {
        TransactionAttributeSource tas = this.getTransactionAttributeSource();
        return tas == null || tas.getTransactionAttribute(method, targetClass) != null;
    }
此时tas表示AnnotationTransactionAttributeSource类型,而AnnotationTransactionAttributeSource类型的getTransactionAttribute方法如下:
    public TransactionAttribute getTransactionAttribute(Method method, Class<?> targetClass) {
        Object cacheKey = this.getCacheKey(method, targetClass);
        Object cached = this.attributeCache.get(cacheKey);
        if (cached != null) {
            return cached == NULL_TRANSACTION_ATTRIBUTE ? null : (TransactionAttribute)cached;
        } else {
            TransactionAttribute txAtt = this.computeTransactionAttribute(method, targetClass);
            if (txAtt == null) {
                this.attributeCache.put(cacheKey, NULL_TRANSACTION_ATTRIBUTE);
            } else {
                if (this.logger.isDebugEnabled()) {
                    Class<?> classToLog = targetClass != null ? targetClass : method.getDeclaringClass();
                    this.logger.debug("Adding transactional method '" + classToLog.getSimpleName() + "." + method.getName() + "' with attribute: " + txAtt);
                }

                this.attributeCache.put(cacheKey, txAtt);
            }

            return txAtt;
        }
    }
3.提取事务标签
    private TransactionAttribute computeTransactionAttribute(Method method, Class<?> targetClass) {
        if (this.allowPublicMethodsOnly() && !Modifier.isPublic(method.getModifiers())) {
            return null;
        } else {
            Class<?> userClass = ClassUtils.getUserClass(targetClass);
            Method specificMethod = ClassUtils.getMostSpecificMethod(method, userClass);
            specificMethod = BridgeMethodResolver.findBridgedMethod(specificMethod);
            //查看方法中是否存在事务声明
            TransactionAttribute txAtt = this.findTransactionAttribute(specificMethod);
            if (txAtt != null) {
                return txAtt;
            } else {
            //查看方法所在类中是否存在事务声明
                txAtt = this.findTransactionAttribute(specificMethod.getDeclaringClass());
                if (txAtt != null) {
                    return txAtt;
                    //如果存在接口,则到接口中找
                } else if (specificMethod != method) {
                    txAtt = this.findTransactionAttribute(method);
                    return txAtt != null ? txAtt : this.findTransactionAttribute(method.getDeclaringClass());
                } else {
                    return null;
                }
            }
        }
    }
如果方法中存在事务属性,则使用方法上的属性,否则使用方法所在的类上的属性,如果方法所在类的属性上还是没有搜寻到对应的事务属性,那么再搜寻接口中的方法,再没有的话,最后尝试搜寻接口的类上面的声明。对于函数computeTransactionAttribute中的逻辑与我们所认识的规则并无差别,但是上面函数中并没有真正的去搜寻事务属性的逻辑,而是搭建了个执行框架,将搜寻事务属性的任务委托给了findTransactionAttribute方法去执行。
    @Nullable
    protected TransactionAttribute findTransactionAttribute(Method method) {
        return this.determineTransactionAttribute(method);
    }

    @Nullable
    protected TransactionAttribute determineTransactionAttribute(AnnotatedElement element) {
        Iterator var2 = this.annotationParsers.iterator();

        TransactionAttribute attr;
        do {
            if (!var2.hasNext()) {
                return null;
            }

            TransactionAnnotationParser parser = (TransactionAnnotationParser)var2.next();
            attr = parser.parseTransactionAnnotation(element);
        } while(attr == null);

        return attr;
    }
this.annotationParsers是在当前类AnnotationTransactionAttributeSource初始化的时候初始化的,其中的值被加入了SpringTransactionAnnotationParser类的parseTransactionAnnotation方法中进行解析的。
    public TransactionAttribute parseTransactionAnnotation(AnnotatedElement element) {
        AnnotationAttributes attributes = AnnotatedElementUtils.findMergedAnnotationAttributes(element, Transactional.class, false, false);
        return attributes != null ? this.parseTransactionAnnotation(attributes) : null;
    }
至此,我们终于看到了想看到的获取注解标记的代码。首先会判断当前的类是否含有Transactional注解,这是事务属性的基础,当然如果有的话继续调用parseTransactionAnnotation方法解析详细的属性。
    protected TransactionAttribute parseTransactionAnnotation(AnnotationAttributes attributes) {
        RuleBasedTransactionAttribute rbta = new RuleBasedTransactionAttribute();
        //解析propagation
        Propagation propagation = (Propagation)attributes.getEnum("propagation");
        rbta.setPropagationBehavior(propagation.value());
        //解析isolation
        Isolation isolation = (Isolation)attributes.getEnum("isolation");
        rbta.setIsolationLevel(isolation.value());
        //解析timeout
        rbta.setTimeout(attributes.getNumber("timeout").intValue());
        //解析readOnly
        rbta.setReadOnly(attributes.getBoolean("readOnly"));
        //解析value
        rbta.setQualifier(attributes.getString("value"));
        List<RollbackRuleAttribute> rollbackRules = new ArrayList();
        //解析rollbackFor
        Class[] var6 = attributes.getClassArray("rollbackFor");
        int var7 = var6.length;

        int var8;
        Class rbRule;
        for(var8 = 0; var8 < var7; ++var8) {
            rbRule = var6[var8];
            rollbackRules.add(new RollbackRuleAttribute(rbRule));
        }

        String[] var10 = attributes.getStringArray("rollbackForClassName");
        var7 = var10.length;

        String rbRule;
        for(var8 = 0; var8 < var7; ++var8) {
            rbRule = var10[var8];
            rollbackRules.add(new RollbackRuleAttribute(rbRule));
        }

        var6 = attributes.getClassArray("noRollbackFor");
        var7 = var6.length;

        for(var8 = 0; var8 < var7; ++var8) {
            rbRule = var6[var8];
            rollbackRules.add(new NoRollbackRuleAttribute(rbRule));
        }

        var10 = attributes.getStringArray("noRollbackForClassName");
        var7 = var10.length;

        for(var8 = 0; var8 < var7; ++var8) {
            rbRule = var10[var8];
            rollbackRules.add(new NoRollbackRuleAttribute(rbRule));
        }

        rbta.setRollbackRules(rollbackRules);
        return rbta;
    }
至此,我们终于完成了事务标签的解析。
事务增强器后面更新