关于springboot+simbot+mriai实现QQ群智能回复机器人
前言
前几天在一个在一个java的交流群上发现了一个舔狗机器人,感觉有点意思。在git上逛了一圈发现simbot这个框架封装得还不错,这是一个基于kotlin的框架但他并不仅至此。用java也是能进行编写工作,我们简单尝试一下。
前期准备
本次demo使用了jdk1.8。
以下是所需要的依赖:
<?xml version="1.0" encoding="UTF-8"?>
<project xmlns="http://maven.apache.org/POM/4.0.0" xmlns:xsi="http://www.w3.org/2001/XMLSchema-instance"
         xsi:schemaLocation="http://maven.apache.org/POM/4.0.0 https://maven.apache.org/xsd/maven-4.0.0.xsd">
    <modelVersion>4.0.0</modelVersion>
    <parent>
        <groupId>org.springframework.boot</groupId>
        <artifactId>spring-boot-starter-parent</artifactId>
        <version>2.3.4.RELEASE</version>
        <relativePath/> <!-- lookup parent from repository -->
    </parent>
    <groupId>com.xiaoxiaoguai</groupId>
    <artifactId>robot</artifactId>
    <version>0.0.1-SNAPSHOT</version>
    <name>robot</name>
    <description>java机器人</description>
    <properties>
        <java.version>1.8</java.version>
<!--        <simbot.version>2.3.0</simbot.version>-->
    </properties>

    <dependencyManagement>
        <dependencies>
            <dependency>
                <groupId>love.forte.simple-robot</groupId>
                <artifactId>parent</artifactId>
                <version>2.3.0</version>
                <scope>import</scope>
                <type>pom</type>
            </dependency>
        </dependencies>
    </dependencyManagement>
    <dependencies>
        <dependency>
            <groupId>org.springframework.boot</groupId>
            <artifactId>spring-boot-starter</artifactId>
        </dependency>
        <dependency>
            <groupId>org.projectlombok</groupId>
            <artifactId>lombok</artifactId>
            <version>1.16.10</version>
        </dependency>

        <dependency>
            <groupId>org.slf4j</groupId>
            <artifactId>slf4j-simple</artifactId>
            <version>1.7.28</version>
        </dependency>

        <dependency>
            <groupId>org.springframework.boot</groupId>
            <artifactId>spring-boot-starter-test</artifactId>
            <scope>test</scope>

        </dependency>
        <!--日志依赖-->
        <dependency>
            <groupId>org.slf4j</groupId>
            <artifactId>slf4j-api</artifactId>
        </dependency>
        <!--simbot版本尽量更新到最新的稳定版,否则可能会有意料之外的bug-->
        <dependency>
            <groupId>love.forte.simple-robot</groupId>
            <artifactId>component-mirai-spring-boot-starter</artifactId>
        </dependency>

        <!-- https://mvnrepository.com/artifact/org.apache.httpcomponents/httpclient -->
        <dependency>
            <groupId>org.apache.httpcomponents</groupId>
            <artifactId>httpclient</artifactId>
            <version>4.5.13</version>
        </dependency>
    </dependencies>

    <build>
        <plugins>
            <plugin>
                <groupId>org.springframework.boot</groupId>
                <artifactId>spring-boot-maven-plugin</artifactId>
                <configuration>
                    <excludes>
                        <exclude>
                            <groupId>org.projectlombok</groupId>
                            <artifactId>lombok</artifactId>
                        </exclude>
                    </excludes>
                </configuration>
            </plugin>
        </plugins>
    </build>

</project>
application.yml
#配置QQ号和群号,多个则用逗号分割
bello:
  qq: 12323213,123123123
belloGroup:
  group: 10212329,213233332

simbot:
  core:
    # bot的qq账号与密码。
    bots: 账号:密码
  component:
    mirai:
      # mirai心跳周期. 过长会导致被服务器断开连接. 单位毫秒。
      heartbeat-period-millis: 30000
      # 每次心跳时等待结果的时间.一旦心跳超时, 整个网络服务将会重启 (将消耗约 1s). 除正在进行的任务 (如图片上传) 会被中断外, 事件和插件均不受影响.
      heartbeat-timeout-millis: 5000
      # 心跳失败后的第一次重连前的等待时间.
      first-reconnect-delay-millis: 5000
      # 重连失败后, 继续尝试的每次等待时间
      reconnect-period-millis: 5000
      # 最多尝试多少次重连
      reconnection-retry-times: 2147483647
      # 使用协议类型。注,此值为枚举类 net.mamoe.mirai.utils.BotConfiguration.MiraiProtocol 的元素值,
      # 可选值为:ANDROID_PHONE、ANDROID_PAD、ANDROID_WATCH
      protocol: ANDROID_PAD
      # 是否关闭mirai的bot logger
      no-bot-log: true
      # 关闭mirai网络日志
      no-network-log: true
      # mirai bot log切换使用simbot的log
      use-simbot-bot-log: true
      # mirai 网络log 切换使用simbot的log
      use-simbot-network-log: true
      # mirai配置自定义deviceInfoSeed的时候使用的随机种子。默认为1.
      device-info-seed: 1
      # mirai图片缓存策略,为枚举 love.forte.simbot.component.mirai.configuration.MiraiCacheType 的元素值,
      # 可选为 FILE、 MEMORY
      cache-type: MEMORY
      # 如果配置项 simbot.mirai.cacheType 的值为 FILE,此处为缓存文件的保存目录。为空时默认为系统临时文件夹。
      cache-directory:
      # 登录验证码处理器,当登录需要输入验证码的时候可能会用到。
      login-solver-type: DEFAULT
      # 如果不为空,此处代表指定一个 deviceInfo 的 json文件路径。
      dispatcher:
        # mirai组件中,对事件进行调度的线程池参数:最大线程数。
        core-pool-size: 8
        # mirai组件中,对事件进行调度的线程池参数:最大线程数。
        maximum-pool-size: 8
        # mirai组件中,对事件进行调度的线程池参数:线程存活时间(毫秒)
        keep-alive-time: 1000
实体
package com.ph.robot.entity;

import lombok.AllArgsConstructor;
import lombok.Builder;
import lombok.Data;
import lombok.NoArgsConstructor;

import java.util.List;

/**
 * @author ph
 * @description 实体
 * @since 2022/11/15 10:15
 */
@Data
@Builder
@NoArgsConstructor
@AllArgsConstructor
public class LoveChatDTO {
    private String female;
    private List<String> male;

}
事件监听类
package com.ph.robot.listener;

import com.alibaba.fastjson.JSONObject;
import com.ph.robot.util.HttpUtil;
import lombok.extern.slf4j.Slf4j;
import love.forte.simbot.annotation.OnGroup;
import love.forte.simbot.annotation.OnPrivate;
import love.forte.simbot.api.message.Reply;
import love.forte.simbot.api.message.ReplyAble;
import love.forte.simbot.api.message.events.GroupMsg;
import love.forte.simbot.api.message.events.MessageGet;
import love.forte.simbot.api.message.events.PrivateMsg;
import love.forte.simbot.api.sender.MsgSender;
import org.springframework.stereotype.Component;
import org.springframework.util.StringUtils;

/**
 * @author ph
 * @description 机器人监听
 * @since 2022/11/15 10:15
 */
@Component
@Slf4j
public class MessageListener {
    //青云客url
    static final String URLqyk = "http://api.qingyunke.com/api.php";
    //舔狗日记url
    static final String URLtgrj = "https://v.api.aa1.cn/api/tiangou/index.php";

    /**
     * 监听私聊消息
     */
    @OnPrivate
    public void privateMsg(PrivateMsg privateMsg, MsgSender sender) {
        // 智能聊天
        sendMsg(privateMsg, sender, false);
    }


    /**
     * 监听群消息
     */
    @OnGroup
    public ReplyAble groupMsg(GroupMsg groupMsg, MsgSender sender) {
        // 默认关闭群聊模式,需要的话把注释去掉
        return sendMsg(groupMsg, sender, true);

    }
    /**
     * 封装智能聊天
     *
     * @param commonMsg commonMsg
     * @param sender    sender
     */
    private ReplyAble sendMsg(MessageGet commonMsg, MsgSender sender, boolean group) {
        log.info("智能聊天中~~~,接收消息:qq={}, msg={}", commonMsg.getAccountInfo().getAccountCode(),
                commonMsg.getMsgContent().getMsg());
        // MsgSender中存在三大送信器,以及非常多的重载方法。
        // 通过get请求调用聊天接口
        // 判断msg是否为#舔狗日记,否则进入青云客智能回复。
        if(commonMsg.getMsgContent().getMsg().equals("#舔狗日记")){
            String result = HttpUtil.get(URLtgrj).toString();
            JSONObject json = JSONObject.parseObject(result);
            String msg = json.getJSONArray("newslist").getJSONObject(0).getString("content");
            log.info("智能聊天中~~~,发送消息:qq={}, msg={}", commonMsg.getAccountInfo().getAccountCode(), msg);
            //发送群消息
            if (group) {
                // 参数1:回复的消息 参数2:是否at当事人
                return Reply.reply(msg, false);
            }
            //发送私聊消息
            sender.SENDER.sendPrivateMsg(commonMsg, msg);
        }else {
            String result = HttpUtil.get(URLqyk.concat("?key=free&appid=0&msg=").concat(commonMsg.getMsgContent().getMsg().replaceAll(" ", "")));
            //@机器人,机器人才回复
            if (!StringUtils.isEmpty(result)&&commonMsg.getMsgContent().getMsg().contains("CAT:at,code=2033332031")) {
                JSONObject json = JSONObject.parseObject(result);
                if (json.getInteger("result") == 0 && !StringUtils.isEmpty(json.getString("content"))) {
                    String msg = json.getString("content").replaceAll("
", "\n");
                    log.info("智能聊天中~~~,发送消息:qq={}, msg={}", commonMsg.getAccountInfo().getAccountCode(), msg);
                    //发送群消息
                    if (group) {
                        // 参数1:回复的消息 参数2:是否at当事人
                        return Reply.reply(msg, true);
                    }
                    //发送私聊消息
                    sender.SENDER.sendPrivateMsg(commonMsg, msg);
                }
            }

        }
        return null;
    }


}
http工具类
package com.ph.robot.util;

import org.apache.http.HttpEntity;
import org.apache.http.HttpResponse;
import org.apache.http.client.config.RequestConfig;
import org.apache.http.client.methods.CloseableHttpResponse;
import org.apache.http.client.methods.HttpGet;
import org.apache.http.client.methods.HttpPost;
import org.apache.http.entity.StringEntity;
import org.apache.http.impl.client.CloseableHttpClient;
import org.apache.http.impl.client.HttpClients;
import org.apache.http.impl.conn.PoolingHttpClientConnectionManager;
import org.apache.http.util.EntityUtils;

import java.io.BufferedReader;
import java.io.IOException;
import java.io.InputStreamReader;

/**
 * @author ph
 * @description http工具类
 * @since 2022/11/15 12:11
 */
public class HttpUtil {
    private static final CloseableHttpClient HTTP_CLIENT;

    static {
        PoolingHttpClientConnectionManager cm = new PoolingHttpClientConnectionManager();
        cm.setMaxTotal(100);
        cm.setDefaultMaxPerRoute(20);
        cm.setDefaultMaxPerRoute(50);
        HTTP_CLIENT = HttpClients.custom().setConnectionManager(cm).build();
    }

    public static String get(String url) {
        CloseableHttpResponse response = null;
        BufferedReader in;
        String result = "";
        try {
            HttpGet httpGet = new HttpGet(url);
            RequestConfig requestConfig = RequestConfig.custom().setConnectTimeout(30000).setConnectionRequestTimeout(30000).setSocketTimeout(30000).build();
            httpGet.setConfig(requestConfig);
            httpGet.setConfig(requestConfig);
            httpGet.addHeader("Content-type", "application/json; charset=utf-8");
            httpGet.setHeader("Accept", "application/json");
            response = HTTP_CLIENT.execute(httpGet);
            in = new BufferedReader(new InputStreamReader(response.getEntity().getContent()));
            StringBuilder sb = new StringBuilder("");
            String line;
            String nL = System.getProperty("line.separator");
            while ((line = in.readLine()) != null) {
                sb.append(line).append(nL);
            }
            in.close();
            result = sb.toString();
        } catch (IOException e) {
            e.printStackTrace();
        } finally {
            try {
                if (null != response) {
                    response.close();
                }
            } catch (IOException e) {
                e.printStackTrace();
            }
        }
        return result;
    }

    public static String post(String url, String jsonString) {
        HttpPost httpPost = new HttpPost(url);
        CloseableHttpClient client = HttpClients.createDefault();
        //解决中文乱码问题
        StringEntity entity = new StringEntity(jsonString, "utf-8");
        entity.setContentEncoding("utf-8");
        entity.setContentType("application/json");
        httpPost.setEntity(entity);
        HttpResponse response;
        try {
            response = client.execute(httpPost);
            if(response.getStatusLine().getStatusCode() == 200){
                HttpEntity httpEntity = response.getEntity();
                return EntityUtils.toString(httpEntity, "utf-8");
            }
        } catch (IOException e) {
            e.printStackTrace();
        }
        return null;

    }

}
启动类
package com.ph.robot;

import lombok.extern.slf4j.Slf4j;
import love.forte.simbot.spring.autoconfigure.EnableSimbot;
import org.springframework.boot.SpringApplication;
import org.springframework.boot.autoconfigure.SpringBootApplication;
import org.springframework.boot.autoconfigure.jdbc.DataSourceAutoConfiguration;
import org.springframework.scheduling.annotation.EnableScheduling;

/**
 * @author ph
 * @description main
 * @since 2022/09/15 12:13
 */
@EnableSimbot
@EnableScheduling
@SpringBootApplication(exclude = {DataSourceAutoConfiguration.class})
@Slf4j
public class RobotApplication {

    public static void main(String[] args) {
        SpringApplication.run(RobotApplication.class, args);
        log.info("机器人启动成功!");
    }
}
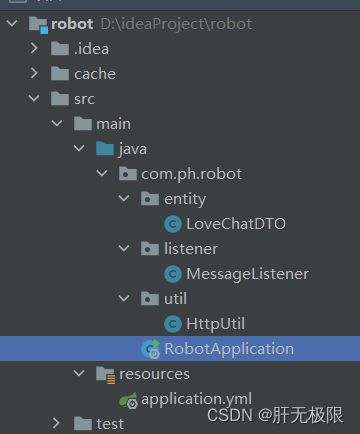
目录结构
现在项目就可以正常启动了
首次启动项目可能会需要一些设备验证和滑块验证,不用紧张,mriai帮我们都做好了!
通过控制台给我们的链接就可以进入验证页面,按F12进入调试模式,在网络里可以得到qq验证成功给的ticket,将ticket输入控制台就可以完成验证。
如果遇到启动失败,qq版本过低bug请转隔壁
mriai启动发现qq版本过低问题
源码链接QQ智能机器人
如有问题,欢迎在评论区讨论。
要是喜欢的话帮忙点个赞再走吧!(●’◡’●)
