03_Linux ARM架构-安装elasticsearch 7.16-银河麒麟V10操作系统
本文章收录于【国产银河服务器安装文档集】,将详细的讲解 国产银河服务器操作系统各种软件的部署与说明。
本文使用的操作系统:银河麒麟V10 鲲鹏版
官网开源软件兼容版本:
https://ic-openlabs.huawei.com/openlab/#/unioncompaty
RPM 地址:
http://update.cs2c.com.cn:8080/NS/V10/V10SP2/os/adv/lic/base/aarch64/Packages/
ps:推荐先从官网开源软件兼容版本里面下载对应的安装包,如果选择rpm方式的话请一定要选择自己对应版本的包。
一、下载安装包
下载地址:https://ic-openlabs.huawei.com/openlab/#/unioncompaty
由于银河麒麟V10操作系统刚出来,还在试用运行中,各种软件的兼容不是非常好,若是在该页面能够找到自己对应的操作系统版本就选择该版本,若是不能找到则去对应的官网当中下载linux-aarch64的安装包。
本文使用的是银河麒麟V10 鲲鹏版(Kylin Linux Advanced Server V10 (Tercel)),在操作系统筛选栏中未找到对应的系统,故选择直接去es 官网下载linux-aarch64类型的安装包elasticsearch-7.16.0-linux-aarch64.tar.gz、kibana-7.16.0-linux-aarch64.tar.gz。
elasticsearch 官网下载地址:
https://www.elastic.co/cn/downloads/past-releases/elasticsearch-7-16-0
kibana 官网下载地址:
https://www.elastic.co/cn/downloads/past-releases/kibana-7-16-0
下载好之后把安装包通过xftp或者scp的方式放到服务器相应的文件夹中
二、进行elasticsearch 7.16.0 安装部署
安装路径:/usr/local/geoStar/
1、解压安装包
tar -zxvf elasticsearch-7.16.0-linux-x86_64.tar.gz2、创建es 账号
useradd es3、改变文件夹的归属
chown -R es:es /usr/local/geoStar/elasticsearch-7.16.04、先简单验证是否能够启动
前台方式启动es
#切换到es账户
su es
#进入es文件夹
cd /usr/local/geoStar/elasticsearch-7.16.0
#前台方式启动es
bin/elasticsearch
由于兼容性不是很好,启动的时候会比CentOS 7.6操作系统慢,耐心等待即可。
启动报错,控制台输出报错日志:ElasticsearchException[X-Pack is not supported and Machine Learning is not available for [linux-aarch64]; you can use the other X-Pack features (unsupported) by setting xpack.ml.enabled: false in elasticsearch.yml]
org.elasticsearch.bootstrap.StartupException: ElasticsearchException[X-Pack is not supported and Machine Learning is not available for [linux-aarch64]; you can use the other X-Pack features (unsupported) by setting xpack.ml.enabled: false in elasticsearch.yml]
  at org.elasticsearch.bootstrap.Elasticsearch.init(Elasticsearch.java:174) ~[elasticsearch-7.6.1.jar:7.6.1]
  at org.elasticsearch.bootstrap.Elasticsearch.execute(Elasticsearch.java:161) ~[elasticsearch-7.6.1.jar:7.6.1]
  at org.elasticsearch.cli.EnvironmentAwareCommand.execute(EnvironmentAwareCommand.java:86) ~[elasticsearch-7.6.1.jar:7.6.1]
  at org.elasticsearch.cli.Command.mainWithoutErrorHandling(Command.java:125) ~[elasticsearch-cli-7.6.1.jar:7.6.1]
  at org.elasticsearch.cli.Command.main(Command.java:90) ~[elasticsearch-cli-7.6.1.jar:7.6.1]
  at org.elasticsearch.bootstrap.Elasticsearch.main(Elasticsearch.java:126) ~[elasticsearch-7.6.1.jar:7.6.1]
at org.elasticsearch.bootstrap.Elasticsearch.main(Elasticsearch.java:92) ~[elasticsearch-7.6.1.jar:7.6.1]错误日志也说的比较清楚,由于有些X-Pack特性不支持,故需要修改配置文件elasticsearch.yml
vi config/elasticsearch.yml在elasticsearch.yml 文件最后面添加配置
#设置为false以禁用X-Pack机器学习功能。
xpack.ml.enabled: false
然后重新启动,当看到如下提示则说明启动ok,若是出现 exception during geoip databases update 错误,请参考文末的5.5章节(部署时可能出现的错误解决方法)。

新开一个xshell连接,本地验证是否启动成功
curl 'http://127.0.0.1:9200'出现如下画面则说明简单验证elasticsearch 启动成功,说明该版本的安装包是可以运行的。

5、正式部署elsaticsearch
如果服务器配置了弹性IP ,需要拿到本服务器的内网ip,不然会启动不起来,访问的话照样是可以用弹性ip进行访问。
(1)获取本服务器内网ip地址
使用ifconfig 命令查看ip地址时,首先要确保登陆用户为root,因为ifconfig在etc目录下
su root
ifconfig
(2)elasticsearch.yml 配置文件增加配置
完整的配置如下
cluster.name: nanshanPre
node.name: es01
node.master: true
node.data: true
path.data: /usr/local/geoStar/elasticsearch-7.16.0/data
path.logs: /usr/local/geoStar/elasticsearch-7.16.0/logs
bootstrap.memory_lock: false
bootstrap.system_call_filter: false
network.host: 192.168.10.70
http.port: 9200
#设置节点间交互的tcp端口,默认是9300。
transport.tcp.port: 9300
discovery.seed_hosts: ["192.168.10.70:9300","192.168.10.187:9200"]
cluster.initial_master_nodes: es01
action.destructive_requires_name: true
## 开启跨域访问(配置文件末尾添加即可)
http.cors.enabled: true
http.cors.allow-origin: "*"
#设置为false以禁用X-Pack机器学习功能。
xpack.ml.enabled: false
#此版本将GeoIp功能默认开启了采集。在默认的启动下是会去官网的默认地址下获取最新的Ip的GEO信息,若是不需要则要设置为false
ingest.geoip.downloader.enabled: false
(3)启动es主节点
成功如下图
#前台启动的方式
bin/elasticsearch
#后台启动方式(推荐使用)
bin/elasticsearch -d
(4)部署其他节点
其他节点和主节点的部署步骤是一样的,只是需要把elasticsearch.yml 配置文件的节点名称、IP地址等信息修改一下,在这里我就不一一叙述。以下是第二个节点的配置文件
cluster.name: nanshanPre
node.name: es02
node.master: true
node.data: true
path.data: /usr/local/geoStar/elasticsearch-7.16.0/data
path.logs: /usr/local/geoStar/elasticsearch-7.16.0/logs
bootstrap.memory_lock: false
bootstrap.system_call_filter: false
network.host: 192.168.10.187
http.port: 9200
#设置节点间交互的tcp端口,默认是9300。
transport.tcp.port: 9300
discovery.seed_hosts: ["192.168.10.70:9300","192.168.10.187:9200"]
cluster.initial_master_nodes: es01
action.destructive_requires_name: true
### 开启跨域访问(配置文件末尾添加即可)
http.cors.enabled: true
http.cors.allow-origin: "*"
##设置为false以禁用X-Pack机器学习功能。
xpack.ml.enabled: false
##此版本将GeoIp功能默认开启了采集。在默认的启动下是会去官网的默认地址下获取最新的Ip的GEO信息,若是不需要则要设置为false
ingest.geoip.downloader.enabled: false
(5)部署时可能出现的错误解决方法
a、最大虚拟内存面积vm不足
[1]: max virtual memory areas vm.max_map_count [65530] is too low, increase to at least [262144]
[2021-11-14T13:36:28,468][INFO ][o.e.b.BootstrapChecks    ] [node-1] bound or publishing to a non-loopback address, enforcing bootstrap checks
[2021-11-14T13:36:28,473][ERROR][o.e.b.Bootstrap          ] [node-1] node validation exception
[1] bootstrap checks failed
[1]: max virtual memory areas vm.max_map_count [65530] is too low, increase to at least [262144]
解决方法:
需要切换到root用户修改配置。修改/etc/security/limits.conf 文件
vi /etc/security/limits.conf添加内容如下所示。
* soft nofile 65536
* hard nofile 131072
* soft nproc 4096
* hard nproc 4096
修改 /etc/sysctl.conf 文件。增加
vm.max_map_count=262145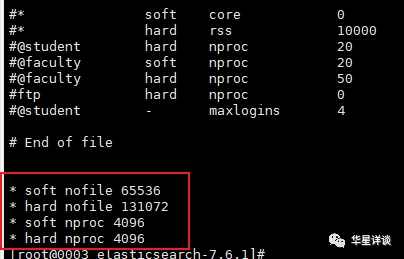
修改完成使用命令:sysctl -p 刷新使用
b、配置文件ip地址写的不对
org.elasticsearch.bootstrap.StartupException: BindTransportException[Failed to bind to [9300]]; nested: BindException[无法指定被请求的地址];
org.elasticsearch.bootstrap.StartupException: BindTransportException[Failed to bind to [9300]]; nested: BindException[无法指定被请求的地址];
  at org.elasticsearch.bootstrap.Elasticsearch.init(Elasticsearch.java:174) ~[elasticsearch-7.6.1.jar:7.6.1]
  at org.elasticsearch.bootstrap.Elasticsearch.execute(Elasticsearch.java:161) ~[elasticsearch-7.6.1.jar:7.6.1]
  at org.elasticsearch.cli.EnvironmentAwareCommand.execute(EnvironmentAwareCommand.java:86) ~[elasticsearch-7.6.1.jar:7.6.1]
  at org.elasticsearch.cli.Command.mainWithoutErrorHandling(Command.java:125) ~[elasticsearch-cli-7.6.1.jar:7.6.1]
  at org.elasticsearch.cli.Command.main(Command.java:90) ~[elasticsearch-cli-7.6.1.jar:7.6.1]
  at org.elasticsearch.bootstrap.Elasticsearch.main(Elasticsearch.java:126) ~[elasticsearch-7.6.1.jar:7.6.1]
  at org.elasticsearch.bootstrap.Elasticsearch.main(Elasticsearch.java:92) ~[elasticsearch-7.6.1.jar:7.6.1]
BindTransportException[Failed to bind to [9300]]; nested: BindException[无法指定被请求的地址];
Likely root cause: java.net.BindException: 无法指定被请求的地址
  at sun.nio.ch.Net.bind0(Native Method)
  at sun.nio.ch.Net.bind(Net.java:433)
  at sun.nio.ch.Net.bind(Net.java:425)
  at sun.nio.ch.ServerSocketChannelImpl.bind(ServerSocketChannelImpl.java:223)
  at io.netty.channel.socket.nio.NioServerSocketChannel.doBind(NioServerSocketChannel.java:134)
  at io.netty.channel.AbstractChannel$AbstractUnsafe.bind(AbstractChannel.java:551)
  at io.netty.channel.DefaultChannelPipeline$HeadContext.bind(DefaultChannelPipeline.java:1346)
  at io.netty.channel.AbstractChannelHandlerContext.invokeBind(AbstractChannelHandlerContext.java:503)
  at io.netty.channel.AbstractChannelHandlerContext.bind(AbstractChannelHandlerContext.java:488)
  at io.netty.channel.DefaultChannelPipeline.bind(DefaultChannelPipeline.java:985)
  at io.netty.channel.AbstractChannel.bind(AbstractChannel.java:247)
  at io.netty.bootstrap.AbstractBootstrap$2.run(AbstractBootstrap.java:344)
  at io.netty.util.concurrent.AbstractEventExecutor.safeExecute(AbstractEventExecutor.java:163)
  at io.netty.util.concurrent.SingleThreadEventExecutor.runAllTasks(SingleThreadEventExecutor.java:510)
  at io.netty.channel.nio.NioEventLoop.run(NioEventLoop.java:518)
  at io.netty.util.concurrent.SingleThreadEventExecutor$6.run(SingleThreadEventExecutor.java:1050)
  at io.netty.util.internal.ThreadExecutorMap$2.run(ThreadExecutorMap.java:74)
at java.lang.Thread.run(Thread.java:748)解决办法:使用ifconfig 查看本机内网ip,替换到写错的ip
c、exception during geoip databases update 错误
7.16.0版本将GeoIp功能默认开启了采集。在默认的启动下是会去官网的默认地址下获取最新的Ip的GEO信息,若是不需要则要设置为false
#此版本将GeoIp功能默认开启了采集。在默认的启动下是会去官网的默认地址下获取最新的Ip的GEO信息,若是不需要则要设置为false
ingest.geoip.downloader.enabled: false
6、X-Pack 安全配置
X-Pack 安全配置和之前设置的方式是一样的,在这里我就不一一叙述了。请参考以下文章中关于X-Paxk安全配置的内容。
《06_Elasticsearch 7.4.2集群部署以及X-Pack 安全配置(Es、kibana)【超详细版】》
7、其他可选配置项
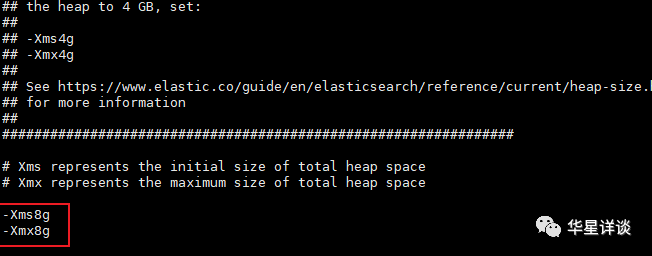
(1)修改 JVM 参数
注意点:
-
机器内存可能不够,就需要修改 JVM 参数,配置文件路径为 config/jvm.options,ES V7.1 版本之后默认为 1g, 老版本为2g,可自行修改。
-
Xmx 和Xms 数值请设置相同;
-
Xmx 不要超过机器内存的 50%;
-
内存总量不要超过 30GB,
参见官方文档 https://www.elastic.co/cn/blog/a-heap-of-trouble;
< END >
本文章收录于【国产银河服务器安装文档集】,将详细的讲解 国产银河服务器操作系统各种软件的部署与说明。