国产麒麟系统KylinOS Server V10 SP2安装MySQL 8.0.28—二进制包安装
上一篇文档讲述了在国产麒麟系统KylinOS V10 SP2上以源码编译方式安装MySQL 8.0.28。
此篇文档是第三篇:使用MySQL官方预编译二进制包方式安装。
一: 操作系统环境检查
1.1 首先确认操作系统版本是KylinOS Server V10 SP2
麒麟操作系统Kylinos Server V10 SP2使用的安装介质是
Kylin-Server-10-SP2-x86-Release-Build09-20210524.iso,执行以下命令查看版本:
cat /etc/kylin-releasecat /proc/version1.2 检查系统是否自带MySQL或MariaDB
通过以下命令检查是否安装:
rpm -qa | grep mariadb如果系统已经安装了其它版本的MySQL或者MariaDB则要将其删除,执行以下命令删除:
rpm -e {mariadb-server,mariadb,mariadb-errmessage,mariadb-common}1.3 安装mysql运行所必须的依赖包
mysql 8.0运行依赖如下包,执行以下命令安装:
yum install -y perl-Data-Dumper libaio libaio-devel
yum install -y ncurses ncurses-devel ncurses-base ncurses-libs
yum install -y openssl openssl-devel openssl-libs
yum install -y bzip2 bzip2-devel
yum install -y libtirpc libtirpc-devel
yum install -y readline readline-devel
二:准备MySQL安装包
此文档安装社区版MySQL 8.0.28,此版本可与Kylinos V10 SP2兼容。
2.1 下载MySQL安装包
打开MySQL官网下载页面,选择正确的筛选条件
https://dev.mysql.com/downloads/mysql/
- Select Operating System 选择Linux-Generic,
- Select OS Version 中有两选择,第一个是选择glibc2.12(X86_64),第二个是选择glibc2.17(X86_64),二者区别我们放在文章最后讲述。
此处我们选择glibc_2.17(X86_64)版本:
2.2 上传MySQL二进制包
将MySQL 8.0.28的二进制包上传到/root/Documents目录并解压,解压后将所得目录移动到/usr/local目录下。
cd /root/Documents
tar xvf mysql-8.0.28-linux-glibc2.17-x86_64-minimal.tar.xz
mv mysql-8.0.28-linux-glibc2.17-x86_64-minimal  /usr/local/mysql-8.0.28
三:配置启动MySQL
4.1 创建mysql用户
groupadd mysql
useradd -M -g mysql -s /sbin/nologin mysql
4.2 创建数据目录
mkdir /data/mysql/{data,log,redo,undo,arch} -p
chown mysql.mysql /data -R
4.3 创建mysql环境变量
创建mysql目录软连接
ln -s /usr/local/mysql-8.0.28  /usr/local/mysql
chown mysql.mysql mysql-8.0.28 -R
创建mysql环境变量配置文件
echo 'MYSQL_HOME=/usr/local/mysql' >>  /etc/profile.d/mysql.sh
echo 'PATH=$PATH:$MYSQL_HOME/bin' >>  /etc/profile.d/mysql.sh
echo 'export PATH' >>  /etc/profile.d/mysql.sh
source  /etc/profile.d/mysql.sh
4.4 创建my.cnf配置文件
编辑/etc/my.cnf文件
vim /etc/my.cnf输入以下内容到/etc/my.cnf中,此配置将data、redolog、undo、binlog分别置于独立目录。
[mysql]
socket=/data/mysql/data/mysqld.sock
[mysqld]
###base config###
server-id=210
basedir=/usr/local/mysql
datadir=/data/mysql/data
socket=/data/mysql/data/mysqld.sock
pid-file=/data/mysql/data/mysqld.pid
log-error=/data/mysql/log/mysqld.log
###query config###
join_buffer_size = 128M
sort_buffer_size = 16M
read_buffer_size = 16M
read_rnd_buffer_size = 8M
###open table config###
table_open_cache=2000
table_open_cache_instances=16
###connection config###
max_connections=2000
thread_cache_size=200
###binlog config###
log_bin=/data/mysql/log/binlog
log_bin_index=/data/mysql/log/binlog.index
binlog_format=ROW
max_binlog_size=1G
binlog_cache_size=16M
binlog_expire_logs_seconds=604800
enforce_gtid_consistency=ON
gtid_mode=ON
###general log config###
general_log=OFF
general_log_file=/data/mysql/log/mysqld.gnl
###slow query config###
log_output=FILE
long_query_time=1
slow_query_log=ON
slow_query_log_file=/data/mysql/log/mysqld.slow
###innodb redo log config###
innodb_log_file_size=1G
innodb_log_files_in_group=3
innodb_log_buffer_size=16M
innodb_log_group_home_dir=/data/mysql/redo
innodb_redo_log_archive_dirs=/data/mysql/arch
###innodb undo log config###
#innodb_max_undo_log_size=1G
#innodb_undo_tablespaces=2
innodb_undo_directory=/data/mysql/undo
###innodb config###
#innodb_data_file_path=ibdata1:12M:autoextend
#innodb_temp_data_file_path=ibtmp1:12M:autoextend
#innodb_temp_tablespaces_dir=./#innodb_temp/
#innodb_autoextend_increment=64
innodb_buffer_pool_size=8G
innodb_open_files=10000
open_files_limit=10000
4.5 初始化mysql
mysqld --defaults-file=/etc/my.cnf --initialize --user=mysql4.6 配置systemctl mysqld服务
vim /usr/lib/systemd/system/mysqld.service输入如下内容:
[Unit]
Description=MySQL Server
Documentation=man:mysqld(8)
Documentation=http://dev.mysql.com/doc/refman/en/using-systemd.html
After=network.target
After=syslog.target
[Install]
WantedBy=multi-user.target
[Service]
User=mysql
Group=mysql
Type=notify
# Disable service start and stop timeout logic of systemd for mysqld service.
TimeoutSec=0
# Execute pre and post scripts as root
PermissionsStartOnly=true
# Start main service
ExecStart=/usr/local/mysql/bin/mysqld $MYSQLD_OPTS
# Use this to switch malloc implementation
EnvironmentFile=-/etc/sysconfig/mysql
# Sets open_files_limit
LimitNOFILE = 10000
Restart=on-failure
RestartPreventExitStatus=1
# Set enviroment variable MYSQLD_PARENT_PID. This is required for restart.
Environment=MYSQLD_PARENT_PID=1
PrivateTmp=false
vim /usr/lib/systemd/system/[email protected]输入如下内容:
[Unit]
Description=MySQL Server
Documentation=man:mysqld(8)
Documentation=http://dev.mysql.com/doc/refman/en/using-systemd.html
After=network.target
After=syslog.target
[Install]
WantedBy=multi-user.target
[Service]
User=mysql
Group=mysql
Type=notify
# Disable service start and stop timeout logic of systemd for mysqld service.
TimeoutSec=0
# Execute pre and post scripts as root
PermissionsStartOnly=true
# Start main service
ExecStart=/usr/local/mysql/bin/mysqld --defaults-group-suffix=@%I $MYSQLD_OPTS
# Use this to switch malloc implementation
EnvironmentFile=-/etc/sysconfig/mysql
# Sets open_files_limit
LimitNOFILE = 10000
Restart=on-failure
RestartPreventExitStatus=1
# Set enviroment variable MYSQLD_PARENT_PID. This is required for restart.
Environment=MYSQLD_PARENT_PID=1
PrivateTmp=false
4.7 启用mysqld服务
配置并初始化完成后MySQL服务默认并未启动,可以通过以下命令启动:
systemctl enable mysqld启动mysql服务
systemctl start mysqld查看mysqld服务状态:
systemctl status mysqld4.7 首次登录mysql
在MySQL初始化(initialize)完成后会自动为MySQL的root用户生成一个随机初始化密码,并在MySQL的errorlog文件中记录下来,我们要找到它并用它登录MySQL,修改root用户密码后才能执行任何其它操作:
- 找到初始化密码
grep password /data/mysql/log/mysqld.log下图绿色方框中即为初始化密码
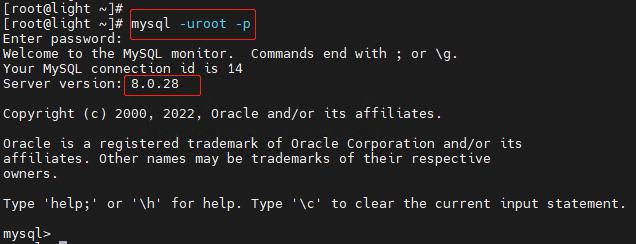
- 使用上面的初始化密码登录MySQL
mysql -uroot -p- 修改root密码
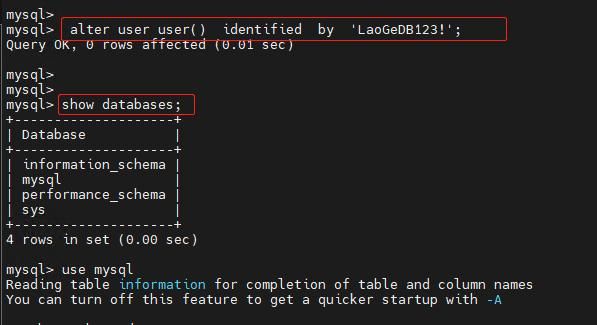
使用初始化密码登录MySQL后只能执行修改密码的操作,其它任何操作是不能执行的,使用以下命令修改密码:
mysql> alter user user() identified by 'LaoGeDB123!';密码修改成功后,执行以下命令查看MySQL基本信息:
mysql>status一切正常,至此安装完成。
补充说明
- mysql-8.0.28-linux-glibc2.17-x86_64-minimal.tar.xz与mysql-8.0.28-linux-glibc2.12-x86_64.tar.xz两个版本的区别:
- mysql-8.0.28-linux-glibc2.17-x86_64-minimal.tar.xz是最小化编译二进制版本,其中不包括一系列debug所用到的mysqld_debug可执行文件,并且mysqld也不是静态编译,而是动态链接库方式编译的,所以它的体积更小,但需要操作系统中有其运行所需要的2.17的动态链接库。
- mysql-8.0.28-linux-glibc2.12-x86_64.tar.xz是完整编译的二进制版本,其中包括debug所需的mysqld_debug可执行文件,并且mysqld是静态编译,而非动态链接库方式编译的,所以它的体积更大,但不需要操作系统提供动态链接库即可运行。
之所以选择glibc2.17版本,是因为此本体积更小巧。
centos7以及之后的操作系统一般都同时支持了glibc2.12与glibc2.17,甚至到centos8系列已经可以支持到glibc2.28,比如我们用的麒麟服务器版V10 SP2就提供了最低2.2.5到最高2.28各个版本的支持。
- 查看系统支持的GLIBC库列表,可以执行如下命令:
strings /usr/lib64/libc.so.6 | grep GLIBC- 查看系统当前运行的GLIBC版本,可以执行如下命令:
ldd --version作者:老哥讲数据库
简介:数据库高级架构师 | Oracle 11g&12c OCM认证 | MySQL 5.7&8.0 OCP认证
原创文章,转载请注明来源。


