git、github、gitlab基础
文章目录
- git 简介
-
- git 的前世今生
- 集中式vs分布式
- Git 安装
- 初始化配置 git config
- Git 初始化配置
- 创建仓库
- 初始化仓库 git init
- 工作区和暂存区
- 添加到暂存区 git add
- 添加到本地仓库 git commit
- 检查当前文件状态 git status
- 版本回退
-
- 撤回工作区中的修改 : git checkout --filename
- 撤回暂存区的修改 : git reset HEAD filename
- 删除和移动文件
-
- 使用频率最高的五个命令
- 分支
-
- git分支命令
- 默认分支
- 创建分支
- 切换分支
- 分支合并
- 删除分支
- bug分支
- 团队协作
- 公有仓库GitHab
-
- 注册登录
- 修改个人信息
- 创建 GitHub 仓库
- 利用 SSH 完成 Git 与 GitHub 的绑定
- 向远程仓库提交代码
- 把远程的代码拉到本地 git clone
- 查看远程分支的提交历史
- 删除远程分支
- 关联多个远程库
- 私有仓库 GitLab
-
- gitlab架构
- gitlab 相关目录
- 常用命令
- 安装
- 关闭账号注册
- 邮件通知设置
- 创建git 账户
- 创建组
- 创建项目/提交下载
- 配置GitLab中的SSH key
- 备份与恢复
Github:基于git的一个公有代码仓库,借助git来管理项目代码
Gitlab:基于git的一个私有代码仓库。
Git是版本控制软件
git 简介
git是一个开源的分布式版本控制系统,用于高效的管理各种大小项目和文件。
代码管理工具的用途:防止代码丢失,做备份。项目的版本管理和控制,可以通过设置节点进行跳转。建立各自的开发环境分支,互不影响,方便合并。在多终端开发时,方便代码的相互传输
版本控制系统:
版本控制是一种记录一个或若干文件内容变化,以便将来查阅特定版本修订情况的系统。有了它你就可以将某个文件回溯到之前的状态,甚至将整个项目都回退到过去某个时间点的状态。
如果你用Microsoft Word写过长篇大论,那你一定有这样的经历:想删除一个段落,又怕将来想恢复找不回来怎么办?有办法,先把当前文件“另存为……”一个新的Word文件,再接着改,改到一定程度,再“另存为……”一个新文件,这样一直改下去,最后你的Word文档变成了这样:
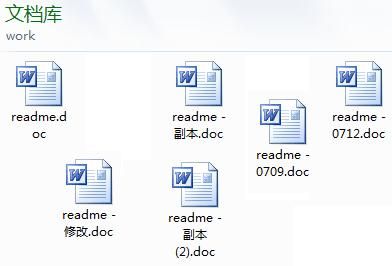
过了一周,你想找回被删除的文字,但是已经记不清删除前保存在哪个文件里了,只好一个一个文件去找,看着一堆乱七八糟的文件,想保留最新的一个,然后把其他的删掉,又怕哪天会用上,还不敢删。更要命的是,有些部分需要你的财务同事帮助填写,于是你把文件Copy到U盘里给她(也可能通过Email发送一份给她),然后,你继续修改Word文件。一天后,同事再把Word文件传给你,此时,你必须想想,发给她之后到你收到她的文件期间,你作了哪些改动,得把你的改动和她的部分合并,真困难。于是有一个软件,不但能自动帮我记录每次文件的改动,还可以让同事协作编辑,这样就不用自己管理一堆类似的文件了,也不需要把文件传来传去。如果想查看某次改动,只需要在软件里瞄一眼就可以,岂不是很方便?
首先这里再明确一下,所有的版本控制系统,其实只能跟踪文本文件的改动,比如TXT文件,网页,所有的程序代码等等,Git也不例外。版本控制系统可以告诉你每次的改动,比如在第5行加了一个单词“Linux”,在第8行删了一个单词“Windows”。而图片、视频这些二进制文件,虽然也能由版本控制系统管理,但没法跟踪文件的变化,只能把二进制文件每次改动串起来,也就是只知道图片从100KB改成了120KB,但到底改了啥,版本控制系统不知道,也没法知道。
Microsoft的Word格式是二进制格式,因此,版本控制系统是没法跟踪Word文件的改动的,举的例子只是为了演示,如果要真正使用版本控制系统,就要以纯文本方式编写文件。因为文本是有编码的,比如中文有常用的GBK编码,如果没有历史遗留问题,强烈建议使用标准的UTF-8编码,所有语言使用同一种编码,既没有冲突,又被所有平台所支持。
| 版本 | 文件名 | 用户 | 说明 | 日期 |
|---|---|---|---|---|
| 1 | service.doc | 张三 | 删除了软件服务条款5 | 7/12 10:38 |
| 2 | service.doc | 张三 | 增加了License人数限制 | 7/12 18:09 |
| 3 | service.doc | 李四 | 财务部门调整了合同金额 | 7/13 9:51 |
| 4 | service.doc | 张三 | 延长了免费升级周期 | 7/14 15:17 |
git 的前世今生
Linus在1991年创建了开源的Linux,但Linux的壮大是靠全世界热心的志愿者参与的,在2002年以前,世界各地的志愿者把源代码文件通过diff的方式发给Linus,然后由Linus本人通过手工方式合并代码!Linus坚定地反对CVS和SVN,这些集中式的版本控制系统不但速度慢,而且必须联网才能使用。有一些商用的版本控制系统,虽然比CVS、SVN好用,但那是付费的,和Linux的开源精神不符。到了2002年,Linux系统已经发展了十年了,代码库之大让Linus很难继续通过手工方式管理了,社区的弟兄们也对这种方式表达了强烈不满,于是Linus选择了一个商业的版本控制系统BitKeeper,BitKeeper的东家BitMover公司出于人道主义精神,授权Linux社区免费使用这个版本控制系统。
Linux社区牛人聚集,不免沾染了一些梁山好汉的江湖习气。安定团结的大好局面在2005年就被打破了,原因是开发Samba的Andrew试图破解BitKeeper的协议(这么干的其实也不只他一个),被BitMover公司发现了(监控工作做得不错!),于是BitMover公司怒了,要收回Linux社区的免费使用权。Linus花了两周时间自己用C写了一个分布式版本控制系统,这就是Git!一个月之内,Linux系统的源码已经由Git管理了!牛!!!
Git迅速成为最流行的分布式版本控制系统,尤其是2008年,GitHub网站上线了,它为开源项目免费提供Git存储,无数开源项目开始迁移至GitHub,包括jQuery,PHP,Ruby等等。
集中式vs分布式
集中式版本控制系统:版本库是集中存放在中央服务器的,干活的时候,用的都是自己的电脑,所以要先从中央服务器取得最新的版本,然后开始干活,干完活了,再把自己的活推送给中央服务器。中央服务器就好比是一个图书馆,你要改一本书,必须先从图书馆借出来,然后回到家自己改,改完了,再放回图书馆。而且集中式版本控制系统是必须联网才能工作。如果在局域网内还好,带宽够大,速度够快,可如果在互联网上,遇到网速慢的话,可能提交一个10M的文件就需要5分钟。
分布式版本控制系统,它就没有中央服务器的,每个人的电脑上都是一个完整的版本库,这样,你工作的时候,就不需要联网了,因为版本库就在你自己的电脑上。既然每个人电脑上都有一个完整的版本库,那多个人如何协作呢?比方说你在自己电脑上改了文件A,你的同事也在他的电脑上改了文件A,这时,你们俩之间只需把各自的修改推送给对方,就可以互相看到对方的修改了。和集中式版本控制系统相比,分布式版本控制系统的安全性要高很多,因为每个人电脑里都有完整的版本库,某一个人的电脑坏掉了不要紧,随便从其他人那里复制一个就可以了。而集中式版本控制系统的中央服务器要是出了问题,所有人都没法干活了。
在实际使用分布式版本控制系统的时候,其实很少在两人之间的电脑上推送版本库的修改,因为可能你们俩不在一个局域网内,两台电脑互相访问不了,也可能今天你的同事病了,他的电脑压根没有开机。因此,分布式版本控制系统通常也有一台充当“中央服务器”的电脑,但这个服务器的作用仅仅是用来方便“交换”大家的修改,没有它大家也一样干活,只是交换修改不方便而已。
Git 安装
在 Windows 上安装: https://git-scm.com/download/win

完成安装之后,就可以使用命令行的git工具(已经自带了 ssh 客户端)

当你点击 git bash Here菜单之后,可以看到一个终端窗口,在终端里面输入命令git --version,如果可以看到 git 的版本信息,则说明安装成功

初始化配置 git config
因为Git是分布式版本控制系统,所以每个机器都必须自报家门:你的名字和Email地址。每次 Git 提交时都会引用这两条信息,说明是谁提交了更新,所以会随更新内容一起被永久纳入历史记录。
注意git config命令的–global参数,用了这个参数,表示你这台机器上所有的Git仓库都会使用这个配置,当然也可以对某个仓库指定不同的用户名和Email地址
git config --global user.name "用户名"	#设置用户名,这里的用户并不是github上的用户
git config --global user.email "邮箱"	#设置邮箱地址
git config user.name					#查看用户名
git config user.email					#查看密码
git config --list						#检查已有的配置信息
git config --global --unset user.name	#删除配置信息
[root@localhost ~]# mkdir git_repository
[root@localhost ~]# cd git_repository/
[root@localhost git_repository]# git init
Initialized empty Git repository in /root/git_repository/.git/
[root@localhost git_repository]# git config user.name "zhangsan"
[root@localhost git_repository]# git config user.email "[email protected]"
[root@localhost git_repository]# ls -a
.  ..  .git
[root@localhost git_repository]# cat .git/config
	name = zhangsan
	email = [email protected]
[root@localhost git_repository]# ls -a /root/ | grep git		#设置local,只在当前路径下生效
[root@localhost git_repository]# git config user.name			#local只能在自己路径下看到设置的用户信息,在其它路径查看不到
zhangsan
[root@localhost git_repository]# cd /data/ && git config user.name

[root@localhost git_repository]# git config --global user.name "zhangsan"		#设置global,全局生效
[root@localhost git_repository]# ls -a /root/ | grep git
.gitconfig
[root@localhost git_repository]# cd /data/
[root@localhost data]# git config user.name		#全局在任意路径都会生效
zhangsan

[root@localhost git_repository]# git config user.name "zhangsan"
[root@localhost git_repository]# git config --global user.name "lisi"
[root@localhost git_repository]# git config user.name		#本地优先级要高于global
zhangsan
Git 初始化配置
一般在新的系统上,我们都需要先配置下自己的 Git 工作环境。配置工作只需一次,以后升级时还会沿用现在的配置。
Git 提供了一个叫做 git config 的命令来配置或读取相应的工作环境变量,而正是由这些环境变量,决定了 Git 在各个环节的具体工作方式和行为。这些变量可以存放在以下三个不同的地方:
/etc/gitconfig 系统中对所有用户都普遍适用的配置
创建仓库
仓库又名版本库,英文名repository,可以简单的理解一个目录,这个目录里面的所有文件都可以被Git管理起来,每个文件的修改、删除、Git都能跟踪,以便任何时刻都可以追踪历史,或者在将来某个时刻还可以将文件”还原”。
创建一个版本库也非常简单,如下我是家目录下新建一个git_repository版本库,通过命令 git init 把这个目录变成git可以管理的仓库
[root@localhost ~]# mkdir git_repository
初始化仓库 git init
把这个目录变成Git可以管理的仓库,你可以简单理解成一个目录,这个目录里面的所有文件都可以被Git管理起来,每个文件的修改、删除,Git都能跟踪,以便任何时刻都可以追踪历史,或者在将来某个时刻可以“还原”。我们可以看到在当前目录下多了一个 .git 的目录,这个目录是Git来跟踪管理版本库的。没事千万不要手动修改这个目录里面的文件,不然改乱了,就把Git仓库给破坏了。
首先要明确下,所有的版本控制系统,只能跟踪文本文件的改动,比如txt文件,网页,所有程序的代码等,Git也不列外,版本控制系统可以告诉你每次的改动,但是图片,视频这些二进制文件,虽能也能由版本控制系统管理,但没法跟踪文件的变化,只能把二进制文件每次改动串起来,也就是知道图片从1kb变成2kb,但是到底改了啥,版本控制也不知道。
[root@localhost git_repository]# git init		#初始化仓库
Initialized empty Git repository in /data/git_repository/.git/
[root@localhost git_repository]# ls -a			#.git是隐藏文件
.  ..  .git
[root@localhost git_repository]# tree .git
.git
|-- branches
|-- config			#文件包含项目特有的配置选项
|-- description		#用来显示对仓库的描述信息
|-- HEAD			#文件指示目前被检出的分支
|-- hooks			#目录包含客户端或服务端的钩子脚本
|   |-- applypatch-msg.sample
|   |-- commit-msg.sample
|   |-- post-update.sample
|   |-- pre-applypatch.sample
|   |-- pre-commit.sample
|   |-- prepare-commit-msg.sample
|   |-- pre-push.sample
|   |-- pre-rebase.sample
|   `-- update.sample
|-- info			#包含一个全局性排除文件
|   `-- exclude
|-- objects			#目录存储所有数据内容
|   |-- info
|   `-- pack
`-- refs			#目录存储指向数据的提交对象的指针(分支)
    |-- heads
    `-- tags

9 directories, 13 files
工作区和暂存区
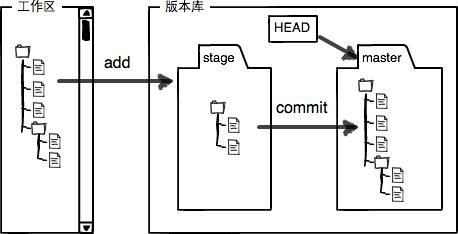
工作区:当前工作目录
版本库:工作区中的隐藏目录.git,是Git的版本库。Git的版本库里存了很多东西,其中最重要的就是称为stage(或者叫index)的暂存区,还有Git为我们自动创建的第一个分支master,以及指向master的一个指针叫HEAD。
Git提交文件到版本库有两步:
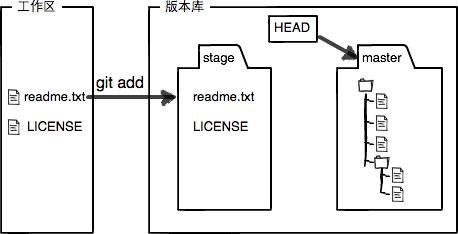
git add 实际上就是把文件修改添加到暂存区;第二步是用git commit 实际上就是把暂存区的所有内容提交到当前分支。因为我们创建Git版本库时,Git自动为我们创建了唯一一个master分支,所以 git commit 就是往master分支上提交更改。你可以简单理解为,需要提交的文件修改通通放到暂存区,然后,一次性提交暂存区的所有修改。
添加到暂存区 git add
使用命令git add 可以把文件添加到暂存区
[root@localhost git_repository]# echo "hello" > test.txt		#在工作区新增一个文本文件
[root@localhost git_repository]# git status			#新文件从来没有被添加过,所以它的状态是Untracked
# On branch master
# Untracked files:
#   (use "git add ..." to include in what will be committed)
#
#	test.txt
nothing added to commit but untracked files present (use "git add" to track)
[root@localhost git_repository]# git add test.txt	#把文件添加到暂存区
[root@localhost git_repository]# git status
# On branch master
# Changes to be committed:
#   (use "git reset HEAD ..." to unstage)
#
#	new file:   test.txt
#
现在,暂存区的状态就变成这样了:git add命令实际上就是把要提交的所有修改放到暂存区(Stage),然后执行git commit就可以一次性把暂存区的所有修改提交到分支。
添加到本地仓库 git commit
#把文件提交到仓库。-m后面输入的是本次提交的说明,可以输入任意内容,当然最好是有意义的,这样你就能从历史记录里方便地找到改动记录。
[root@localhost git_repository]# git commit -m "add 1 file"
[master a435384] add 1 file
 1 file changed, 1 insertion(+)
 create mode 100644 test.txt
[root@localhost git_repository]# git status		#一旦提交后,如果你又没有对工作区做任何修改,那么工作区就是“干净”的
# On branch master
nothing to commit, working directory clean
检查当前文件状态 git status
工作目录下面的所有文件都不外乎这两种状态:已跟踪 或 未跟踪
已跟踪的文件是指本来就被纳入版本控制管理的文件,在上次快照中有它们的记录,工作一段时间后,它们的状态可能是已提交,已修改或者已暂存
所有其他文件都属于未跟踪文件。它们既没有上次更新时的快照,也不在当前的暂存区域。
初次克隆某个仓库时,工作目录中的所有文件都属于已跟踪文件,且状态为已提交;在编辑过某些文件之后,Git 将这些文件标为已修改。我们逐步把这些修改过的文件放到暂存区域,直到最后一次性提交所有这些暂存起来的文件
修改readme.txt文件
[root@localhost git_repository]# echo "hello git" > test.txt
[root@localhost git_repository]# git status 		#git status命令可以让我们时刻掌握仓库当前的状态,文件被修改过了,但还没有准备提交
# On branch master
# Changes not staged for commit:
#   (use "git add ..." to update what will be committed)
#   (use "git checkout -- ..." to discard changes in working directory)
#
#	modified:   test.txt
#
no changes added to commit (use "git add" and/or "git commit -a")
[root@localhost git_repository]# git diff test.txt
diff --git a/test.txt b/test.txt
index ce01362..8d0e412 100644
--- a/test.txt
+++ b/test.txt
@@ -1 +1 @@
-hello
+hello git
[root@localhost git_repository]# git add test.txt
[root@localhost git_repository]# git status
# On branch master
# Changes to be committed:
#   (use "git reset HEAD ..." to unstage)
#
#	modified:   test.txt
#
[root@localhost git_repository]# git commit -m "new file"
[master ddae758] new file
 1 file changed, 1 insertion(+), 1 deletion(-)
[root@localhost git_repository]# git status
# On branch master
nothing to commit, working directory clean
撤销修改
当然了,在实际工作中,我们脑子里怎么可能记得一个几千行的文件每次都改了什么内容,不然要版本控制系统干什么。版本控制系统肯定有某个命令可以告诉我们历史记录,在Git中,我们用git log命令查看:
在Git中,用HEAD表示当前版本,上一个版本就是HEAD^,上上一个版本就是HEAD^^,当然往上100个版本写100个^比较容易数不过来,所以写成HEAD~100。
git  checkout commithash   &   git reset --hard commithash
    1.  checkout只动HEAD    --hard动HEAD而且带着分支一起走
    2.  checkout对工作目录是安全的   --hard是强制覆盖工作目录

git checkout  commithash
git checkout --filename
      相比于git reset --hard  commitHash --filename
      第一  第二步都没做
      只会动了工作目录
git checkout  commithash
      将会跳过第 1 步
      更新暂存区
      更新工作目录
git checkout – 文件名:把文件在工作区的修改全部撤销,这里有两种情况:
一种是文件修改后还没有被放到暂存区,撤销修改就回到和版本库一模一样的状态;
一种是文件已经添加到暂存区,又作了修改,现在,撤销修改就回到添加到暂存区后的状态。总之,就是让这个文件回到最近一次git commit或git add时的状态。
git reset HEAD 可以把暂存区的修改撤销掉(unstage),重新放回工作区
[root@localhost git_repository]# echo > readme.txt 		#文件修改后还没有被放到暂存区
[root@localhost git_repository]# git status
# On branch master
# Changes not staged for commit:
#   (use "git add ..." to update what will be committed)
#   (use "git checkout -- ..." to discard changes in working directory)
#
#	modified:   readme.txt
#
no changes added to commit (use "git add" and/or "git commit -a")
[root@localhost git_repository]# git checkout -- readme.txt
[root@localhost git_repository]# cat readme.txt 	#撤销修改就回到和版本库一模一样的状态
hello git


[root@localhost git_repository]# echo > readme.txt
[root@localhost git_repository]# git add readme.txt		#添加到暂存区,还没提交
[root@localhost git_repository]# git status
# On branch master
# Changes to be committed:
#   (use "git reset HEAD ..." to unstage)
#
#	modified:   readme.txt
#
[root@localhost git_repository]# cat readme.txt 	#发现文件已经发生了修改

[root@localhost git_repository]# git reset HEAD readme.txt	#把暂存区的修改撤销掉,重新放回工作区
Unstaged changes after reset:
M	readme.txt
[root@localhost git_repository]# cat readme.txt

[root@localhost git_repository]# git status
# On branch master
# Changes not staged for commit:
#   (use "git add ..." to update what will be committed)
#   (use "git checkout -- ..." to discard changes in working directory)
#
#	modified:   readme.txt
#
no changes added to commit (use "git add" and/or "git commit -a")
[root@localhost git_repository]# git checkout -- readme.txt
[root@localhost git_repository]# git status
# On branch master
nothing to commit, working directory clean
[root@localhost git_repository]# cat readme.txt
hello git
版本回退
在Git中,HEAD指向的版本就是当前版本,上一个版本就是HEAD^,上上一个版本就是HEAD^^,当然往上100个版本写100个^比较容易数不过来,所以写成HEAD~100。
git reset命令既可以回退版本,也可以把暂存区的修改回退到工作区。使用命令git reset --hard commit_id 可以在版本的历史之间穿梭。穿梭前,用git log可以查看提交历史,以便确定要回退到哪个版本。要重返未来,用git reflog查看命令历史(git reflog记录着你的每一次命令
),以便确定要回到未来的哪个版本。
git reset --hard HEAD^ 回退到上一个版本
git reset --hard 未来版本号 版本号没必要写全,前几位就可以了,Git会自动去找
[root@localhost git_repository]# echo 1 > readme.txt
[root@localhost git_repository]# git add readme.txt
[root@localhost git_repository]# git commit -m "第一提交"
[root@localhost git_repository]# echo 2 >> readme.txt
[root@localhost git_repository]# git add readme.txt
[root@localhost git_repository]# git commit -m "第二提交"
[root@localhost git_repository]# echo 3 >> readme.txt
[root@localhost git_repository]# git add readme.txt
[root@localhost git_repository]# git commit -m "第三提交"


[root@localhost git_repository]# git log --pretty=oneline
7ca55be6897f28ad0ccd5ee7eff1fbf9a5c2da4e 第三提交
283347a0491d617f84c1c4b7d76743019731f535 第二提交
8b936100edeb3368cc397626fe7b83646688b78b 第一提交
我们可以看到一共提交了三次。现在进行版本回退操作,把当前的版本回退到上一个版本
[root@localhost git_repository]# cat readme.txt
1
2
3
[root@localhost git_repository]# git reset --hard HEAD^
[root@localhost git_repository]# cat readme.txt
1
2
[root@localhost git_repository]# git log --pretty=oneline
283347a0491d617f84c1c4b7d76743019731f535 第二提交
8b936100edeb3368cc397626fe7b83646688b78b 第一提交
通过git log查看现在版本库的状态,发现最新的那个版本已经看不到了,要重返未来,用git reflog查看命令历史
[root@localhost git_repository]# git reflog
283347a HEAD@{0}: reset: moving to HEAD^
7ca55be HEAD@{1}: commit: 第三提交
283347a HEAD@{2}: commit: 第二提交
8b93610 HEAD@{3}: commit (initial): 第一提交
[root@localhost git_repository]# git reset --hard 7ca55be
HEAD 现在位于 7ca55be 第三提交
[root@localhost git_repository]# cat readme.txt
1
2
3
Git的版本回退速度非常快,因为Git在内部有个指向当前版本的HEAD指针,当你回退版本的时候,Git仅仅是改变HEAD指向

reset三部曲
git reset --soft commithash    ---> 用commithash的内容重置HEAD内容
git reset [--mixed] commithash ---> 用commithash的内容重置HEAD内容 重置暂存区
git reset --hard commithash    ---> 用commithash的内容重置HEAD内容 重置暂存区 重置工作目录

所有的路径reset都要省略第一步!!!
    第一步是重置HEAD内容  我们知道HEAD本质指向一个分支 分支的本质是一个提交对象
    提交对象 指向一个树对象 树对象又很有可能指向多个git对象 一个git对象代表一个文件!!!
    HEAD可以代表一系列文件的状态!!!!
git reset [--mixed] commithash filename
     用commithash中filename的内容重置暂存区
撤回工作区中的修改 : git checkout --filename
命令 git checkout --readme.txt 意思就是,把readme.txt文件在工作区做的修改全部撤销
文件修改后,还没有放到暂存区,使用撤销修改就回到和版本库一模一样的状态
[root@localhost git_repository]# echo 1 > readme.txt
[root@localhost git_repository]# git add .
[root@localhost git_repository]# git commit -m 'one commit'
[master (root-commit) 2a81aab] one commit
 1 file changed, 1 insertion(+)
 create mode 100644 readme.txt
[root@localhost git_repository]# git status
# On branch master
nothing to commit, working directory clean
[root@localhost git_repository]# cat readme.txt
1
[root@localhost git_repository]# echo 2 >> readme.txt
[root@localhost git_repository]# echo 3 >> readme.txt
[root@localhost git_repository]# cat readme.txt 	#在工作区新增以下内容
1
2
3
[root@localhost git_repository]# git checkout -- readme.txt		#git checkout -- file 可以丢弃工作区的修改
[root@localhost git_repository]# cat readme.txt
1
文件已经放入暂存区了,接着又作了修改,撤销修改就回到添加暂存区后的状态
[root@localhost git_repository]# echo 2 >> readme.txt
[root@localhost git_repository]# echo 3 >> readme.txt
[root@localhost git_repository]# git add readme.txt
[root@localhost git_repository]# echo 4 >> readme.txt
[root@localhost git_repository]# cat readme.txt
1
2
3
4
[root@localhost git_repository]# git checkout -- readme.txt
[root@localhost git_repository]# cat readme.txt
1
2
3
撤回暂存区的修改 : git reset HEAD filename
撤回提交 : git commit --amend
删除和移动文件
| 删除 | git rm -r: 递归 -f:对于已经放进暂存区,但尚未提交的文件,强制从暂存区中删除; 会导致数据丢失 |
| 移动 | git mv |
假如我现在版本库目录添加一个文件test.txt,然后提交
[root@localhost git_repository]# touch test.txt
[root@localhost git_repository]# git add .
[root@localhost git_repository]# git commit -m "添加test文件"
使用rm命令直接在文件目录中把文件删了
[root@localhost git_repository]# rm -f test.txt
[root@localhost git_repository]# git status
# On branch master
# Changes not staged for commit:
#   (use "git add/rm ..." to update what will be committed)
#   (use "git checkout -- ..." to discard changes in working directory)
#
#	deleted:    test.txt
#
no changes added to commit (use "git add" and/or "git commit -a")
此时我们已将本地的文件删除,此时可以使用 git checkout -- 文件名 命令将文件恢复
[root@localhost git_repository]# git checkout -- test.txt		#将文件恢复到本地
[root@localhost git_repository]# ls test.txt
test.txt
通过 git rm 命令对文件进行删除,但是需要使用git commit提交一次
[root@localhost git_repository]# git rm test.txt
[root@localhost git_repository]# git commit -m "删除test.txt"
使用频率最高的五个命令
git高层命令(CRUD)
git init 初始化仓库
git status 查看文件的状态
git diff 查看哪些修改还没有暂存
git diff --staged 查看哪些修改以及被暂存了 还没提交
git log --oneline 查看提交的历史记录
git add ./ 将修改添加到暂存区
git rm 文件名 删除工作目录中对应的文件 再将修改添加到暂存区
git mv 原文件名 新文件名 将工作目录中的文件进行重命名 再将修改添加到暂存区
git commit
git commit -a
git commit -a -m 注释
将暂存区提交到版本库
git高层命令(分支)
git branch 显示分支列表
git branch 分支名 创建分支
git checkout 分支名 切换分支
git branch -D 分支名 强制删除分支
分支
定义:分支即每个人在原有代码(分支)的基础上建立自己的工作环境,单独开发,互不干扰。完成开发工作后再进行分支统一合并。
假设你准备开发一个新功能,但是需要两周才能完成,第一周你写了50%的代码,如果立刻提交,由于代码还没写完,不完整的代码库会导致别人不能干活了。如果等代码全部写完再一次提交,又存在丢失每天进度的巨大风险。现在有了分支,就不用怕了。你创建了一个属于你自己的分支,别人看不到,还继续在原来的分支上正常工作,而你在自己的分支上干活,想提交就提交,直到开发完毕后,再一次性合并到原来的分支上,这样既安全,又不影响别人工作。
分支就像科幻电影里面的平行宇宙,当你正在电脑前努力学习Git的时候,另一个你正在另一个平行宇宙里努力学习SVN。如果两个平行宇宙互不干扰,那对现在的你也没啥影响。不过,在某个时间点,两个平行宇宙合并了,结果你既学会了Git又学会了SVN!

其他版本控制系统如SVN等都有分支管理,但是用过之后你会发现,这些版本控制系统创建和切换分支比蜗牛还慢,简直让人无法忍受,结果分支功能成了摆设,大家都不去用。但Git的分支是与众不同的,无论创建、切换和删除分支,Git在1秒钟之内就能完成!无论你的版本库是1个文件还是1万个文件。
| 分支策略 | 说明 |
|---|---|
| 主干开发、主干发布 | 在master/main上开,直接在master/main发布 |
| 分支开发、主干发布 | 在develop分支上开发,合并至master/main分支,经由main/master发布 |
| 主干开发、分支发布 | 在master/main上直接开发,master/main拥有全量代码 |
git分支命令
| 查看分支列表 | git branch |
| 查看分支指向的最新的提交 | git branch -v |
| 创建分支 | git branch branchname |
| 切换分支 | git checkout branchname |
| 创建并切换分支 | git checkout -b branchname |
| 版本穿梭(时光机) | git branch branchname commitHash |
| 普通删除分支 | git branch -d branchname |
| 强制删除分支 | git branch -D branchname |
| 合并分支 | git merge branchname |
默认分支
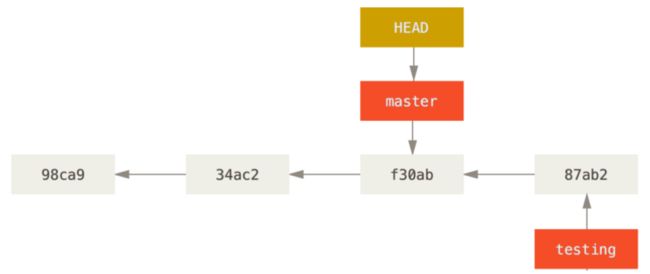
HEAD是一个指针,它默认指向master分支。分支本质是一个提交对象,切换分支时其实就是让HEAD指向不同的分支。所有的分支都会有机会被HEAD所引用(HEAD一个时刻只会指向一个分支)。当我们有新的提交的时候 HEAD会携带当前持有的分支往前移动
一开始的时候,master分支是一条线,Git用master指向最新的提交,再用HEAD指向master,就能确定当前分支,以及当前分支的提交点,每次提交,master分支都会向前移动一步,这样,随着你不断提交,master分支的线也越来越长。
[root@localhost git_repository]# cat .git/HEAD 	#查看文件指示目前被检出的分支
ref: refs/heads/master
创建分支
git branch 命令创建一个可以移动的新的指针,比如创建一个 testing 分支,会在当前所在的提交对象上创建一个指针,并不会自动切换到新分支中去
[root@localhost git_repository]# git branch testing #创建分支
[root@localhost git_repository]# git checkout testing 	#切换分支
Switched to branch 'testing'
[root@localhost git_repository]# cat .git/HEAD
ref: refs/heads/testing
[root@localhost git_repository]# git branch		#查看当前分支,git branch命令会列出所有分支,当前分支前面会标一个*号
  master
* testing

这里也可以使用命令 git checkout -b testing		git checkout命令加上-b参数表示创建并切换,相当于以下两条命令:git branch dev	git checkout dev
切换分支只是修改了HEAD的指向,工作区的文件都没有任何变化。

做出修改再提交,testing指针往前移动一步,而master指针不变
[root@localhost git_repository]# echo "new line" >> test.txt
[root@localhost git_repository]# git add test.txt
[root@localhost git_repository]# git commit -m "branch test"
[testing 142ad60] branch test
 1 file changed, 1 insertion(+)
切换分支
每次在切换分支前,提交一下当前分支。确保当前分支一定得是干净的(已提交状态)。如果在切换分支时,当前分支上有未暂存的修改(第一次) 或者有未提交的暂存(第一次),分支可以切换成功,但是这种操作可能会污染其他分支
允许切换分支:
分支上所有的内容处于 已提交状态
(避免)分支上的内容是初始化创建 处于未跟踪状态
(避免)分支上的内容是初始化创建 第一次处于已暂存状态
不允许切分支:
分支上所有的内容处于 已修改状态 或 第二次以后的已暂存状态
切回master查看 test.txt 文件,发现刚才添加的内容不见了!因为那个提交是在 testing 分支上,而master分支此刻的提交点并没有变
[root@localhost git_repository]# git checkout master
Switched to branch 'master'
[root@localhost git_repository]# cat test.txt
hello git
分支合并
git merge命令用于合并指定分支到当前分支,把testing分支的工作成果合并到master分支上
[root@localhost git_repository]# git merge testing
Updating ddae758..142ad60
Fast-forward			#这次合并是“快进模式”,也就是直接把master指向dev的当前提交,所以合并速度非常快
 test.txt | 1 +
 1 file changed, 1 insertion(+)
[root@localhost git_repository]# cat test.txt 	#合并后再查看test.txt的内容会发现和dev分支的最新提交是完全一样的
hello git
new line
人生不如意之事十之八九,合并分支往往也不是一帆风顺的。如果你在两个不同的分支中,对同一个文件的同一个部分进行了不同的修改,Git 就没法干净的合并它们,在合并它们的时候就会产生合并冲突。
[root@localhost git_repository]# git checkout -b feature1		#创建新的feature1分支,并切换到该分支
Switched to a new branch 'feature1'
[root@localhost git_repository]# cat test.txt
hello git
new line
[root@localhost git_repository]# echo "new feature1" >> test.txt
[root@localhost git_repository]# git add test.txt
[root@localhost git_repository]# git commit -m "new feature1"
[feature1 9e972ea] new feature1
 1 file changed, 1 insertion(+)
切换到master分支修改提交
[root@localhost git_repository]# git checkout master
Switched to branch 'master'
[root@localhost git_repository]# cat test.txt
hello git
new line
[root@localhost git_repository]# echo "new master line" >> test.txt
[root@localhost git_repository]# git add test.txt
[root@localhost git_repository]# git commit -m "new master line"
[master a83fbc3] new master line
 1 file changed, 1 insertion(+)
现在master分支和feature1分支各自都分别有新的提交,Git无法执行“快速合并”,只能试图把各自的修改合并起来,但这种合并就可能会有冲突,变成了这样
[root@localhost git_repository]# git merge feature1
Auto-merging test.txt
CONFLICT (content): Merge conflict in test.txt
Automatic merge failed; fix conflicts and then commit the result.
文件存在冲突,必须手动解决冲突后再提交。Git用<<<<<<<,=======,>>>>>>>标记出不同分支的内容,我们修改如下后保存:
[root@localhost git_repository]# cat test.txt
hello git
new line
<<<<<<< HEAD
new master line
=======
new feature1
>>>>>>> feature1

[root@localhost git_repository]# cat test.txt 		#我们修改如下后保存
hello git
new line
new master line
new feature1
修改完后再提交,现在 master分支和feature1分支变成了下图所示:
[root@localhost git_repository]# git add test.txt
[root@localhost git_repository]# git commit -m "conflict fixed"
[master bba6fbe] conflict fixed
删除分支
[root@localhost git_repository]# git branch dev
[root@localhost git_repository]# git branch
  dev
* master
[root@localhost git_repository]# git branch -d dev
已删除分支 dev(曾为 8206e8c)。
[root@localhost git_repository]# git branch
* master
bug分支
在开发中,会经常碰到bug问题,那么有了bug就需要修复,在Git中,分支是很强大的,每个bug都可以通过一个临时分支来修复,修复完成后,合并分支,然后将临时的分支删除掉。
比如我在开发中接到一个404 bug时候,我们可以创建一个404分支来修复它,但是,当前的dev分支上的工作还没有提交。比如如下:
[root@localhost git_repository]# git status
# On branch master
# Changes not staged for commit:
#   (use "git add ..." to update what will be committed)
#   (use "git checkout -- ..." to discard changes in working directory)
#
#       modified:   readme.txt
#
no changes added to commit (use "git add" and/or "git commit -a")
并不是我不想提交,而是工作进行到一半时候,我们还无法提交,比如我这个分支bug要2天完成,但是我issue-404 bug需要5个小时内完成。所以Git还提供了一个stash功能,可以把当前工作现场 ”隐藏起来”,等以后恢复现场后继续工作
[root@localhost git_repository]# git stash 		#将当前工作区隐藏起来
[root@localhost git_repository]# git status 	#查看状态是干净的
# On branch master
nothing to commit, working directory clean
创建一个新的分支来修复bug
[root@localhost git_repository]# git checkout -b issue_404
[root@localhost git_repository]# cat readme.txt
1
2
3
[root@localhost git_repository]# echo 'hello git' > readme.txt
[root@localhost git_repository]# cat readme.txt
hello git
[root@localhost git_repository]# git add readme.txt
[root@localhost git_repository]# git commit -m "fix bug 404"

#切换到master分支,并完成合并
[root@localhost git_repository]# git checkout master
[root@localhost git_repository]# git merge --no-ff -m "merger bug fix 404" issue_404
[root@localhost git_repository]# cat readme.txt
hello git
[root@localhost git_repository]# git branch -d issue_404

[root@localhost git_repository]# git status	#工作区是干净的
# On branch master
nothing to commit, working directory clean
[root@localhost git_repository]# git stash list		#使用命令 git stash list来查看我们工作现场去了哪里
[root@localhost git_repository]# git stash apply	#git stash apply恢复,恢复后stash内容并不删除,你需要使用命令git stash drop来删除,或使用git stash pop,恢复的同时把stash内容也删了
[root@localhost git_repository]# cat readme.txt
<<<<<<< Updated upstream
hello git
=======
1
2
3
4
>>>>>>> Stashed changes
团队协作
1. 项目经理初始化远程仓库,一定要初始化一个空的仓库; 在github上操作
2. 项目经理创建本地仓库
    git remote 别名 仓库地址(https)
    git init ; 将源码复制进来
    修改用户名 修改邮箱
    git add
    git commit
3. 项目经理推送本地仓库到远程仓库
    git push  别名 分支  (输入用户名 密码;推完之后会附带生成远程跟踪分支)
 4. 项目邀请成员 & 成员接受邀请
      在github上操作
5. 成员克隆远程仓库
    git clone  仓库地址 (在本地生成.git文件 默认为远程仓库配了别名 orgin)
                只有在克隆的时候 本地分支master 和 远程跟踪分支别名/master 是有同步关系的
6. 成员做出贡献
    修改源码文件
    git add
    git commit
    git push  别名 分支 (输入用户名 密码;推完之后会附带生成远程跟踪分支)

7. 项目经理更新修改
    git fetch 别名 (将修改同步到远程跟踪分支上)
    git merge 远程跟踪分支
公有仓库GitHab
Git的杀手级功能之一(注意是之一,也就是后面还有之二,之三……):远程仓库GitHub
Git是分布式版本控制系统,同一个Git仓库,可以分布到不同的机器上。最早只有一台机器有一个原始版本库,别的机器可以“克隆”这个原始版本库,而且每台机器的版本库其实都是一样的,并没有主次之分。但是我只有一台电脑,其实一台电脑上也是可以克隆多个版本库的,只要不在同一个目录下。不过,现实生活中是不会有人这么傻的在一台电脑上搞几个远程库玩,因为一台电脑上搞几个远程库完全没有意义,而且硬盘挂了会导致所有库都挂掉,所以我也不告诉你在一台电脑上怎么克隆多个仓库。所以找一台电脑充当服务器的角色,每天24小时开机,其他每个人都从这个“服务器”仓库克隆一份到自己的电脑上,并且各自把各自的提交推送到服务器仓库里,也从服务器仓库中拉取别人的提交。自己也可以搭建一台运行Git的服务器,不过世界上有个GitHub的神奇网站,这个网站就是提供Git仓库托管服务的,所以,只要注册一个GitHub账号,就可以免费获得Git远程仓库。通常有些仓库对你只读,有些则可以读写。 与他人协作涉及管理远程仓库以及根据需要推送或拉取数据。
GitHub 是最大的 Git 版本库托管商,是成千上万的开发者和项目能够合作进行的中心。 大部分 Git 版本库都托管在 GitHub,很多开源项目使用 GitHub 实现 Git 托管、问题追踪、代码审查以及其它事情。 所以,尽管这不是 Git 开源项目的直接部分,但如果想要专业地使用 Git,你将不可避免地与 GitHub 打交道。
最后友情提示,在GitHub上免费托管的Git仓库,任何人都可以看到喔(但只有你自己才能改)。所以,不要把敏感信息放进去。
如果你不想让别人看到Git库,有两个办法,一个是交点保护费,让GitHub把公开的仓库变成私有的,这样别人就看不见了(不可读更不可写)。另一个办法是自己动手,搭一个Git服务器,因为是你自己的Git服务器,所以别人也是看不见的。
注册登录
如上图所示,这是 GitHub 的官网首页,点击Sign up进行注册:

上面的信息都填写完成后,点击Create an account,进入如下界面:
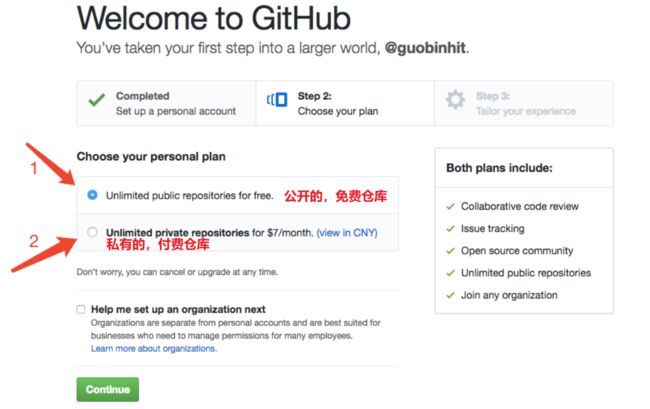
GitHub 的仓库分为两种,一种是public repositories公开免费版,一种是private repositories私有付费版。其中,私有仓库一般是由企业或者不希望自己的仓库公开的个人用户购买,这也是 GitHub 的主要收入来源。在这里,我们选择免费版就可以,然后点击Continue,进入如下界面:

下面这个步骤的主要作用就是收集用户的个人信息,如果感兴趣的话,可以对上面的“ 问答表 ”进行勾选,然后点击Submit提交;如果不感兴趣的话,则可以直接点击skip this step跳过这一步。无论点击两者之中的那个按钮,都将进入如下界面:

修改个人信息

在这里,我们点击Edit profile,编辑个人简历;
Overview,展示了我们账号的主要内容,包括仓库和贡献等;
Repositories:简称Repo,可以理解为“仓库”,我们的项目就存放在仓库之中。也就是说,如果我们想要建立项目,就得先建立仓库;有多个项目,就建立多个仓库。
Star:收藏了我们的“点星”,或者说是“点赞”过的项目。当我们感觉某一个项目做的比较好之后,就可以为这个项目点赞,而且我们点赞过的项目,都会保存到我们的Star之中,方便我们随时查看。在 GitHub 之中,如果一个项目的点星数能够超百,那么说明这个项目已经很不错了。
个人贡献记录:表示的为我们最近一年来的contribution,用实心的小方格标记,小方格的颜色越深,表示我们的contribution越多。
Issues:可以理解为“问题”,举一个简单的例子,如果我们开源一个项目,如果别人看了我们的项目,并且发现了bug,或者感觉那个地方有待改进,他就可以给我们提出Issue,等我们把Issues解决之后,就可以把这些Issues关闭;反之,我们也可以给他人提出Issue。
Fork:可以理解为“拉分支”,如果我们对某一个项目比较感兴趣,并且想在此基础之上开发新的功能,这时我们就可以Fork这个项目,这表示复制一个完成相同的项目到我们的 GitHub 账号之中,而且独立于原项目。之后,我们就可以在自己复制的项目中进行开发了。
Pull Request:可以理解为“提交请求”,此功能是建立在Fork之上的,如果我们Fork了一个项目,对其进行了修改,而且感觉修改的还不错,我们就可以对原项目的拥有者提出一个Pull请求,等其对我们的请求审核,并且通过审核之后,就可以把我们修改过的内容合并到原项目之中,这时我们就成了该项目的贡献者。
Merge:可以理解为“合并”,如果别人Fork了我们的项目,对其进行了修改,并且提出了Pull请求,这时我们就可以对这个Pull请求进行审核。如果这个Pull请求的内容满足我们的要求,并且跟我们原有的项目没有冲突的话,就可以将其合并到我们的项目之中。当然,是否进行合并,由我们决定。
Watch:可以理解为“观察”,如果我们Watch了一个项目,之后,如果这个项目有了任何更新,我们都会在第一时候收到该项目的更新通知。
Gist:如果我们没有项目可以开源或者只是单纯的想分享一些代码片段的话,我们就可以选择Gist。不过说心里话,如果不的话,Gist并不好用。
创建 GitHub 仓库
进入 GitHub 个人主页,点击Repositories,进入如下界面点击new 按钮:

到此仓库创建成功啦,仓库名为test,包含 1 个commit,也就是我们通过勾选 Initialize this repository with a README,创建了一个初始化提交文件README.md,其中文件后缀为.md,表示文件为 Markdown 格式;包含 1 个branch,为master分支,即主分支;包含 1 个contributor,为贡献者,也就是我们自己。

利用 SSH 完成 Git 与 GitHub 的绑定
git本地库与远程库传输协议:http/https、ssh、git
为什么GitHub需要SSH Key呢?因为GitHub需要识别出你推送的提交确实是你推送的,而不是别人冒充的,而Git支持SSH协议,所以,GitHub只要知道了你的公钥,就可以确认只有你自己才能推送。GitHub允许你添加多个Key。假定你有若干电脑,你一会儿在公司提交,一会儿在家里提交,只要把每台电脑的Key都添加到GitHub,就可以在每台电脑上往GitHub推送了。
由于你的本地Git仓库和GitHub仓库之间的传输是通过SSH加密的,所以,需要一点设置:
第1步:创建SSH Key。在用户主目录下,看看有没有.ssh目录,如果有,再看看这个目录下有没有id_rsa和id_rsa.pub这两个文件,如果已经有了,可直接跳到下一步。如果没有,打开Shell(Windows下打开Git Bash),创建SSH Key:
$ ssh-keygen -t rsa
Windows 系统:C:\Documents and Settings\username\\.ssh
然后一路回车,使用默认值即可,由于这个Key也不是用于军事目的,所以也无需设置密码。如果一切顺利的话,可以在用户主目录里找到.ssh目录,里面有id_rsa和id_rsa.pub两个文件,这两个就是SSH Key的秘钥对,id_rsa是私钥,不能泄露出去,id_rsa.pub是公钥,可以放心地告诉任何人。
第2步:登陆GitHub,进入我们的 GitHub 主页,先点击右上角所示的倒三角▽图标或者点击我们的头像,然后再点击Settins,进行设置页面再点击SSH and GPG Keys进入此子界面,然后点击New SSH key按钮,填上任意Title(Titles的内容不填写也没事),在Key文本框里粘贴id_rsa.pub文件的内容,然后点击Add SSH key 即可。

添加完SSH key之后,可以通过在 Git Bash 中输入ssh -T [email protected]进行测试:
[root@localhost ~]# ssh -T [email protected]
Hi qianshuaicn! You've successfully authenticated, but GitHub does not provide shell access.
向远程仓库提交代码
在我们向远程仓库提交代码的时候,一定要先进行pull操作,再进行push操作,防止本地仓库与远程仓库不同步导致冲突的问题,尤其是第二种提交代码的情况,很容易就出现问题。比如A对远程仓库做了修改,B不会知道远程仓库已经被A进行了修改,所以B推送的时候将会发生冲突,所以先使用git pull命令再使用git push。当然也可以建立远程跟踪分支,这样就可以得到相关变化信息
git pull 将远程分支下载到本地,并于本地分支进行合并,默认是master分支
git fetch 将远程分支数据下载到本地,不进行合并
git push 远程仓库名 all 代表将本地所有分支提交
git push 远程仓库名 分支名 把该分支上的所有本地提交推送到远程库
git fetch origin 	取回所有分支

[root@localhost blog]# git fetch origin main
#在github对main分支的README.md进行了修改,拉取单独main分支内容,文件发现并没有发生变化,因为只是拉取了,并没有合并
[root@localhost blog]# cat README.md
# myblog[root@localhost blog]# git merge FETCH_HEAD		#将fetch取回来的分支进行合并
[root@localhost blog]# cat README.md
hello git
建立一个本地仓库,并创建一个远程仓库进行代码上传
[root@localhost ~]# cd blog/
[root@localhost blog]# ls
[root@localhost blog]# git init			#初始化仓库,初始化空的 Git 版本库于 /root/blog/.git/
[root@localhost blog]# unzip ../blog.zip -d ./
[root@localhost blog]# ls
about.html  css  daohang.html  images  index.html  index - 副本.html  info.html  js  list2.html  list3.html  list.html  time.html
[root@localhost blog]# git add .
[root@localhost blog]# git commit -m "blog"
[root@localhost blog]# git remote add origin [email protected]:qianshuaicn/myblog.git	#关联远程仓库,将本地的仓库关联到github上
[root@localhost blog]# git pull origin main		#同步远程仓库和本地仓库
[root@localhost blog]# cat README.md 			#可以看到文件中多了README.md文件
# myblog[root@localhost blog]#
[root@localhost blog]# git push -u origin master	#上传master分支代码到github远程仓库
把远程的代码拉到本地 git clone
本地没有 Git 仓库,这时我们就可以直接将远程仓库clone到本地。通过clone命令创建的本地仓库,其本身就是一个 Git 仓库了,不用我们再进行init初始化操作啦,而且自动关联远程仓库。我们只需要在这个仓库进行修改或者添加等操作,然后commit即可。
[root@localhost ~]# mkdir /data/blog
[root@localhost data]# cd /data/blog/
[root@localhost blog]# git clone [email protected]:qianshuaicn/myblog.git
[root@localhost blog]# ls -a
.  ..  myblog
[root@localhost blog]# ls -a myblog/	#会发现只有一个 README.md文件
.  ..  .git  README.md
因为远程跟本地都有多个分支,可以使用refspec命令指定分支,默认git clone的时候,refspect命令会自动指定。当你从远程仓库克隆时,实际上Git自动把本地的master分支和远程的master分支对应起来了,并且远程仓库的默认名称是origin。
使用 git remote 可以查看远程库的信息
[root@localhost blog]# git remote
origin
[root@localhost blog]# cd myblog/
[root@localhost myblog]# git remote -v		#显示仓库信息,origin自动生成,该信息保存在.git/config文件中。上面显示了可以抓取和推送的origin的地址。如果没有推送权限,就看不到push的地址。
origin	[email protected]:qianshuaicn/myblog.git (fetch)
origin	[email protected]:qianshuaicn/myblog.git (push)
[root@localhost myblog]# cat .git/config 		#fetch信息,自动生成
[core]
	repositoryformatversion = 0
	filemode = true
	bare = false
	logallrefupdates = true
[remote "origin"]
	url = [email protected]:qianshuaicn/myblog.git
	fetch = +refs/heads/*:refs/remotes/origin/*
[branch "main"]
	remote = origin
	merge = refs/heads/main

[root@localhost myblog]# ls .git/refs/heads		#所有本地分支的引用信息保存在 .git/refs/heads中
main
[root@localhost myblog]# git branch develop		#创建develop分支
[root@localhost myblog]# ls .git/refs/heads		#在该路径下就会显示这个分支
develop  main
[root@localhost myblog]# ls .git/refs/remotes	#所有远程分支与本地关联的信息保存在.git/refs/remotes目录下,一个本地仓库可以关联多个远程仓库,origin远程仓库名
origin
[root@localhost myblog]# cat .git/refs/remotes/origin/HEAD 		#默认指向远程仓库的主分支
ref: refs/remotes/origin/main
git clone -b 指定分支
[root@localhost blog]# git clone -b master [email protected]:qianshuaicn/myblog.git
[root@localhost blog]# cd myblog/
[root@localhost myblog]# ls
about.html  css  daohang.html  images  index.html  index - 副本.html  info.html  js  list2.html  list3.html  list.html  README.md  time.html
从远程库clone时,默认情况下,你的小伙伴只能看到本地的master分支
[root@localhost myblog]# git branch
* master
如果要在dev分支上开发,就必须创建远程origin的dev分支到本地,前提是github上必须有dev分支。
[root@localhost myblog]# git checkout -b dev origin/dev
[root@localhost myblog]# git branch
* dev
  main
[root@localhost myblog]# cat readme.txt
hello git
[root@localhost myblog]# echo "Hello Git" > readme.txt
[root@localhost myblog]# git add readme.txt
[root@localhost myblog]# git commit -m "test"
[root@localhost myblog]# git pull origin dev
[root@localhost myblog]# cat readme.txt
Hello Git
[root@localhost myblog]# git push origin dev
确保本地分支已经跟踪了远程跟踪分支,一个本地分支怎么去跟踪一个远程跟踪分支
- 当克隆的时候 会自动生成一个master本地分支(已经跟踪了对应的远程跟踪分支)
- 在新建其他分支时 可以指定想要跟踪的远程跟踪分支
git checkout -b 本地分支名 远程跟踪分支名
git checkout --track 远程跟踪分支名 - 将一个已经存在的本地分支 改成 一个跟踪分支
git branch -u 远程跟踪分支名
查看远程分支的提交历史
git log
	origin/main		远程分支仓库的提交信息
	remotes/origin/main		效果相同,命令不同
	refs/remotes/origin/main
删除远程分支
git push origin:develop 实际上是把本地的空分支推送到了远程仓库,从而达到删除的效果
git branch -D 删除本地分支
关联多个远程库
本地库可以关联多个远程库,git给远程库起的默认名称是origin,如果有多个远程库,我们需要用不同的名称来标识不同的远程库
先删除已关联的名为origin的远程库:git remote rm origin
然后,关联GitHub的远程库:git remote add github github仓库名
注意远程库的名称叫github不叫origin。接着再关联Gitee的远程库:
git remote add gitee gitee仓库名
现在,我们用git remote -v查看远程库信息,可以看到两个远程库:这样一来,我们的本地库就可以同时与多个远程库互相同步:
如果要推送到GitHub,使用命令:git push github master
如果要推送到Gitee,使用命令:git push gitee master
私有仓库 GitLab
GitLab 是一个用于仓库管理系统的开源项目,使用Git作为代码管理工具,并在此基础上搭建起来的web服务。
GitLab和GitHub一样属于第三方基于Git开发的作品,免费且开源(基于MIT协议),与Github类似,可以注册用户,任意提交你的代码,添加SSHKey等等。不同的是,GitLab是可以部署到自己的服务器上,数据库等一切信息都掌握在自己手上,适合团队内部协作开发。
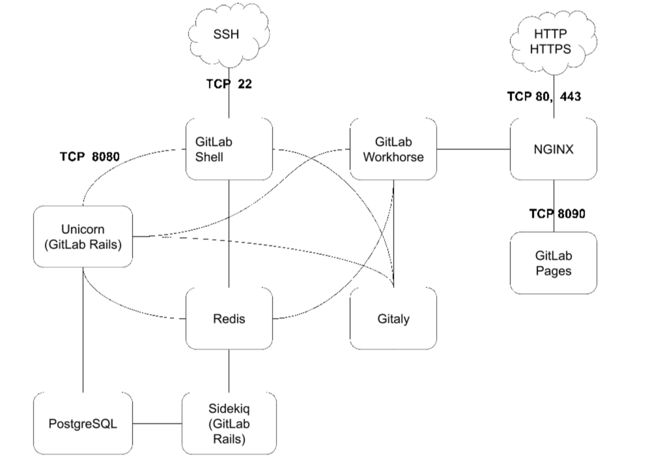
gitlab架构
| 组件名称 | 功能说明 |
|---|---|
| PostgreSQL | 数据库: 持久化数据存放 |
| Redis | 数据库:缓存信息存放 |
| Gitlab Shell | 处理通过SSH方式的操作要求,一般为Git命令等操作 |
| Nginx | Web应用服务器,用于处理通过HTTP或者HTTPS的用户界面操作 |
| GitLab Workhorse | 轻量级的反向代理服务器 |
| Unicorn | GitLab是ROR的应用,符合Rack标准的应用所使用的HTTP应用服务器,GitLab Rails应用所托管的应用服务器 |
| Sidekiq | 用于执行异步的后台队列任务的功能组件 |
| GitLab Pages | GitLab所提供的一项功能,允许用户发布从仓库发布静态的web站点 |
gitlab 相关目录
| 目录 | 说明 |
|---|---|
| /etc/gitlab | 配置文件目录,路径下有gitlab.rb配置文件 |
| /run/gitlab | 运行pid 目录 |
| /opt/gitlab | 组件二进制文件安装目录 |
| /var/opt/gitlab | 数据目录 |
| /var/log/gitlab | 日志目录 |
常用命令
| 命令 | 说明 |
|---|---|
| gitlab-rails | 用于启动控制台进行特殊操作,比如修改管理员密码、打开数据库控制台( gitlab-rails dbconsole)等 |
| gitlab-rails dbconsole | |
| gitlab-psql | 数据库命令行 |
| gitlab-rake | 数据备份恢复等数据操作 |
| gitlab-ctl | 客户端命令行操作行 |
| gitlab-ctl start | 启动gitlab |
| gitlab-ctl stop | 停止gitlab |
| gitlab-ctl restar | 重启gitlab |
| gitlab-ctl status | 查看组件运行状态 |
| gitlab-ctl tail nginx | 查看某个组件的日志 |
安装
官网: https://about.gitlab.com
安装包下载地址:https://packages.gitlab.com/gitlab/gitlab-ce
rpm 包国内下载地址:https://mirrors.tuna.tsinghua.edu.cn/gitlab-ce/yum/
#安装相关依赖
[root@localhost ~]# yum -y install policycoreutils openssh-server openssh-clients postfix

#启动ssh服务&设置为开机启动
[root@localhost ~]# systemctl enable sshd && sudo systemctl start sshd

#设置postfix开机自启,并启动,postfix支持gitlab发信功能
[root@localhost ~]# systemctl enable postfix && systemctl start postfix

#开放ssh以及http服务,然后重新加载防火墙列表,如果关闭防火墙就不需要做以上配置
[root@localhost ~]# firewall-cmd --add-service=ssh --permanent
[root@localhost ~]# firewall-cmd --add-service=http --permanent
[root@localhost ~]# firewall-cmd --reload

#在线下载gitlab包
[root@localhost ~]# wget https://mirrors.tuna.tsinghua.edu.cn/gitlab-ce/yum/el6/gitlab-ce-12.4.2-ce.0.el6.x86_64.rpm
[root@localhost ~]# rpm -i gitlab-ce-12.4.2-ce.0.el6.x86_64.rpm		#安装
       *.                  *.
      ***                 ***
     *****               *****
    .******             *******
    ********            ********
   ,,,,,,,,,***********,,,,,,,,,
  ,,,,,,,,,,,*********,,,,,,,,,,,
  .,,,,,,,,,,,*******,,,,,,,,,,,,
      ,,,,,,,,,*****,,,,,,,,,.
         ,,,,,,,****,,,,,,
            .,,,***,,,,
                ,*,.


     _______ __  __          __
    / ____(_) /_/ /   ____ _/ /_
   / / __/ / __/ /   / __ `/ __ \
  / /_/ / / /_/ /___/ /_/ / /_/ /
  \____/_/\__/_____/\__,_/_.___/
修改gitlab配置
[root@localhost ~]# vi /etc/gitlab/gitlab.rb
external_url 'http://192.168.139.101:81'		修改gitlab访问地址和端口,默认为80,我们改为81
#nginx['listen_port'] = 81
重载配置及启动gitlab
[root@localhost ~]# gitlab-ctl reconfigure		#修改完配置文件要执行此操作,使配置文件生效
[root@localhost ~]# gitlab-ctl status			#验证gitlab 启动完成
把端口添加到防火墙
firewall-cmd --zone=public --add-port=81/tcp --permanent
firewall-cmd --reload
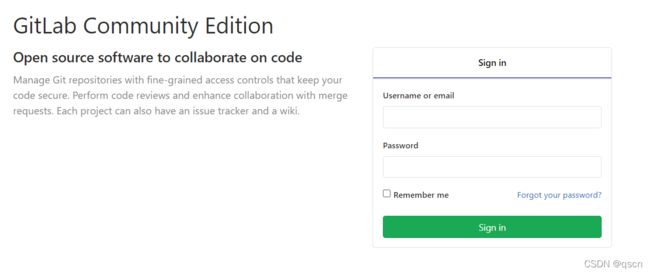
启动成功后,登录web 页面看到以下修改管理员root密码的页面,修改密码后,然后登录即可,默认用户为root


关闭账号注册
默认情况下可以直接注册账号,因此一般都关闭次功能

取消账户注册功能之后点save

邮件通知设置
开启QQ邮箱的SMTP服务,这里使用的是qq邮箱
设置–>账户–>smtp–>密保验证–>验证成功后返回授权码。保存好授权码


[root@localhost ~]# vim /etc/gitlab/gitlab.rb
gitlab_rails['smtp_enable'] = true
gitlab_rails['smtp_address'] = "smtp.qq.com"
gitlab_rails['smtp_port'] = 465
gitlab_rails['smtp_user_name'] = "[email protected]"
gitlab_rails['smtp_password'] = "开通smtp时返回的授权码"
gitlab_rails['smtp_domain'] = "qq.com"
gitlab_rails['smtp_authentication'] = "login"
gitlab_rails['smtp_enable_starttls_auto'] = true
gitlab_rails['smtp_tls'] = true
#设置邮箱来源, 与展示的名称
gitlab_rails['gitlab_email_enabled'] = true
gitlab_rails['gitlab_email_from'] = '[email protected]'
gitlab_rails['gitlab_email_display_name'] = 'Gitlab'


[root@localhost ~]# gitlab-ctl reconfigure			#重新配置服务后生效
[root@localhost ~]# gitlab-rails console			#进入控制台,然后发送邮件
irb(main):003:0> Notify.test_email('[email protected]', '邮件标题', '邮件正文').deliver_now
创建git 账户
方法一:通过管理员用户进行账号创建

第一次使用新账号登录要设置密码

通过邮件设置密码登录

方法二:在首页进行用户注册

注册完成以后,无法登录,需要管理员批准注册

使用管理员账号登录,批准注册,然后再使用注册的账号进行登录即可登录成功

创建组
使用管理员root 创建组,一个组里面可以有多个项目分支,可以将开发添加到组里面进行设置权限,不同的组就是公司不同的开发项目或者服务模块,不同的组添加不同的开发即可实现对开发设置权限的管理。


创建项目/提交下载
[root@localhost ~]# git clone http://192.168.139.101:81/root/test_project.git
[root@localhost ~]# cat /root/test_project/README.md
<h1>test</h1>[root@localhost ~]#
编辑文件并测试提交:
[root@localhost ~]# cd /root/test_project/
[root@localhost test_project]# git config --global user.name "zhangsan"
[root@localhost test_project]# git config --global user.email "[email protected]"
[root@localhost test_project]# echo "上传测试提交" > test.txt
[root@localhost test_project]# git add test.txt
[root@localhost test_project]# git commit -m "test v1"
[root@localhost test_project]# git push http://192.168.139.101:81/root/test_project.git
配置GitLab中的SSH key
由于你的本地Git仓库和GitHub仓库之间的传输是通过SSH加密的,所以,需要一点设置:
第1步:创建SSH Key。在用户主目录下,看看有没有.ssh目录,如果有,再看看这个目录下有没有id_rsa和id_rsa.pub这两个文件,如果已经有了,可直接跳到下一步。如果没有,打开Shell(Windows下打开Git Bash),创建SSH Key:
$ ssh-keygen -t rsa
Windows 系统:C:\Documents and Settings\username\\.ssh
然后一路回车,使用默认值即可,由于这个Key也不是用于军事目的,所以也无需设置密码。如果一切顺利的话,可以在用户主目录里找到.ssh目录,里面有id_rsa和id_rsa.pub两个文件,这两个就是SSH Key的秘钥对,id_rsa是私钥,不能泄露出去,id_rsa.pub是公钥,可以放心地告诉任何人。
查看公钥并复制
cat ~/.ssh/id_rsa.pub    #查看公钥,自己手动复制
cat ~/.ssh/id_rsa.pub | clip #或者直接复制到剪贴板
登录gitlab,最右边下拉,点击“Settings”去User Setting页面,点击左边的SSH Keys去添加

备份与恢复
可以通过修改/etc/gitlab/gitlab.rb配置文件来修改默认存放备份文件的目录
gitlab_rails['backup_path'] = "/var/opt/gitlab/backups"   #此路径为备份文件路径,可以修改,修改完成之后使用gitlab-ctl reconfigure命令重载配置文件即可
gitlab_rails['backup_keep_time'] = 604800  #每次备份保留时间,默认7天,可以省略
备份格式:EPOCH_YYYY_MM_DD_GitLab_version_gitlab_backup.tar
如备份文件:1542603058_2018_11_19_11.4-ce_gitlab_backup.tar
手动使用命令备份gitlab
gitlab-rake gitlab:backup:create
查看下备份文件(文件权限是设定好的644)
[root@gitlab backups]# ll
total 1680
-rw-r--r-- 1 git git 1720320 May  6 17:47 1557136073_2019_05_06_11.10.4_gitlab_backup.tar
加入到crontab中
0 2 * * * /bin/bash /opt/scripts/gitlab_backup.sh > /dev/null 2>&1
恢复
GItlab只能还原到与备份文件相同的gitlab版本。假设在上面gitlab备份之前创建了test项目,然后不小心误删了test项目,现在就进行gitlab恢复操作:
1、停止相关数据连接服务
sudo gitlab-ctl stop unicorn
sudo gitlab-ctl stop sidekiq
# Verify是否停止
sudo gitlab-ctl status
2、通过之前的备份文件进行恢复
gitlab-rake gitlab:backup:restore BACKUP=/var/opt/gitlab/backups/1557136073_2019_05_06_11.10.4
gitlab-ctl start			#最后再次启动Gitlab
gitlab-ctl status			#查看gitlab状态
sudo gitlab-ctl restart  	#重启服务
sudo gitlab-rake gitlab:check SANITIZE=true 	#检查恢复情况
再次登录Gitlab,就会发现之前误删除的test项目已经恢复了!


