SpringCloud常见微服务总结-服务治理(Eureka、Consul、Nacos),调用(Ribbon、Feign),降级、熔断(Hystrix),网关(Gateway)
SpringCloud
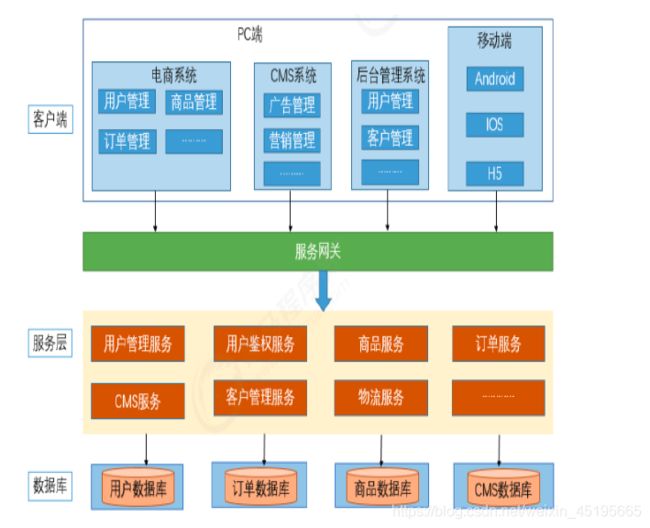
1 初识Spring Cloud-微服务架构
来源:
http://martinfowler.com/articles/microservices.html
国内翻译的不错的帖子
http://blog.didispace.com/microservices-translate/
http://blog.didispace.com/20160917-microservices-note/   : (建议认真读一下这个文章)
微服务特点:
	1) 小
	2) 相互独立
	3)使用 http协议中的restful 风格
优势:
	低耦合
	每个服务都可以选择一种不同的开发语言
微服务 =80% soa 思想 + 100% 组件化思想 + 80%领域建模思想
2 初识Spring Cloud
1) Spring Cloud 是一系列框架的有序集合。相当于一份盒饭,里面封装了其他很多优秀的技术
2) spring Cloud 使用Spring-Boot 对其他技术进行整合,方便微服务开发
3) Spring Cloud 版本 命名方式采用了伦敦地铁站的名称,同时根据字母表的顺序来对应版本时间顺序
优点:
单易懂、易部署和易维护
释义: “顶级”,表示出现在官网独立菜单栏的项目,在官方内部可以看做是一个独立的东西对外发布
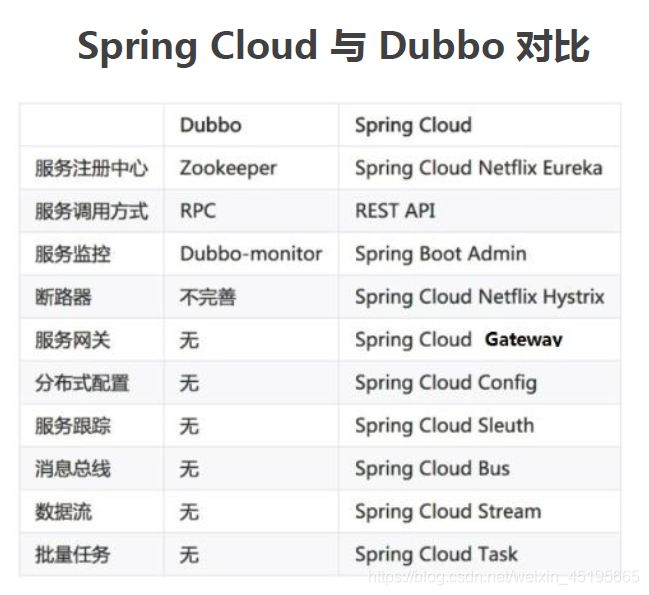
3 初识Spring Cloud-Spring Cloud 和 dubbo 对比
-
dubbo 也是可以做微服务, 微服务是 包含了 soa 的思想,多了 “微服务思想”,
-
Dubbo 只是实现了服务治理,而cloud 实现了很多其他功能
-
Dubbo 效率稍高
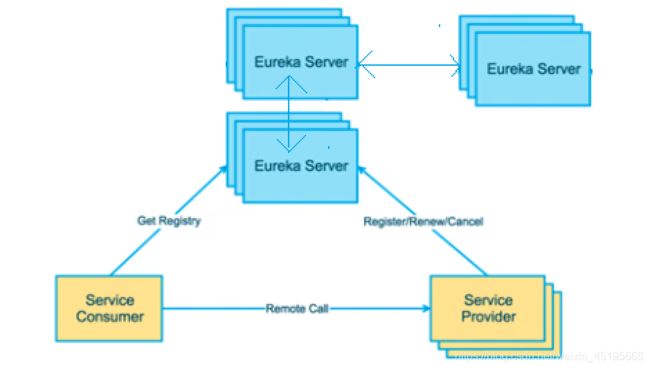
4 Spring Cloud服务治理-Eureka介绍
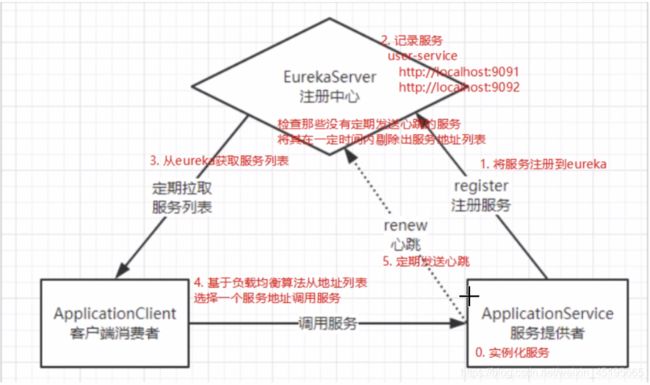
1)Eureka 是 Netflix 公司开源的一个服务注册与发现的组件
2)Eureka 被springCloud 和Netflix公司的其他服务组件(例如负载均衡、熔断器、网关等)仪器封装到了Spring-Cloud-Netflix 模块中(到入这个jar包即可)
3)Eureka 包含两个组件:Eureka Server(注册中心)和 Eureka Client(服务提供者、服务消费者)
备注: 比zookeeper 功能更全面,更强大(效率没有zookeeper 高)
快速入门步骤
- 搭建 Provider 和 Consumer 服务。
- 使用 RestTemplate 完成远程调用。
- 搭建 Eureka Server 服务。
- 改造 Provider 和 Consumer 称为 Eureka Client 。
- Consumer 服务 通过从 Eureka Server 中抓取 Provider
地址 完成 远程调用
5 Spring Cloud服务治理-Eureka快速入门-环境搭建
<parent>
    <groupId>org.springframework.bootgroupId>
    <artifactId>spring-boot-starter-parentartifactId>
    <version>2.1.0.RELEASEversion>
    <relativePath/>
parent>
<properties>
    <project.build.sourceEncoding>UTF-8project.build.sourceEncoding>
    <project.reporting.outputEncoding>UTF-8project.reporting.outputEncoding>
    <java.version>1.8java.version>
properties>
Consumer/Provider
<dependencies>

    <dependency>
        <groupId>org.springframework.bootgroupId>
        <artifactId>spring-boot-starter-webartifactId>
    dependency>
dependencies>
6 Spring Cloud服务治理-Eureka快速入门-RestTemplate远程调用
@Configuration
public class RestTemplateConfig {
    @Bean
    public RestTemplate restTemplate(){
        return new RestTemplate();
    }
}
@Autowired
private RestTemplate restTemplate;
备注: 我们使用的时候直接new 也行,但是每次都new麻烦,所以我们写了Config 类, 把RestTemplate 放入容器中,用的时候直接注入即可
Resttemplate:
get 请求
String url = "http://localhost:8000/goods/findOne/"+id;
Goods goods = restTemplate.getForObject(url, Goods.class);
post 请求
String url = "http://localhost:18085/es/user/location";
// 构造请求参数
Map<String, Object> param = new HashMap<>();
param.put("userId", userId);
param.put("longitude", longitude);
param.put("latitude", latitude);
param.put("address", address);
String requestBody = MAPPER.writeValueAsString(param);

// 构造请求头信息,指定格式为json
HttpHeaders httpHeaders = new HttpHeaders();
httpHeaders.setContentType(MediaType.APPLICATION_JSON);

HttpEntity<String> httpEntity = new HttpEntity<>(requestBody, httpHeaders);

ResponseEntity<Void> responseEntity = this.restTemplate.postForEntity(url, httpEntity, Void.class);
if (responseEntity.getStatusCodeValue() == 200) {
    return userId.toString();
}
7 Spring Cloud服务治理-Eureka快速入门-Eureka Server 搭建
- 创建 eureka server 模块
- 引入 SpringCloud 和 euraka server 相关依赖
父pom.xml
<properties>
    <project.build.sourceEncoding>UTF-8project.build.sourceEncoding>
    <project.reporting.outputEncoding>UTF-8project.reporting.outputEncoding>
    <java.version>1.8java.version>

    <spring-cloud.version>Greenwich.RELEASEspring-cloud.version>
properties>


<dependencyManagement>
    <dependencies>
        <dependency>
            <groupId>org.springframework.cloudgroupId>
            <artifactId>spring-cloud-dependenciesartifactId>
            <version>${spring-cloud.version}version>
            <type>pomtype>
            <scope>importscope>
        dependency>
    dependencies>
dependencyManagement>
eureka-server中pom.xml
<dependencies>
        <dependency>
            <groupId>org.springframework.bootgroupId>
            <artifactId>spring-boot-starter-webartifactId>
        dependency>

        <dependency>
            <groupId>org.springframework.cloudgroupId>
            <artifactId>spring-cloud-starter-netflix-eureka-serverartifactId>
        dependency>
    dependencies>
-
完成 Eureka Server 相关配置
启动类上增加注解 @EnableEurekaServerserver: port: 8761 # eureka 配置 # eureka 一共有4部分 配置 # 1. dashboard:eureka的web控制台配置 (管理控制台) # 2. server:eureka的服务端配置 (当前Eureka Instance实例注册中心的配置) # 3. client:eureka的客户端配置 (当前Eureka Instance实例作为消费者的配置) # 4. instance:eureka的实例配置 当前Eureka Instance实例信息配置 eureka: instance: hostname: localhost # 此处配置的是作为客户端,我需要知道的信息,或者干的工作 client: service-url: defaultZone: http://${eureka.instance.hostname}:${server.port}/eureka # eureka服务端地址,将来客户端使用该地址和eureka进行通信 register-with-eureka: false # 是否将自己的路径 注册到eureka上。eureka server 不需要的,eureka provider client 需要 fetch-registry: false # 是否需要从eureka中抓取路径。eureka server 不需要的,eureka consumer client 需要 -
启动该模块
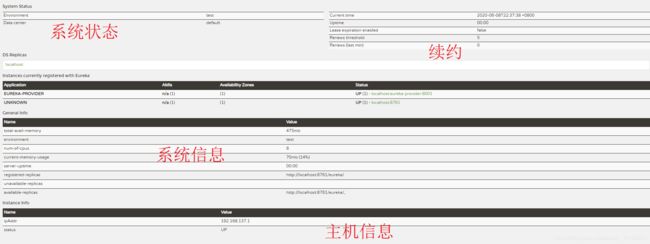
8 Spring Cloud服务治理-Eureka快速入门-Eureka控制台介绍
9 Spring Cloud服务治理-Eureka快速入门-Eureka Client
pom.xml
<dependencies>

    <dependency>
        <groupId>org.springframework.bootgroupId>
        <artifactId>spring-boot-starter-webartifactId>
    dependency>

    <dependency>
        <groupId>org.springframework.cloudgroupId>
        <artifactId>spring-cloud-starter-netflix-eureka-clientartifactId>
        ependency>
dependencies>
启动器
@EnableEurekaClient //该注解 在新版本中可以省略
@SpringBootApplication
public class ProviderApp {
    public static void main(String[] args) {
        SpringApplication.run(ProviderApp.class,args);
    }
}
配置
server:
  port: 8001

eureka:
  instance:
    hostname: localhost # 主机名
  client:
    service-url:
      defaultZone: http://localhost:8761/eureka # eureka服务端地址,将来客户端使用该地址和eureka进行通信
spring:
  application:
    name: eureka-provider # 设置当前应用的名称。将来会在eureka中Application显示。将来需要使用该名称来获取路径
10 Spring Cloud服务治理-Eureka快速入门-动态获取路径
- 启动类增加注解
@EnableDiscoveryClient // 激活DiscoveryClient
- 改造controller 代码
    @Autowired
    private DiscoveryClient discoveryClient;

    @GetMapping("/goods/{id}")
    public Goods findGoodsById(@PathVariable("id") int id){
        System.out.println("findGoodsById..."+id);
        /*
        	动态从Eureka Server 中获取 provider 的 ip 和端口
        	1. 注入 DiscoveryClient 对象.激活
        	2. 调用方法
         */
        //演示discoveryClient 使用
        List<ServiceInstance> instances = discoveryClient.getInstances("EUREKA-PROVIDER");
        //判断集合是否有数据
        if(instances == null || instances.size() == 0){
            //集合没有数据
            return null;
        }
        ServiceInstance instance = instances.get(0);
        String host = instance.getHost();//获取ip
        int port = instance.getPort();//获取端口

        System.out.println(host);
        System.out.println(port);

        String url = "http://"+host+":"+port+"/goods/findOne/"+id;
        // 3. 调用方法
        Goods goods = restTemplate.getForObject(url, Goods.class);
        return goods;
    }
11 Spring Cloud服务治理-Eureka属性-instance相关属性
provider:
eureka:
  instance:
    hostname: localhost # 主机名
    prefer-ip-address: true # 将当前实例的ip注册到eureka server 中。默认是false 注册主机名
    ip-address: 127.0.0.1 # 设置当前实例的ip
    instance-id: ${eureka.instance.ip-address}:${spring.application.name}:${server.port} # 设置web控制台显示的 实例id
    lease-renewal-interval-in-seconds: 3 # 每隔3 秒发一次心跳包
    lease-expiration-duration-in-seconds: 9 # 如果9秒没有发心跳包,服务器呀,你把我干掉吧~
  client:
    service-url:
      defaultZone: http://localhost:8761/eureka # eureka服务端地址,将来客户端使用该地址和eureka进行通信
spring:
  application:
    name: eureka-provider # 设置当前应用的名称。将来会在eureka中Application显示。将来需要使用该名称来获取路径
释义: 回环地址
127.0.0.1 -127.255.255.254 都是回环地址,不仅仅只是 127.0.0.1
12 Spring Cloud服务治理-Eureka属性-server相关属性
eureka:
  instance:
    hostname: localhost
    lease-renewal-interval-in-seconds: 30  # 每一次 eureka client 向 eureka server 发送心跳的时间间隔
    lease-expiration-duration-in-seconds: 90  # 如果 90 秒内 eureka server 没有收到 eureka client 的心跳包,则剔除该服务

eureka:
  server:
    enable-self-preservation: false # 关闭自我保护机制
    eviction-interval-timer-in-ms: 3000 # 检查服务的时间间隔 ,默认 60*1000  60秒
解释:
Eureka的自我保护机制用最通俗的语言说就是:好死不如赖活着。
   默认情况下,如果eureka server在一定时间内没有接收到某个微服务实例的心跳,eureka server将会注销该实例。
  如果默认保护机制开启,在注销(剔除)前
  Eureka Server 在运行期间会去统计心跳失败比例在 15 分钟之内是否低于 85%,如果低于 85%,Eureka Server 会将这些实例保护起来,让这些实例不会过期,(永不过期直到自动修复为止)
  (这里面是没有问题的,因为15分钟内大面积服务停止的概率很低的(几乎不存在),除非是网络问题,所以这个开能够保证服务的稳定性)
触发 自我保护机制的算法
期望次数 2* (n+1) *0.85 (向下取整) 此处的2 表示 每分钟两次 , n 表示启动了多少个实例
实际次数 2*n
13 Spring Cloud服务治理-Eureka高可用-介绍
- 准备两个 Eureka Server
- 分别进行配置,相互注册
- Eureka Client 分别注册到这两个 Eureka Server 中
14 Spring Cloud服务治理-Eureka高可用-搭建
-
准备两个 Eureka Server
-
修改host 文件
C:\Windows\System32\drivers\etc 127.0.0.1 eureka-server1 127.0.0.1 eureka-server2 -
修改配置
-
相互注册,买否则无法发现.
-
要注册自身(方便测试查看效果)
server: port: 8762 eureka: instance: hostname: eureka-server2 # 主机名 client: service-url: defaultZone: http://eureka-server1:8761/eureka register-with-eureka: true # 是否将自己的路径 注册到eureka上。eureka server 不需要的,eureka provider client 需要 fetch-registry: true # 是否需要从eureka中抓取路径。eureka server 不需要的,eureka consumer client 需要 spring: application: name: eureka-server-cluster -
15 Spring Cloud服务治理-Eureka高可用-客户端测试
eureka:
  instance:
    hostname: localhost # 主机名
  client:
    service-url:
      defaultZone:  http://eureka-server1:8761/eureka,http://eureka-server2:8762/eureka
      # eureka服务端地址,将来客户端使用该地址和eureka进行通信
16 Spring Cloud服务治理-Consul 概述
| Nacos | Eureka | Consul | Zookeeper | |
|---|---|---|---|---|
| 一致性协议 | CP+AP | AP | CP | CP |
| 健康检查 | TCP/HTTP/MYSQL/Client Beat | Client Beat | TCP/HTTP/gRPC/Cmd | Keep Alive |
| 负载均衡策略 | 权重/ metadata/Selector | Ribbon | Fabio | ----- |
| 雪崩保护 | 有 | 有 | 无 | 无 |
| 自动注销实例 | 支持 | 支持 | 不支持 | 支持 |
| 访问协议 | HTTP/DNS | HTTP | HTTP/DNS | TCP |
| 监听支持 | 支持 | 支持 | 支持 | 支持 |
| 多数据中心 | 支持 | 支持 | 支持 | 不支持 |
| 跨注册中心同步 | 支持 | 不支持 | 支持 | 不支持 |
| SpringCloud集成 | 支持 | 支持 | 支持 | 不支持 |
| Dubbo集成 | 支持 | 不支持 | 不支持 | 支持 |
| K8S集成 | 支持 | 不支持 | 支持 | 不支持 |
下载 https://www.consul.io/
使用
	1)先双击运行一下,然后在执行如下命令
	2)./consul.exe agent -dev
17 Spring Cloud服务治理-Consul 快速入门
provider pom.xml
<dependencies>

    <dependency>
        <groupId>org.springframework.cloudgroupId>
        <artifactId>spring-cloud-starter-consul-discoveryartifactId>
    dependency>

    <dependency>
        <groupId>org.springframework.bootgroupId>
        <artifactId>spring-boot-starter-webartifactId>
    dependency>

    <dependency>
        <groupId>org.springframework.bootgroupId>
        <artifactId>spring-boot-starter-testartifactId>
        <scope>testscope>
    dependency>

    <dependency>
        <groupId>org.springframework.bootgroupId>
        <artifactId>spring-boot-starter-actuatorartifactId>
    dependency>
dependencies>
yaml
server:
  port: 8000

spring:
  cloud:
    consul:
      host: localhost # consul 服务端的 ip
      port: 8500 # consul 服务端的端口 默认8500
      discovery:
        service-name: ${spring.application.name} # 当前应用注册到consul的名称
        prefer-ip-address: true # 注册ip

  application:
    name: consul-provider # 应用名称
consumer 配置一样,Controller 代码改造
public class OrderController {
    @Autowired
    private RestTemplate restTemplate;

    @Autowired
    private DiscoveryClient discoveryClient;

    @GetMapping("/goods/{id}")
    public Goods findGoodsById(@PathVariable("id") int id){
        //演示discoveryClient 使用
        List<ServiceInstance> instances = discoveryClient.getInstances("consul-PROVIDER");

        //判断集合是否有数据
        if(instances == null || instances.size() == 0){
            //集合没有数据
            return null;
        }

        ServiceInstance instance = instances.get(0);
        String host = instance.getHost();//获取ip
        int port = instance.getPort();//获取端口

        System.out.println(host);
        System.out.println(port);

        String url = "http://"+host+":"+port+"/goods/findOne/"+id;
        // 3. 调用方法
        Goods goods = restTemplate.getForObject(url, Goods.class);

        return goods;
    }
18 Spring Cloud服务治理-Nacos 概述
•Nacos = Spring Cloud 注册中心 + Spring Cloud 配置中心。
•Nacos是阿里巴巴 2018 年 7 月开源的项目。
•官网: https://nacos.io/
•下载地址: https://github.com/alibaba/nacos/releases
启动
19 Spring Cloud服务治理-Nacos 快速入门
pom.xml
<dependencies>

    <dependency>
        <groupId>org.springframework.cloudgroupId>
        <artifactId>spring-cloud-starter-alibaba-nacos-discoveryartifactId>
        <version>0.2.2.RELEASEversion>
    dependency>
    <dependency>
        <groupId>com.alibaba.nacosgroupId>
        <artifactId>nacos-clientartifactId>
        <version>1.1.0version>
    dependency>
    <dependency>
        <groupId>org.springframework.bootgroupId>
        <artifactId>spring-boot-starter-webartifactId>
    dependency>
    <dependency>
        <groupId>org.springframework.bootgroupId>
        <artifactId>spring-boot-starter-testartifactId>
        <scope>testscope>
    dependency>
    <dependency>
        <groupId>org.springframework.bootgroupId>
        <artifactId>spring-boot-starter-actuatorartifactId>
    dependency>
dependencies>
yaml
server:
  port: 8000
spring:
  cloud:
    nacos:
      discovery:
        server-addr:  127.0.0.1:8848 # 配置nacos 服务端地址
  application:
    name: nacos-provider # 服务名称
补充:
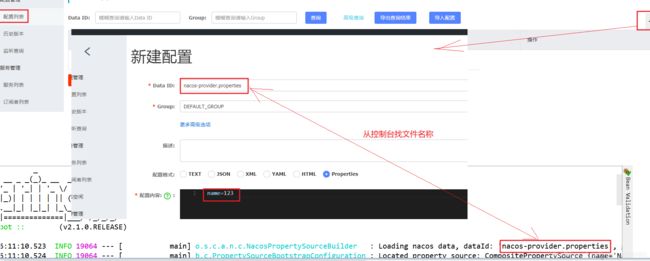
nacos 作为配置中心动态更新配置
1,导入坐标
<dependency>
    <groupId>org.springframework.cloudgroupId>
    <artifactId>spring-cloud-starter-alibaba-nacos-configartifactId>
    <version>0.2.2.RELEASEversion>
dependency>
2, 新建 文件 bootstrap.yml,配置nacos
spring:
  cloud:
    nacos:
      config:
        server-addr: 127.0.0.1:8848
3, controller 代码增加 @RefreshScope 注解
@RestController
@RequestMapping("/goods")
@RefreshScope
public class GoodsController {
    @Value("${name}")
    private String name;

    @Autowired
    private GoodsService goodsService;

    @GetMapping("/findOne/{id}")
    public Goods findOne(@PathVariable("id") int id){
        Goods goods = goodsService.findOne(id);
        System.out.println(name);

        return goods;
    }
}
4, nacos 增加配置
20 Ribbon 客户端负载均衡-概述
1) 简化 restTemplate 使用
2) 客户端负载均衡
21 Ribbon 客户端负载均衡-简化RestTemplate调用
-
声明 RestTemplate 时增加注解 @LoadBalanced
-
使用时把ip:port 改为 服务名称
@Configuration
public class RestTemplateConfig {
    @Bean
    @LoadBalanced
    public RestTemplate restTemplate(){
        return new RestTemplate();
    }
}
@GetMapping("/goods/{id}")
public Goods findGoodsById2(@PathVariable("id") int id){
    System.out.println("findGoodsById..."+id);
    String url = "http://EUREKA-PROVIDER/goods/findOne/"+id;
    // 3. 调用方法
    Goods goods = restTemplate.getForObject(url, Goods.class);


    return goods;
}
22 Ribbon 客户端负载均衡-负载均衡演示
高版本idea 开启多个实例
| 策略类 | 命名 | 描述 |
|---|---|---|
| RandomRule | 随机策略 | 随机选择server |
| RoundRobinRule | 轮询策略 | 按照顺序选择server(ribbon默认策略) |
| RetryRule | 重试策略 | 在一个配置时间段内,当选择server不成功,则一直尝试选择一个可用的server |
| BestAvailableRule | 最低并发策略 | 逐个考察server,如果server断路器打开,则忽略,再选择其中并发链接最低的server |
| AvailabilityFilteringRule | 可用过滤策略 | 过滤掉一直失败并被标记为circuit tripped的server,过滤掉那些高并发链接的server(active connections超过配置的阈值) |
| ResponseTimeWeightedRule | 响应时间加权重策略 | 根据server的响应时间分配权重,响应时间越长,权重越低,被选择到的概率也就越低。响应时间越短,权重越高,被选中的概率越高,这个策略很贴切,综合了各种因素,比如:网络,磁盘,io等,都直接影响响应时间 |
| ZoneAvoidanceRule | 区域权重策略 | 综合判断server所在区域的性能,和server的可用性,轮询选择server并且判断一个AWS Zone的运行性能是否可用,剔除不可用的Zone中的所有server |
23 Ribbon 客户端负载均衡-负载均衡策略
注解方式:
@Configuration
public class MyRule {
    @Bean
    public IRule getRule(){
        return  new RandomRule();
    }
}
启动类增加注解
// name  : 那个服务 负载均衡, 策略是那个
@RibbonClient(name = "EUREKA-PROVIDER",configuration = MyRule.class)
yaml 方式
EUREKA-PROVIDER:
  ribbon:
    NFLoadBalancerRuleClassName: com.netflix.loadbalancer.RandomRule
24 Feign-概述
- Feign 是一个简化客户端的调用服务端的组件 (封装了ribbon)
- spring-cloud 对其进行了二次封装,支持注解方式使用
25 Feign-快速入门
- 配置在消费者一方pom.xml
<dependencies>

    <dependency>
        <groupId>org.springframework.bootgroupId>
        <artifactId>spring-boot-starter-webartifactId>
    dependency>
    <dependency>
        <groupId>org.springframework.bootgroupId>
        <artifactId>spring-boot-starter-actuatorartifactId>
    dependency>

    <dependency>
        <groupId>org.springframework.cloudgroupId>
        <artifactId>spring-cloud-starter-netflix-eureka-clientartifactId>
    dependency>

    <dependency>
        <groupId>org.springframework.cloudgroupId>
        <artifactId>spring-cloud-starter-openfeignartifactId>
    dependency>
dependencies>
-
启动类上增加注解开启feign 功能
@EnableFeignClients //开启Feign的功 -
编写接口并配置
/** * feign声明式接口。发起远程调用的。 * String url = "http://FEIGN-PROVIDER/goods/findOne/"+id; Goods goods = restTemplate.getForObject(url, Goods.class); * * 1. 定义接口 * 2. 接口上添加注解 @FeignClient,设置value属性为 服务提供者的 应用名称 * 3. 编写调用接口,接口的声明规则 和 提供方接口保持一致。 * 4. 注入该接口对象,调用接口方法完成远程调用 */ @FeignClient(value = "FEIGN-PROVIDER") public interface GoodsFeignClient { @GetMapping("/goods/findOne/{id}") Goods findGoodsById(@PathVariable("id") int id); } -
使用,那个类使用那个类注入就好了
@Autowired
private GoodsFeignClient goodsFeignClient;
25 Feign-超时配置
# 设置Ribbon的超时时间
ribbon:
  ConnectTimeout: 1000 # 连接超时时间 默认1s
  ReadTimeout: 3000 # 逻辑处理的超时时间 默认1s
26 Feign-日志记录
1,增加日志配置
# 设置当前的日志级别 debug,feign只支持记录debug级别的日志
logging:
  level:
    com.itheima: debug
- 增加feign 配置
@Configuration
public class FeignLogConfig {
    /*
        NONE,不记录
        BASIC,记录基本的请求行,响应状态码数据
        HEADERS,记录基本的请求行,响应状态码数据,记录响应头信息
        FULL;记录完成的请求 响应数据
     */
    @Bean
    public Logger.Level level(){
        return Logger.Level.FULL;
    }
}
- 接口配置
@FeignClient(value = "FEIGN-PROVIDER",configuration = FeignLogConfig.class)
public interface GoodsFeignClient {

    @GetMapping("/goods/findOne/{id}")
    public Goods findGoodsById(@PathVariable("id") int id);

}
27 Hystrix-概述
Hystix 是 Netflix 开源的一个延迟和容错库,用于隔离访问远程服务、第三方库,防止出现级联失败(雪崩)。

雪崩:一个服务失败,导致整条链路的服务都失败的情形。
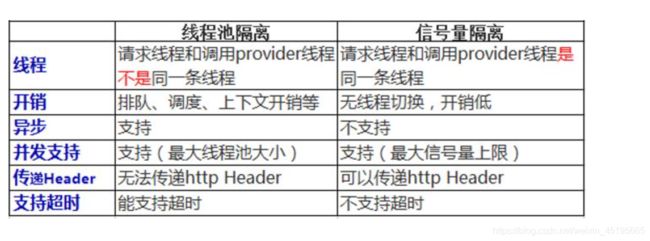
•隔离 : 某个服务固定资源(线程数限定,请求数限定),防止资源被某个业务占用完毕
		线程池隔离:限制某个服务或方法的线程数
		信号量隔离: 信号量隔离是指在规定时间内只允许指定数量的信号量进行服务访问,其他得不到信号量的线程进入fallback。

•降级 : 报错以后,响应错误消息而不是 500或异常等错误
•熔断 : 当降级触发到一定比例,会触发熔断, 断开所有连接
•限流 : 限制访问速率
		 限流限制的是流速, 而第一条信号量限制的是最大并发数
线程池隔离 和 信号量隔离的区别
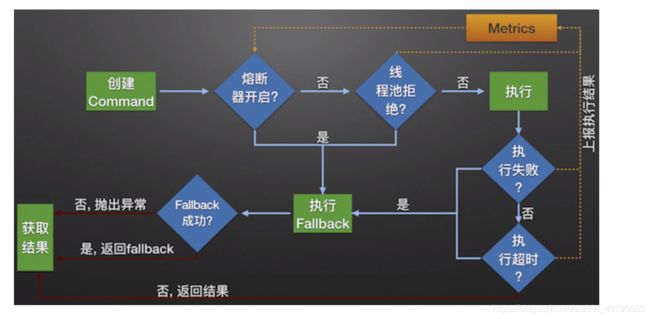
降级流程图图
28 Hystrix-降级-提供方降级
1) 只要时间超过1s 降级
2) 出现异常降级
- pom.xml
<dependency>
    <groupId>org.springframework.cloudgroupId>
    <artifactId>spring-cloud-starter-netflix-hystrixartifactId>
dependency>
- 启动类增加注解 @EnableCircuitBreaker
@EnableEurekaClient //该注解 在新版本中可以省略
@EnableCircuitBreaker // 开启Hystrix功能
@SpringBootApplication
public class ProviderApp {
    public static void main(String[] args) {
        SpringApplication.run(ProviderApp.class,args);
    }
}
- 增加 降级方法
/**
 * 定义降级方法:
 *  1. 方法的返回值需要和原方法一样
 *  2. 方法的参数需要和原方法一样
 */
public Goods findOne_fallback(int id){
    Goods goods = new Goods();
    goods.setTitle("降级了~~~");

    return goods;
}
- 配置降级
/**
 * 降级:
 *  1. 出现异常
 *  2. 服务调用超时
 *      * 默认1s超时
 *
 *  @HystrixCommand(fallbackMethod = "findOne_fallback")
 *      fallbackMethod:指定降级后调用的方法名称
 */
@GetMapping("/findOne/{id}")
@HystrixCommand(fallbackMethod = "findOne_fallback",commandProperties = {
    //设置Hystrix的超时时间,默认1s
    @HystrixProperty(name="execution.isolation.thread.timeoutInMilliseconds",value = "3000")
})
public Goods findOne(@PathVariable("id") int id){
    //1.造个异常
    int i = 3/0;
    try {
        //2. 休眠2秒
        Thread.sleep(2000);
    } catch (InterruptedException e) {
        e.printStackTrace();
    }
    Goods goods = goodsService.findOne(id);

    goods.setTitle(goods.getTitle() + ":" + port);//将端口号,设置到了 商品标题上
    return goods;
}
说明:
-
很多方法可以共用一个降级方法,但是每个需要降级的方法必须单独配置
如果想要统一配置可以在类上使用统一配置注解
@DefaultProperties(defaultFallback = "findOne_fallback") -
默认超过1s为响应,也会触发降级逻辑,所以可以配置超时时间
可以通过如下配置配置统一处理逻辑
hystrix:
  command:
    default:
      execution:
        isolation:
          thread:
            timeoutInMilliseconds: 2000
28 Hystrix-降级-消费方降级
- yaml 配置 ,开启feign对hystrix的支持
# 开启feign对hystrix的支持
feign:
  hystrix:
    enabled: true
- 定义实现类
/**
 * Feign 客户端的降级处理类
 * 1. 定义类 实现 Feign 客户端接口
 * 2. 使用@Component注解将该类的Bean加入SpringIOC容器
 */
@Component
public class GoodsFeignClientFallback implements GoodsFeignClient {
    @Override
    public Goods findGoodsById(int id) {
        Goods goods = new Goods();
        goods.setTitle("又被降级了~~~");
        return goods;
    }
}
- 在接口上增加降级逻辑
@FeignClient(value = "HYSTRIX-PROVIDER",fallback = GoodsFeignClientFallback.class)
public interface GoodsFeignClient {
    @GetMapping("/goods/findOne/{id}")
    public Goods findGoodsById(@PathVariable("id") int id);
}
降级的原因是 客户端超时, 增加如下配置实现超时配置
ribbon:
  ConnectTimeout: 4000  #毫秒    连接超时时间
  ReadTimeout: 4000     #毫秒      逻辑处理超时时间

hystrix:
  command:
    default:
      execution:
        isolation:
          thread:
            timeoutInMilliseconds: 5000 # 设置hystrix的超时时间为3000ms, 之后才调用降级方法
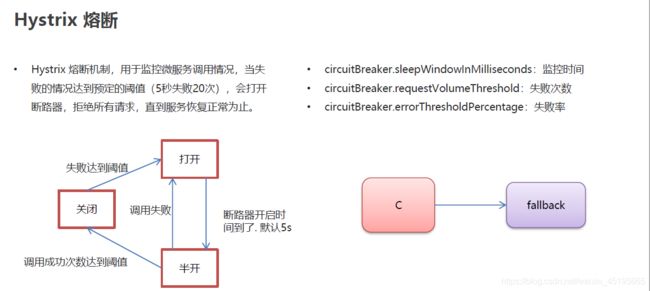
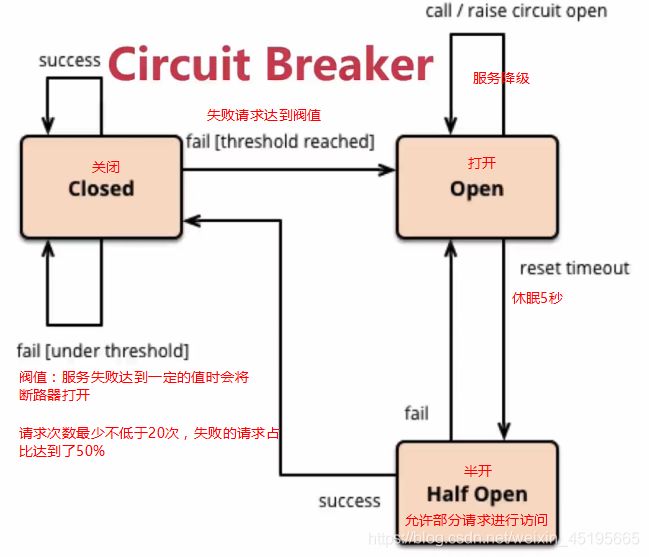
29 Hystrix-熔断-概念
-
熔断是一种机制
当服务提供者如果短时间内大量的请求失败,既有可能是服务压力短时间内过大导致的异常. 明知道异常了还继续处理,服务器压力会继续过大,导致雪崩,为了防止雪崩,提供了熔断机制
30 Hystrix-熔断-代码演示
参数配置
@GetMapping("/findOne/{id}")
@HystrixCommand(fallbackMethod = "findOne_fallback",commandProperties = {
    //设置Hystrix的超时时间,默认1s
    @HystrixProperty(name="execution.isolation.thread.timeoutInMilliseconds",value = "3000"),
    //监控时间 默认5000 毫秒
    @HystrixProperty(name="circuitBreaker.sleepWindowInMilliseconds",value = "5000"),
    //失败次数。默认20次
    @HystrixProperty(name="circuitBreaker.requestVolumeThreshold",value = "20"),
    //失败率 默认50%
    @HystrixProperty(name="circuitBreaker.errorThresholdPercentage",value = "50")
})
public Goods findOne(@PathVariable("id") int id){
    //如果id == 1 ,则出现异常,id != 1 则正常访问
    if(id == 1){
        //1.造个异常
        int i = 3/0;
    }

    /*try {
            //2. 休眠2秒
            Thread.sleep(2000);
        } catch (InterruptedException e) {
            e.printStackTrace();
        }*/
    Goods goods = goodsService.findOne(id);

    goods.setTitle(goods.getTitle() + ":" + port);//将端口号,设置到了 商品标题上
    return goods;
}

/**
     * 定义降级方法:
     *  1. 方法的返回值需要和原方法一样
     *  2. 方法的参数需要和原方法一样
     */
public Goods findOne_fallback(int id){
    Goods goods = new Goods();
    goods.setTitle("降级了~~~");

    return goods;
}
熔断可以通过 yaml 统一配置
hystrix:
  command:
    default:
      execution:
        isolation:
          thread:
            timeoutInMilliseconds: 2000
      circuitBreaker:
        errorThresholdPercentage: 50 # 触发熔断错误比例阈值,默认值50%
        sleepWindowInMilliseconds: 5000 # 熔断后休眠时长,默认值5秒
        requestVolumeThreshold: 20 # 熔断触发最小请求次数,默认值是20
31 Hystrix-熔断监控
1)  Hystrix 熔断监控 Hystrix dashboard 只能监控一个
2)  Netflix 还提供了 Turbine ,进行聚合监控。
	http://localhost:8769/turbine.stream
32 Gateway-概述
GetWay网关类似于nginx但是比nginx 强大
概念:
	统一管理api 的工具

网关就是系统的入口,封装了应用程序的内部结构,为客户端提供统一服务,一些与业务本身功能无关的公共逻辑可以在这里实现,诸如认证、鉴权、监控、缓存、负载均衡、流量管控、路由转发等。

解决方案: nginx_lua,netflixzuul,springCloud GetWay
33 Gateway-快速入门
1) 搭建getway 网关模块
2) 引入starter-gateway 网关模块
3) 编写启动类
4) 编写配置文件
<dependency>
    <groupId>org.springframework.cloudgroupId>
    <artifactId>spring-cloud-starter-gatewayartifactId>
dependency>
server:
  port: 80

spring:
  application:
    name: api-gateway-server

  cloud:
    # 网关配置
    gateway:
      # 路由配置:转发规则
      routes: #集合。
      # id: 唯一标识。默认是一个UUID
      # uri: 转发路径
      # predicates: 条件,用于请求网关路径的"匹配规则"
      # filters:配置局部过滤器的

      - id: gateway-provider
        # 静态路由
        uri: http://localhost:8001/
        predicates:
        - Path=/goods/**

      - id: gateway-consumer
        uri: http://localhost:9000
        predicates:
        - Path=/order/**
34 Gateway-静态路由
配置同上,
缺点: ip: 端口写死,后续一旦变更,维护不方便
35 Gateway-动态路由
server:
  port: 80

spring:
  application:
    name: api-gateway-server

  cloud:
    # 网关配置
    gateway:
      # 路由配置:转发规则
      routes: #集合。
      # id: 唯一标识。默认是一个UUID
      # uri: 转发路径
      # predicates: 条件,用于请求网关路径的匹配规则
      # filters:配置局部过滤器的

      - id: gateway-provider
        # 静态路由
        # uri: http://localhost:8001/
        # 动态路由
        uri: lb://GATEWAY-PROVIDER
        predicates:
        - Path=/goods/**

      - id: gateway-consumer
        # uri: http://localhost:9000
        uri: lb://GATEWAY-CONSUMER
        predicates:
        - Path=/order/**
eureka:
  client:
    service-url:
      defaultZone: http://localhost:8761/eureka
36 Gateway-微服务名称配置
我们可以使用配置,访问时可以增加服务名称,方便管理
server:
  port: 80

spring:
  application:
    name: api-gateway-server

  cloud:
    # 网关配置
    gateway:
      # 路由配置:转发规则
      routes: #集合。
      # id: 唯一标识。默认是一个UUID
      # uri: 转发路径
      # predicates: 条件,用于请求网关路径的匹配规则
      # filters:配置局部过滤器的

      - id: gateway-provider
        # 静态路由
        # uri: http://localhost:8001/
        # 动态路由
        uri: lb://GATEWAY-PROVIDER
        predicates:
        - Path=/goods/**
        filters:
        - AddRequestParameter=username,zhangsan

      - id: gateway-consumer
        # uri: http://localhost:9000
        uri: lb://GATEWAY-CONSUMER
        predicates:
        - Path=/order/**

      # 微服务名称配置
      discovery:
        locator:
          enabled: true # 设置为true 请求路径前可以添加微服务名称
          lower-case-service-id: true # 允许为小写(配置后必须用小写,不配置,必须用全大写)

eureka:
  client:
    service-url:
      defaultZone: http://localhost:8761/eureka
37 Gateway-过滤器-概述
概念:
	过滤所有请求或响应,统一处理,处理后响应
过滤器分类:
	1. 按照请求响应分类:
		Gateway 提供两种过滤器方式:“ pre” 和“ post”
	2.按照过滤范围分类
		GatewayFilter:局部过滤器,针对单个路由
		GlobalFilter :全局过滤器,针对所有路由
38 Gateway-过滤器-局部过滤器
在配置中配置即可
server:
  port: 80

spring:
  application:
    name: api-gateway-server

  cloud:
    # 网关配置
    gateway:
      # 路由配置:转发规则
      routes: #集合。
      # id: 唯一标识。默认是一个UUID
      # uri: 转发路径
      # predicates: 条件,用于请求网关路径的匹配规则
      # filters:配置局部过滤器的

      - id: gateway-provider
        # 静态路由
        # uri: http://localhost:8001/
        # 动态路由
        uri: lb://GATEWAY-PROVIDER
        predicates:
        - Path=/goods/**
        filters:
        - AddRequestParameter=username,zhangsan

      - id: gateway-consumer
        # uri: http://localhost:9000
        uri: lb://GATEWAY-CONSUMER
        predicates:
        - Path=/order/**

      # 微服务名称配置
      discovery:
        locator:
          enabled: true # 设置为true 请求路径前可以添加微服务名称
          lower-case-service-id: true # 允许为小写

eureka:
  client:
    service-url:
      defaultZone: http://localhost:8761/eureka
39 Gateway-过滤器-全局过滤器
@Component
public class MyFilter implements GlobalFilter, Ordered {
    @Override
    public Mono<Void> filter(ServerWebExchange exchange, GatewayFilterChain chain) {
        System.out.println("自定义全局过滤器执行了~~~");
        return chain.filter(exchange);//放行
    }

    /**
     * 过滤器排序
     * @return 数值越小 越先执行
     */
    @Override
    public int getOrder() {
        return 0;
    }
}
