nginx--如何基于rpm包进行离线安装及配置(Linux)
【背景说明】
1、很多情况下,公司的生产环境一般都是内网,而大多数的内网Linux环境,一般都是无法直接在线安装nginx等工具的,此时就可以通过rpm安装包进行离线安装及配置。
2、安装nginx一般建议使用root用户创建一个对应的nginx普通用户来完成nginx服务器的后续运维工作~
Linux添加用户可以参考我的这篇博文https://blog.csdn.net/JustinQin/article/details/101677631
一、安装nginx
1.1 资源准备
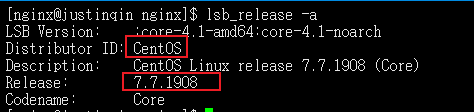
- 查看系统版本
lsb_release -a
可以看到我这里的操作系统是Linux Centos 7.7
- 官方下载rpm安装包
- 具体操作系统按实际情况进行选择,下载地址 http://nginx.org/packages/
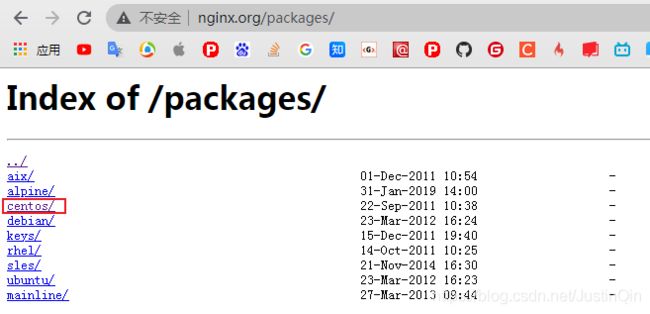
- 具体操作系统按实际情况进行选择,下载地址 http://nginx.org/packages/
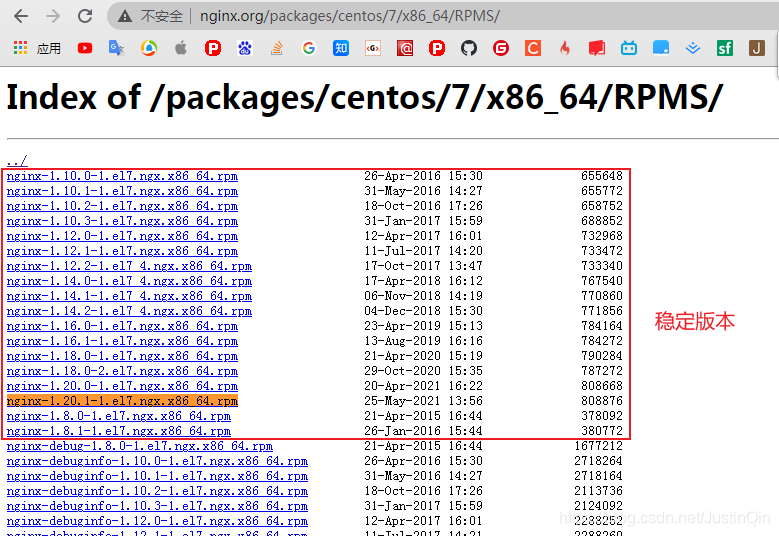
- 这里我使用的是Linux CentOS 7的最新稳定版本
nginx-1.20.1-1.el7.ngx.x86_64.rpmhttp://nginx.org/packages/centos/7/x86_64/RPMS/ - 具体版本需要根据实际进行选择,只要确保生产使用的是
稳定版本就行
- 上传安装包
- 使用普通用户
nginx上传安装包到服务路径:/usr/nginx/
即完整路径为/usr/nginx/nginx-1.20.1-1.el7.ngx.x86_64.rpm - 按实际需要创建对应路径,建议在
nginx用户有权限的目录下创建,如果没有nginx用户,可以申请下用root用户创建nginx用户。 - Linux添加用户可以参考我的这篇博文 Linux–用户、用户组管理的常用命令
- 使用普通用户
1.2 检查环境
- 检查命令
cd /usr/nginx
rpm -ivh --test nginx-1.20.1-1.el7.ngx.x86_64.rpm
--test表示仅检查安装环境不实际安装,若正常,提示如下图:

1.3 安装及检查
- 首次安装nginx,需要使用
root用户进行安装、检查等操作后,最后再授权给nginx用户,直接使用nginx或者其他普通用户安装,一般会提示无权限,如下:

- 安装nginx(
root用户)
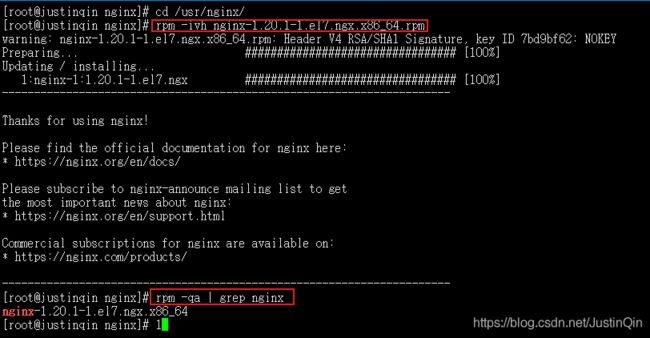
cd /usr/nginx/
rpm -ivh nginx-1.20.1-1.el7.ngx.x86_64.rpm
- 检查是否安装成功
rpm -qa | grep nginx
二、配置nginx
2.1 配置权限
- nginx的rpm安装包,其实就是一个很多文件的压缩包,使用
root用户安装后,这些目录、文件很多都是root权限的,需要重新授权给nginx或者普通用户。 - 查看
rpm安装包列表清单
rpm -qpl nginx-1.20.1-1.el7.ngx.x86_64.rpm
- 复制列表清单授权给
nginx用户
授权格式:chown -R用户名:用户组名资源路径
chown -R nginx:nginx /etc/logrotate.d/nginx
chown -R nginx:nginx /etc/nginx
chown -R nginx:nginx /etc/nginx/conf.d
chown -R nginx:nginx /etc/nginx/conf.d/default.conf
chown -R nginx:nginx /etc/nginx/fastcgi_params
chown -R nginx:nginx /etc/nginx/mime.types
chown -R nginx:nginx /etc/nginx/modules
chown -R nginx:nginx /etc/nginx/nginx.conf
chown -R nginx:nginx /etc/nginx/scgi_params
chown -R nginx:nginx /etc/nginx/uwsgi_params
chown -R nginx:nginx /usr/lib/systemd/system/nginx-debug.service
chown -R nginx:nginx /usr/lib/systemd/system/nginx.service
chown -R nginx:nginx /usr/lib64/nginx
chown -R nginx:nginx /usr/lib64/nginx/modules
chown -R nginx:nginx /usr/libexec/initscripts/legacy-actions/nginx
chown -R nginx:nginx /usr/libexec/initscripts/legacy-actions/nginx/check-reload
chown -R nginx:nginx /usr/libexec/initscripts/legacy-actions/nginx/upgrade
chown -R nginx:nginx /usr/sbin/nginx
chown -R nginx:nginx /usr/sbin/nginx-debug
chown -R nginx:nginx /usr/share/doc/nginx-1.20.1
chown -R nginx:nginx /usr/share/doc/nginx-1.20.1/COPYRIGHT
chown -R nginx:nginx /usr/share/man/man8/nginx.8.gz
chown -R nginx:nginx /usr/share/nginx
chown -R nginx:nginx /usr/share/nginx/html
chown -R nginx:nginx /usr/share/nginx/html/50x.html
chown -R nginx:nginx /usr/share/nginx/html/index.html
chown -R nginx:nginx /var/cache/nginx
chown -R nginx:nginx /var/log/nginx
2.2 目录变更
- 使用
root用户基于rpm安装包安装完成后,切回nginx用户 - 为了方便后续的
日志备份以及更灵活的部署前端静态资源,建议重新规划日志目录和静态资源目录 - 创建
日志目录和静态资源目录
mkdir -p /usr/nginx/logs/nginx
mkdir -p /usr/nginx/nginx/html
- 将rpm安装包初始化的nginx欢迎页面,拷贝到静态资源路径下
cp /usr/share/nginx/html/50x.html /usr/nginx/nginx/html/50x.html
cp /usr/share/nginx/html/index.html /usr/nginx/nginx/html/index.html
2.3 重要目录说明
-
/etc/nginxnginx默认配置文件的目录nginx.confnginx主配置文件,文件最后配置了自动加载conf.d下*.conf的配置
-
/etc/nginx/conf.dnginx的*.conf多个子配置存放目录default.confnginx子配置文件,主要用于端口端口、日志、负载均衡、反向代理等配置。
-
/usr/sbin/nginx可执行二进制文件,nginx的启停等执行命令前缀 -
/usr/share/nginx/html静态资源目录
本文这里已经改为/usr/nginx/nginx/html -
/var/log/nginx日志文件存放目录
本文这里已经改为/usr/nginx/logs/nginx
2.4 配置default.conf
- 修改nginx监听端口,这里以
10080端口为例,具体端口根据实际项目需要进行修改。 - 创建
10080.conf
cd /etc/nginx/conf.d
cp default.conf default.conf.bak
mv default.conf 10080.conf
- 修改
10080.conf
主要修改对应的端口号、日志路径、静态资源路径,如下截图:
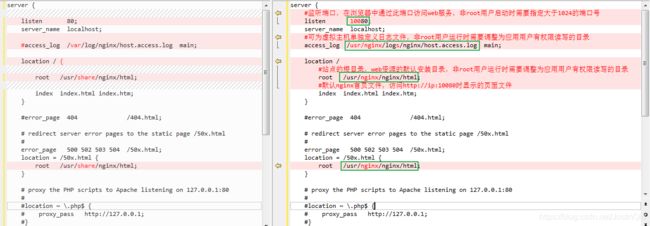
10080.conf修改后完整代码如下:
server {
    #当前模块所监听的端口
    listen 10080;
    server_name  localhost;

    #定义当前server模块的独立日志文件,非root用户运行时需要调整为应用用户有权限读写的目录
    access_log  /usr/nginx/logs/nginx/host.access.log  main;

    location / {
        #站点的根目录,web资源的默认安装目录,非root用户运行时需要调整为应用用户有权限读写的目录
        root   /usr/nginx/nginx/html;
        #默认nginx首页文件,访问http://ip:port时显示的页面文件
        index  index.html index.htm;
    }

    #error_page  404              /404.html;

    # redirect server error pages to the static page /50x.html
    #
    error_page   500 502 503 504  /50x.html;
    location = /50x.html {
        #站点的根目录,web资源的默认安装目录,非root用户运行时需要调整为应用用户有权限读写的目录
        root   /usr/nginx/nginx/html;
    }

    # proxy the PHP scripts to Apache listening on 127.0.0.1:80
    #
    #location ~ \.php$ {
    #    proxy_pass   http://127.0.0.1;
    #}

    # pass the PHP scripts to FastCGI server listening on 127.0.0.1:9000
    #
    #location ~ \.php$ {
    #    root           html;
    #    fastcgi_pass   127.0.0.1:9000;
    #    fastcgi_index  index.php;
    #    fastcgi_param  SCRIPT_FILENAME  /scripts$fastcgi_script_name;
    #    include        fastcgi_params;
    #}

    # deny access to .htaccess files, if Apache's document root
    # concurs with nginx's one
    #
    #location ~ /\.ht {
    #    deny  all;
    #}
}
2.5 配置nginx.conf
- 备份
nginx.conf
cd /etc/nginx/
cp nginx.conf nginx.conf.bak
- 修改
nginx.conf
同样主要修改日志路径及nginx进程文件,如下截图:
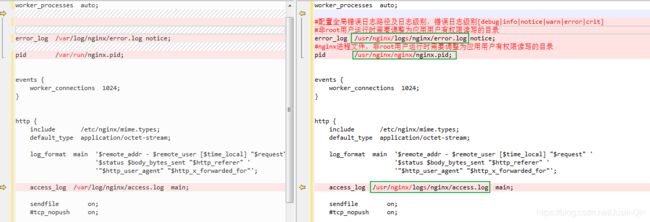
nginx.conf修改后完整代码如下:
user  nginx;
worker_processes  auto;

#配置全局错误日志路径及日志级别,错误日志级别[debug|info|notice|warn|error|crit]
#非root用户运行时需要调整为应用用户有权限读写的目录
error_log  /usr/nginx/logs/nginx/error.log notice;
#nginx进程文件,非root用户运行时需要调整为应用用户有权限读写的目录
pid        /usr/nginx/nginx/nginx.pid;


events {
    worker_connections  1024;
}


http {
    include       /etc/nginx/mime.types;
    default_type  application/octet-stream;

    log_format  main  '$remote_addr - $remote_user [$time_local] "$request" '
                      '$status $body_bytes_sent "$http_referer" '
                      '"$http_user_agent" "$http_x_forwarded_for"';

    access_log  /usr/nginx/logs/nginx/access.log  main;

    sendfile        on;
    #tcp_nopush     on;

    keepalive_timeout  65;

    #gzip  on;

    include /etc/nginx/conf.d/*.conf;
}
2.6 启动nginx
-
查看nginx运行进程
ps -ef|grep nginx
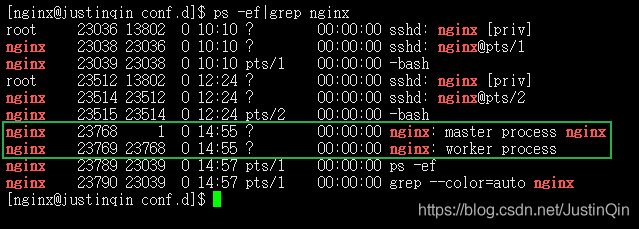
存在nginx的运行进程,表明nginx服务正在运行中~ -
如果nginx已经处于运行状态,那么不需要重启nginx,只需要刷新nginx配置即可,刷新配置前先检查下nginx配置是否正确,检查命令
nginx -t,配置正确则刷新nginx配置,刷新命令nginx -s reload -
如果nginx处于未运行状态,先检查下nginx配置是否正确,检查命令
nginx -t,配置正确则直接启动nginx,启动命令为nginx或/usr/sbin/nginx
–说明:
普通用户nginx,启动nginx时,可能会提示如下警告信息:
nginx:[warn] ***
表示nginx: master process主进程只能对超级用户root生效即root启动nginx时生效,该
警告不影响nginx的正常使用。 -
nginx其他常用命令
nginx -s stop停止 nginx
nginx -s reload刷新nginx配置(不重启nginx的情况下,重新加载最新nginx配置文件)
nginx -s reopen新开nginx日志(不重启的情况下,当access.log等日志文件不存在时会新生成对应日志文件)
2.7 访问nginx
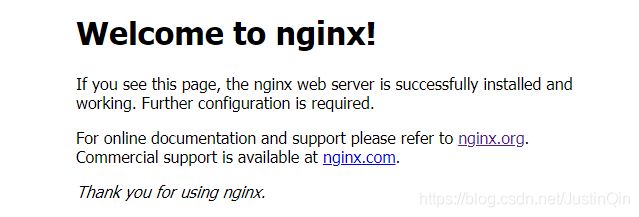
-
打开浏览器,访问
http//ip:port
IP改成自己服务器(ifconfig查看)和port表示配置的监听端口号。
-
如访问提示
403 Forbidden相关报错提示信息,则拷贝nginx默认html欢迎页面到静态资源目录下
cp /usr/share/nginx/html/50x.html /usr/nginx/nginx/html/50x.html
cp /usr/share/nginx/html/index.html /usr/nginx/nginx/html/index.html
- 如果nginx启动正常,html欢迎页面也存在,但是访问加载超时,这种情况则需要看下你的服务器的防火墙状态,如果你的Linux的防火墙当前处于开启状态,但是防火墙未添加
监听端口号端口,则需要使用root添加监听端口号后,再重启防火墙,再重新访问~
2.8 检查防火墙
-
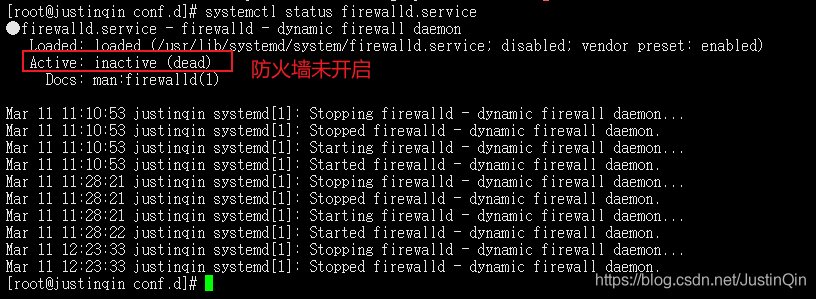
关于防火墙的检查,这个根据实际情况进行配置,如果防火墙本身未开启,也不会影响nginx的访问
-
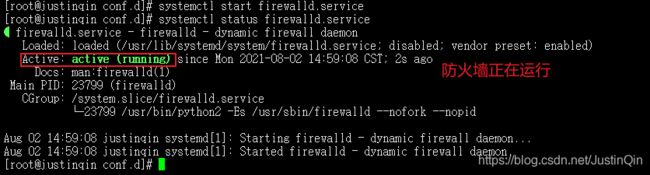
但是如果你的Linux环境开启了防火墙,要确保nginx监听的相关端口号,要被添加到防火墙中,才可以正常访问nginx。
-
这里使用
root用户操作,放开nginx的tcp/10080端口号 -
查看防火墙运行状态
systemctl status firewalld.service
-
开启防火墙
systemctl start firewalld.service
-
查看防火墙已放开端口列表
firewall-cmd --permanent --zone=public --list-ports -
放开
10080/tcp端口
firewall-cmd --permanent --zone=public --add-port=10080/tcp -
再次查看端口
firewall-cmd --permanent --zone=public --list-ports -
重启防火墙
systemctl restart firewalld.service -
其他防火墙常用命令
删除防火墙指定端口firewall-cmd --permanent --zone=public --remove-port=10080/tcp
附录
** 中途可能遇到的问题 **
-
权限问题?
若使用nginx用户启动nginx时,提示权限问题,则使用root用户重新操作【配置权限】章节的chown授权给nginx用户。 -
default.conf配置问题
要仔细检查nginx的/etc/nginx.conf和/etc/nginx/conf.d/default.conf两个主要配置信息
比如,我当时就错将nginx.conf的内容拷贝到10080.conf中了,则nginx -t测试时会提示报错如下:
nginx: [warn] the “user” directive makes sense only if the master process runs with super-user privileges, ignored in /etc/nginx/nginx.conf:1
nginx: [emerg] "user" directive is not allowed here in /etc/nginx/conf.d/10080.conf:1
nginx: configuration file /etc/nginx/nginx.conf test failed