第四章 Hadoop运行模式
目录
- 1、本地运行模式(了解)
-
- 1.1 在hadoop-3.1.3文件下面创建一个wcinput文件夹
- 1.2 在wcinput文件下创建一个word.txt文件
- 1.3 回到Hadoop目录/opt/module/hadoop-3.1.3
- 1.4 查看结果
- 2、完全分布式运行模式(重点)
-
- 2.1 编写集群分发脚本xsync
-
- 2.1.1 scp(secure copy)安全拷贝
- 2.1.2 rsync远程同步工具
- 2.1.3 xsync集群分发脚本
- 2.2 SSH无密码登录配置
-
- 2.2.1 免密登录原理
- 2.2.2 配置102无密登录103和104
- 2.3 集群配置
-
- 2.3.1 集群部署规划
- 2.3.2 配置文件说明
- 2.3.3 配置自定义文件
- 2.4 群起集群
-
- 2.4.1 配置workers
- 2.4.2 启动集群
- 2.4.3 集群基本测试
- 2.5 常见集群崩溃后解决方法
- 2.6 配置历史服务器
- 2.7 配置日志的聚集
- 2.8 集群启动
-
- 2.8.3 制作脚本封装启动和关闭操作
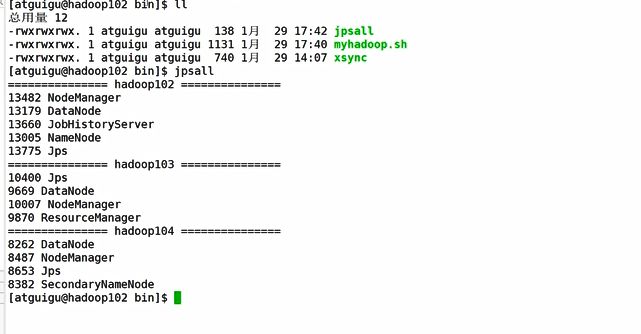
- 2.8.4 制作脚本封装查看所有服务器的jps操作
- 2.9 常用端口号对比
- 3.0 时间同步
- Hadoop官方网站:http://hadoop.apache.org/
- Hadoop运行模式包括:本地模式、伪分布式模式以及完全分布式模式。
1、本地模式:单机运行,只是用来演示一下官方案例。生产环境不用。
2、伪分布式模式:也是单机运行,但是具备Hadoop集群的所有功能,一台服务器模拟一个分布式的环境。个别缺钱的公司用来测试,生产环境不用。
3、完全分布式模式:多台服务器组成分布式环境。生产环境使用。

1、本地运行模式(了解)
1.1 在hadoop-3.1.3文件下面创建一个wcinput文件夹
[atguigu@hadoop102 hadoop-3.1.3]$ mkdir wcinput
1.2 在wcinput文件下创建一个word.txt文件
[atguigu@hadoop102 hadoop-3.1.3]$ cd wcinput
[atguigu@hadoop102 wcinput]$ vim word.txt
在文件中输入如下内容
hadoop yarn
hadoop mapreduce
atguigu atguigu
1.3 回到Hadoop目录/opt/module/hadoop-3.1.3
# 选择统计个数的jar包,执行wordcount,输入的在wcinput,输出在wcoutput(存在的话会报错)
[atguigu@hadoop102 hadoop-3.1.3]$ hadoop jar share/hadoop/mapreduce/hadoop-mapreduce-examples-3.1.3.jar wordcount wcinput wcoutput
1.4 查看结果
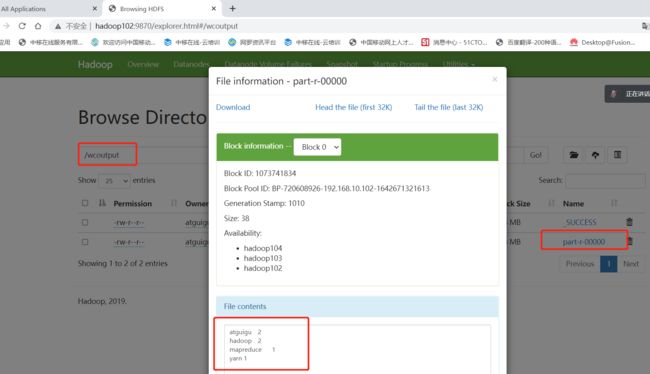
[atguigu@hadoop102 hadoop-3.1.3]$ cat wcoutput/part-r-00000
2、完全分布式运行模式(重点)
2.1 编写集群分发脚本xsync
- 服务器与服务器之间的传输命令
- 利用分发脚本可以将102上的JDK和Hadoop直接拷贝到103和104上。
2.1.1 scp(secure copy)安全拷贝
前提:在hadoop102、hadoop103、hadoop104都已经创建好的/opt/module和/opt/software两个目录,并且已经把这两个目录修改为atguigu:atguigu
(1)在hadoop102上,将hadoop102中/opt/module/jdk1.8.0_212目录拷贝到hadoop103上。
[atguigu@hadoop102 ~]$ scp -r /opt/module/jdk1.8.0_212 atguigu@hadoop103:/opt/module
(2)在hadoop103上,将hadoop102中/opt/module/hadoop-3.1.3目录拷贝到hadoop103上。
[atguigu@hadoop103 ~]$ scp -r atguigu@hadoop102:/opt/module/hadoop-3.1.3 /opt/module/
(3)在hadoop103上操作,将hadoop102中/opt/module目录下所有目录拷贝到hadoop104上。
[atguigu@hadoop103 opt]$ scp -r atguigu@hadoop102:/opt/module/* atguigu@hadoop104:/opt/module
2.1.2 rsync远程同步工具
- rsync主要用于备份和镜像。具有速度快、避免复制相同内容和支持符号链接的优点。
- rsync和scp区别:用rsync做文件的复制要比scp的速度快,rsync只对差异文件做更新。scp是把所有文件都复制过去。

(1)删除hadoop103中/opt/module/hadoop-3.1.3/wcinput和wcoutput
[atguigu@hadoop103 hadoop-3.1.3]$ rm -rf wcinput/ wcoutput/
(2)同步hadoop102中的/opt/module/hadoop-3.1.3到hadoop103
[atguigu@hadoop102 module]$ rsync -av hadoop-3.1.3/ atguigu@hadoop103:/opt/module/hadoop-3.1.3/
2.1.3 xsync集群分发脚本
目的:每次访问都要密码,还要切换不同的集群,该脚本是对rsync进行封装实现集群分发功能,循环复制文件到所有节点的相同目录下
期望脚本案例实现:
- 在102上输入:xsync a.txt 就把 txt文件分发到103、104上相同的目录里面。
- 在任何路径上都能实现(全局路径)
(1)新建txt文件
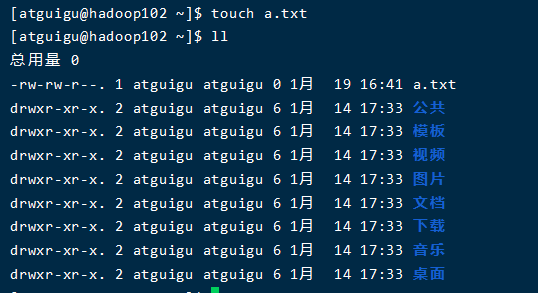
(2)在/home/atguigu/bin目录下创建xsync文件
[atguigu@hadoop102 opt]$ cd /home/atguigu
[atguigu@hadoop102 ~]$ mkdir bin
[atguigu@hadoop102 ~]$ cd bin
[atguigu@hadoop102 bin]$ vim xsync
添加下面内容:
#!/bin/bash

#1. 判断参数个数
if [ $# -lt 1 ]
then
    echo Not Enough Arguement!
    exit;
fi

#2. 遍历集群所有机器
for host in hadoop102 hadoop103 hadoop104
do
    echo ====================  $host  ====================
    #3. 遍历所有目录,挨个发送

    for file in $@
    do
        #4. 判断文件是否存在
        if [ -e $file ]
            then
                #5. 获取父目录
                pdir=$(cd -P $(dirname $file); pwd)

                #6. 获取当前文件的名称
                fname=$(basename $file)
                ssh $host "mkdir -p $pdir"
                rsync -av $pdir/$fname $host:$pdir
            else
                echo $file does not exists!
        fi
    done
done
(3)修改可执行权限

(4)在102上同步bin目录,发现103和104上都有bin/xsync
[atguigu@hadoop102 ~]$ xsync bin/
(5)分发环境变量my_env.sh
# 发现根本没有分发
[atguigu@hadoop102 profile.d]$ xsync /etc/profile.d/my_env.sh
修改:(注意:如果用了sudo,那么xsync一定要给它的路径补全。)
[atguigu@hadoop102 ~]$ sudo ./bin/xsync/etc/profile.d/my_env.sh
(6)让环境变量生效
[atguigu@hadoop103 bin]$ source /etc/profile
[atguigu@hadoop104 bin$ source /etc/profile
2.2 SSH无密码登录配置
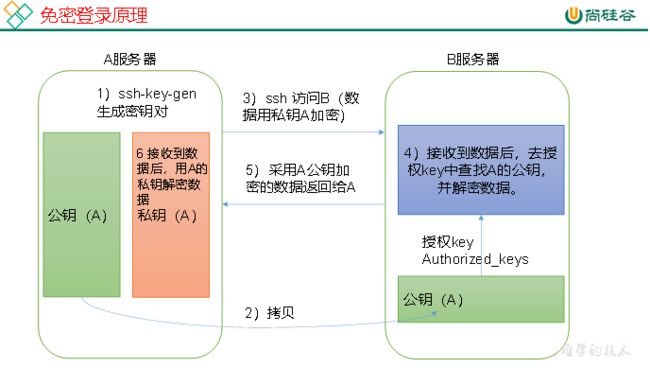
2.2.1 免密登录原理
(1)查看所有文件(包括隐藏的)
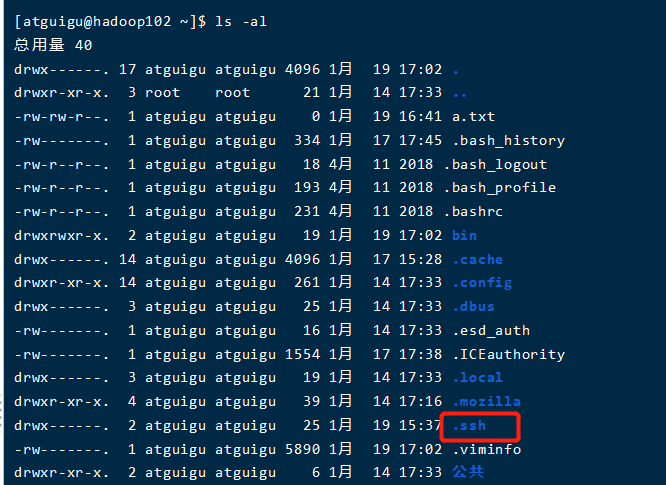
(2)查看访问记录(只有用过ssh的才有.ssh)
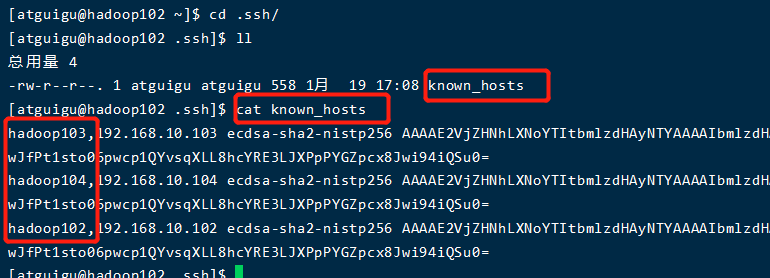
(3).ssh文件夹下(~/.ssh)的文件功能解释

2.2.2 配置102无密登录103和104
(1)生成公钥和私钥
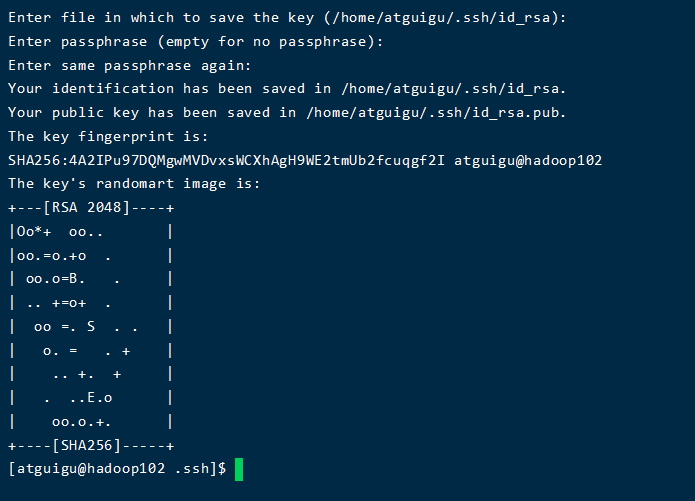
#然后敲(三个回车),就会生成两个文件id_rsa(私钥)、id_rsa.pub(公钥)
[atguigu@hadoop102 .ssh]$ ssh-keygen -t rsa
[atguigu@hadoop102 .ssh]$ ssh-copy-id hadoop102  # 访问自己
[atguigu@hadoop102 .ssh]$ ssh-copy-id hadoop103
[atguigu@hadoop102 .ssh]$ ssh-copy-id hadoop104
- 在103和104上也做上述操作,就可以三个自己免密登录。
- 目前只在atguigu上配置了,想再root权限下也免密,也需要相同配置。
2.3 集群配置
2.3.1 集群部署规划
- NameNode和SecondaryNameNode不要安装在同一台服务器
- ResourceManager也很消耗内存,不要和NameNode、SecondaryNameNode配置在同一台机器上。
2.3.2 配置文件说明
Hadoop配置文件分两类:默认配置文件和自定义配置文件,只有用户想修改某一默认配置值时,才需要修改自定义配置文件,更改相应属性值。
(1)默认配置文件:

(2)自定义配置文件:
core-site.xml、hdfs-site.xml、yarn-site.xml、mapred-site.xml四个配置文件存放在[atguigu@hadoop102 ~]$ cd /opt/module/hadoop-3.1.3/etc/hadoop/这个路径上,用户可以根据项目需求重新进行修改配置。
2.3.3 配置自定义文件
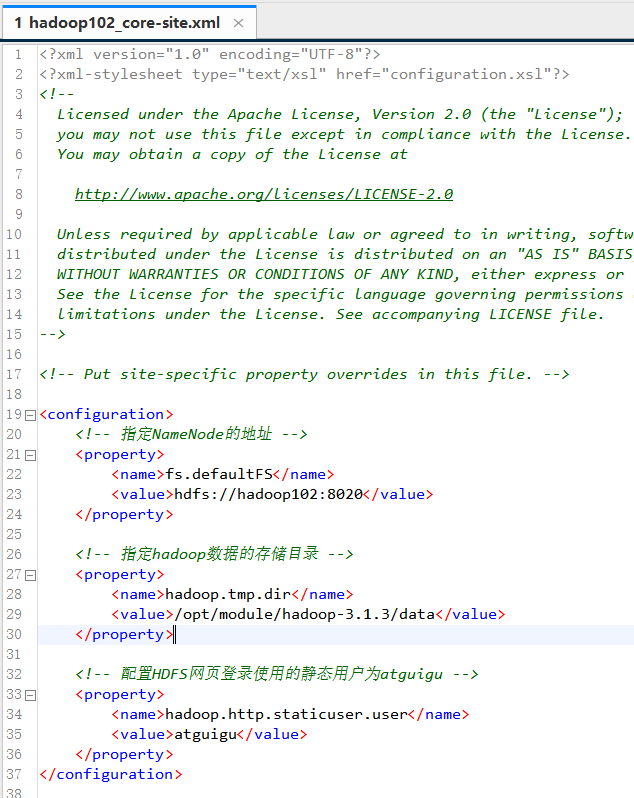
(1)配置core-site.xml
[atguigu@hadoop102 ~]$ cd /opt/module/hadoop-3.1.3/etc/hadoop/
[atguigu@hadoop102 hadoop]$ vim core-site.xml
添加内容:
        fs.defaultFS
        hdfs://hadoop102:8020


        hadoop.tmp.dir
        /opt/module/hadoop-3.1.3/data


        hadoop.http.staticuser.user
        atguigu
[atguigu@hadoop102 hadoop]$ vim hdfs-site.xml
文件内容如下:
        dfs.namenode.http-address
        hadoop102:9870


        dfs.namenode.secondary.http-address
        hadoop104:9868
(3)YARN配置文件,配置yarn-site.xml
[atguigu@hadoop102 hadoop]$ vim yarn-site.xml
文件内容如下:
        yarn.nodemanager.aux-services
        mapreduce_shuffle


        yarn.resourcemanager.hostname
        hadoop103


        yarn.nodemanager.env-whitelist
        JAVA_HOME,HADOOP_COMMON_HOME,HADOOP_HDFS_HOME,HADOOP_CONF_DIR,CLASSPATH_PREPEND_DISTCACHE,HADOOP_YARN_HOME,HADOOP_MAPRED_HOME
(4)MapReduce配置文件,配置mapred-site.xml
[atguigu@hadoop102 hadoop]$ vim mapred-site.xml
文件内容如下:
        mapreduce.framework.name
        yarn
(5)在集群上分发配置好的Hadoop配置文件
[atguigu@hadoop102 hadoop]$ xsync /opt/module/hadoop-3.1.3/etc/hadoop/
(6)去103和104上查看文件分发情况
[atguigu@hadoop103 ~]$ cat /opt/module/hadoop-3.1.3/etc/hadoop/core-site.xml
[atguigu@hadoop104 ~]$ cat /opt/module/hadoop-3.1.3/etc/hadoop/core-site.xml
2.4 群起集群
2.4.1 配置workers
[atguigu@hadoop102 hadoop]$ vim /opt/module/hadoop-3.1.3/etc/hadoop/workers
在该文件中增加如下内容:
hadoop102
hadoop103
hadoop104
注意:该文件中添加的内容结尾不允许有空格,文件中不允许有空行。
同步所有节点配置文件
[atguigu@hadoop102 hadoop]$ xsync /opt/module/hadoop-3.1.3/etc
2.4.2 启动集群
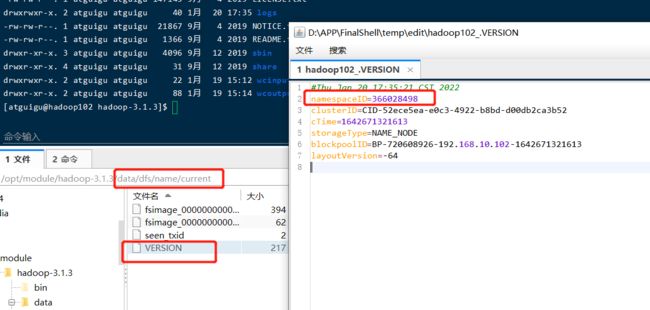
(1)如果集群是第一次启动,需要在hadoop102节点格式化NameNode(注意:格式化NameNode,会产生新的集群id,导致NameNode和DataNode的集群id不一致,集群找不到已往数据。如果集群在运行过程中报错,需要重新格式化NameNode的话,一定要先停止namenode和datanode进程,并且要删除所有机器的data和logs目录,然后再进行格式化。)
[atguigu@hadoop102 hadoop-3.1.3]$ hdfs namenode -format
#102、103、104都启动了
[atguigu@hadoop102 hadoop-3.1.3]$ sbin/start-dfs.sh

(3)在配置了ResourceManager的节点(hadoop103)启动YARN
[atguigu@hadoop103 hadoop-3.1.3]$ sbin/start-yarn.sh
[atguigu@hadoop102 hadoop-3.1.3]$ jps
95059 NameNode
95282 DataNode
107602 Jps
103260 NodeManager
[atguigu@hadoop103 hadoop-3.1.3]$ jps
61331 ResourceManager
53572 DataNode
61545 NodeManager
63113 Jps
[atguigu@hadoop104 hadoop-3.1.3]$ jps
53574 DataNode
61465 NodeManager
66347 Jps
53771 SecondaryNameNode
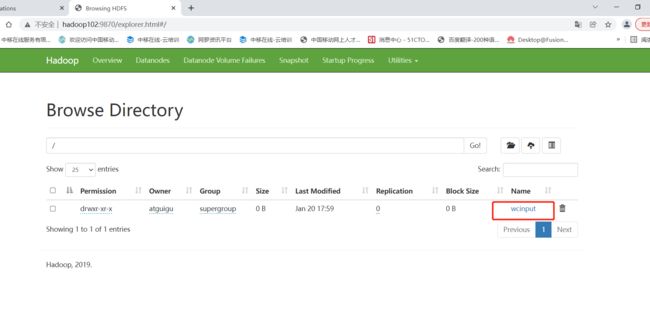
(a)浏览器中输入:http://hadoop102:9870
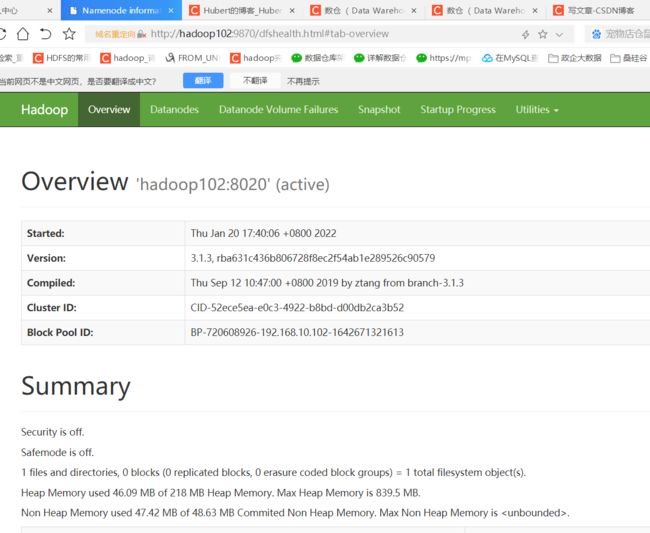
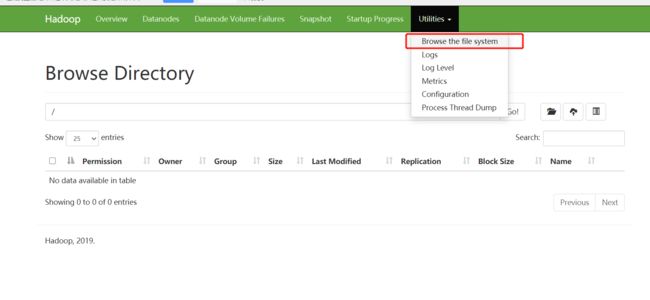
(b)查看HDFS上存储的数据信息
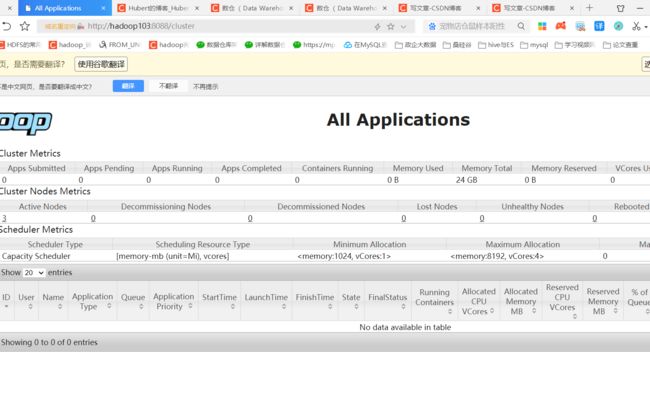
(5)Web端查看YARN的ResourceManager
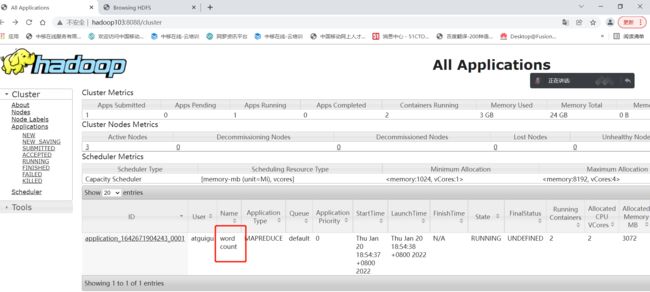
(a)浏览器中输入:http://hadoop103:8088
(b)查看YARN上运行的Job信息
2.4.3 集群基本测试
1. 上传小文件
# 创建
[atguigu@hadoop102 ~]$ hadoop fs -mkdir /wcinput
# 上传本地word.txt到wcinput
[atguigu@hadoop102 hadoop-3.1.3]$ hadoop fs -put wcinput/word.txt /wcinput
# 上传到根目录
[atguigu@hadoop102 ~]$ hadoop fs -put  /opt/software/jdk-8u212-linux-x64.tar.gz  /
- 这里web页面不具备存储功能,只是方便展示;
- 真正存储的文件的是datenode,路径为之前设置的data文件夹中。
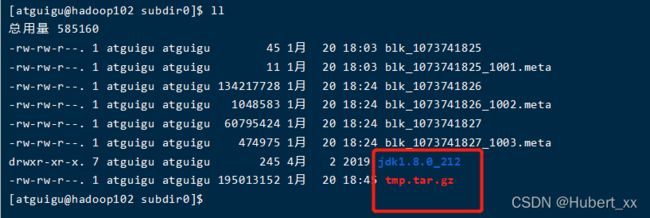
3. 查看HDFS文件存储路径
[atguigu@hadoop102 subdir0]$ pwd
/opt/module/hadoop-3.1.3/data/dfs/data/current/BP-1436128598-192.168.10.102-1610603650062/current/finalized/subdir0/subdir0
[atguigu@hadoop102 subdir0]$ cat blk_1073741825
# 查看文件追加到gz
[atguigu@hadoop102 subdir0]$ cat blk_1073741826>>tmp.tar.gz
[atguigu@hadoop102 subdir0]$ cat blk_1073741827>>tmp.tar.gz
[atguigu@hadoop102 subdir0]$ tar -zxvf tmp.tar.gz
5. 执行wordcount程序
[atguigu@hadoop102 hadoop-3.1.3]$ hadoop jar share/hadoop/mapreduce/hadoop-mapreduce-examples-3.1.3.jar wordcount /wcinput /wcoutput
2.5 常见集群崩溃后解决方法
1、查看进程
[atguigu@hadoop102 hadoop-3.1.3]$ jps
95059 NameNode
95282 DataNode
26682 Jps
103260 NodeManager
2、关闭集群

3、删除每个集群上(102,103,104)的data和logs文件
[atguigu@hadoop102 hadoop-3.1.3]$ ll
总用量 180
drwxr-xr-x. 2 atguigu atguigu    183 9月  12 2019 bin
drwxrwxr-x. 4 atguigu atguigu     37 1月  20 17:45 data
drwxr-xr-x. 3 atguigu atguigu     20 9月  12 2019 etc
drwxr-xr-x. 2 atguigu atguigu    106 9月  12 2019 include
drwxr-xr-x. 3 atguigu atguigu     20 9月  12 2019 lib
drwxr-xr-x. 4 atguigu atguigu    288 9月  12 2019 libexec
-rw-rw-r--. 1 atguigu atguigu 147145 9月   4 2019 LICENSE.txt
drwxrwxr-x. 3 atguigu atguigu   4096 1月  20 17:45 logs
-rw-rw-r--. 1 atguigu atguigu  21867 9月   4 2019 NOTICE.txt
-rw-rw-r--. 1 atguigu atguigu   1366 9月   4 2019 README.txt
drwxr-xr-x. 3 atguigu atguigu   4096 9月  12 2019 sbin
drwxr-xr-x. 4 atguigu atguigu     31 9月  12 2019 share
drwxrwxr-x. 2 atguigu atguigu     22 1月  19 15:12 wcinput
drwxr-xr-x. 2 atguigu atguigu     88 1月  19 15:14 wcoutput
[atguigu@hadoop102 hadoop-3.1.3]$ rm -rf data/ logs/
4、格式化namenode
[atguigu@hadoop102 hadoop-3.1.3]$ hdfs namenode -format
5、重启集群
[atguigu@hadoop102 hadoop-3.1.3]$ sbin/start-dfs.sh
Starting namenodes on [hadoop102]
Starting datanodes
hadoop104: ssh: connect to host hadoop104 port 22: No route to host
hadoop103: ssh: connect to host hadoop103 port 22: No route to host
Starting secondary namenodes [hadoop104]
hadoop104: ssh: connect to host hadoop104 port 22: No route to host
[atguigu@hadoop102 hadoop-3.1.3]$ jps
4017 NameNode
4438 Jps
4188 DataNode
2.6 配置历史服务器
为了在web(102:1988)上查看程序的历史运行情况,需要配置一下历史服务器。具体配置步骤如下:
[atguigu@hadoop102 hadoop]$ pwd
/opt/module/hadoop-3.1.3/etc/hadoop
[atguigu@hadoop102 hadoop]$ vim mapred-site.xml
1、在该文件里面增加如下配置。
    mapreduce.jobhistory.address
    hadoop102:10020


    mapreduce.jobhistory.webapp.address
    hadoop102:19888
2、分发配置
[atguigu@hadoop102 hadoop]$ xsync /opt/module/hadoop-3.1.3/etc/hadoop/mapred-site.xml
3、在hadoop102启动历史服务器
[atguigu@hadoop102 hadoop]$ sbin/stop-dfs.sh
[atguigu@hadoop102 hadoop]$  sbin/start-dfs.sh
[atguigu@hadoop102 hadoop]$ mapred --daemon start historyserver
4、查看历史服务器是否启动
[atguigu@hadoop102 hadoop]$ jps
4017 NameNode
5129 JobHistoryServer
4188 DataNode
5246 Jps
5、查看JobHistory
http://hadoop102:19888/jobhistory
2.7 配置日志的聚集
日志聚集概念:应用运行完成以后,将程序运行日志信息上传到HDFS系统上。
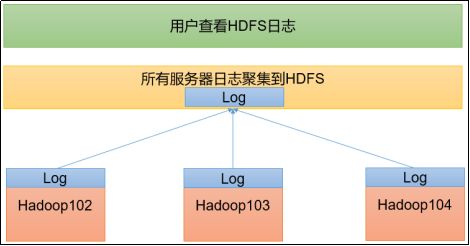
日志聚集功能好处:可以方便的查看到程序运行详情,方便开发调试。
注意:开启日志聚集功能,需要重新启动NodeManager 、ResourceManager和HistoryServer。
1、配置yarn-site.xml
[atguigu@hadoop102 hadoop]$ vim yarn-site.xml
在该文件里面增加如下配置。
    yarn.log-aggregation-enable
    true


    yarn.log.server.url
    http://hadoop102:19888/jobhistory/logs


    yarn.log-aggregation.retain-seconds
    604800
2、分发配置
[atguigu@hadoop102 hadoop]$ xsync /opt/module/hadoop-3.1.3/etc/hadoop/yarn-site.xml
3、关闭NodeManager 、ResourceManager和HistoryServer
[atguigu@hadoop103 hadoop-3.1.3]$ sbin/stop-yarn.sh
[atguigu@hadoop103 hadoop-3.1.3]$ mapred --daemon stop historyserver
4、启动NodeManager 、ResourceManage和HistoryServer
[atguigu@hadoop103 ~]$ start-yarn.sh
[atguigu@hadoop102 ~]$ mapred --daemon start historyserver
5、删除HDFS上已经存在的输出文件
[atguigu@hadoop102 ~]$ hadoop fs -rm -r /output
6、执行WordCount程序
[atguigu@hadoop102 hadoop-3.1.3]$ hadoop jar share/hadoop/mapreduce/hadoop-mapreduce-examples-3.1.3.jar wordcount /input /output
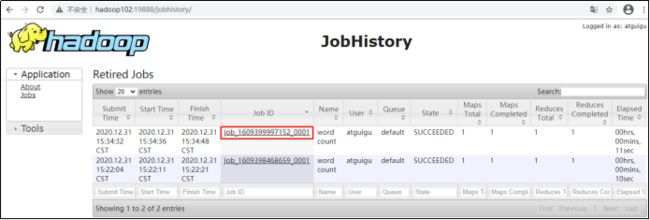
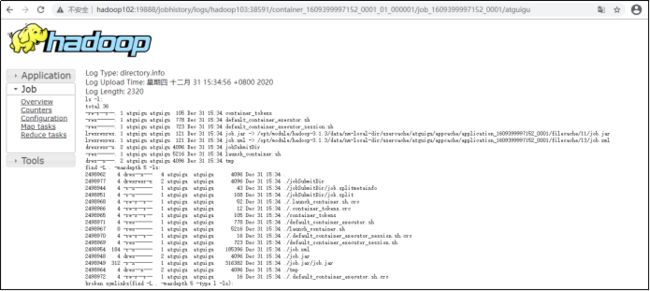
7、查看日志
(1)历史服务器地址
http://hadoop102:19888/jobhistory
(2)历史任务列表
(3)查看任务运行日志

(4)运行日志详情
2.8 集群启动
2.8.3 制作脚本封装启动和关闭操作
#!/bin/bash

if [ $# -lt 1 ]
then
    echo "No Args Input..."
    exit ;
fi

case $1 in
"start")
        echo " =================== 启动 hadoop集群 ==================="

        echo " --------------- 启动 hdfs ---------------"
        ssh hadoop102 "/opt/module/hadoop-3.1.3/sbin/start-dfs.sh"
        echo " --------------- 启动 yarn ---------------"
        ssh hadoop103 "/opt/module/hadoop-3.1.3/sbin/start-yarn.sh"
        echo " --------------- 启动 historyserver ---------------"
        ssh hadoop102 "/opt/module/hadoop-3.1.3/bin/mapred --daemon start historyserver"
;;
"stop")
        echo " =================== 关闭 hadoop集群 ==================="

        echo " --------------- 关闭 historyserver ---------------"
        ssh hadoop102 "/opt/module/hadoop-3.1.3/bin/mapred --daemon stop historyserver"
        echo " --------------- 关闭 yarn ---------------"
        ssh hadoop103 "/opt/module/hadoop-3.1.3/sbin/stop-yarn.sh"
        echo " --------------- 关闭 hdfs ---------------"
        ssh hadoop102 "/opt/module/hadoop-3.1.3/sbin/stop-dfs.sh"
;;
*)
    echo "Input Args Error..."
;;
esac


