Eureka-Eureka的介绍与搭建
文章目录
- 1:Eureka介绍
-
- 1:Eureka是什么
- 2:EUREKA中的几个概念
-
- 服务治理
- 服务注册
- 服务发现
- 2:Eureka搭建
-
- 1:创建cloud-eureka(springboot)项目
- 2:引入依赖eureka-server
- 3:配置application.yml
- 4:主启动添加@EnableEurekaServer启动服务
- 5:启动服务,访问eureka注册中心
- 3:Eureka服务提供者
-
- 1:创建项目: springcloud-common1
- 2:添加pom依赖
- 3:配置applicaton.yml
- 4:主启动类添加@EnableEurekaClient注解
- 4:Eureka服务消费者
-
- 1:创建项目: springcloud-comsumer
- 2:添加pom依赖
- 3:配置applicaton.yml
- 4:主启动类添加@EnableEurekaClient注解
- 5配置restTemplate
- 6:使用resttemplate通过服务名调用
- 5:Eureka集群
-
- 1:修改 hosts 文件
- 2:创建三个项目,引入依赖和上边相同
- 3:配置application.yml
- 4:Eureka 服务端注解 @EnableEurekaServer
- 5:集群最多三台
- 6:Eureka自我保护机制
1:Eureka介绍
1:Eureka是什么
Eureka是一个基于REST (Representational State Transfer)的服务,主要用于AWS云中的服务定位,以实现中间层服务器的负载平衡和故障转移。也就是说Eureka在微服务中是一个服务发现注册的组件
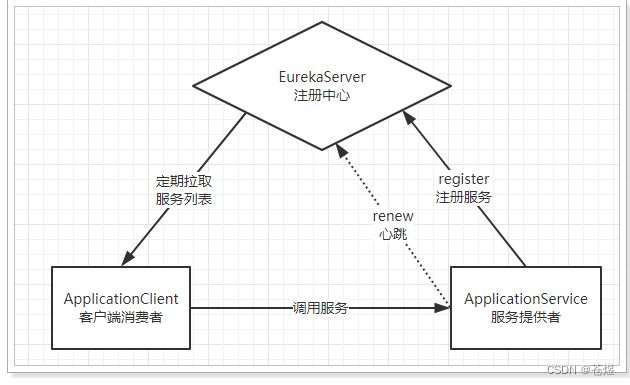
EurekaServer:就是服务注册中心(可以是一个集群),对外暴露自己的地址
提供者:服务的提供者,向EurekaServer注册自己的信息,也叫EurekaClient
消费者:服务的消费者
EurekaServer是一个注册中心,服务的提供者需要向EurekaServer注册,并且定时的发送心跳以确保EurekaServer注册中心指导这个服务是active的,而EurekaServer注册中心则向消费者提供服务提供者的ip和端口号,以便消费者调用
2:EUREKA中的几个概念
服务治理
用来实现各个微服务实例化的自动化注册与发现。
服务注册
首先会构建一个服务中心,之后的每个服务单元向这个服务中心提供主机,端口号等信息登记自己提供的服务。
而注册中心通过服务名分类组织服务清单,并对其进行维护。
服务注册中心需要以心跳的方式去监测清单中的服务是否可用,若不可用需要从服务清单中剔除。
服务发现
服务之间不需要指定具体的实例地址,而是通过服务中心发起请求调用实现。所以,调用方并不需要知道服务提供方具体的位置,只需向注册中心发起请求,从而获取所有服务的实例清单,才能实现对具体服务实例的访问。
实际应用中,不会每次都向注册中心获取服务,使用了缓存和服务剔除等不同的策略。
2:Eureka搭建
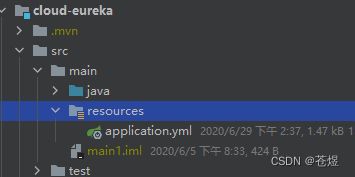
1:创建cloud-eureka(springboot)项目
2:引入依赖eureka-server
		<dependency>
            <groupId>org.springframework.cloudgroupId>
            <artifactId>spring-cloud-starter-netflix-eureka-serverartifactId>
        dependency>
3:配置application.yml
# 服务启动端口号
server:
  port: 7000
eureka:
  instance:
    hostname: euk-server-two.com # 服务注册中心ip地址,在hosts文件配置
    # 可作为参数传递,使用http://euk-server-two.com:7000/eureka/可展示具体信息
    metadataMap:
      message: xiaohong server
  client:
    # 是否将自己注册到Eureka Server,默认是true,如果当前就一个Server,那就设置成false,
    # 表明该服务不会向Eureka Server注册自己的信息
    # 但如果当前有多个Server,那就设置成true,
    # 表明该服务不会向其他Eureka Server注册自己的信息
    registerWithEureka: true
    # 是否从Eureka Server获取注册信息,如果当前就一个Server,不需要同步其他节点的数据,设置false
    # 如果当前有多个Server,设置true
    fetchRegistry: true
    # 设置服务注册中心的URL,用于client和server端交流
    serviceUrl:
      defaultZone: http://euk-server-one.com:7001/eureka/
  # 关闭自我保护模式
  server:
    enableSelfPreservation: false
# 设置Server的名称
spring:
  application:
    name: Eureka-Server
4:主启动添加@EnableEurekaServer启动服务
package com.mashibing.cloudeureka;

import org.springframework.boot.SpringApplication;
import org.springframework.boot.autoconfigure.SpringBootApplication;
import org.springframework.cloud.netflix.eureka.server.EnableEurekaServer;

@SpringBootApplication
@EnableEurekaServer
public class CloudEurekaApplication {

    public static void main(String[] args) {
        SpringApplication.run(CloudEurekaApplication.class, args);
    }

}
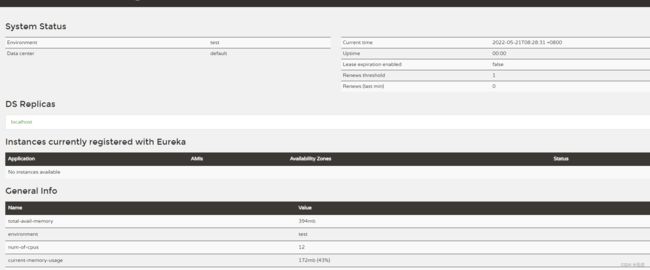
5:启动服务,访问eureka注册中心
3:Eureka服务提供者
1:创建项目: springcloud-common1
2:添加pom依赖
        <dependency>
            <groupId>org.springframework.cloudgroupId>
            <artifactId>spring-cloud-starter-netflix-eureka-clientartifactId>
            <version>2.2.1.releaseversion>
        dependency>
3:配置applicaton.yml
eureka:
  client:
  	# 注册信息到Eureka服务端
    serviceUrl:
      # 使用英文逗号,注册到多个Eureka服务端
      defaultZone: http://${eureka.instance.hostname}:7000/eureka/,http://euk-server-one.com:7001/eureka/
    registerWithEureka: true
    fetchRegistry: true
  # Eureka服务端的域名信息
  instance:
    hostname: euk-server-two.com
# 服务启动端口号
server:
  port: 7100
# 设置被Server发现后,当前Client的名称
spring:
  application:
    name: USER-PROVIDER
4:主启动类添加@EnableEurekaClient注解
package com.online.taxi.order;

import org.springframework.boot.SpringApplication;
import org.springframework.boot.autoconfigure.SpringBootApplication;
import org.springframework.cloud.netflix.eureka.EnableEurekaClient;
import org.springframework.scheduling.annotation.EnableAsync;

/**
 * @author yueyi2019
 */
@EnableEurekaClient
@SpringBootApplication
public class ServiceOrderApplication {

	public static void main(String[] args) {
		SpringApplication.run(ServiceOrderApplication.class, args);
	}


}
4:Eureka服务消费者
1:创建项目: springcloud-comsumer
2:添加pom依赖
        <dependency>
            <groupId>org.springframework.cloudgroupId>
            <artifactId>spring-cloud-starter-netflix-eureka-clientartifactId>
            <version>2.2.1.releaseversion>
        dependency>
3:配置applicaton.yml
eureka:
  client:
  	# 注册信息到Eureka服务端
    serviceUrl:
      # 使用英文逗号,注册到多个Eureka服务端
      defaultZone: http://${eureka.instance.hostname}:7000/eureka/,http://euk-server-one.com:7001/eureka/
    registerWithEureka: true
    fetchRegistry: true
  # Eureka服务端的域名信息
  instance:
    hostname: euk-server-two.com
# 服务启动端口号
server:
  port: 7100
# 设置被Server发现后,当前Client的名称
spring:
  application:
    name: USER-PROVIDER
4:主启动类添加@EnableEurekaClient注解
package com.online.taxi.order;

import org.springframework.boot.SpringApplication;
import org.springframework.boot.autoconfigure.SpringBootApplication;
import org.springframework.cloud.netflix.eureka.EnableEurekaClient;
import org.springframework.scheduling.annotation.EnableAsync;

/**
 * @author yueyi2019
 */
@EnableEurekaClient
@SpringBootApplication
public class ServiceOrderApplication {

	public static void main(String[] args) {
		SpringApplication.run(ServiceOrderApplication.class, args);
	}


}
5配置restTemplate
在resttemplate上添加@LoadBalanced。使用服务名调用
package com.zy.config;

import org.springframework.cloud.client.loadbalancer.LoadBalanced;
import org.springframework.cloud.loadbalancer.annotation.LoadBalancerClient;
import org.springframework.context.annotation.Bean;
import org.springframework.context.annotation.Configuration;
import org.springframework.web.client.RestTemplate;

@Configuration
@LoadBalancerClient(value="SPRINGCLOUD-COMMON")
public class RestTemplateConfiguration {

	@Bean
	@LoadBalanced
	public RestTemplate restTemplate() {
		return new RestTemplate();
	}


}
6:使用resttemplate通过服务名调用
package com.zy.controller;

import java.util.Map;

import org.apache.commons.collections4.MapUtils;
import org.apache.commons.lang3.StringUtils;
import org.springframework.beans.factory.annotation.Autowired;
import org.springframework.http.ResponseEntity;
import org.springframework.web.bind.annotation.CrossOrigin;
import org.springframework.web.bind.annotation.RequestBody;
import org.springframework.web.bind.annotation.RequestMapping;
import org.springframework.web.bind.annotation.RestController;
import org.springframework.web.client.RestTemplate;

@RestController
@RequestMapping("/consumer")
public class ConsumerController {

    @Autowired
    private RestTemplate restTemplate;

    private static String port = null;

    @RequestMapping("/get")
    public Object get(@RequestBody Map<String, Object> parm) {
        ResponseEntity<Map> postForEntity = restTemplate.postForEntity("http://SPRINGCLOUD-COMMON/com/get", parm,
                Map.class);
        Map<String, Object> body = postForEntity.getBody();
        System.out.println(body);
        String rstPort = MapUtils.getString(body, "port");
        if (StringUtils.equals(port, rstPort)) {
            System.err.println("相同:" + port + " ,rstPort:" + rstPort);
        }
        port = rstPort;
        return body;
    }

}
5:Eureka集群
1:修改 hosts 文件
由于只能在一台机器模拟三台服务器,此时必须要在主机的 hosts 文件中修改主机名,否则都默认为 localhost,则无法区分各个 Eureka 服务注册中心的实例。
windows 目录:C:\Windows\System32\drivers\etc\hosts,在末尾处添加如下映射配置。(修改主机名 hostname)
127.0.0.1 eureka1
127.0.0.1 eureka2
127.0.0.1 eureka3
2:创建三个项目,引入依赖和上边相同
3:配置application.yml
server:
  port: 8761

eureka:
  instance:
    hostname: eureka8761 	# eureka 服务端的实例名称
  client:
    register-with-eureka: false     # false 表示不向本端注册中心注册自己。
    fetch-registry: false     # false 表示自己端就是注册中心,我的职责就是维护服务实例,并不需要去检索服务
    service-url:
      # Eureka 实例之间互相注册,即把自己注册到另外两个服务注册中心实例中
      defaultZone: http://eureka8762:8762/eureka/,http://eureka8763:8763/eureka/,http://eureka8763:8763/eureka/
注;如果是三台集群的话,defaultZone一定要都配上三台地址,这个就不解释了,debug源码能看出来
4:Eureka 服务端注解 @EnableEurekaServer
5:集群最多三台
通过源码追踪,发现集群最多三台,因为源码里在检测eurake服务时,也是循环了三次,如果想要配置第四台,需要修改源码;源码我忘了在哪里了,懒得找了;
通过查看源码得到,客户端在拉取eureka服务时,总是按照defaultZone配置的顺序使用,所以为了提高效率,建议不同的客户端在配置defaultZone时,打乱顺序;
6:Eureka自我保护机制
Eureka在CAP理论当中是属于AP , 也就说当产生网络分区时,Eureka保证系统的可用性,但不保证系统里面数据的一致性
默认开启,服务器端容错的一种方式,即短时间心跳不到达仍不剔除服务列表里的节点
默认情况下,Eureka Server在一定时间内,没有接收到某个微服务心跳,会将某个微服务注销(90S)。但是当网络故障时,微服务与Server之间无法正常通信,上述行为就非常危险,因为微服务正常,不应该注销。
Eureka Server通过自我保护模式来解决整个问题,当Server在短时间内丢失过多客户端时,那么Server会进入自我保护模式,会保护注册表中的微服务不被注销掉。当网络故障恢复后,退出自我保护模式。
思想:宁可保留健康的和不健康的,也不盲目注销任何健康的服务。
自我保护触发条件
默认情况下,客户端每分钟续约数量小于客户端总数的85%时会触发保护机制
eureka:
  server:
    # 自我保护看自己情况
    enable-self-preservation: true
    # 续约阈值,和自我保护相关
    renewal-percent-threshold: 0.85
    # server剔除过期服务的时间间隔
    eviction-interval-timer-in-ms: 1000
    # 是否开启readOnly读缓存
    use-read-only-response-cache: true
    # 关闭 readOnly
    response-cache-update-interval-ms: 1000


