03.Nginx搭建LNMP架构 -1(单节点部署lnmp,拆分数据库,应用割接,添加web节点,对接NFS存储.最后加入负载均衡)
1.介绍LNMP架构
1.1 什么是LNMP
LNMP是指一组通常一起使用来运行动态网站或者服务器的自由软件名称首字母缩写。
L指Linux,N指Nginx,M一般指MySQL,也可以指MariaDB,P一般指PHP,也可以指Perl或Python
1.2 LNMP架构是如何工作
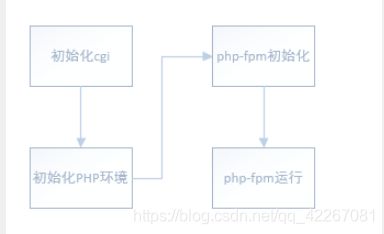
1.3 LNMP架构详细工作流程
- 用户通过http协议发起请求,请求会xiandidaLNMP架构中的nginx
- nginx会根据用户的请求,进行location匹配
- location如果匹配的是静态内容,Nginx会读取本地,直接返回。
- location如果匹配的请求动态内容,Nginx自会将请求转发给fastcgi协议
- fastcgi将请求交给php-fpm进程管理,php-fpm管理进程收到后---->>调用具体的warrap进程。
- warrap进程调用PHP程序进行解析,如果是代码php则返回。
- 如果是查询数据库工作则有php连接数据库(用户,密码,ip)发起查询操作。
最终mysql —> php —> php-fpm —> fastcgi —> nginx —> http —> user
1.4 作者对学习lnmp的一些扩展
我们学习过程中web服务器也就是nginx和后端应用服务器(php解析器).这里把他们分开两台不同虚拟机上去想,我们实际操作是部署在一台机器上。
那么连接通过两种方式一种是走tcp协议方式监听在php解析器的9000,一种是走 运输层tcp,udp协议基础上的socket一种程序组件,监听一个套接字文件上。
然后cgi(通用网关接口)定义了web服务器运行时外部程序的规范,可以理解为一种接口协议。(调用外部程序过程如下。外部程序就是主进程运行过程中需要调用的程序。这个调用的外部程序也就是指我们的php)

那么按照这种协议编写的cgi程序,可以与浏览器进行交互。
我联系都osi七层模式角度,把web(nginx)和php分开,那么就是nginx通过fastcgi协议经过第一种tcp或者第二种socket协议连接到php,在应用层通过cgi协议进行规范,主进程fork出子进程调用cgi程序(php.ini),通过实现fastcgi协议的php-fpm管理运行php-ini进程 进行对web请求的处理,然后还可通过数据API与数据库服务器等外部数据源进行通信,从数据库服务器中获取数据,这个web和php交互数据的接口就是ASPI,PHP提供了多种SAPI接口包含fastcgi。最后格式化为HTML,发送给浏览器。
fastcgi这种协议的出现是在cgi协议基础上的优化,解决当web server收到index.php请求时,会fork一个新进程,也就是cgi程序(php.ini)。进程和程序的区别一句话就是进程是程序一次的执行。
那么这个进程会再处理完数据返回给web服务器后进行关闭,每次处理请求重新开启新进程新的处理和关闭,造成效率低下,这个就是和cgi运行模式(fork-and-execute)有关。

于是又引进了一个对我来说新的概念php-fpm,设计风格与nginx相似的 master(主)/worker(子)多进程架构。
master进程分为
master管理worker,worker进程分为

php-fpm是一个实现了fastcgi协议的程序,来管理cgi程序php.ini,负载管理由php.ini组成的进程池,从而处理web服务器的请求。
2.安装LNMP架构环境 (所有部署都在一台web01节点)
2.1 Nginx与PHP集成的原理
①安装PHP服务(支持链接各类数据库的模块)
1.卸载旧版本的php
[root@web01 ~]# rpm -e $(rpm -qa | grep php)
[root@web01 ~]# rm -f /etc/php.ini.rpmsave
2.安装php的几种方式
方法一:安装php7版本的软件【联网】
[root@nginx ~]# cat /etc/yum.repos.d/php.repo
[webtatic-php]
name = php Repository
baseurl = http://us-east.repo.webtatic.com/yum/el7/x86_64/
gpgcheck = 0

[root@nginx ~]# yum -y install php71w php71w-cli php71w-common php71w-devel php71w-embedded php71w-gd \
php71w-mcrypt php71w-mbstring php71w-pdo php71w-xml php71w-fpm php71w-mysqlnd php71w-opcache \
php71w-pecl-memcached php71w-pecl-redis php71w-pecl-mongodb
方法二:安装php7版本的软件【本地】
[root@web01 ~]# wget http://cdn.xuliangwei.com/php.zip
[root@web01 ~]# unzip php.zip
[root@web01 ~]# yum localinstall php/*.rpm -y
3.开启php服务,加入下此开机自启,查看端口
systemctl start php-fpm
systemctl enable php-fpm
netstat -lntp #查看端口
ps -ef |grep php-fpm #查看进程
②在将nginx与php集成过程中,需要先了解Fastcgi代理配置语法
1.设置fastcgi服务器地址,该地址可以指定为域名或IP地址,以及端口
Syntax: fastcgi_pass address;
Default: -
Context: location,if in location

#语法示例
fastcgi_pass localhost:9000;
2.设置fastcgi默认的首页文件,需要结合fastcgi_param一起设置
Syntax: fastcgi_index name;
Default: -
Context: http,server,location
3.通过fastcgi_param设置变量,并将设置的变量传递到后端的fastcgi服务器
Syntax: fastcgi_param parameter value [if_not_empty]
Default: -
Context: http,server,location

#语法示例
fastcgi_index index.php;
fastcgi_param SCRIPT_FILENAME $document_root$fastcgi_script_name;
4.通过图形方式展示fastcgi_index与fastcgi_param作用

③配置nginx与php的协同工作
1.配置nginx与php连接的配置文件
[root@web01 ~]#  cat /etc/nginx/conf.d/php.etiantian.org.conf
server {
	listen 80;
	server_name php.etiantian.org;
	root /code/php;

	location / {
		index index.php;
	}

	location ~ \.php$ {
		fastcgi_pass 127.0.0.1:9000;										# 将请求转给9000端口的应用程序处理
		fastcgi_param SCRIPT_FILENAME $document_root$fastcgi_script_name;	# 告诉php我们需要被解析的文件在哪个目录,是哪个文件
		include fastcgi_params;
	}

}
2.创建一个php书写的代码
mkdir /code/php
vim /code/php/index.php
<?php
	phpinfo();
?>
3.配置本地dns劫持,谷歌浏览器测试nginx与php的连接是否成功,能否解析php类型文件


2.2 PHP与MySQL集成的原理
1.安装数据库服务
yum -y install mariadb mariadb-server
2. 启动Mariadb数据库
[root@web01 ~]# systemctl enable mariadb
[root@web01 ~]# systemctl start mariadb
netstat -lntup #查看端口号为3306
3.配置对应root(数据库用户)的密码:
我们用的是mariadb5.5版本 默认数据库roo用户没有密码 可以直接mysql登入
[root@web01 ~]# mysqladmin password "boy123.com"
4.配置一个php测试mysql的脚本:
[root@web01 ~]# cat /code/php/mysql.php
<?php
				$servername = "localhost";
				$username = "root";
				$password = "boy123.com";

				// 创建连接
				$conn = mysqli_connect($servername, $username, $password);

				// 检测连接
				if (!$conn) {
					die("Connection failed: " . mysqli_connect_error());
				}
				echo "php连接MySQL数据库成功";

?>
3.LNMP架构部署
3.1 Wordpress
1)添加Nginx配置,新增一个网站
[root@web01 ~]# cat /etc/nginx/conf.d/blog.etiantian.org.conf
	server {
		listen 80;
		server_name blog.etiantian.org;
		root /code/wordpress;

		location / {
			index index.php;
		}

		location ~ \.php$ {
			fastcgi_pass 127.0.0.1:9000;
			fastcgi_param SCRIPT_FILENAME $document_root$fastcgi_script_name;
			include fastcgi_params;
		}
	}

	[root@web01 ~]# nginx -t
	nginx: the configuration file /etc/nginx/nginx.conf syntax is ok
	nginx: configuration file /etc/nginx/nginx.conf test is successful
	[root@web01 ~]# systemctl reload nginx
2)上传wordpress代码
[root@web01 ~]# cd /code/
[root@web01 code]# rz
[root@web01 code]# unzip wordpress-5.4.2-zh_CN.zip
[root@web01 code]# chown -R www.www /code/wordpress
3)需要在Mariadb中添加一个wordpress库名称:
	[root@web01 code]# mysql -uroot -pboy123.com
	MariaDB [(none)]> create database wordpress;
	MariaDB [(none)]> show databases;
	+--------------------+
	| Database           |
	+--------------------+
	| wordpress          |
	+--------------------+
3.2 Wecenter
1)编写Nginx配置文件:
[root@web01 code]# cat  /etc/nginx/conf.d/zh.etiantian.org.conf
server {
	listen 80;
	server_name zh.etiantian.org;
	root /code/zh;
	client_max_body_size 100m;

	location / {
		index index.php;
	}

	location ~ \.php$ {
		fastcgi_pass 127.0.0.1:9000;
		fastcgi_param SCRIPT_FILENAME $document_root$fastcgi_script_name;
		include fastcgi_params;
	}
}
[root@web01 code]# nginx -t
nginx: the configuration file /etc/nginx/nginx.conf syntax is ok
nginx: configuration file /etc/nginx/nginx.conf test is successful
[root@web01 code]# systemctl reload nginx
2)上传代码:
[root@web01 code]# mkdir /code/zh
[root@web01 code]# rz
[root@web01 code]# unzip WeCenter_3-6-0.zip -d /code/zh/
3)授权为进程的用户身份:
[root@web01 code]# chown -R www.www /code/zh/
4)创建zh库名称:
[root@web01 code]# mysql -uroot -pboy123.com
MariaDB [(none)]>
MariaDB [(none)]> create database zh;
MariaDB [(none)]> show databases;
+--------------------+
| Database           |
+--------------------+
| information_schema |
| mysql              |
| performance_schema |
| test               |
| wordpress          |
| zh                 |
+--------------------+
4.拆分数据库
1)环境准备:
| web01 | 10.0.0.7 | 172.16.1.7 |
|---|---|---|
| db01 | 10.0.0.51 | 172.16.1.51 |
2)备份 172.16.1.7 上数据库的数据 (10:23)
	[root@web01 ~]# mysqldump -uroot -pboy123.com -A >backup.sql
	[root@web01 ~]# du -sh backup.sql
	1.3M	backup.sql
3)将172.16.1.7 的备份数据,推送到 172.16.1.51 上
[root@web01 ~]# scp backup.sql [email protected]:~
4)172.16.1.51 恢复 172.16.1.7 推送过来的数据
	[root@db01 ~]# yum install mariadb mariadb-server -y
	[root@db01 ~]# systemctl start mariadb
	[root@db01 ~]# systemctl enable mariadb.service


	[root@db01 ~]# mysql < /root/backup.sql

	[root@db01 ~]# systemctl restart mariadb
	[root@db01 ~]# mysql -uroot -pboy123.com		# 使用恢复的密码
5)在172.16.1.51 数据库上,添加一个远程连接的用户以及密码,并配置授权规则(来源的IP,执行的操作(增 删 查 改))
# 授权all这个用户,可以通过任意地址网段来访问数据库
# 授权了所有库,以及所有表的,所有权限。
# 它的密码是boy123.com
MariaDB [(none)]> grant all privileges on *.* to 'all'@'%' identified by 'boy123.com';
MariaDB [(none)]> flush privileges;
6)应用割接。(将原本连接本地数据库的信息,修改为连接远程 172.16.1.51 这台服务器 )
6.1) 将本地172.16.1.7数据库直接停止,并关闭开机自启动。
		[root@web01 ~]# systemctl stop mariadb
		[root@web01 ~]# systemctl disable mariadb
6.2) 记得通过浏览器看看是什么错误:
6.3)修改wordpress指向到新的数据库服务:
		[root@web01 ~]# vim  /code/wordpress/wp-config.php
			// ** MySQL 设置 - 具体信息来自您正在使用的主机 ** //
			/** WordPress数据库的名称 */
			define( 'DB_NAME', 'wordpress' );

			/** MySQL数据库用户名 */
			define( 'DB_USER', 'all' );

			/** MySQL数据库密码 */
			define( 'DB_PASSWORD', 'boy123.com' );

			/** MySQL主机 */
			define( 'DB_HOST', '172.16.1.51' );
6.4)wecenter指向到新的数据库:
		[root@web01 ~]# find /code/zh/ -type f  | xargs grep -R "boy123.com"
		[root@web01 ~]# vim /code/zh/system/config/database.php
		  'charset' => 'utf8mb4',
		  'host' => '172.16.1.51',
		  'username' => 'all',
		  'password' => 'boy123.com',
		  'dbname' => 'zh',
7)测试:通过浏览器
5.扩展多个WEB节点
##1) 准备一台新的服务器,安装Nginx、PHP环境
	Nginx:
	[root@web02 ~]# scp 172.16.1.7:/etc/yum.repos.d/nginx.repo /etc/yum.repos.d/
	[root@web02 ~]# yum install nginx -y

	PHP:
	[root@web02 ~]# wget http://cdn.xuliangwei.com/php.zip
	[root@web02 ~]# unzip php.zip
	[root@web02 ~]# yum localinstall php/*.rpm -y
2) 准备Nginx配置,PHP配置文件,然后启动服务,加入开机自启动 ( 172.16.1.7 --> 172.16.1.8 )
	创建用户和组:
		[root@web02 ~]# groupadd -g666 www
		[root@web02 ~]# useradd -u666 -g666 www

	Nginx配置文件:
		[root@web02 ~]# rm -f /etc/nginx/conf.d/default.conf
		[root@web02 ~]# scp 172.16.1.7:/etc/nginx/nginx.conf /etc/nginx/nginx.conf
		[root@web02 ~]# scp 172.16.1.7:/etc/nginx/conf.d/* /etc/nginx/conf.d/

	PHP配置文件:
		[root@web02 ~]# scp 172.16.1.7:/etc/php-fpm.d/www.conf  /etc/php-fpm.d/www.conf
		[root@web02 ~]# scp 172.16.1.7:/etc/php.ini /etc/php.ini

	检查语法:
		[root@web02 ~]# nginx -t
		nginx: the configuration file /etc/nginx/nginx.conf syntax is ok
		nginx: configuration file /etc/nginx/nginx.conf test is successful

		[root@web02 ~]# php-fpm -t
		[28-Oct-2020 19:54:37] NOTICE: configuration file /etc/php-fpm.conf test is successful

	启动服务:
	[root@web02 ~]# systemctl enable nginx php-fpm
	[root@web02 ~]# systemctl start nginx php-fpm
3) 准备对应的代码,代码连接数据库是 远程的数据库。 ( 172.16.1.7 --> 172.16.1.8 )
	[root@web02 ~]# scp -r  172.16.1.7:/code /
	[root@web02 ~]# chown -R www.www /code/
4) 用户配置域名解析 10.0.0.8
6.静态资源共享NFS
1) 准备多台web节点、准备NFS存储服务 172.16.1.31
	0)基础环境准备:
		关闭防火墙
				systemctl stop firewalld
				systemctl disable firewalld

		创建www用户
			[root@nfs ~]# groupadd -g666 www
			[root@nfs ~]# useradd -u666 -g666 www

	1) 安装NFS存储:
		[root@nfs ~]# yum install nfs-utils -y

	2) 配置NFS存储
	[root@nfs ~]# cat /etc/exports
	/data/blog 172.16.1.0/24(rw,async,all_squash,anonuid=666,anongid=666)
	/data/zh 172.16.1.0/24(rw,async,all_squash,anonuid=666,anongid=666)


	3) 重启NFS存储:
		[root@nfs ~]# rm -rf /data
		[root@nfs ~]# mkdir /data/{blog,zh} -p
		[root@nfs ~]# chown -R www.www /data/
		[root@nfs ~]# systemctl restart nfs
2) 获取产品静态资源存储的目录 172.16.1.7 172.16.1.8
	Wordpress:
		http://blog.etiantian.org/wp-content/uploads/2020/10/123-1024x466.png
		==> /code/wordpress/wp-content/uploads/2020/10/123-1024x466.png
3) 将【所有应用节点】的静态资源对接NFS存储上 172.16.1.7 172.16.1.8
	# yum install nfs-utils -y
	# mount -t nfs 172.16.1.31:/data/blog /code/wordpress/wp-content/uploads/
7.多节点如何访问
7.1 DNS轮询
(1)需要所有的web节点具备公网IP地址
(2)公网独立IP需要费用,而且不便宜。
(3)所有的web节点有公网IP,不安全。
(4)DNS只有轮询机制,没有 健康检查功能。
7.2 负载均衡
(1)所有的web节点不在需要有公网IP,能节省成本、并保证安全
(2)能够对后端的web节点进行健康检查机制
(3)负载均衡有多种调度算法来满足企业不同需求