Python web开发之flask项目实战总结
在线问答系统
- Flask Web开发
- 项目介绍
- 功能描述
- 一、前端设计
- 二、数据库设计
- 三、页面功能开发
-
- 1.用户模块
- 2.问答模块
- 四、总结
Flask Web开发
请求到响应
用户通过浏览器访问url,会发送请求到服务器,服务器接收请求后会根据url规则找到对应的视图函数进行处理,处理完后会把结果发送到浏览器端,浏览器接收到返回的内容并呈现给用户(得到响应)。
上下文对象
在分派请求之前都会被激活,在请求处理完成后都被删除。
请求上下文对象:
Request:请求对象,封装了客户端发出的HTTP请求中的内容。
Session:用户会话(dict)。各请求之间的数据共享。
应用上下文对象:
current_app:当前激活程序的程序实例。
g:处理请求时的临时存储对象,每次请求都会重设这个变量
Session与cookie:
- Session是在服务器端存储数据,而cookie是在客户端存储数据。
- Session依赖于cookie实现,客户端向服务器端发送请求时会带上cookie,服务器端根据cookie的值找到Session中对应的值(数据或用户)。
请求报文:包括请求头和请求体
常用参数:
method:GET/POST
form:POST请求数据dict
args:GET请求数据dict
values:POST请求数据和GET请求数据集合dict
files:上传的文件数据dict
cookies:请求中cookie dict
headers:HTTP请求头
响应报文:包括响应头和响应体
响应:字符串,元组(response,status,headers)
响应元组:response-响应内容;status-响应状态码;headers-响应头信息(dict)。
项目介绍
该系统是基于Python的Web开发实战项目,前端框架采用Bootstrap,后端采用Flask框架,模板引擎为Jinja2,数据库采用Mysql8.0,开发环境为Python3.9,Flask2.0.1。
功能描述
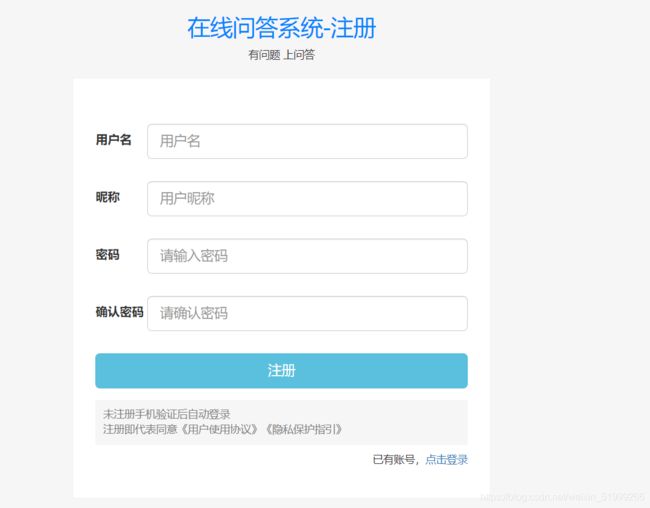
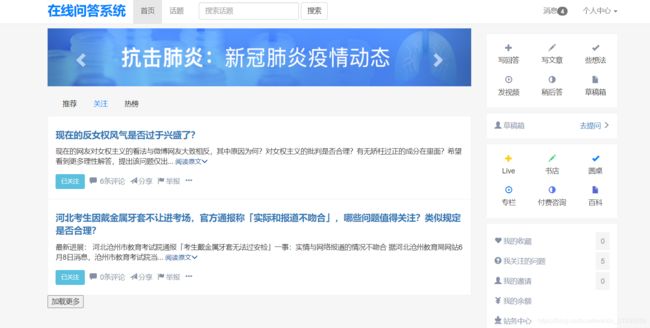
该项目通过蓝图改造实现了项目模块化,主要分为用户模块和问答模块,用户模块包括登录、注册、个人主页。问答模块包括首页,关注页,详情页,写文章页。
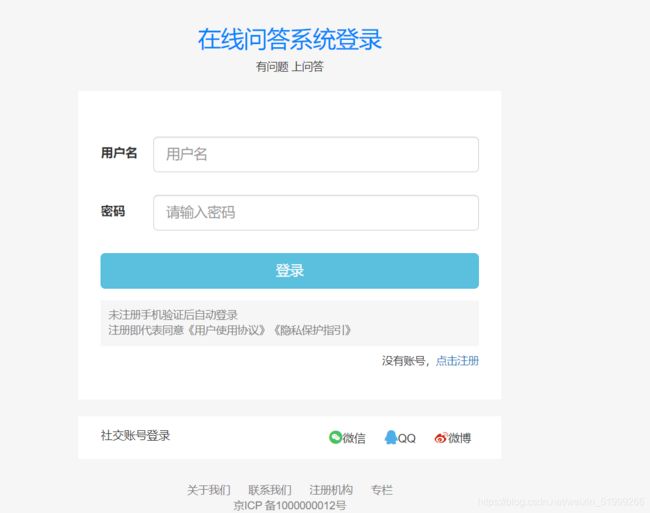
用户可以登录,注册,并在个人主页查看和修改个人信息等。
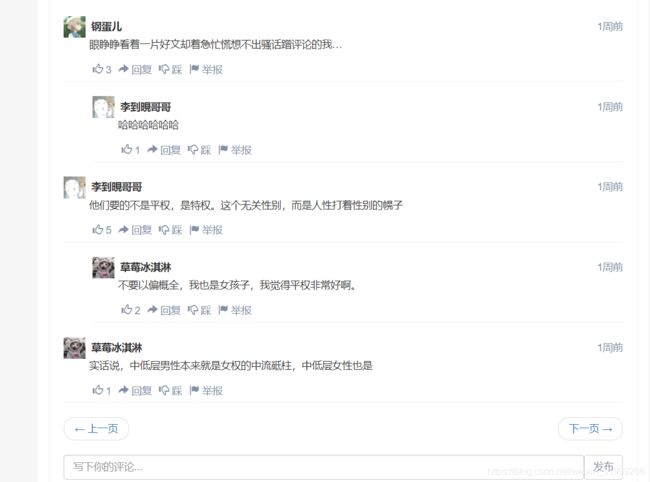
用户可以发问题,关注问题,回答问题,也可以收藏回答,点赞回答,点赞评论,评论回答等。
一、前端设计
前端主要采用了HTML标签,CSS样式,JS语言。布局主要采用的是Flex布局和Bootstrap栅格布局,也用到了Bootstrap许多内置的全局CSS样式和组件以及JS插件,同时用到了iconfont阿里图标库,再加上自己对页面样式的改写和优化,这样下来,基本搭建了项目的前端页面。
二、数据库设计
使用flask_sqlalchemy扩展建立ORM模型,难点主要在对表之间关系的理解以及建立表与表的关系属性,常见的关系主要是一对一和一对多。
例如在UserProfile模型下建立与User模型一对一属性:
user = db.relationship('User', backref=db.backref('profile', uselist=False))
在Question模型下建立与User模型一对多属性:
user = db.relationship('User', backref=db.backref('question_list', lazy='dynamic'))
这里采用lazy=‘dynamic’(懒加载):不是直接加载这些数据,SQLAlchemy会返回一个查询对象,在加载数据前可以过滤(提取)它们,不可用在一对一和多对一关系中
三、页面功能开发
1.用户模块
该模块难点主要在登录,这里采用了第三方扩展flask_login。
登录流程:
- 用户在登陆表单输入用户名和密码。
- 表单验证包括验证用户名和密码是否正确,用户名规定为手机号,用户名和密码不为空,用户状态为激活状态等。
- 通过表单验证,执行登录操作。
- 记录用户登录信息。
- 跳转到上一次访问的页面或首页。
开发流程:
- 编写登录表单并渲染到模板中。
- 编写表单验证,包括自定义表单验证,验证用户名和密码是否正确。注:由于数据库中的密码是加密存储,验证时需要拿到表单中的用户名和密码,并将密码加密后再验证
- 通过login_user()执行登录操作,可以记录、保存当前成功登录的用户(current_user)。
- 使用ORM模型保存用户登录的相关信息到数据库中。
- 登陆成功后重定向,这里添加了一个隐藏表单域用来保存用户上一次试图访问的页面url,并在视图函数中得到相应的值。
next_url = request.values.get('next', url_for('qa.index'))
2.问答模块
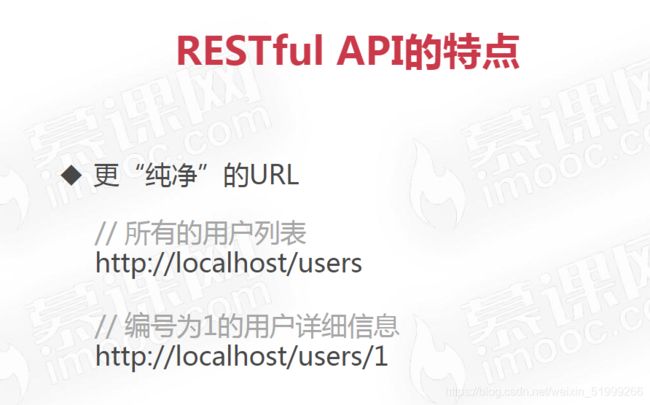
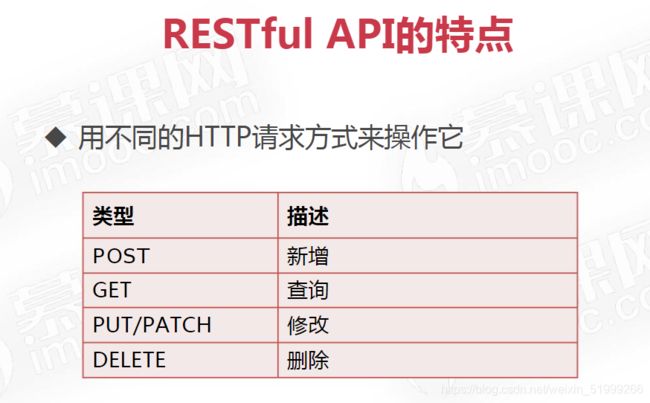
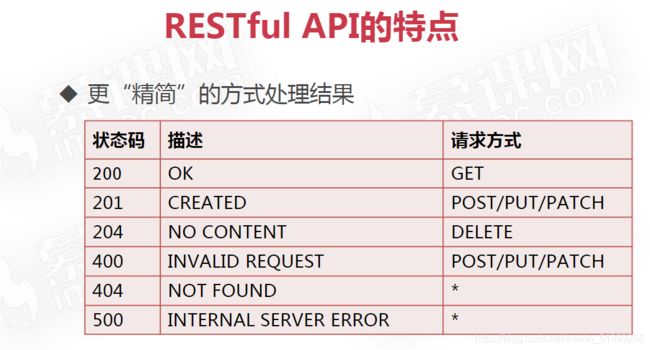
该模块难点主要在关注页面中问答列表的分页异步加载,详情页面中评论功能的开发和评论的分页异步加载等。接口使用restful风格接口,并通过Jquery中的ajax调用接口。
实现流程:
- 后端(视图层)编写API
- 前端(模板层)调用API
- 渲染页面,绑定功能。
部分代码:
@qa.route('/qa/list')
def question_list():
    """异步查询问题数据列表"""
    try:
        per_page = 2
        page = request.args.get('page', 1, type=int)
        lst = []  # 用来保存当前用户关注的问题id
        # 只查询当前用户关注的问题
        question_follow = QuestionFollow.query.filter_by(user_id=current_user.id).all()
        for item in question_follow:
            lst.append(item.q_id)
        page_data = Question.query.filter(Question.id.in_(lst)).paginate(page=page, per_page=per_page)
        data = render_template('qa_list.html', page_data=page_data)
        return {'code': 0, 'data': data}
    except Exception as e:
        print(e)
        data = ''
    return {'code': 1, 'data': data}
<script>
        $(function () {
            // 要填充的容器
            var container = $('#id-qa-ls');
            // 默认页码为1
            var page = 1;
            // 给按钮绑定点击事件
            $('#id-load-more').click(function () {
                // 前端模板层调用数据接口
                $.get('{{ url_for("qa.question_list") }}',
                    {'page': page},
                    function (result) {
                        console.log(result);
                        if (result.code === 0) {
                            var res = result.data
                            console.log(res);
                            // 手动绑定DOM事件
                            // 1.构建JQ对象
                            var html = $(res);
                            // 2.为对象里面的一些元素绑定事件,指定事件范围
                            $('.more', html).click(function () {
                                $(this).parent().addClass('hidden');
                                $(this).parent().next().removeClass('hidden')
                            })
                            $('.more', html).click(function () {
                                $(this).parent().addClass('hidden');
                                $(this).parent().prev().removeClass('hidden')
                            })
                            // 添加到容器
                            container.append(html);
                            // 加载完成后,页码+1
                            page += 1;
                        } else {
                            window.alert('接口请求失败');
                        }
                    })
            })
        })
    </script>
@qa.route('/comments/' , methods=['GET', 'POST'])
def comments(answer_id):
"""坪论"""
answer = Answer.query.get(answer_id)
question = answer.question
if request.method == 'POST':
# 添加一条评论
try:
# 判断用户是否登录
if not current_user.is_authenticated:
result = {'code': 1, 'message': '请登录'}
return jsonify(result), 400
# 1.获取前端传递的参数
content = request.form.get('content', '')
reply_id = request.form.get('reply_id', None)
# 2.保存到数据库
comment_obj = Comment(content=content, user=current_user,
answer=answer, question=question, reply_id=reply_id)
db.session.add(comment_obj)
db.session.commit()
# 如果添加成功,则返回result和201状态码
result = {'code': 0, 'message': '评论成功'}
return jsonify(result), 201
except Exception as e:
print(e)
result = {'code': 1, 'message': '服务器正忙,请稍后重试'}
# jsonify将字典转成json字符串
return jsonify(result), 400
else:
# GET获取坪论列表
try:
page = int(request.args.get('page', 1))
page_data = answer.comment_list().paginate(page=page, per_page=3)
data = render_template('comments.html', page_data=page_data, answer=answer) # 获取html内容
return jsonify({'code': 0, 'data': data, 'meta': {'page': page}}), 200
except Exception as e:
print(e)
return jsonify({'code': 1, 'data': '', 'message': '服务器正忙'}), 500
		// 发表评论
        function bindCommentPublishEvent(html) {
            // 查询发表评论表单
            var form = $('.comment-publish', html);
            // 给发表评论表单下的.btn绑定事件
            $('.btn', form).click(function () {
                var _form = $(this).parent();
                var content = $('input[name=content]', _form);
                // 将表单内容序列化成一个字符串
                var data = _form.serialize();
                $.ajax({
                    url: {% if answer %}'{{ url_for("qa.comments", answer_id=answer.id) }}'{% else %}''{% endif %},
                    method: 'POST',
                    data: data,
                    complete: function (res) {
                        console.log(res);
                        if (res.status === 201) {
                            window.alert(res.responseJSON.message);
                            // 清空评论框
                            content.val('');
                            // 重新加载页面
                            location.reload();
                        } else if (res.status === 400) {
                            window.alert(res.responseJSON.message);
                            window.location.href = '{{ url_for("accounts.login") }}';
                        } else {
                            window.alert('请求失败,请稍后重试');
                        }
                    }
                })
            })
        }
        // 评论列表的异步加载
        var comment_ls = $('#id-comment-ls');
        var page = 1;

        function loadPageData(page) {
            page = page || 1
            $.ajax({
                url: {% if answer %}'{{ url_for("qa.comments", answer_id=answer.id) }}'{% else %}''{% endif %},
                method: 'GET',
                data: {
                    page: page
                },
                complete: function (res) {
                    // console.log('res:', res);
                    if (res.status === 200) {
                        var result = res.responseJSON;
                        if(result) {
                            if (result.code === 0) {
                                var html = $(result.data);
                                // 评论回复按钮事件绑定
                                bindReplyEvent(html);
                                // 发布按钮事件绑定
                                bindCommentPublishEvent(html);
                                // 点赞按钮事件绑定
                                bindCommentEvent(html);
                                comment_ls.empty().append(html);
                            }
                        }
                    } else {
                        window.alert('服务器正忙')
                    }
                }
            })
        }

        $('.pager .previous').click(function () {
            page = page - 1;
            loadPageData(page);
        })
        $('.pager .next').click(function () {
            page = page + 1;
            loadPageData(page);
        });
        // 默认加载第一页数据
        loadPageData(page);
注:通过ajax请求时,需要重新手动绑定DOM事件
异步调用接口的好处:提升查询效率,提升用户体验,降低代码耦合度,维护性更强。
四、总结
本次项目让我更加深刻地体会到了前端框架的强大与便利,加深了我对Flask框架的认识,也更加了解了从客户端到服务器端,从请求到响应的过程,最重要的是让我认识到了Restful接口风格以及学会了怎样编写接口,并通过ajax异步请求调用接口。此次项目基本完成了在线问答系统的相关功能。
更多内容可前往http://39.105.148.140:8001/ 进行查看。
