java搭建websocket_Java轻松搭建简易WebSocket,附可用源码
前言
最近,本人在自学WebSocket,然而在百度学习的过程中,发现要么按照文章的代码搭起来的WebSocket不能用,要么太过复杂,看的本菜鸟一愣一愣的,不知从何入手。
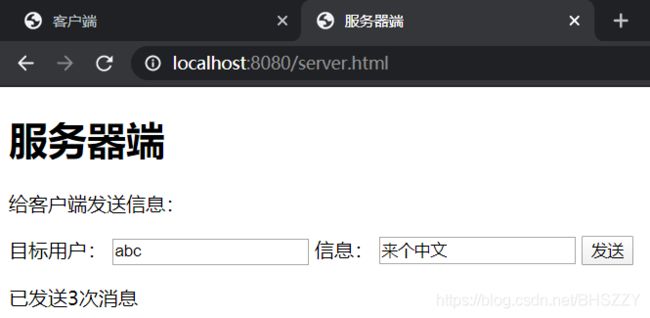
所幸有大佬赐教,本人终于实现了一个简易的WebSocket,如图:
第二张图:
界面与内部确实有些简陋,不过请大家放心,确实是WebSocket实现的。
接下来就进入正题:
WebSocket作用
简单的说,WebSocket可以让服务器直接给客户端发送信息,而不是先等客户端发起请求后、服务器才返回信息。(比起轮询,能更好的节省服务器资源和带宽,并且能够更实时地进行通讯。关于具体实现原理在此不再赘述,可查看相关专业文章。)
Java搭建WebSocket
1.使用IDEA创建SpringBoot项目
由于本人是用springboot实现的,因此这么写;当然也可以用spring框架之类的。
2.创建一个WebSocket类
用来接收客户端的webSocket链接请求、处理主要逻辑,代码如下:
package com.websocket.demo.controller;
import net.sf.json.JSONObject;
import org.springframework.stereotype.Component;
import javax.websocket.*;
import javax.websocket.server.PathParam;
import javax.websocket.server.ServerEndpoint;
import java.io.IOException;
import java.util.Map;
import java.util.concurrent.ConcurrentHashMap;
@Component
@ServerEndpoint("/webSocket/{username}")
public class WebSocket {
//@ServerEndpoint("/webSocket/{username}")
private static Map clients = new ConcurrentHashMap();
private static int onlineCount = 0;
private Session session;
private String username;
@OnOpen
public void onOpen(@PathParam("username") String username, Session session) throws IOException {
this.username = username;
this.session = session;
addOnlineCount();
clients.put(username, this);
System.out.println("已连接");
}
@OnClose
public void onClose() throws IOException {
clients.remove(username);
subOnlineCount();
}
@OnMessage
public void onMessage(String message) throws IOException {
JSONObject jsonTo = JSONObject.fromObject(message);
String mes = (String) jsonTo.get("message");
if (!jsonTo.get("To").equals("All")){
sendMessageTo(mes, jsonTo.get("To").toString());
}else{
sendMessageAll("给所有人");
}
}
@OnError
public void onError(Session session, Throwable error) {
error.printStackTrace();
}
public void sendMessage(String message) throws IOException {
// session.getBasicRemote().sendText(message);
session.getAsyncRemote().sendText(message);
}
public void sendMessageTo(String message, String To) throws IOException {
// session.getBasicRemote().sendText(message);
// session.getAsyncRemote().sendText(message);
for (WebSocket item : clients.values()) {
if (item.username.equals(To) )
item.session.getAsyncRemote().sendText(message);
}
}
public void sendMessageAll(String message) throws IOException {
for (WebSocket item : clients.values()) {
item.session.getAsyncRemote().sendText(message);
}
}
public static synchronized int getOnlineCount() {
return onlineCount;
}
public static synchronized void addOnlineCount() {
WebSocket.onlineCount++;
}
public static synchronized void subOnlineCount() {
WebSocket.onlineCount--;
}
public static synchronized Map getClients() {
return clients;
}
}
3.重要!创建一个WebSocketConfig类
这个类非常重要,如果没有这个类,就无法建立WebSocket链接(本人当时就是卡在这一步了,都不知道为什么无法建立链接,网上也不说明白,这让本菜鸟怎么搞;多亏大佬赐教才明白),代码如下:
package com.websocket.demo.controller;
import org.springframework.context.annotation.Bean;
import org.springframework.context.annotation.Configuration;
import org.springframework.web.socket.server.standard.ServerEndpointExporter;
@Configuration
public class WebSocketConfig {
/**
* ServerEndpointExporter 作用
*
* 这个Bean会自动注册使用@ServerEndpoint注解声明的websocket endpoint
*
* @return
*/
@Bean
public ServerEndpointExporter serverEndpointExporter() {
return new ServerEndpointExporter();
}
}
4.创建一个ServerController类
这个类是模拟服务器给客户端发送信息用的,通过WebSocket,服务器就可以直接给客户端发送信息。注意,为了便于测试,user变量写死了。代码如下:
package com.websocket.demo.controller;
import org.springframework.web.bind.annotation.RequestMapping;
import org.springframework.web.bind.annotation.RequestMethod;
import org.springframework.web.bind.annotation.RestController;
import javax.servlet.http.HttpServletRequest;
import javax.servlet.http.HttpSession;
import javax.websocket.Session;
import java.io.IOException;
@RestController
public class ServerController {
@RequestMapping(value = "/server",method={RequestMethod.POST, RequestMethod.GET})
public String server(HttpServletRequest request) throws IOException {
try {
String msg = request.getParameter("msg");
String user = request.getParameter("user");
//注意,为了便于测试,这里写死了
user = "abc";
//获取用户的webSocket对象
WebSocket ws = WebSocket.getClients().get(user);
//发送消息
ws.sendMessage(msg);
}catch (Exception e){
System.out.println(e.toString());
}
return "
"window.location.href=\"server.html\";\n" +
"";
}
}
5.修改index.html文件
创建springboot项目时,idea会自动生成一个index.html文件(在resources/static下),因此只要修改即可,代码如下:
客户端客户端
打开服务器页面
与服务器建立websocket链接
关闭websocket链接
链接状态:
未建立链接
从服务器发来的信息:
6.创建index.js文件
这个文件放在index.html旁边即可,是客户端申请建立WebSocket链接用的,也比较重要。注意,为了便于测试,username变量写死了。代码如下:
var websocket = null;
var host = document.location.host;
var username = "${loginUsername}"; // 获得当前登录人员的userName
// alert(username)
//判断当前浏览器是否支持WebSocket
if ('WebSocket' in window) {
alert("浏览器支持Websocket")
//假设当前用户是abc
username = "abc";
//alert(username);
//alert('ws://'+host+'/webSocket/'+username);
} else {
alert('当前浏览器 Not support websocket')
}
//将消息显示在网页上
function setMessageInnerHTML(innerHTML) {
document.getElementById('message').innerHTML += innerHTML + '
';
}
//建立websocket链接
function buttonCreate() {
try {
websocket = new WebSocket('ws://' + host + '/webSocket/' + username);
initWebSocket();
}catch (e){
alert(e);
}
}
//关闭websocket链接
function buttonClose() {
try{
websocket.close();
}catch (e){
alert(e)
}
}
function initWebSocket() {
//连接发生错误的回调方法
websocket.onerror = function() {
//alert("WebSocket连接发生错误")
setMessageInnerHTML("WebSocket连接发生错误");
};
//连接成功建立的回调方法
websocket.onopen = function() {
//alert("WebSocket连接成功")
changeStatus("WebSocket连接成功");
}
//接收到消息的回调方法
websocket.onmessage = function(event) {
//alert("这是后台推送的消息:"+event.data);
setMessageInnerHTML(event.data);
}
//连接关闭的回调方法
websocket.onclose = function() {
changeStatus("WebSocket连接关闭");
}
//监听窗口关闭事件,当窗口关闭时,主动去关闭websocket连接,防止连接还没断开就关闭窗口,server端会抛异常。
window.onbeforeunload = function() {
try {
websocket.close();
}catch (e){
alert(e);
}
}
}
function changeStatus(text) {
document.getElementById("status").innerText = text;
}
7.创建server.html文件
这个文件是模拟服务器页面用的。代码如下:
服务器端服务器端
给客户端发送信息:
目标用户:
信息:
已发送0次消息
var num = 0;
function changeNum() {
num++;
document.getElementById("num").innerText = num;
}
以上,Java搭建的简易的WebSocket就完成了。
总结
好不容易搞出来一个可用的WebSocket的Java代码,赶紧总结了这篇文章。
本菜鸟也只是刚接触WebSocket,还是有很多不太明白的地方。(比如服务器代码部分应该这样写吗?不清楚实际应用场景......)
如果大家按照上述代码还是无法搭建可用的WebSocket,请联系本人;也可以下载本人github上的完整代码(springboot版,本人亲测,绝对可用,大概)。
github源码下载地址:

