Spring Security+JWT+前后端分离学习笔记
Spring Security+JWT+前后端分离学习笔记
前后端分离,以JWT作为用户的凭证来访问网站。重点学习怎么使用Spring Security+JWT,我自己做一个小例子作为学习记录。这里面主要用到的技术:
- Spring Boot
- Spring Security
- MyBatis-Plus
- MySQL
- Vue
学习过程中看到觉得挺好的链接:
-
MarkerHub的VueAdmin项目前后端笔记:
https://shimo.im/docs/OnZDwoxFFL8bnP1c/read
https://shimo.im/docs/pxwyJHgqcWjWkTKX/read
-
知乎上看到的Spring Security教程:
https://zhuanlan.zhihu.com/p/47224331
-
JWT相关:
https://www.ruanyifeng.com/blog/2018/07/json_web_token-tutorial.html
-
Spring Security各种Filter介绍:
https://blog.csdn.net/qq_35067322/article/details/102690579
下面的小例子就是基于MarkerHub的VueAdmin项目来做的,只提取其中关于Spring Security+JWT的部分。
项目代码地址:https://gitee.com/cooperzr/jwt-demo
前置了解
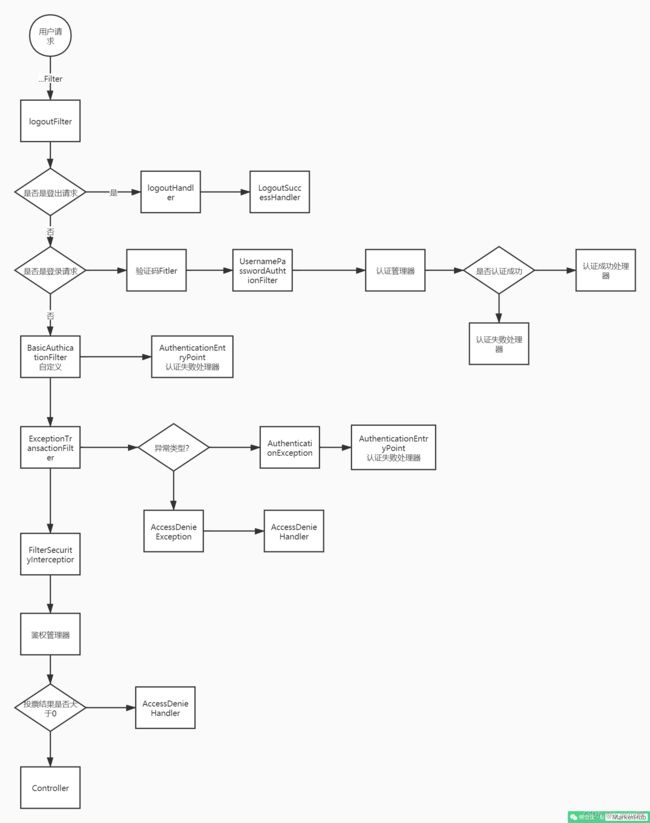
客户端发起一个请求,进入 Security 过滤器链。
当到 LogoutFilter 的时候判断是否是登出路径,如果是登出路径则到 logoutHandler ,如果登出成功则到 logoutSuccessHandler 登出成功处理。如果不是登出路径则直接进入下一个过滤器。
判断是否为登录路径,如果是,则进入UsernamePasswordAuthenticationFilter过滤器进行登录操作,如果登录失败则到 AuthenticationFailureHandler 登录失败处理器处理,如果登录成功则到 AuthenticationSuccessHandler 登录成功处理器处理,如果不是登录请求则不进入该过滤器。
进入认证BasicAuthenticationFilter进行用户认证,成功的话就把认证了的结果写入到SecurityContextHolder中SecurityContext的属性authentication上面。如果认证失败就会交给AuthenticationEntryPoint认证失败处理类,或者抛出异常被后续ExceptionTranslationFilter过滤器处理异常,如果是AuthenticationException就交给AuthenticationEntryPoint处理,如果是AccessDeniedException异常则交给AccessDeniedHandler处理。
当到 FilterSecurityInterceptor 的时候会拿到 uri ,根据 uri 去找对应的鉴权管理器,鉴权管理器做鉴权工作,鉴权成功则到 Controller 层,否则到 AccessDeniedHandler 鉴权失败处理器处理。
总结一下我们需要了解的几个组件:
-
LogoutFilter - 登出过滤器
-
logoutSuccessHandler - 登出成功之后的操作类
-
UsernamePasswordAuthenticationFilter - from提交用户名密码登录认证过滤器
-
AuthenticationFailureHandler - 登录失败操作类
-
AuthenticationSuccessHandler - 登录成功操作类
-
BasicAuthenticationFilter - Basic身份认证过滤器
-
SecurityContextHolder - 安全上下文静态工具类
-
AuthenticationEntryPoint - 认证失败入口
-
ExceptionTranslationFilter - 异常处理过滤器
-
AccessDeniedHandler - 权限不足操作类
-
FilterSecurityInterceptor - 权限判断拦截器
后端java部分
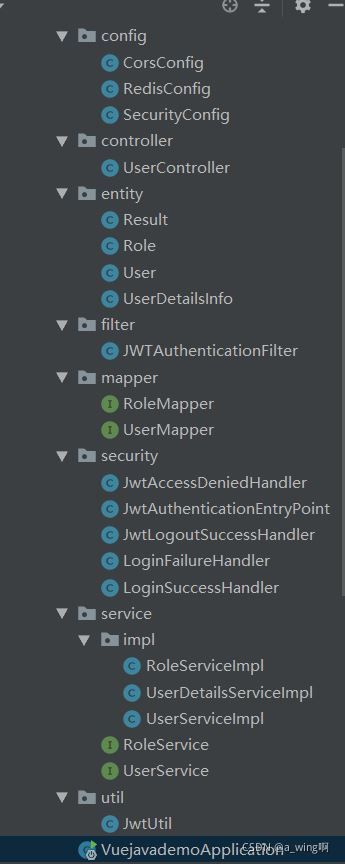
项目目录
数据库
/*
SQLyog Ultimate v12.08 (64 bit)
MySQL - 5.7.35 : Database - spring_security_jwt_demo
*********************************************************************
*/


/*!40101 SET NAMES utf8 */;

/*!40101 SET SQL_MODE=''*/;

/*!40014 SET @OLD_UNIQUE_CHECKS=@@UNIQUE_CHECKS, UNIQUE_CHECKS=0 */;
/*!40014 SET @OLD_FOREIGN_KEY_CHECKS=@@FOREIGN_KEY_CHECKS, FOREIGN_KEY_CHECKS=0 */;
/*!40101 SET @OLD_SQL_MODE=@@SQL_MODE, SQL_MODE='NO_AUTO_VALUE_ON_ZERO' */;
/*!40111 SET @OLD_SQL_NOTES=@@SQL_NOTES, SQL_NOTES=0 */;
CREATE DATABASE /*!32312 IF NOT EXISTS*/`spring_security_jwt_demo` /*!40100 DEFAULT CHARACTER SET utf8 */;

USE `spring_security_jwt_demo`;

/*Table structure for table `t_authority` */

DROP TABLE IF EXISTS `t_authority`;

CREATE TABLE `t_authority` (
  `id` int(20) NOT NULL AUTO_INCREMENT,
  `authority` varchar(20) NOT NULL,
  PRIMARY KEY (`id`)
) ENGINE=InnoDB AUTO_INCREMENT=3 DEFAULT CHARSET=utf8;

/*Data for the table `t_authority` */

insert  into `t_authority`(`id`,`authority`) values (1,'ROLE_common'),(2,'ROLE_admin');

/*Table structure for table `t_user` */

DROP TABLE IF EXISTS `t_user`;

CREATE TABLE `t_user` (
  `id` int(20) NOT NULL AUTO_INCREMENT,
  `username` varchar(20) NOT NULL,
  `password` varchar(100) DEFAULT NULL,
  `valid` tinyint(1) NOT NULL DEFAULT '1',
  PRIMARY KEY (`id`),
  UNIQUE KEY `username` (`username`)
) ENGINE=InnoDB AUTO_INCREMENT=3 DEFAULT CHARSET=utf8;

/*Data for the table `t_user` */

insert  into `t_user`(`id`,`username`,`password`,`valid`) values (1,'tony','$2a$10$TiE4jhhVWGGRTvEu3tXHN.7SNN3B9vFJnJ77pNhJ8660LsxNN8Cv6',1),(2,'mike','$2a$10$TiE4jhhVWGGRTvEu3tXHN.7SNN3B9vFJnJ77pNhJ8660LsxNN8Cv6',1);

/*Table structure for table `t_user_authority` */

DROP TABLE IF EXISTS `t_user_authority`;

CREATE TABLE `t_user_authority` (
  `id` int(20) NOT NULL AUTO_INCREMENT,
  `user_id` int(20) NOT NULL,
  `authority_id` int(20) NOT NULL,
  PRIMARY KEY (`id`)
) ENGINE=InnoDB AUTO_INCREMENT=3 DEFAULT CHARSET=utf8;

/*Data for the table `t_user_authority` */

insert  into `t_user_authority`(`id`,`user_id`,`authority_id`) values (1,1,1),(2,2,2);

/*!40101 SET SQL_MODE=@OLD_SQL_MODE */;
/*!40014 SET FOREIGN_KEY_CHECKS=@OLD_FOREIGN_KEY_CHECKS */;
/*!40014 SET UNIQUE_CHECKS=@OLD_UNIQUE_CHECKS */;
/*!40111 SET SQL_NOTES=@OLD_SQL_NOTES */;
引入依赖
<dependency>
            <groupId>org.springframework.bootgroupId>
            <artifactId>spring-boot-starter-securityartifactId>
        dependency>
        <dependency>
            <groupId>org.springframework.bootgroupId>
            <artifactId>spring-boot-starter-webartifactId>
        dependency>
        <dependency>
            <groupId>org.springframework.bootgroupId>
            <artifactId>spring-boot-starter-testartifactId>
            <scope>testscope>
            <exclusions>
                <exclusion>
                    <groupId>org.junit.vintagegroupId>
                    <artifactId>junit-vintage-engineartifactId>
                exclusion>
            exclusions>
        dependency>
        <dependency>
            <groupId>org.springframework.securitygroupId>
            <artifactId>spring-security-testartifactId>
            <scope>testscope>
        dependency>

        <dependency>
            <groupId>io.jsonwebtokengroupId>
            <artifactId>jjwtartifactId>
            <version>0.9.1version>
        dependency>

        <dependency>
            <groupId>com.baomidougroupId>
            <artifactId>mybatis-plus-boot-starterartifactId>
            <version>3.4.1version>
        dependency>

        <dependency>
            <groupId>mysqlgroupId>
            <artifactId>mysql-connector-javaartifactId>
        dependency>

        <dependency>
            <groupId>org.springframework.bootgroupId>
            <artifactId>spring-boot-starter-data-redisartifactId>
        dependency>

        <dependency>
            <groupId>com.alibabagroupId>
            <artifactId>fastjsonartifactId>
            <version>1.2.76version>
        dependency>
application.yaml
spring:
  datasource:
    # 数据库驱动:
    driver-class-name: com.mysql.cj.jdbc.Driver
    # 数据源名称
    name: defaultDataSource
    # 数据库连接地址
    url: jdbc:mysql://localhost:3306/spring_security_jwt_demo?serverTimezone=UTC
    # 数据库用户名&密码:
    username: root
    password: root

    #redis配置
  redis:
    host: 127.0.0.1
    port: 6379
    password:
server:
  port: 8080
实体类
统一返回结果Result类
public class Result implements Serializable {
    private int code;
    private String msg;
    private Object data;

    public static Result success(Object data) {
        return success(200,"操作成功",data);
    }

    public static Result success(int code,String msg,Object data) {
        Result result = new Result();
        result.setCode(code);
        result.setMsg(msg);
        result.setData(data);
        return result;
    }

    public static Result fail(String msg){
        return fail(400,msg,null);
    }

    public static Result fail(String msg,Object data){
        return fail(400,msg,data);
    }

    public static Result fail(int code,String msg,Object data){
        Result result = new Result();
        result.setCode(code);
        result.setMsg(msg);
        result.setData(data);
        return result;
    }
    //属性的get、set方法和toString方法就不放上来了,实际中记得加上
}
Role
@TableName("t_authority")
public class Role implements Serializable {

    private Integer id;

    @TableField("authority")
    private String roleName;
    //属性的get、set方法和toString方法就不放上来了,实际中记得加上
}
User
@TableName("t_user")
public class User implements Serializable {

    private Integer id;
    private String username;
    private String password;
    //属性的get、set方法和toString方法就不放上来了,实际中记得加上
}
UserDetailsInfo
public class UserDetailsInfo implements UserDetails {

    private Integer id;
    private String username;
    private String password;
    private  Collection<? extends GrantedAuthority> authorities;
    private boolean accountNonExpired;
    private boolean accountNonLocked;
    private boolean credentialsNonExpired;
    private boolean enabled;

    public UserDetailsInfo(Integer id, String username, String password, Collection<? extends GrantedAuthority> authorities) {
        this(id,username,password,authorities,true,true,true,true);
    }

    public UserDetailsInfo(Integer id, String username, String password, Collection<? extends GrantedAuthority> authorities,
                           boolean accountNonExpired, boolean accountNonLocked, boolean credentialsNonExpired,
                           boolean enabled) {
        this.id = id;
        this.username = username;
        this.password = password;
        this.authorities = authorities;
        this.accountNonExpired = accountNonExpired;
        this.accountNonLocked = accountNonLocked;
        this.credentialsNonExpired = credentialsNonExpired;
        this.enabled = enabled;
    }

    @Override
    public Collection<? extends GrantedAuthority> getAuthorities() {
        return this.authorities;
    }

    @Override
    public String getPassword() {
        return this.password;
    }

    @Override
    public String getUsername() {
        return this.username;
    }

    @Override
    public boolean isAccountNonExpired() {
        return this.accountNonExpired;
    }

    @Override
    public boolean isAccountNonLocked() {
        return this.accountNonLocked;
    }

    @Override
    public boolean isCredentialsNonExpired() {
        return this.credentialsNonExpired;
    }

    @Override
    public boolean isEnabled() {
        return this.enabled;
    }
    //这个类里没有写其他的get、set和toString方法
}
安全配置类
SecurityConfig
@Configuration
@EnableWebSecurity
@EnableGlobalMethodSecurity(prePostEnabled = true)
public class SecurityConfig extends WebSecurityConfigurerAdapter {

    @Autowired
    LoginFailureHandler loginFailureHandler;

    @Autowired
    LoginSuccessHandler loginSuccessHandler;

    @Autowired
    JwtAuthenticationEntryPoint jwtAuthenticationEntryPoint;

    @Autowired
    UserDetailsServiceImpl userDetailsService;

    @Autowired
    JwtLogoutSuccessHandler jwtLogoutSuccessHandler;

    @Autowired
    JwtAccessDeniedHandler jwtAccessDeniedHandler;

    @Bean
    JWTAuthenticationFilter jwtAuthenticationFilter() throws Exception{
        JWTAuthenticationFilter filter = new JWTAuthenticationFilter(authenticationManager());
        return filter;
    }

    @Bean
    BCryptPasswordEncoder bCryptPasswordEncoder(){
        return new BCryptPasswordEncoder();
    }

    @Override
    protected void configure(HttpSecurity http) throws Exception {
        // 允许跨域访问
        http.cors().and()
                //关闭csrf防护
                .csrf().disable()
                //开启基于表单的登录
                .formLogin()
                //设置自己的登录失败处理器
                .failureHandler(loginFailureHandler)
                //设置自己的登录成功处理器
                .successHandler(loginSuccessHandler)
                //退出相关配置
                .and()
                .logout()
                .logoutSuccessHandler(jwtLogoutSuccessHandler)
                .and()
                //开启基于HttpServletRequest请求访问的限制
                .authorizeRequests()
                .antMatchers("/login").permitAll()
                .antMatchers("/api/admin/**").hasRole("admin")
                .antMatchers("/api/common/**").hasRole("common")
                //任何请求需要是已登录认证的用户
                .anyRequest().authenticated()
                //不创建session
                .and()
                .sessionManagement()
                .sessionCreationPolicy(SessionCreationPolicy.STATELESS)
                .and()
                //异常相关
                .exceptionHandling()
                .authenticationEntryPoint(jwtAuthenticationEntryPoint)
                .accessDeniedHandler(jwtAccessDeniedHandler)
                .and()
                .addFilter(jwtAuthenticationFilter());

    }

    @Override
    protected void configure(AuthenticationManagerBuilder auth) throws Exception {
        auth.userDetailsService(userDetailsService);
    }
}
Mapper
RoleMapper
public interface RoleMapper extends BaseMapper<Role> {
}
UserMapper
public interface UserMapper extends BaseMapper<User> {
}
Service
RoleService
public interface RoleService extends IService<Role> {
}
UserService
public interface UserService extends IService<User> {

    User selectByUsername(String username);

    String selectUserAuthority(Integer userId);
}
RoleServiceImpl
@Service
public class RoleServiceImpl extends ServiceImpl<RoleMapper,Role> implements RoleService {
}
UserServiceImpl
@Service
public class UserServiceImpl extends ServiceImpl<UserMapper, User> implements UserService {

    @Autowired
    UserMapper userMapper;

    @Autowired
    RedisTemplate redisTemplate;

    @Autowired
    RoleService roleService;

    @Override
    public User selectByUsername(String username) {
        return getOne(new QueryWrapper<User>().eq("username",username));
    }

    @Override
    public String selectUserAuthority(Integer userId) {
        User user = userMapper.selectById(userId);
        String authority = "";
        //如果缓存里有就用缓存的
        if (redisTemplate.hasKey("GrantedAuthority:"+user.getUsername())){
            authority = redisTemplate.opsForValue().get("GrantedAuthority:"+user.getUsername()).toString();
        }else {
            List<Role> list = roleService.list(new QueryWrapper<Role>()
                    .inSql("id","select authority_id from t_user_authority where user_id = "+userId));

            if (list.size() > 0){
                authority = list.stream().map(r->r.getRoleName()).collect(Collectors.joining(","));
                redisTemplate.opsForValue().set("GrantedAuthority:"+user.getUsername(), authority, 60*60, TimeUnit.SECONDS);
            }
        }

        return authority;
    }
}
JwtUtil工具类
public class JwtUtil {

    //7天,秒单位
    private static long expire = 604800L;

    private static String secret = "ji8n3439n439n43ld9ne9343fdfer49h";
    public static String header = "Authorization";

    //生成JWT
    public static String generateToken(String username){
        Date nowDate = new Date();
        Date expireDate= new Date(nowDate.getTime() + 1000 * expire);
        return Jwts.builder()
                .setHeaderParam("typ","JWT")
                .setSubject(username)
                .setIssuedAt(nowDate)
                .setExpiration(expireDate)
                .signWith(SignatureAlgorithm.HS512,secret)
                .compact();
    }

    //解析JWT
    public static Claims getClaimByToken(String jwt){
        try {
            return Jwts.parser()
                    .setSigningKey(secret)
                    .parseClaimsJws(jwt)
                    .getBody();
        } catch (Exception e) {
            return null;
        }
    }

    //判断JWT是否过期
    public static boolean isTokenExpired(Claims claims){
        return claims.getExpiration().before(new Date());
    }
}
LoginFailureHandler
登录失败的时候交给AuthenticationFailureHandler,所以我们自定义了LoginFailureHandler
@Component
public class LoginFailureHandler implements AuthenticationFailureHandler {
    @Override
    public void onAuthenticationFailure(HttpServletRequest httpServletRequest, HttpServletResponse httpServletResponse, AuthenticationException authenticationException) throws IOException, ServletException {
        httpServletResponse.setContentType("application/json;charset=UTF-8");
        ServletOutputStream outputStream = httpServletResponse.getOutputStream();
        Result result = Result.fail(
                "Bad credentials".equals(authenticationException.getMessage()) ? "账号或密码错误" : authenticationException.getMessage());
        outputStream.write(JSON.toJSONString(result).getBytes("UTF-8"));
        outputStream.flush();
        outputStream.close();
    }
}
主要就是获取异常的消息,然后封装到Result,最后转成json返回给前端
LoginSuccessHandler
登录成功,security默认跳转到/链接,根据上面的流程,登录成功之后会走AuthenticationSuccessHandler,因此在登录之前,我们先去自定义这个登录成功操作类LoginSuccessHandler
@Component
public class LoginSuccessHandler implements AuthenticationSuccessHandler {
    @Override
    public void onAuthenticationSuccess(HttpServletRequest httpServletRequest, HttpServletResponse httpServletResponse, Authentication authentication) throws IOException, ServletException {
        //生成jwt
        String jwt = JwtUtil.generateToken(authentication.getName());


        httpServletResponse.setContentType("application/json;charset=UTF-8");
        httpServletResponse.setHeader(JwtUtil.header,jwt);
        ServletOutputStream outputStream = httpServletResponse.getOutputStream();
        Result result = Result.success("");
        outputStream.write(JSON.toJSONString(result).getBytes("UTF-8"));
        outputStream.flush();
        outputStream.close();
    }

}
JWT工具类
public class JwtUtil {

    //7天,秒单位
    private static long expire = 604800L;
    //随意写32位字符
    private static String secret = "ji8n3439n439n43ld9ne9343fdfer49h";
    public static String header = "Authorization";

    //生成JWT
    public static String generateToken(String username){
        Date nowDate = new Date();
        Date expireDate= new Date(nowDate.getTime() + 1000 * expire);
        return Jwts.builder()
                .setHeaderParam("typ","JWT")
                .setSubject(username)
                .setIssuedAt(nowDate)
                .setExpiration(expireDate)
                .signWith(SignatureAlgorithm.HS512,secret)
                .compact();
    }

    //解析JWT
    public static Claims getClaimByToken(String jwt){
        try {
            return Jwts.parser()
                    .setSigningKey(secret)
                    .parseClaimsJws(jwt)
                    .getBody();
        } catch (Exception e) {
            return null;
        }
    }

    //判断JWT是否过期
    public static boolean isTokenExpired(Claims claims){
        return claims.getExpiration().before(new Date());
    }
}
登录成功之后我们利用用户名生成jwt,然后把jwt作为请求头返回回去,请求头的键就叫Authorization
JWTAuthenticationFilter
定义一个过滤器用来进行识别JWT。
public class JWTAuthenticationFilter extends BasicAuthenticationFilter {

    @Autowired
    UserDetailsServiceImpl userDetailsService;

    @Autowired
    UserService userService;

    //@Autowired
    //@Qualifier("handlerExceptionResolver")
    //HandlerExceptionResolver resolver;

    public JWTAuthenticationFilter(AuthenticationManager authenticationManager) {
        super(authenticationManager);
    }

    @Override
    protected void doFilterInternal(HttpServletRequest request, HttpServletResponse response, FilterChain chain) throws IOException, ServletException {
        String jwt = request.getHeader("Authorization");

        //debugger发现请求头里如果没有Authorization,上面的jwt的值为"null"
        if ("".equals(jwt) || jwt == null || "null".equals(jwt)){
            chain.doFilter(request,response);
            return;
        }
        /*Claims claim = null;
        try {
            claim = JwtUtil.getClaimByToken(jwt);
        } catch (JwtException e) {
            System.out.println("token异常");
            return;
        }*/
        Claims claim = JwtUtil.getClaimByToken(jwt);
        if (claim == null){
            chain.doFilter(request,response);
            return;
            //throw new JwtException("token异常");
            //resolver.resolveException(request,response,null,new JwtException("token异常"));
        }
        if (JwtUtil.isTokenExpired(claim)){
            chain.doFilter(request,response);
            return;
            //throw new JwtException("token已经过期");
        }

        String username = claim.getSubject();
        User user = userService.selectByUsername(username);
        UsernamePasswordAuthenticationToken usernamePasswordAuthenticationToken
                = new UsernamePasswordAuthenticationToken(username, null, userDetailsService.getAuthority(user.getId()));
        SecurityContextHolder.getContext().setAuthentication(usernamePasswordAuthenticationToken);
        chain.doFilter(request,response);
    }
}
获取到用户名之后我们把它封装成UsernamePasswordAuthenticationToken,之后交给SecurityContextHolder参数传递authentication对象,这样后续security就能获取到当前登录的用户信息了,也就完成了用户认证。
JwtAuthenticationEntryPoint
当认证失败的时候会进入AuthenticationEntryPoint
@Component
public class JwtAuthenticationEntryPoint implements AuthenticationEntryPoint {
    @Override
    public void commence(HttpServletRequest httpServletRequest, HttpServletResponse httpServletResponse, AuthenticationException authenticationException) throws IOException, ServletException {
        httpServletResponse.setContentType("application/json;charset=UTF-8");
        httpServletResponse.setStatus(HttpServletResponse.SC_UNAUTHORIZED);
        ServletOutputStream outputStream = httpServletResponse.getOutputStream();
        Result result = Result.fail("请先登录");

        outputStream.write(JSON.toJSONString(result).getBytes("UTF-8"));
        outputStream.flush();
        outputStream.close();
    }
}
参与验证的要素(用户名、密码)在前端由表单提交,由网络传入后端后,会形成一个Authentication类的实例。
该实例在进行验证前,携带了用户名、密码等信息;在验证成功后,则携带了身份信息、角色等信息。Authentication接口代码节选如下:
public interface Authentication extends Principal, Serializable {
    Collection<? extends GrantedAuthority> getAuthorities();
    Object getCredentials();
    Object getDetails();
    Object getPrincipal();
    boolean isAuthenticated();
    void setAuthenticated(boolean var1) throws IllegalArgumentException;
}
- getCredentials()返回一个Object credentials,它代表验证凭据,即密码;
- getPrincipal()返回一个Object principal,它代表身份信息,即用户名等;
- getAuthorities()返回一个Collection,它代表一组已经分发的权限,即本次验证的角色(本文中权限和角色可以通用)集合。
有了Authentication实例,则验证流程主要围绕这个实例来完成。它会依次穿过整个验证链,并存储在SecurityContextHolder中。
上面介绍了Authentication类,它代表了验证信息。
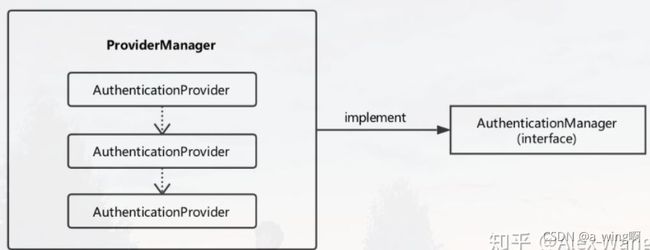
再介绍一个类AuthenticationManager,它是验证管理类的总接口;而具体的验证管理需要ProviderManager类,它具有一个List
验证成功后,验证实例Authentication会被存入SecurityContextHolder中
具体的验证流程如下:
- 后端从前端的表单得到用户密码,包装成一个Authentication类的对象;
- 将Authentication对象传给“验证管理器”ProviderManager进行验证;
- ProviderManager在一条链上依次调用AuthenticationProvider进行验证;
- 验证成功则返回一个封装了权限信息的Authentication对象(即对象的Collection属性被赋值);
- 将此对象放入安全上下文SecurityContext中;
- 需要时,可以将Authentication对象从SecurityContextHolder上下文中取出。
注意,在ProviderManager管理的验证链上,任何一个AuthenticationProvider通过了验证,则验证成功。
因此可知,要加入想自定义的验证功能,就可以向ProviderManager中加入一个自定义的AuthenticationProvider实例。
为了加入使用数据库进行验证的DaoAuthenticationProvider类(这个类在我们的代码中是透明的)实例,可以使用AuthenticationManagerBuilder类的userDetailsService(UserDetailsService)方法。
/*
使用Security内置了的BCryptPasswordEncoder,里面就有生成和匹配密码是否正确的方法,也就是加密和验证策略
这样系统就会使用我们这个新的密码策略进行匹配密码是否正常了。
*/
@Bean
    BCryptPasswordEncoder bCryptPasswordEncoder(){
        return new BCryptPasswordEncoder();
    }
protected void configure(AuthenticationManagerBuilder auth) throws Exception {
        ...省略
        //加入数据库验证类,下面的语句实际上在验证链中加入了一个DaoAuthenticationProvider
        auth.userDetailsService(userDetailsService);
    }
需要掌握的就是由Security框架提供的两个接口UserDetails和UserDetailsService。其中UserDetails接口中定义了用于验证的“用户详细信息”所需的方法。而UserDetailsService接口仅定义了一个方法loadUserByUsername(String username) 。这个方法由接口的实现类来具体实现,它的作用就是通过用户名username从数据库中查询,并将结果赋值给一个UserDetails的实现类实例。验证流程如下:
- 由于在上面的configure方法中调用了userDetailsService(userDetailsService)方法,因此在ProviderManager的验证链中加入了一个DaoAuthenticationProvider类的实例;
- 验证流程进行到DaoAuthenticationProvider时,它调用用户自定义的userDetailsService服务的loadUserByUsername方法,这个方法会从数据库中查询用户名是否存在;
- 若存在,则从数据库中返回的信息会组成一个UserDetails接口的实现类的实例,并将此实例返回给DaoAuthenticationProvider进行密码比对,比对成功则通过验证。
UserDetailsServiceImpl
/**
 * security在认证用户身份的时候会调用UserDetailsService.loadUserByUsername()方法,
 * 因此我们重写了之后security就可以根据我们的流程去查库获取用户了
 */
@Service
public class UserDetailsServiceImpl implements UserDetailsService {

    @Autowired
    UserService userServiceImpl;

    @Override
    public UserDetails loadUserByUsername(String username) throws UsernameNotFoundException {
        User user = userServiceImpl.selectByUsername(username);
        if (user == null) {
            throw new UsernameNotFoundException("用户名或密码不正确!");
        }
        return new UserDetailsInfo(user.getId(),user.getUsername(),user.getPassword(),getAuthority(user.getId()));
    }

    //1个用户可以有多个角色(如同时拥有admin和common两种角色,这里我的用户只有1个角色,不影响运行
    public List<GrantedAuthority> getAuthority(Integer userId){
        String authority = userServiceImpl.selectUserAuthority(userId);

        return AuthorityUtils.commaSeparatedStringToAuthorityList(authority);
    }
}
实现UserDetails接口的实体类上面已经有了,就是UserDetailsInfo类。
UserServiceImpl
@Service
public class UserServiceImpl extends ServiceImpl<UserMapper, User> implements UserService {

    @Autowired
    UserMapper userMapper;

    @Autowired
    RedisTemplate redisTemplate;

    @Autowired
    RoleService roleService;

    @Override
    public User selectByUsername(String username) {
        return getOne(new QueryWrapper<User>().eq("username",username));
    }

    @Override
    public String selectUserAuthority(Integer userId) {
        User user = userMapper.selectById(userId);
        String authority = "";
        //如果缓存里有就用缓存的
        if (redisTemplate.hasKey("GrantedAuthority:"+user.getUsername())){
            authority = redisTemplate.opsForValue().get("GrantedAuthority:"+user.getUsername()).toString();
        }else {
            List<Role> list = roleService.list(new QueryWrapper<Role>()
                    .inSql("id","select authority_id from t_user_authority where user_id = "+userId));

            if (list.size() > 0){
                authority = list.stream().map(r->r.getRoleName()).collect(Collectors.joining(","));
                redisTemplate.opsForValue().set("GrantedAuthority:"+user.getUsername(), authority, 60*60, TimeUnit.SECONDS);
            }
        }

        return authority;
    }
}
通过用户id分别获取到用户的角色信息,然后通过逗号链接起来,这里我的1个用户只有1个角色,有多个应该也行。
如用户同时拥有admin角色和common角色,则最后的字符串是:ROLE_admin,ROLE_common。
我也把用户的角色存到redis缓存里了。
JwtLogoutSuccessHandler
退出成功处理类
@Component
public class JwtLogoutSuccessHandler implements LogoutSuccessHandler {
    @Override
    public void onLogoutSuccess(HttpServletRequest httpServletRequest, HttpServletResponse httpServletResponse, Authentication authentication) throws IOException, ServletException {

        if (authentication != null){
            new SecurityContextLogoutHandler().logout(httpServletRequest,httpServletResponse,authentication);
        }
        httpServletResponse.setContentType("application/json;charset=UTF-8");
        ServletOutputStream outputStream = httpServletResponse.getOutputStream();
        //清空用户的jwt
        httpServletResponse.setHeader(JwtUtil.header, "");

        Result result = Result.success("退出成功");
        outputStream.write(JSON.toJSONString(result).getBytes("UTF-8"));
        outputStream.flush();
        outputStream.close();
    }
}
JwtAccessDeniedHandler
无权限访问或者说拒绝访问时的处理类
@Component
public class JwtAccessDeniedHandler implements AccessDeniedHandler {
    @Override
    public void handle(HttpServletRequest httpServletRequest, HttpServletResponse httpServletResponse, AccessDeniedException accessDeniedException) throws IOException, ServletException {
        httpServletResponse.setContentType("application/json;charset=UTF-8");
        httpServletResponse.setStatus(HttpServletResponse.SC_FORBIDDEN);
        ServletOutputStream outputStream = httpServletResponse.getOutputStream();
        Result result = Result.fail(403,
                "Access is denied".equals(accessDeniedException.getMessage()) ? "拒绝访问" : accessDeniedException.getMessage(),null);

        //outputStream.write("权限不足啦".getBytes("UTF-8"));
        outputStream.write(JSON.toJSONString(result).getBytes("UTF-8"));
        outputStream.flush();
        outputStream.close();
    }
}
解决跨域–CorsConfig
关于跨域的配置:
https://segmentfault.com/a/1190000019485883?utm_source=tag-newest
@Configuration
public class CorsConfig implements WebMvcConfigurer {

    /**
     *
     * HttpSecurity.cors + WebMvcConfigurer.addCorsMappings 是一种相对低效的方式,会导致跨域请求分别在 Filter 和 Interceptor 层各经历一次 CORS 验证
     * HttpSecurity.cors + 注册 CorsFilter 与 HttpSecurity.cors + 注册 CorsConfigurationSource 在运行的时候是等效的
     *
     */
    @Bean
    public CorsFilter corsFilter(){
        CorsConfiguration corsConfiguration = new CorsConfiguration();
        corsConfiguration.addAllowedOrigin("*");
        corsConfiguration.addAllowedHeader("*");
        corsConfiguration.addAllowedMethod("*");
        corsConfiguration.addExposedHeader("Authorization");

        UrlBasedCorsConfigurationSource source = new UrlBasedCorsConfigurationSource();
        source.registerCorsConfiguration("/**",corsConfiguration);
        return new CorsFilter(source);
    }
    /*
    @Override
    public void addCorsMappings(CorsRegistry registry) {
        registry.addMapping("/**")
                .allowedOrigins("*")
                .allowCredentials(true)
                .allowedMethods("GET","POST","DELETE","PUT")
                .maxAge(3600);
    }
*/

}
Controller
UserController
@RestController
@RequestMapping("/api")
public class UserController {

    @GetMapping("/userInfo")
    public Result getUserInfo(HttpServletRequest request){
        String authorization = request.getHeader("Authorization");      //获取前端传来的jwt
        Claims claim = JwtUtil.getClaimByToken(authorization);      //解析jwt
        System.out.println(claim.getSubject());     //输出username
        return  Result.success(claim.getSubject()+"访问/userInfo");
    }

    //@PreAuthorize("hasRole('admin')")       //测试发现写@PreAuthorize("hasRole('ROLE_admin')") 也可以
    @GetMapping("/admin/getData")
    public Result getDataWithAdmin(HttpServletRequest request){
        String authorization = request.getHeader("Authorization");      //获取前端传来的jwt
        Claims claim = JwtUtil.getClaimByToken(authorization);      //解析jwt
        return  Result.success(claim.getSubject()+"访问需要admin权限的数据");
    }

    @GetMapping("/common/getData")
    public Result getDataWithCommon(HttpServletRequest request){
        String authorization = request.getHeader("Authorization");      //获取前端传来的jwt
        Claims claim = JwtUtil.getClaimByToken(authorization);      //解析jwt
        return  Result.success(claim.getSubject()+"访问需要common权限的数据");
    }
}
启动类
@SpringBootApplication
@MapperScan("com.rgb3.vuejavademo.mapper")
public class VuejavademoApplication {

    public static void main(String[] args) {
        SpringApplication.run(VuejavademoApplication.class, args);
    }
}
前端部分
这里使用的是vue2的版本
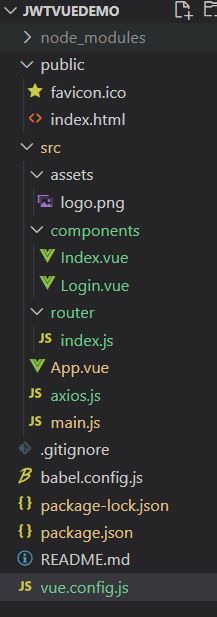
项目目录
安装axios、qs
axios:一个基于 promise 的 HTTP 库,类ajax
qs:查询参数序列化和解析库
npm install axios
npm install qs
在main.js中全局引入axios
main.js
import Vue from 'vue'
import App from './App.vue'
//import axios from 'axios'
import qs from 'qs'
import VueRouter from 'vue-router'
import router from './router/index'
import axiosCustom from './axios'

Vue.use(VueRouter)

Vue.prototype.$axios = axiosCustom
Vue.prototype.qs = qs

Vue.config.productionTip = false

new Vue({
  render: h => h(App),
  router:router
}).$mount('#app')
组件
这里就简单创建2个组件
src/components/Index.vue
欢迎来到主页
登录
src/components/Login.vue
src\router\index.js
import VueRouter from "vue-router";
import Index from '../components/Index.vue'
import Login from '../components/Login.vue'

export default new VueRouter({
    routes:[
        {
            path:'/',
            component:Index
        },
        {
            path:'/login',
            component:Login
        }
    ]
})
src/App.vue

定义全局axios拦截器
src/axios.js
import axios from 'axios'
//import router from './router/index'

const request = axios.create({
    timeout:5000,
    headers:{
        'Content-Type':'application/json;charset=utf-8'
    }
})

//拦截器,在请求或响应被 then 或 catch 处理前拦截它们
//添加请求拦截器
request.interceptors.request.use(config=>{
    //在发送请求前做什么
    config.headers['Authorization'] = localStorage.getItem("authorization") // 请求头带上jwt
    return config
})
//添加响应拦截器
request.interceptors.response.use(response=>{
    //对响应数据做点什么
    console.log('响应码:'+response.data.code)
    let responseCode = response.data.code
    //这里只是简单判断响应码,可以加更细致的判断
    if(responseCode == 200){
        return response
    }else{
        //console.log(response.data.msg)
        return Promise.reject(response.data.msg)
    }
},
(error)=>{
    //对响应错误做点什么
    if(error.response.data.code === 403) {
        error.message = error.response.data.msg
        //console.log(error.response.data.msg)
    }
    return Promise.reject(error)
})

export default request
vue.config.js
module.exports = {
    lintOnSave:false,
    devServer: {
        port: 8081,  // 此处修改你想要的端口号,
        proxy:'http://localhost:8080' //代理
      }
}
在一台电脑上运行,所以就简单改了下端口模拟跨域,后端用8080端口,前端用8081端口。
测试
启动数据库,Redis,前端,后端测试:
现在是没有登录的状态,点击2个访问数据的按钮:
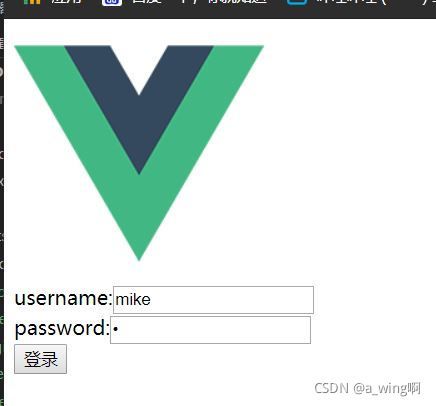
数据库里的2个用户1个mike是admin,另一个tony是common,密码都是1,先试试输入错误的密码登录:
再输入正确的密码登录:
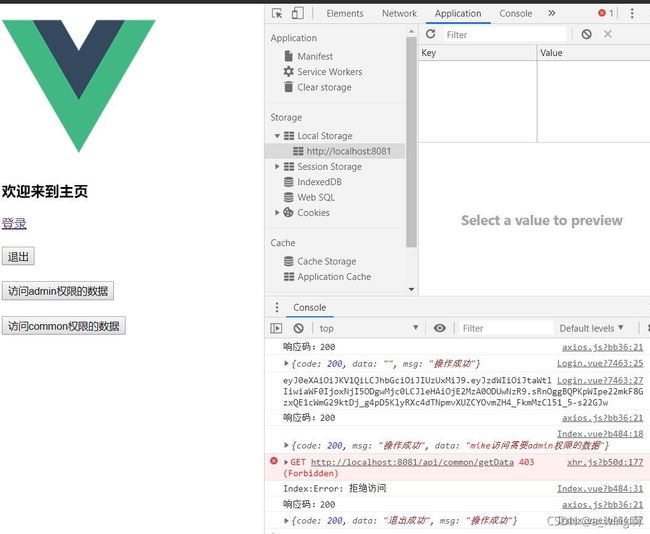
成功登录后可以看到浏览器的Local Storage里也有authorization了(就是JWT)
mike是admin,点击访问admin权限的数据按钮:
点击访问common权限的数据按钮:
拒绝访问,满足权限要求。
点击退出:
可以看到退出成功后Local Storage里的authorization也没了。现在是没有登录的状态,再点击2个访问数据的按钮:
确实访问不了,满足要求。
现在登录tony用户(tony的角色是common):
拒绝访问

