十分钟搭建一个EFK集群
快速部署搭建ELK
- ELK 介绍
- 环境信息
- 架构
- 二进制部署
-
- 一,系统初始化。
- 二,elasticsearch安装(所有节点)
- 三,filebeat安装使用
- 四,nginx安装
- 五,kibana 安装
- 六访问elasticsearch出现yellow
ELK 介绍
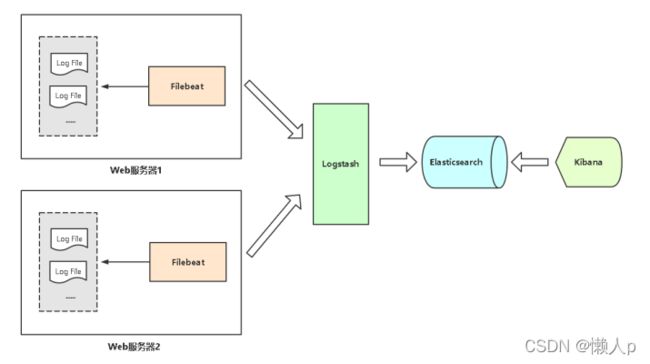
ELK 是三个开源软件的缩写,提供一套完整的企业级日志平台解决方案。
分别是:
• Elasticsearch:搜索、分析和存储数据。
• Logstash :采集日志、格式化、过滤,最后将数据推送到Elasticsearch存储
• Kibana:数据可视化
• Beats :集合了多种单一用途数据采集器,用于实现从边缘机器向 Logstash 和
Elasticsearch 发送数据。里面应用最多的是Filebeat,是一个轻量级日志采集器,将采集的数据推送到Logstash、ES存储。
-l: 让shell成为登录shell,用 runuser -l PAM 文件替代默认的
-g:指定主要的组
-G 追加组
-c:命令,要传到shell的单个命令
--session-command=COMMAND:使用-c传递单个命令道shell中并且不创建新的会话
-m: 不重置环境变量
环境信息
|主机名|操作系统版本|IP地址|
|–|–|–|–|
|master |Centos7 |192.168.30.133|
|node1|Centos7 |192.168.30.134|
|node2|Centos7 |192.168.30.135|
架构
二进制部署
一,系统初始化。
#关闭防火墙
systemctl stop firewalld
systemctl disable firewalld
#关闭selinux
sed -i ‘s/enforcing/disabled/’ /etc/selinux/config # 永久
setenforce 0 # 临时
#根据规划设置主机名
hostnamectl set-hostname
#添加hosts
cat >> /etc/hosts << EOF
192.168.30.133 elk1
192.168.30.134 elk2
192.168.30.135 elk3
EOF
# 创建用户
groupadd elk
useradd elk -g elk
# 创建数据及⽇志⽂件并授权
mkdir -pv /data/elk/{data,logs}
chown -R elk:elk /data/elk/
启动先决条件:
调整进程最大打开文件数数量
#临时设置
ulimit -n 65535
#永久设置,重启生效
vi /etc/security/limits.conf
* hard nofile 65535
* soft nofile 65535
• 调整进程最大虚拟内存区域数量
#临时设置
sysctl -w vm.max_map_count=262144
#永久设置
echo “vm.max_map_count=262144” >> /etc/sysctl.conf
sysctl -p
二,elasticsearch安装(所有节点)
安装java 1.8。
yum install -y epel-release
yum install -y java-1.8.0-openjdk.x86_64
下载部署elasticsearch,(elasticsearch-7.9.3-linux-x86_64.tar.gz)
https://www.elastic.co/cn/downloads/elasticsearch
cd /opt/
#解压到当前⽬录
tar -xf elasticsearch-7.9.3-linux-x86_64.tar.gz -C .
mv elasticsearch-7.9.3-linux-x86_64 elasticsearch
授权
chown -R elk.elk elasticsearch
更改配置文件
在elk1机器上.
vim elasticsearch/config/elasticsearch.yml

cluster.name: elk-cluster # 集群名称
node.name: elk1 # 集群节点名称
path.data: /data/elk/data # 数据目录
path.logs: /date/elk/logs # 日志目录
bootstrap.memory_lock: false # 锁内存,尽量不使⽤交换内存
network.host: 0.0.0.0 # 监听地址
http.port: 9200 # 监听端口
transport.tcp.port: 9300 #内部节点之间通信端口
discovery.seed_hosts: [“192.168.30.133”, “192.168.31.62”,“192.30.134”] # 集群节点列表
cluster.initial_master_nodes: [“elk1”] # 首次启动指定的Master节点
在elk2 机器上。
vim elasticsearch/config/elasticsearch.yml

cluster.name: elk-cluster # 集群名称
node.name: elk2 # 集群节点名称
path.data: /data/elk/data # 数据目录
path.logs: /date/elk/logs # 日志目录
bootstrap.memory_lock: false # 锁内存,尽量不使⽤交换内存
network.host: 0.0.0.0 # 监听地址
http.port: 9200 # 监听端口
transport.tcp.port: 9300 #内部节点之间通信端口
discovery.seed_hosts: [“192.168.30.133”, “192.168.31.62”,“192.30.134”] # 集群节点列表
cluster.initial_master_nodes: [“elk1”] # 首次启动指定的Master节点
es启动
./bin/elasticsearch -d
查看es健康状态: curl http://172.18.2.35:9200/_cat/health
查看集群节点:curl -XGET 'http://127.0.0.1:9200/_cat/nodes?pretty'
查询集群状态: curl -i -XGET http://127.0.0.1:9200/_cluster/health?pretty
green:集群所有数据都处于正常状态
yellow:集群所有数据都可以访问,但一些数据的副本还没有分配
red:集群部分数据不可访问

设置systemctl启动
[Unit]
Description=Elasticsearch
Wants=network-online.target
After=network-online.target

[Service]
User=es
Group=es
ExecStart=/opt/elasticsearch/bin/elasticsearch
ExecReload=/bin/kill -HUP \$MAINPID
LimitNOFILE=65535
KillMode=process
Restart=on-failure

[Install]
WantedBy=multi-user.target
三,filebeat安装使用
3.1下载安装。
 curl ‐L ‐O https://artifacts.elastic.co/downloads/beats/filebeat/filebeat‐7.13.2‐linux‐ x86_64.tar.gz
 tar xzvf filebeat‐7.13.2‐linux‐x86_64.tar.gz ‐C /usr/local/
 mv /usr/local/filebeat‐7.13.2‐linux‐x86_64 /usr/local/filebeat
3.1 修改 Filebeat配置文件。
(1),配置文件
该配置⽂件的所有者必须是root或正在执⾏Beat进程的⽤户。 该⽂件的权限
必须不允许除所有者以外的任何⼈写⼊,需要是0644的权限
vim /usr/local/filebeat
filebeat.prospectors:
- input_type: log
 paths:
 - /var/log/nginx/*.log
 tags: ["nginx"]

 output.elasticsearch:
  hosts: ["192.168.30.136:9200","192.168.30.137:9200"]
- 配置等级,输出到kibana
当filebeat和kibana在一台机器上时候可不用配置。
fields:
    level: info
    review: 1

setup.kibana:
host: "192.168.30.136:5601"
路径的最后不能⽤ * 代替所有,必须有⼀个相对的匹配或者绝对的匹配。
/var/log/* 这样的匹配是错误的
(2) 检测配置文件:
./filebeat/filebeat test config -c filebeat/filebeat.yml
3.3 Filebeat启动管理
(1)前台运行 采用前台运行的方式查看Filebeat获取的日志结果
nohup /usr/local/filebeat/filebeat -e -c /usr/local/filebeat/kafka.yml >/dev/null 2>&1 &
(2)后台运行
使用nohup方式启动Filebeat到后台,日志结果可查看nohup.out文件
使用systemd管理的后台方式启动Filebeat进程不能查看输出日志,测试阶段勿用 配置systemd方式的Filebeat启动管理文件
vim /usr/lib/systemd/system/filebeat.service
[Unit]
Description=Filebeat sends log files to Logstash or directly to Elasticsearch.
 Wants=network‐online.target
After=network‐online.target
[Service]
ExecStart=/usr/local/filebeat/filebeat ‐c /usr/local/filebeat/filebeat.yml Restart=always
[Install]
WantedBy=multi‐user.target
1. 给脚本赋权
   chmod +x /lib/systemd/system/elasticsearch.service
2. 设置开机启动
   #重新加载systemd的守护线程:
   systemctl daemon-reload
   systemctl enable elasticsearch
四,nginx安装
需要抓取nginx的日志,nginx和filebeat安装在同一台es1机器上。
yum -y install nginx
五,kibana 安装
安装在es1上,kibana安装一台即可。
- 修改配置文件。
server.port: 5601
server.host: "0.0.0.0"
elasticsearch.hosts: ["http://192.168.30.136:9200","http://192.168.30.137:9200","http://192.168.30.138:9200"]
i18n.locale: "zh-CN"
2.system 启动
vim kibana.service
[Unit]
Description=kibana

[Service]
ExecStart=/data/apps/kibana/bin/kibana
User=es
Group=es

[Install]
wantedBy=multi-user.target
六访问elasticsearch出现yellow
curl http://172.18.2.35:9200/_cat/health
1679992708 08:38:28 elasticsearch yellow 1 1 806 806 0 0 1 0 - 99.9%
curl http://172.18.2.35:9200/_cluster/health?pretty

{
  "cluster_name" : "elasticsearch",
  "status" : "yellow",
  "timed_out" : false,
  "number_of_nodes" : 1,
  "number_of_data_nodes" : 1,
  "active_primary_shards" : 806,
  "active_shards" : 806,
  "relocating_shards" : 0,
  "initializing_shards" : 0,
  "unassigned_shards" : 1,
  "delayed_unassigned_shards" : 0,
  "number_of_pending_tasks" : 0,
  "number_of_in_flight_fetch" : 0,
  "task_max_waiting_in_queue_millis" : 0,
  "active_shards_percent_as_number" : 99.87608426270135
}
“unassigned_shards” : 1, 分片数为1,设置为0
curl -X PUT "172.18.2.35:9200/_settings" -H 'Content-Type: application/json' -d'{"number_of_replicas":0}'
查看elasticsearch的状态已经变成green了。
curl http://172.18.2.35:9200/_cluster/health?pretty
curl http://172.18.2.35:9200/_cat/health
filebeat后台启动
nohup /usr/local/filebeat/filebeat -e -c /usr/local/filebeat/kafka.yml >/dev/null 2>&1 &

logstash 后台启动
nohup /usr/local/logstash/bin/logstash -f /usr/local/logstash/bin/k_es.conf -w 8 -b 1000 > /dev/null 2>&1 &

kafka 后台启动
nohup /usr/local/kafka/bin/kafka-server-start.sh /usr/local/kafka/config/server.properties > /dev/null 2>&1 &

KafkaStreamsLog 后台启动
nohup /usr/local/jdk/bin/java -Xms128m -Xmx512m -jar /usr/local/KafkaStreams/KafkaStreamsLog.jar > /dev/null 2>&1 &

 Elasticsearch 后台启动
su elasticsearch -l -c "/usr/local/elasticsearch/bin/elasticsearch -d"