MySQL学习笔记(9)
2. 获取数据库链接的方法
方式1
接下来将会讲解连接的具体方式,由于笔者的Eclipse有问题,所以以下虽然会使用Eclipse进行讲解,但不会呈现最终结果。使用Idea的方法建议参考:
JDBC连接的多种方式(idea)_Northern Crescent的博客-CSDN博客师承康师傅, 学完总结一下目录jar包下载方式五种获取数据库连接的方式:方式一:方式二:方式三:方式四:方式五:尚硅谷 康师傅的 JDBC课程用的是 Eclipse MySQL5.X 我这里用IDEA MySQL 8.0.X重新演示一遍环境:JDK 8 MySQL 8.0 IDEA在读这篇文章之前, 建议先看一下这MySQL安装篇, 做两件事(可选) 改时区, 看到评论区说了很多时区的问题 如果有时区...https://blog.csdn.net/m0_52559040/article/details/122709637
Driver(驱动)实现类
打开driver链接的简介,发现有如下方法获取连接:
1. 编写接口
按照如下的方式编写接口,可能会遇到以下问题:
The type org.junit.Test is not accessible
这个可能是因为JDK版本过高,可以修改为JDK8. 笔者是直接删除module_info.java后可用
之后的代码如下所示
2. 导入驱动(class文件打包的jar包)
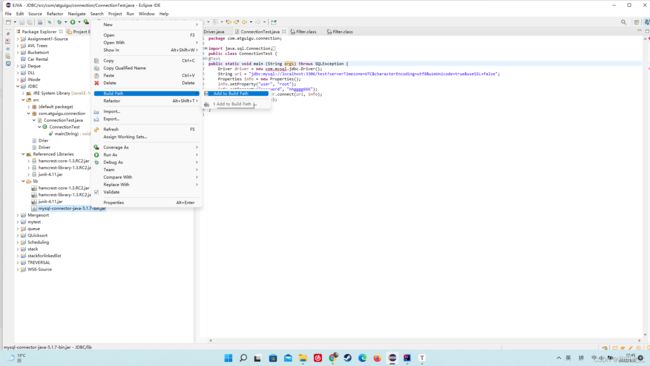
下载课件中附带的驱动,并导入进包。具体操作如下:
1. 新建文件夹
2. 将驱动复制进文件夹
3. 导入驱动 步骤如图:
暂时使用5.1.7驱动
3. 使用驱动
首先找到driver的实现类(ctrl+T)
查看源码 目前无法查看,需要从源码导入(attach)
4. URL and info
URL : 关联的链接
1. 寻找url
通过阅读read me 查找url的具体格式
具体格式如下
        // jdbc:mysql:协议
        // localhost:ip地址
        // 3306:默认mysql的端口号
        // mysql:mysql的存储mysql本身一些信息的数据库

        String url = "jdbc:mysql://localhost:3306/test";
INFO:
封装用户名,密码
最终代码如下
package com.atguigu.connection;

import java.sql.Connection;
import java.sql.Driver;
import java.sql.SQLException;
import java.util.Properties;

import org.junit.Test;
public class ConnectionTest {
@Test
public void testConnection1() throws SQLException {
	Driver driver = new com.mysql.jdbc.Driver();
	String url = "jdbc:mysql://localhost:3306/test?serverTimezone=UTC&characterEncoding=utf8&useUnicode=true&useSSL=false";
	Properties info = new Properties();
	info.setProperty("user", "root");
	info.setProperty("password", "nhgggg666");
	Connection conn = driver.connect(url, info);
	System.out.println(conn);
}
}
方式2
注意: 各个方式之间是递进关系,并不是平行关系
方式2 是方式1 的迭代
由于是面向接口编程,所以希望有更好的可移植性,所以最好不要出现第三方API
第三方API : driver
1. 获取driver的实现类对象(使用反射)
2. 提供要连接的数据库
3. 用户名/密码
4. 获取连接
@Test
public void testconnection2() throws Exception{
	Class clazz = Class.forName("com.mysql.jdbc.Driver");
	Driver driver = (Driver) clazz.getDeclaredConstructor().newInstance();
	//2.
	String url = "jdbc:mysql://localhost:3306/test";
	//3.
	Properties info = new Properties();
	info.setProperty("user", "root");
	info.setProperty("password", "nhgggg666");
	//4.
	Connection conn = driver.connect(url, info);
	System.out.println(conn);


}
可以看到和方式1基本相同,但是使用的API都是JDBC提供的
方式3
方式3使用drivermanager替换driver
基本代码如下
@Test
public void testconnection3() throws Exception {
	//获取driver实现类对象
	Class clazz = Class.forName("com.mysql.jdbc.Driver");
	Driver driver = (Driver) clazz.getDeclaredConstructor().newInstance();
	//提供另外3个连接的基本信息
	String url = "jdbc:mysql://localhost:3306/test";
	String user = "root";
	String password = "nhgggg666";


	//注册驱动
	DriverManager.registerDriver(driver);
	//获取连接
	Connection conn = DriverManager.getConnection(url,user,password);
	System.out.println(conn);
}
方式4
首先继续关注方式3,首先看到Drivermanager已经被隐去
@Test
public void testconnection3() throws Exception {
	//提供另外3个连接的基本信息
	String url = "jdbc:mysql://localhost:3306/test";
	String user = "root";
	String password = "nhgggg666";
	//获取driver实现类对象
	Class clazz = Class.forName("com.mysql.jdbc.Driver");
	//Driver driver = (Driver) clazz.getDeclaredConstructor().newInstance();


	//注册驱动
	//DriverManager.registerDriver(driver);
	//获取连接
	Connection conn = DriverManager.getConnection(url,user,password);
	System.out.println(conn);
}
之后发现class变量也没有用处了,直接删去
@Test
public void testconnection3() throws Exception {
	//提供另外3个连接的基本信息
	String url = "jdbc:mysql://localhost:3306/test";
	String user = "root";
	String password = "nhgggg666";
	//获取driver实现类对象
	Class.forName("com.mysql.jdbc.Driver");
	//Driver driver = (Driver) clazz.getDeclaredConstructor().newInstance();


	//注册驱动
	//DriverManager.registerDriver(driver);
	//获取连接
	Connection conn = DriverManager.getConnection(url,user,password);
	System.out.println(conn);
}
这样就形成了方式4
这么做能够成功的原因是,如下的代码能够自主加载驱动
Class.forName("com.mysql.jdbc.Driver");因为mysql的Driver实现类加载了如下操作
public class Driver extends NonRegisteringDriver implements java.sql.Driver {
	// ~ Static fields/initializers
	// ---------------------------------------------

	//
	// Register ourselves with the DriverManager
	//
	static {
		try {
			java.sql.DriverManager.registerDriver(new Driver());
		} catch (SQLException E) {
			throw new RuntimeException("Can't register driver!");
		}
	}

	// ~ Constructors
	// -----------------------------------------------------------

	/**
	 * Construct a new driver and register it with DriverManager
	 *
	 * @throws SQLException
	 *             if a database error occurs.
	 */
	public Driver() throws SQLException {
		// Required for Class.forName().newInstance()
	}
}
方式5
将基本信息(Driver,地址,用户名,密码)改写成配置文件
user=root
password=nhgggg666
url=jdbc:mysql://localhost:3306/mysql
driverClass=com.mysql.cj.jdbc.Driver
代码如下:
@Test
public void testconnection5() throws Exception{
	//1.读取配置文件中的基本信息
	InputStream is = ConnectionTest.class.getClassLoader().getResourceAsStream("jdbc.properties");
	Properties pros = new Properties();
	pros.load(is);

	String user = pros.getProperty("user");
	String password = pros.getProperty("nhgggg666");
	String url = pros.getProperty("jdbc:mysql://localhost:3306/test");
	String driverClass = pros.getProperty("com.mysql.jdbc.Driver");
	//加载驱动
	Class.forName("driverClass");
	Connection conn = DriverManager.getConnection(url,user,password);
	System.out.println(conn);

}
