3种方案扩展RestTemplate让其具备负载均衡
导读
RestTemplate简化了网络请求,在使用的时候,设置一个url,可以指定返回的数据的类型。在默认情况下,是不具备负载均衡能力的,那么我们是否可以对RestTemplate进行扩展,实现负载均衡能力呢?本文将为你介绍3中方案,以及给你一个值得你一生拥有的一个信念~
一、RestTemplate概述以及思路分析
在具体的实战之前,有些小伙伴对于RestTemplate可能还不知道这是个啥?我们花点时间简单介绍下。
另外就是如果要实现负载均衡的话,大体的思路是怎么样的?
1.1 RestTemplate是什么?
RestTemplate是由Spring框架提供的一个可用于应用中调用rest服务的类它简化了与http服务的通信方式,统一了RESTFul的标准,封装了http连接,我们只需要传入url及其返回值类型即可。相较于之前常用的HttpClient,RestTemplate是一种更为优雅的调用RESTFul服务的方式。
简单来说:RestTemplate就是封装了http连接的网络请求。
Spring中还有哪些类似的Template呢?大家可以自己回忆一下噢~~
1.2 RestTemplate底层实现机制
RestTemplate默认依赖JDK提供了http连接的能力(HttpURLConnection),如果有需要的话也可以通过setRequestFactory方法替换为例如Apache HttpCompoent、Netty或OKHttp等其他Http libaray。
1.3 RestTemplate默认支持负载均衡吗?
不支持,默认情况下,就是直接提供一个url进行请求。如果你访问的是域名的情况下,服务端已经实现了负载均衡的话,那么是支持负载的。我们这里说的不支持更多的是在站在客户端的角度下不支持,比如: 127.0.0.1:8080/127.0.0.1:8081都提供了相同的服务,那么由于只能提供一个url,那么无法做到负载均衡访问到8080/8081的。
1.4 RestTemplate负载均衡实现思路
在上面1.3提到了,负载的一个基本是url地址,那么我们就可以有这么几种思路:
(1)调用之前处理,在调用RestTemplate的请求的方法传入url之前,就对于url进行处理,根据不同的算法返回url。
(2)RestTemplate为我们提供了一个很重要的方法setInterceptors,设置拦截器,也就是添加一个拦截器拦截请求,对拦截到的请求进行处理,比如替换url,然后返回新的构造的请求。这里替换url,一方面可以根据不同的算法返回不同的url,也可以对于某些url进行拦截不执行,或者某些url直接转到新的地址上。
所以这里的核心就是添加拦截器,添加拦截器,有这么两种常见的思路:①在构建RestTemplate的时候,使用RestTemplate提供的setInterceptors进行添加。
②使用注解,然后在利用Spring提供的扩展点注入Interceptor。
根据上面的分析,我们就有了3中方案:
(1)根据不同的算法获得url,然后使用RestTemplate进行请求。
(2)在构造RestTemplate的时候,注入拦截器拦截请求,根据不同的算法重新构建请求。
(3)使用注解和Spring的扩展点,RestTemplate创建的时候,注入拦截器拦截请求,根据不同的算法重新构建请求。
这里我想给大家传递一个信念:凡事至少有三个解决方法。
你不知道不代表没有~O(∩_∩)O~
二、RestTemplate的使用
我们来看看对于RestTemplate如何使用。
开发环境:
(1)操作系统:Mac OS
(2)Spring Boot版本:2.7.0
(3)开发工具:idea
2.1 构建项目
构建一个新的Spring Boot项目,取名为spring-boot-resttemplate-example,如果使用idea构建的话,添加starter-web,你也可以手动在pom.xml进行添加:
 org.springframework.boot
    spring-boot-starter-web
2.2 注入RestTemplate的Bean
默认情况下RestTemplate还不是一个Spring Bean(作者可能RestTemplate大家平时用的比较少,没有必要自动注入了吧),所以需要手动注入一下,在启动类进行注入:
@Bean
publicRestTemplaterestTemplate(){
    RestTemplate restTemplate = new RestTemplate();
    return restTemplate;
}
2.3 使用RestTemplate
编写一个测试代码类进行测试RestTemplate:
package com.kfit.demo.controller;

import org.springframework.beans.factory.annotation.Autowired;
import org.springframework.web.bind.annotation.RequestMapping;
import org.springframework.web.bind.annotation.RestController;
import org.springframework.web.client.RestTemplate;

/**
 * 测试RestTemplate
 *
 * @author 悟纤「公众号SpringBoot」
 * @date 2022-09-03
 * @slogan 大道至简 悟在天成
 */
@RestController
public
class DemoController {

    @Autowired
    private RestTemplaterestTemplate;

    @RequestMapping("/api")
    public  String api(){
        return "success";
    }

    @RequestMapping("/test")
    public  String test(){
        return restTemplate.getForObject("http://127.0.0.1:8080/api", String.class);
    }

}
说明:这里有提供了两个方法test()和api(),test方法是我们待会要访问的,api是为了RestTemplate进行调用的,在实际项目中,这个地址大概率是其它项目的地址,这里只是为了方便讲解。
2.4 测试RestTemplate
启动Spring Boot应用进行测试,访问如下地址:
http://127.0.0.1:8080/test
(1)首先请求地址先请求到/test,进入到test()方法。
(2)在test()方法中使用了RestTemplate方法请求到了/api方法,进入到api()方法。
三、负载均衡方案1
第一种方案就是在设置url的时候,实现一个获取url的算法,假设现在有两个地址提供相同的服务,这里为了方便测试,就以地址的不同进行区分:
地址1:127.0.0.1:8080/api
地址2:localhost:8080/api
那现在的核心就是根据不同的算法返回不同的host,这里我们就实现一个随机算法来实现。
3.1 算法类
这里实现一个简单的算法类,根据不同的服务,然后随机算法获取一个host:
package com.kfit.demo.util;

import java.util.HashMap;
import java.util.Map;
import java.util.Random;

/**
 * 不同的服务,对应的host.
 *
 * @author 悟纤「公众号SpringBoot」
 * @date 2022-09-03
 * @slogan 大道至简 悟在天成
 */
public class UtilUrl {
    private static MapserviceHostMap = new HashMap<>();
    static {
        //不同的服务,对应的url
        serviceHostMap.put("user-service", new String[]{"127.0.0.1:8080","localhost:8080"});
    }

    /**
     * 根据服务名获取一个host (实际中,还能指定算法,随机算法、均衡算法、权重算法)
     * @param serviceName
     * @return
     */
    public static String getHost(String
serviceName){
        String[] hosts = serviceHostMap.get(serviceName);
        if(hosts == null){
            //地址不存在的时候,
            return "";
        }
        int num =
hosts.length;
        int index = new Random().nextInt(num);
        String host  = hosts[index];
        System.out.println("根据随机算法,当前获取到的host:"+host);
        return host;
    }

}
说明:这里定义了map,定义了服务和host之间的关系,然后根据随机算法获取服务中的一个host,实际项目中具体的实现会比这个复杂多了。
3.2 请求类
此时在调用的时候,要稍微调整下:
@RequestMapping("/test")
public  String test(){
    //return restTemplate.getForObject("http://127.0.0.1:8080/api",
String.class);
    return restTemplate.getForObject("http://"+UtilUrl.getHost("user-service") +"/api", String.class);
}
看到这里是不是已经看到了ribbon的影子了 ^_^
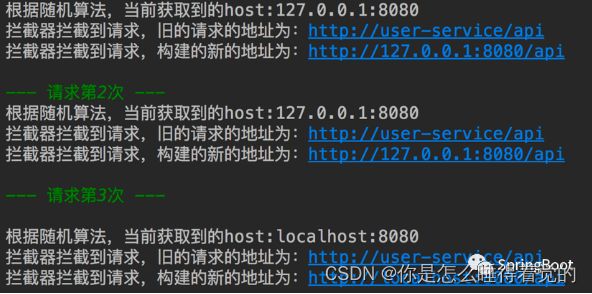
3.3 测试
多次访问如下地址:
四、负载均衡方案2
上面的方案,对于使用者很不友好,地址看起来也不知道什么鬼~,我们还是看看更优雅的方案。先来看下大体的思路:
(1)重新定义一个请求,在此方法中,主要是获取新的URI。
(2)定义一个拦截器,拦截请求,然后使用新的构建的请求进行执行。
(3)构建RestTemplate的时候,注入拦截器。
(4)使用RestTemplate进行访问请求。
4.1定义新的Request
实现接口HttpRequest,重新构建请求:
package com.kfit.demo.interceptor;

import com.kfit.demo.util.UtilUrl;
import org.springframework.http.HttpHeaders;
import org.springframework.http.HttpRequest;
import java.net.URI;

/**
 *
 * @author 悟纤「公众号SpringBoot」
 * @date 2022-09-03
 * @slogan 大道至简 悟在天成
 */
public class MyRequest implements HttpRequest {
    private HttpRequest sourceRequest;// 原请求request

    public MyRequest(HttpRequest sourceRequest){
        this.sourceRequest = sourceRequest;
    }

    @Override
    public HttpHeaders getHeaders() {
        return sourceRequest.getHeaders();
    }

    @Override
    public String getMethodValue() {
        return sourceRequest.getMethodValue();
    }

    @Override
    public URI getURI() {
        try {
            // 将拦截到的URI,修改为新的URI
            URI oldUri = sourceRequest.getURI();
            String url = UtilUrl.getHost(oldUri.getHost());
            URI uri = new URI(oldUri.getScheme()+"://"+url+oldUri.getPath());
            System.out.println("拦截器拦截到请求,旧的请求的地址为:"+oldUri);
            System.out.println("拦截器拦截到请求,构建的新的地址为:"+uri);
            return uri;
        } catch (Exception e) {
            e.printStackTrace();
        }
        return sourceRequest.getURI();
    }
}
说明:这里核心的方法就是getURI(),根据旧的URI,根据随机算法获取一个host,然后构建出一个新的URI。
4.2构建拦截器
定义拦截器拦截请求,然后新的构建的请求:
package com.kfit.demo.interceptor;

import org.springframework.http.HttpRequest;
import org.springframework.http.client.ClientHttpRequestExecution;
import org.springframework.http.client.ClientHttpRequestInterceptor;
import org.springframework.http.client.ClientHttpResponse;
import java.io.IOException;

/**
 * 拦截器
 *
 * @author 悟纤「公众号SpringBoot」
 * @date 2022-09-03
 * @slogan 大道至简 悟在天成
 */
public class MyClientHttpRequestInterceptor implements ClientHttpRequestInterceptor {
    /**
     * 主要构造新的请求进行返回
     * @param request
     * @param body
     * @param execution
     * @return
     * @throws IOException
     */
    @Override
    public ClientHttpResponse intercept(HttpRequest request, byte[] body, ClientHttpRequestExecution execution) throws IOException {
        MyRequest myRequest = new MyRequest(request);
        return execution.execute(myRequest,body);
    }
}4.3注入拦截器
在RestTemplate初始化的时候,注入自定义的拦截器:
@Bean
public RestTemplate restTemplate(){
    RestTemplate restTemplate = new RestTemplate();
    restTemplate.getInterceptors().add(new MyClientHttpRequestInterceptor());
    return restTemplate;
}4.4请求代码
这时候请求方法就简单优雅很多了:
@RequestMapping("/test")
public  String test(){
    //return restTemplate.getForObject("http://127.0.0.1:8080/api", String.class);
    //return restTemplate.getForObject("http://"+UtilUrl.getHost("user-service") +"/api", String.class);
    return restTemplate.getForObject("http://user-service/api", String.class);
}
说明:现在的写法,是不是就是ribbon的写法了~
4.5测试
启动运用进行测试,访问地址:
http://127.0.0.1:8080/test
五、负载均衡方案3
到这里,其实已经算是挺美好了,但作为优秀的负载均衡框架ribbon,不止于此。
我们发现在注入拦截器的时候,这种方法并不是最优的写法,那么是否可以添加一个注解旧具备了负载均衡的能力呢,ribbon就是这么干的。
大体的实现思路:
(1)自定义注解@MyLoadBalanced
(2)利用Spring的扩展点注入拦截器
(3)在注入RestTemplate添加注解@MyLoadBalanced
(4)测试
5.1 自定义注解@MyLoadBalanced
自定义注解@MyLoadBalanced:
package com.kfit.demo.config;

import org.springframework.beans.factory.annotation.Qualifier;
import java.lang.annotation.ElementType;
import java.lang.annotation.Retention;
import java.lang.annotation.RetentionPolicy;
import java.lang.annotation.Target;

/**
 *
 *
 * @author 悟纤「公众号SpringBoot」
 * @date 2022-09-03
 * @slogan 大道至简 悟在天成
 */
@Target({ElementType.FIELD, ElementType.PARAMETER, ElementType.METHOD})
@Retention(RetentionPolicy.RUNTIME)
@Qualifier //使用@Qualifier来限定注入的Bean
public @interface MyLoadBalanced {

}
说明:对于@Qualifier具体的使用还不是很懂的话,先不用管,后面我单独撰文介绍,这里你只需要知道这个注解配合上@Autowired,就会限定只会注入注解了@MyLoadBalanced的Spring Bean。
5.2 利用Spring的扩展点注入拦截器
接下来就是利用利用Spring的扩展点注入拦截器,这里主要是使用了扩展点:SmartInitializingSingleton - 所有的非延迟的、单例的bean 都初始化后调用,只调用一次。如果是多例的bean实现,不会调用。
具体更多关于SmartInitializingSingleton的知识,可以关注公众号「SpringBoot」回复关键词[436],查看文章:
《SpringBoot/Spring扩展点系列之SmartInitializingSingleton - 第436篇》
看下具体的实现代码:
package com.kfit.demo.config;

import com.kfit.demo.interceptor.MyClientHttpRequestInterceptor;
import org.springframework.beans.factory.SmartInitializingSingleton;
import org.springframework.beans.factory.annotation.Autowired;
import org.springframework.context.annotation.Bean;
import org.springframework.context.annotation.Configuration;
import org.springframework.web.client.RestTemplate;
import java.util.Collections;
import java.util.List;

/**
 *
 * 获取到注解了@MyLoadBalanced的RestTemplate集合,
 * 然后利用Spring扩展点SmartInitializingSingleton在所有Bean初始化之后添加拦截器。
 * @author 悟纤「公众号SpringBoot」
 * @date 2022-09-03
 * @slogan 大道至简 悟在天成
 */
@Configuration
public class MyConfig {
    @Autowired(required = false)
    @MyLoadBalanced
    private List restTemplates = Collections.emptyList();

    @Bean
    public SmartInitializingSingleton lbInitializing(){
        return new SmartInitializingSingleton() {
            @Override
            public void afterSingletonsInstantiated() {
                System.out.println("RestTemplate集合大小:"+restTemplates.size());
                for(RestTemplate restTemplate : restTemplates){
                    restTemplate.getInterceptors().add(new MyClientHttpRequestInterceptor());
                }
            }
        };
    }
}
说明:获取到注解了@MyLoadBalanced的RestTemplate集合,然后利用Spring扩展点SmartInitializingSingleton在所有Bean初始化之后添加拦截器。
5.3 在注入RestTemplate添加注解@MyLoadBalanced
最后就是修改一下RestTemplate注入的代码,只需要在方法上添加注解@MyLoadBalanced。
@Bean
@MyLoadBalanced
public RestTemplate restTemplate(){
    RestTemplate restTemplate = new RestTemplate();
    //restTemplate.getInterceptors().add(new MyClientHttpRequestInterceptor());
    return restTemplate;
}
5.4 测试
调用代码不需要修改,就可以进行测试了,访问地址:
http://127.0.0.1:8080/test
总结
文章内容有点多,如果你都弄懂的话,对于学习的思考以及Ribbon框架有一个更好的理解,总的来说就是介绍了三种负载均衡的方案:
(1)根据不同的算法获得url,然后使用RestTemplate进行请求。
(2)在构造RestTemplate的时候,注入拦截器拦截请求,根据不同的算法重新构建请求。
(3)使用注解和Spring的扩展点,RestTemplate创建的时候,注入拦截器拦截请求,根据不同的算法重新构建请求。
另外就是一个给大家很重要的信念:凡事至少有三个解决方法。
一旦你拥有了这个信念,碰到任何问题,就不会条件反射害怕了。
对于任何方法,没有最好,只有合适,在当下合适你的就是最好的。


