linux0.11-文件系统
文件系统包括的重要部分
1、 标准库:glibc OpenGL media Framework
2、配置文件:/etc/init.d/rcs 想要开机运行什么软件 载入什么画面 执行命令都可以写入rcs中。
sys/ 开机时需要挂载的设备节点
3、设备节点:/dev/console 控制台节点
/dev/null
linux是用文件操作硬件,所以Linux想要操作硬件的时侯就必须有文件设备节点,有节点就要挂载/dev/console控制台节点、创建节点/dev/null ---->mknod sudo mknod console c 5 1:
4、架构程序:对多种服务和功能进行系统接口封装。
5、SHELL的实现:所有的shell,命令都在文件系统中。
根文件系统各功能:
Linux启动时,第一个必须挂载的是根文件系统;若系统不能从指定设备上挂载根文件系统,则系统会出错而退出启动。成功之后可以自动或手动挂载其他的文件系统。因此,一个系统中可以同时存在不同的文件系统。
在 Linux 中将一个文件系统与一个存储设备关联起来的过程称为挂载(mount)。使用 mount 命令将一个文件系统附着到当前文件系统层次结构中(根)。在执行挂装时,要提供文件系统类型、文件系统和一个挂装点。根文件系统被挂载到根目录下“/”上后,在根目录下就有根文件系统的各个目录,文件:/bin /sbin /mnt等,再将其他分区挂接到/mnt目录上,/mnt目录下就有这个分区的各个目录,文件。
Linux根文件系统中一般有如下的几个目录:
1./bin目录
该目录下的命令可以被root与一般账号所使用,由于这些命令在挂接其它文件系统之前就可以使用,所以/bin目录必须和根文件系统在同一个分区中。
/bin目录下常用的命令有:cat、chgrp、chmod、cp、ls、sh、kill、mount、umount、mkdir、[、test等。其中“[”命令就是test命令,我们在利用Busybox制作根文件系统时,在生成的bin目录下,可以看到一些可执行的文件,也就是可用的一些命令。
2./sbin 目录
该目录下存放系统命令,即只有系统管理员(俗称最高权限的root)能够使用的命令,系统命令还可以存放在/usr/sbin,/usr/local/sbin目录下,/sbin目录中存放的是基本的系统命令,它们用于启动系统和修复系统等,与/bin目录相似,在挂接其他文件系统之前就可以使用/sbin,所以/sbin目录必须和根文件系统在同一个分区中。
/sbin目录下常用的命令有:shutdown、reboot、fdisk、fsck、init等,本地用户自己安装的系统命令放在/usr/local/sbin目录下。
3、/dev目录
该目录下存放的是设备与设备接口的文件,设备文件是Linux中特有的文件类型,在Linux系统下,以文件的方式访问各种设备,即通过读写某个设备文件操作某个具体硬件。比如通过"dev/ttySAC0"文件可以操作串口0,通过"/dev/mtdblock1"可以访问MTD设备的第2个分区。比较重要的文件有/dev/null, /dev/zero, /dev/tty, /dev/lp*等。
4./etc目录
该目录下存放着系统主要的配置文件,例如人员的账号密码文件、各种服务的其实文件等。一般来说,此目录的各文件属性是可以让一般用户查阅的,但是只有root有权限修改。对于PC上的Linux系统,/etc目录下的文件和目录非常多,这些目录文件是可选的,它们依赖于系统中所拥有的应用程序,依赖于这些程序是否需要配置文件。在嵌入式系统中,这些内容可以大为精减。
5./lib目录
该目录下存放共享库和可加载(驱动程序),共享库用于启动系统。运行根文件系统中的可执行程序,比如:/bin /sbin 目录下的程序。
6./home目录
系统默认的用户文件夹,它是可选的,对于每个普通用户,在/home目录下都有一个以用户名命名的子目录,里面存放用户相关的配置文件。
7./root目录
系统管理员(root)的主文件夹,即是根用户的目录,与此对应,普通用户的目录是/home下的某个子目录。
8./usr目录
/usr目录的内容可以存在另一个分区中,在系统启动后再挂接到根文件系统中的/usr目录下。里面存放的是共享、只读的程序和数据,这表明/usr目录下的内容可以在多个主机间共享,这些主要也符合FHS标准的。/usr中的文件应该是只读的,其他主机相关的,可变的文件应该保存在其他目录下,比如/var。/usr目录在嵌入式中可以精减。
9./var目录
与/usr目录相反,/var目录中存放可变的数据,比如spool目录(mail,news),log文件,临时文件。
10./proc目录
这是一个空目录,常作为proc文件系统的挂接点,proc文件系统是个虚拟的文件系统,它没有实际的存储设备,里面的目录,文件都是由内核
临时生成的,用来表示系统的运行状态,也可以操作其中的文件控制系统。
11./mnt目录
用于临时挂载某个文件系统的挂接点,通常是空目录,也可以在里面创建一引起空的子目录,比如/mnt/cdram /mnt/hda1 。用来临时挂载光盘、移动存储设备等。
12. /tmp目录
用于存放临时文件,通常是空目录,一些需要生成临时文件的程序用到的/tmp目录下,所以/tmp目录必须存在并可以访问。
那我们利用Busybox制作根文件系统就是创建这上面的这些目录,和这些目录下面的各种文件。
对于嵌入式Linux系统的根文件系统来说,一般可能没有上面所列出的那么复杂,比如嵌入式系统通常都不是针对多用户的,所以/home这个目录在一般嵌入式Linux中可能就很少用到,而/boot这个目录则取决于你所使用的BootLoader是否能够重新获得内核映象从你的根文件系统在内核启动之前。一般说来,只有/bin,/dev,/etc,/lib,/proc,/var,/usr这些需要的,而其他都是可选的。
根文件系统一直以来都是所有类Unix操作系统的一个重要组成部分,也可以认为是嵌入式Linux系统区别于其他一些传统嵌入式操作系统的重要特征,它给 Linux带来了许多强大和灵活的功能,同时也带来了一些复杂性
busybox 下载:1.70
https://busybox.net/downloads/
根文件系统简介 - 蘑菇王国大聪明 - 博客园
如何从内核跳转到busybox,和文件系统的工作流程
在创建根文件系统的时候,如果使用Busybox的话,只需要在/dev目录下创建必要的设备节点,在/etc目录下增加一些配置文件即可,当然,如果Busybox使用动态链接,那么还需要再/lib目录下包含库文件。下面是Busybox源码目录结构图:
![]()
linux-2.6.22
static int noinline init_post(void)
{
	free_initmem();
	unlock_kernel();
	mark_rodata_ro();
	system_state = SYSTEM_RUNNING;
	numa_default_policy();

    // /dev/console 由文件系统提供     打开控制台作为标准输入
	if (sys_open((const char __user *) "/dev/console", O_RDWR, 0) < 0)
		printk(KERN_WARNING "Warning: unable to open an initial console.\n");

     //复制句柄 作为标准输出 标准错误
	(void) sys_dup(0);
	(void) sys_dup(0);

	if (ramdisk_execute_command) {
		run_init_process(ramdisk_execute_command);
		printk(KERN_WARNING "Failed to execute %s\n",
				ramdisk_execute_command);
	}

	/*
	 * We try each of these until one succeeds.
	 *
	 * The Bourne shell can be used instead of init if we are
	 * trying to recover a really broken machine.
	 */
	if (execute_command) {
		run_init_process(execute_command);
		printk(KERN_WARNING "Failed to execute %s.  Attempting "
					"defaults...\n", execute_command);
	}
	run_init_process("/sbin/init");
	run_init_process("/etc/init");
	run_init_process("/bin/init");
	run_init_process("/bin/sh");

	panic("No init found.  Try passing init= option to kernel.");
}
如果设立了execute_command变量则跳转到他的代码中,这里execute_command=linuxrc,则跳转到busybox上,其实linuxrc与/sbin/init都指向了busybox文件系统。现在开始跑文件系统的代码。进入的是busybox的 init_main函数。
在ubuntu20.04中,指向
ok@ok-Precision-3630-Tower:/sbin$ ls -l init
lrwxrwxrwx 1 root root 20 7月  21 17:14 init -> /lib/systemd/systemd
execute_command 被赋值的地方:init/main.c
static int __init init_setup(char *str)
{
	unsigned int i;

	execute_command = str;
	/*
	 * In case LILO is going to boot us with default command line,
	 * it prepends "auto" before the whole cmdline which makes
	 * the shell think it should execute a script with such name.
	 * So we ignore all arguments entered _before_ init=... [MJ]
	 */
	for (i = 1; i < MAX_INIT_ARGS; i++)
		argv_init[i] = NULL;
	return 1;
}

__setup("init=", init_setup);
__setup宏分析,__setup这条宏在Linux Kernel中,使用最多的地方就是定义处理Kernel的启动参数 的函数及数据结构,宏定义如下:
include/linux/init.h
#define __setup(str, fn)					\
	__setup_param(str, fn, fn, 0)


#define __setup_param(str, unique_id, fn, early)			\
	static char __setup_str_##unique_id[] __initdata = str;	\
	static struct obs_kernel_param __setup_##unique_id	\
		__attribute_used__				\
		__attribute__((__section__(".init.setup")))	\
		__attribute__((aligned((sizeof(long)))))	\
		= { __setup_str_##unique_id, fn, early }


struct obs_kernel_param {
	const char *str;
	int (*setup_func)(char *);
};
__setup("init=", init_setup);被解析后就是:
#define __setup(init=,init_setup )					\
	static char __setup_str_ __initdata = “init=”;	\
	static struct obs_kernel_param __setup_		\
		 __attribute_used__				\
		 __attribute__((__section__(".init.setup")))	\
		= { __setup_str_, fn }
初始化内容为"root=",由于该变量用 __initdata修饰,它将被放入.init.data输入段;另一变量是结构变量__setup_str,其类型为 struct obs_kernel_param, 该变量被放入 输入段.init.setup中。
通过__setup宏定义obs_kernel_param结构变量都被放入.init.setup段中,这样一来实际是使.init.setup段变成一张表,Kernel在处理每一个启动参数时,都会来查找这张表,与每一个数据项中的成员str进行比较,如果完全相同,就会调用该数据项的函数指针成员setup_func所指向的函数(该函数是在使用__setup宏定义该变量时传入的函数参数),并将启动参数 如root=后面的内容 传给该处理函数。
execute_command是UBOOT传入的,以 init=xxxxx的参数UBOOT传入的CMD参数。init=linurc、execute_command=linuxrc。最后程序跳转进busybox文件系统。(uboot传来init=linurc,我们的“init=”经过段中表查找得出linuxrc,所以最终execute_command=linuxrc)
梳理一下:UBOOT传入了很多的参数 tagglist,被解析为多个setup的段—存放在.init.setup的代码段中,形式为CMD(字符串),命令对应的处理函数:obsolete_checksetup (。进行了所有存放在.init.setup代码段的命令执行针对各种setup段的CMD进行全局变量的赋值。
内核向文件系统是如何传递参数
uboot引导内核启动时给内核传递参数是通过tagglist,那么内核向文件系统是如何传递参数呢,是利用inittab,文件系统的运行流程如下:
![]()
busybox: init/init.c
    signal(SIGHUP, exec_signal);
	signal(SIGQUIT, exec_signal);
	signal(SIGUSR1, shutdown_signal);
	signal(SIGUSR2, shutdown_signal);
	signal(SIGINT, ctrlaltdel_signal);
	signal(SIGTERM, shutdown_signal);
	signal(SIGCONT, cont_handler);
	signal(SIGSTOP, stop_handler);
	signal(SIGTSTP, stop_handler);

    console_init();

    parse_inittab();

    run_actions(SYSINIT);

	run_actions(WAIT);

	run_actions(ONCE);

    while (1) {
		run_actions(RESPAWN);

		run_actions(ASKFIRST);

		sleep(1);

		wpid = wait(NULL);
		while (wpid > 0) {
			for (a = init_action_list; a; a = a->next) {
				if (a->pid == wpid) {
					a->pid = 0;
					message(L_LOG, "process '%s' (pid %d) exited. "
							"Scheduling it for restart.",
							a->command, wpid);
				}
			}
			wpid = waitpid(-1, NULL, WNOHANG);
}这里主要还是分析内核传入的参数是如何接收的、如何解析参数、如何使用参数。
我们看以上代码得出,parse_inittab这个函数就是解析参数的。
/* NOTE that if CONFIG_FEATURE_USE_INITTAB is NOT defined,
 * then parse_inittab() simply adds in some default
 * actions(i.e., runs INIT_SCRIPT and then starts a pair
 * of "askfirst" shells).  If CONFIG_FEATURE_USE_INITTAB
 * _is_ defined, but /etc/inittab is missing, this
 * results in the same set of default behaviors.
 */
static void parse_inittab(void)
{
#if ENABLE_FEATURE_USE_INITTAB
	FILE *file;
	char buf[INIT_BUFFS_SIZE], lineAsRead[INIT_BUFFS_SIZE];
	char tmpConsole[CONSOLE_NAME_SIZE];
	char *id, *runlev, *action, *command, *eol;
	const struct init_action_type *a = actions;

	file = fopen(INITTAB, "r");
	if (file == NULL) {
		/* No inittab file -- set up some default behavior */
#endif
		/* Reboot on Ctrl-Alt-Del */
		new_init_action(CTRLALTDEL, "reboot", "");
		/* Umount all filesystems on halt/reboot */
		new_init_action(SHUTDOWN, "umount -a -r", "");
		/* Swapoff on halt/reboot */
		if (ENABLE_SWAPONOFF) new_init_action(SHUTDOWN, "swapoff -a", "");
		/* Prepare to restart init when a HUP is received */
		new_init_action(RESTART, "init", "");
		/* Askfirst shell on tty1-4 */
		new_init_action(ASKFIRST, bb_default_login_shell, "");
		new_init_action(ASKFIRST, bb_default_login_shell, VC_2);
		new_init_action(ASKFIRST, bb_default_login_shell, VC_3);
		new_init_action(ASKFIRST, bb_default_login_shell, VC_4);
		/* sysinit */
		new_init_action(SYSINIT, INIT_SCRIPT, "");

		return;
#if ENABLE_FEATURE_USE_INITTAB
	}

	while (fgets(buf, INIT_BUFFS_SIZE, file) != NULL) {
		/* Skip leading spaces */
		for (id = buf; *id == ' ' || *id == '\t'; id++);

		/* Skip the line if it's a comment */
		if (*id == '#' || *id == '\n')
			continue;

		/* Trim the trailing \n */
		//XXX: chomp() ?
		eol = strrchr(id, '\n');
		if (eol != NULL)
			*eol = '\0';

		/* Keep a copy around for posterity's sake (and error msgs) */
		strcpy(lineAsRead, buf);

		/* Separate the ID field from the runlevels */
		runlev = strchr(id, ':');
		if (runlev == NULL || *(runlev + 1) == '\0') {
			message(L_LOG | L_CONSOLE, "Bad inittab entry: %s", lineAsRead);
			continue;
		} else {
			*runlev = '\0';
			++runlev;
		}

		/* Separate the runlevels from the action */
		action = strchr(runlev, ':');
		if (action == NULL || *(action + 1) == '\0') {
			message(L_LOG | L_CONSOLE, "Bad inittab entry: %s", lineAsRead);
			continue;
		} else {
			*action = '\0';
			++action;
		}

		/* Separate the action from the command */
		command = strchr(action, ':');
		if (command == NULL || *(command + 1) == '\0') {
			message(L_LOG | L_CONSOLE, "Bad inittab entry: %s", lineAsRead);
			continue;
		} else {
			*command = '\0';
			++command;
		}

		/* Ok, now process it */
		for (a = actions; a->name != 0; a++) {
			if (strcmp(a->name, action) == 0) {
				if (*id != '\0') {
					if (strncmp(id, "/dev/", 5) == 0)
						id += 5;
					strcpy(tmpConsole, "/dev/");
					safe_strncpy(tmpConsole + 5, id,
						sizeof(tmpConsole) - 5);
					id = tmpConsole;
				}
				new_init_action(a->action, command, id);
				break;
			}
		}
		if (a->name == 0) {
			/* Choke on an unknown action */
			message(L_LOG | L_CONSOLE, "Bad inittab entry: %s", lineAsRead);
		}
	}
	fclose(file);
#endif /* FEATURE_USE_INITTAB */
}
在parse_inittab中我们看到new_init_action这个函数被反复调用。
参数的传入方式:
1、用户自定义/etc/inittab配置文件,在init_main中进行了文件的读取,并且根据文件的每一项参数,创建init_action结构体节点,并且把inittab中所有的配置项解析的init_action节点形成一个init_action_list。
2、用户没有自定义/etc/inittab配置文件,busybox会默认进行多个配置项节点的建立并且形成init_action_list链表,而new_init_action函数就是生成这个链表的,这个时候就将执行的程序与行为绑定了。
static void new_init_action(int action, const char *command, const char *cons)
{
	struct init_action *new_action, *a, *last;

	if (strcmp(cons, bb_dev_null) == 0 && (action & ASKFIRST))
		return;

	/* Append to the end of the list */
	for (a = last = init_action_list; a; a = a->next) {
		/* don't enter action if it's already in the list,
		 * but do overwrite existing actions */
		if ((strcmp(a->command, command) == 0)
		 && (strcmp(a->terminal, cons) == 0)
		) {
			a->action = action;
			return;
		}
		last = a;
	}

	new_action = xzalloc(sizeof(struct init_action));
	if (last) {
		last->next = new_action;
	} else {
		init_action_list = new_action;
	}
	strcpy(new_action->command, command);
	new_action->action = action;
	strcpy(new_action->terminal, cons);
	messageD(L_LOG | L_CONSOLE, "command='%s' action=%d tty='%s'\n",
		new_action->command, new_action->action, new_action->terminal);
}
在parse_inittab执行完后我们会得到一个表:
默认参数配置项:
	:::
	new_init_action(int action, const char *command, const char *cons)
默认的inittab
	::CTRLALTDEL:reboot
	::SHUTDOWN:umount -a -r
	::RESTART:init
	::ASKFIRST:-/bin/sh
	/dev/tty2::ASKFIRST:-/bin/sh
	/dev/tty3::ASKFIRST:-/bin/sh
	/dev/tty4::ASKFIRST:-/bin/sh
	::SYSINIT:/etc/init.d/rcS(new_init_action(SYSINIT, INIT_SCRIPT, ""))
现在解析inittab完成了,后面依次运行
run_actions(SYSINIT);
run_actions(WAIT);
run_actions(ONCE);
while (1) {
run_actions(RESPAWN);
run_actions(ASKFIRST);
}
又用了run_actions这个函数,下面进入run_actions:
static void run_actions(int action)
{
	struct init_action *a, *tmp;

	for (a = init_action_list; a; a = tmp) {
		tmp = a->next;
		if (a->action == action) {
			/* a->terminal of "" means "init's console" */
			if (a->terminal[0] && access(a->terminal, R_OK | W_OK)) {//如果terminal不
//为空且可读可写
				delete_init_action(a);
			} else if (a->action & (SYSINIT | WAIT | CTRLALTDEL | SHUTDOWN | RESTART)) {
				waitfor(a, 0);
				delete_init_action(a);
			} else if (a->action & ONCE) {
				run(a);
				delete_init_action(a);
			} else if (a->action & (RESPAWN | ASKFIRST)) {
				/* Only run stuff with pid==0.  If they have
				 * a pid, that means it is still running */
				if (a->pid == 0) {
					a->pid = run(a);
				}

}
1、delete_init_action(a);把这个action从链表中拿出去(删除);
2、waitfor(a, 0); //运行该action对应的命令函数,并且等待其退出
3、对不同的action有不同的动作;
一开始就会在while(1)中,执行RESPAWN、ASKFIRST其中的一个。运行之后如果子进程退出之后就退出pid清0;退出后再次执行应用程序。这个应用程序就是我们输入的各种shell命令。RESPAWN、ASKFIRST并没太大区别都是等待shell命令。
总结:首先在init_main一开始设置了几个信号量,解析parse_inittab()函数,然后执行默认的inttab或者配置的inttab;parse_inittab会生成action项,这些action项对应各自的脚本等等。对这些项执行各自的脚本,这些脚本执行的方式也不同,有的执行一次就完事(run_actions(SYSINIT); 运行/etc/init.d/rcS脚本 ,是第一个运行的命令),并且等待其退出出,然后等待下一次;比如ctrlaltdel_signal这个信号量,当发生这个信号的时候,就会执行signal(SIGINT, ctrlaltdel_signal)这个函数,这个函数里面就只有一个run_action,也就是执行重启。
一个最小文件系统都需要什么?
1、/dev/console;
2、init_main函数(busybox提供的);
3、/etc/init.d/rcS—这是一个阻塞脚本,这个脚本步运行完就无法返回程序继续执行,这个是很重要的,这是根文件系统执行的第一个脚本,往里面写什么开机就执行什么;
4、因为需要运行shell命令,所有要有shell命令的支持函数—>busybox
5、busybox的响应函数运行必须要标准库函数的支持,所以文件系统中必须包含glibc.
linux 对文件系统的支持
Linux使用文件系统功能划分
有关linux中高速缓冲区的管理程序。
分页机制,可以产生分页中断。
文件系统的底层通用函数。
硬盘的读写分配释放,对节点管理iNode,内存与磁盘映射。
对文件数据进行读写操作
VFS虚拟文件系统把一个设备当成文件读取,硬件驱动和文件系统的关系,pipe块设备的读取。
文件系统与其他程序的接口实现
fopen,关闭文件等常见的文件调用方式。
文件系统的基本概念
基本概念
通俗地说,文件系统用来辅佐内核与设备进行交互,如读写文件,显示字符等操作。就好比作为一个图书馆,需要设计目录,分区来方便用户查询或放置图书。以往块设备打开并写入一个文件这一过程为例,我们看看内核应该怎么完成
- 块设备分块。首先,块设备对于CPU而言也是一块地址空间,如划分内存物理页一样,应该对块设备存储空间进行分块。如,1k为一块
- 设置块位图。内存管理中,通过mem_map表示当前物理内存物理页使用情况。同样地,对于块设备的每一块的使用情况也应设计位图进行表示
- 设置i节点。在物理内存中,通过连续地址空间存储一个结构体,由于地址是连续的,内核通过起始地址便能索引到该结构体。而块设备如果要存储文件,一个文件有大有小,仍使用连续块进行分配会造成空间浪费。因此,可以通过设计i节点,每个文件对应一个i节点,i节点中存储了该文件所使用的块索引。对于文件,内核只需知道i节点地址即可。同时,i节点应该存在内存和块设备中。
- 设置超级块。当块设备更换挂载的内核时,如何让内核快速知道块设备目前情况呢?最好的办法就是设计一个总结构体,其中存放如i节点数量,块数量等信息。该结构体我们成为超级块。
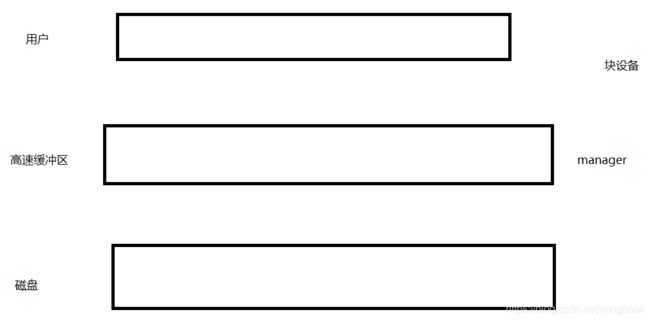
- 设置高速缓冲区。上述四步将块设备结构化后,内核已经可以对其进行寻址和访问。但如CPU与磁盘的IO与CPU执行速度相差巨大,会影响用户体验,并且对于一些文件可能会重复使用,理应单次读取多次使用。为此,需要在物理内存中设计一块高速缓冲区。当内核想写文件时,将内容写入高速缓冲区即刻返回。后续交给块设备驱动将缓冲区内容同步至块设备中。该过程其实就是异步,缓冲区相当于一个消息队列。
- 实现同步。上述提到,文件内容写入高速缓冲区即刻返回。那怎么将缓冲区内容写回块设备呢?这就是同步刷盘。需要设置程序将缓冲区内容写回块设备,或者读入缓冲区。
- 设计消息队列。由于块设备也属于共享资源,不能允许多个程序同时刷盘。因此需要对刷盘请求进行排队。并且,由于写入块设备时,如磁盘寻址是有顺序的,因此必须对刷盘请求进行排序,尽可能地让磁盘一次寻址过程能够同步尽可能多的数据
上述我们简述了完成一个文件系统大致要完成的事情。进一步地我们看看代码实际是如何实现的
见Linux内核完全注释12 文件系统fs
linuxkernelsrc-Linux文档类资源-CSDN下载
总体功能
高速缓冲区
12.3 buffer.c
inode节点:
文件和磁盘的映射关系。
读取磁盘上的资源首先getblk(获取该资源对应的设备和块号的高速缓冲区) 然后bread(确认有效数据的高速缓冲区),最后进程区域内存的拷贝(buffer_head 中的b_data数据区域)。
12.4 bitmap.c 操作i节点位图与逻辑块位图
12.7 super.c 文件系统的挂载卸载与超级块操作 根文件系统的挂载
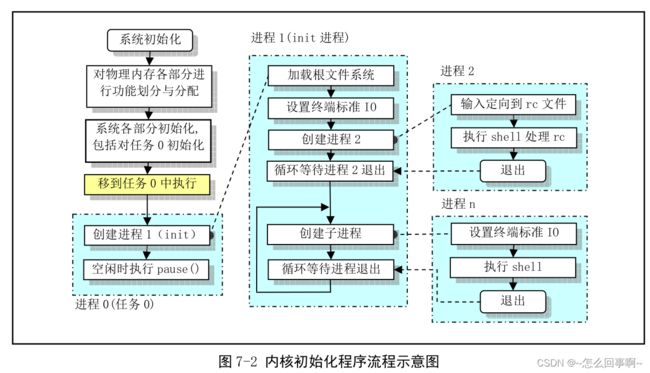
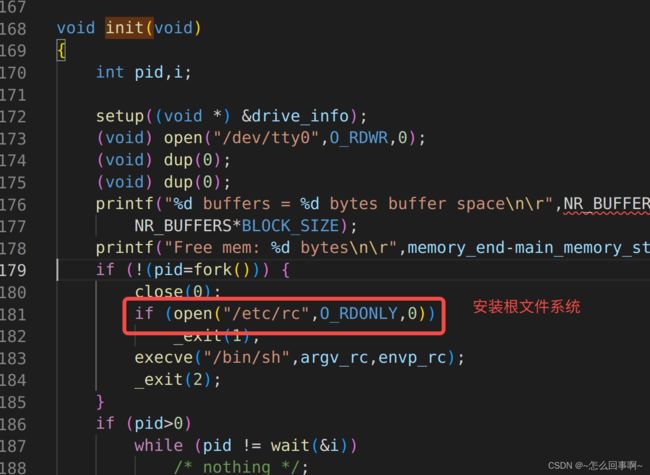
mount_root 函数在系统执行初始化main.c中,在进程0创建进程1后被进程1调用,具体调用位置在Init中的setup函数,setup函数位于kernel\blk_drv\hd.c 中的71行:
/* This may be used only once, enforced by 'static int callable' */
int sys_setup(void * BIOS)
{
	static int callable = 1;
	int i,drive;
	unsigned char cmos_disks;
	struct partition *p;
	struct buffer_head * bh;

	if (!callable)
		return -1;
	callable = 0;
#ifndef HD_TYPE
	for (drive=0 ; drive<2 ; drive++) {
		hd_info[drive].cyl = *(unsigned short *) BIOS;
		hd_info[drive].head = *(unsigned char *) (2+BIOS);
		hd_info[drive].wpcom = *(unsigned short *) (5+BIOS);
		hd_info[drive].ctl = *(unsigned char *) (8+BIOS);
		hd_info[drive].lzone = *(unsigned short *) (12+BIOS);
		hd_info[drive].sect = *(unsigned char *) (14+BIOS);
		BIOS += 16;
	}
	if (hd_info[1].cyl)
		NR_HD=2;
	else
		NR_HD=1;
#endif
	for (i=0 ; i are the primary drives in the system, and
		the ones reflected as drive 1 or 2.

		The first drive is stored in the high nibble of CMOS
		byte 0x12, the second in the low nibble.  This will be
		either a 4 bit drive type or 0xf indicating use byte 0x19
		for an 8 bit type, drive 1, 0x1a for drive 2 in CMOS.

		Needless to say, a non-zero value means we have
		an AT controller hard disk for that drive.


	*/

	if ((cmos_disks = CMOS_READ(0x12)) & 0xf0)
		if (cmos_disks & 0x0f)
			NR_HD = 2;
		else
			NR_HD = 1;
	else
		NR_HD = 0;
	for (i = NR_HD ; i < 2 ; i++) {
		hd[i*5].start_sect = 0;
		hd[i*5].nr_sects = 0;
	}
	for (drive=0 ; driveb_data[510] != 0x55 || (unsigned char)
		    bh->b_data[511] != 0xAA) {
			printk("Bad partition table on drive %d\n\r",drive);
			panic("");
		}
		p = 0x1BE + (void *)bh->b_data;
		for (i=1;i<5;i++,p++) {
			hd[i+5*drive].start_sect = p->start_sect;
			hd[i+5*drive].nr_sects = p->nr_sects;
		}
		brelse(bh);
	}
	if (NR_HD)
		printk("Partition table%s ok.\n\r",(NR_HD>1)?"s":"");
	rd_load();
	mount_root();// do
	return (0);
}
VFS
12.10 节
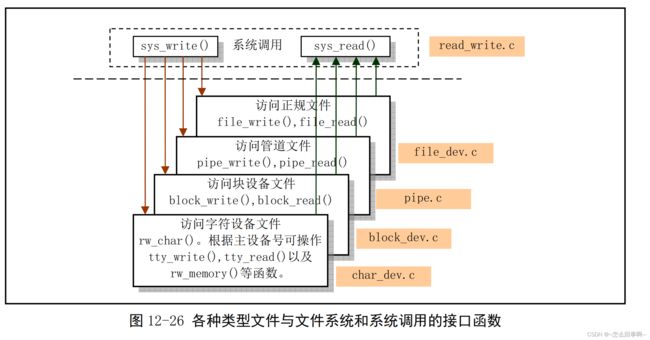
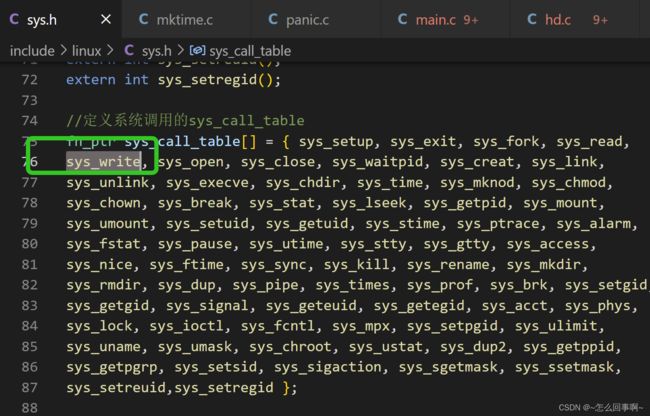
例如:系统调用 sys_write:
根据不同的文件类型,调用不同文件的写接口:
int sys_write(unsigned int fd,char * buf,int count)
{
	struct file * file;
	struct m_inode * inode;

	if (fd>=NR_OPEN || count <0 || !(file=current->filp[fd]))
		return -EINVAL;
	if (!count)
		return 0;
	inode=file->f_inode;
	if (inode->i_pipe)
		return (file->f_mode&2)?write_pipe(inode,buf,count):-EIO;
	if (S_ISCHR(inode->i_mode))
		return rw_char(WRITE,inode->i_zone[0],buf,count,&file->f_pos);
	if (S_ISBLK(inode->i_mode))
		return block_write(inode->i_zone[0],&file->f_pos,buf,count);
	if (S_ISREG(inode->i_mode))
		return file_write(inode,file,buf,count);
	printk("(Write)inode->i_mode=%06o\n\r",inode->i_mode);
	return -EINVAL;
}
关于pipe.c 可以了解到匿名管道的创建过程
todo
