SpringBoot 整合 Redis 实现消息队列
写这篇文章的原因还是得归咎于 上一篇博客写了Docker搭建Redis Cluster 集群环境
我自己是认为对于每个知识点,光看了不操作是没有用的(遗忘太快…),多少得在手上用上几回才可以,才能对它加深印象。
昨天搭建了Redis Cluster 集群环境,今天就来拿它玩一玩Redis 消息队列吧
于是便有了这个Redis 实现消息队列的Demo,
很喜欢一句话:”八小时内谋生活,八小时外谋发展“。
共勉.
Docker搭建Redis集群
SpringBoot 整合 Redis 实现消息队列
-
- 一、前言
-
- 概念
- 作用:
- 应用场景:
- 二、前期准备
-
- 2.1、项目结构
- 2.2、依赖的jar包
- 2.3、yml配置文件
- 三、编码
-
- 3.1、config层
- 3.2、信息实体类
- 3.3、MyThread类
- 3.4、消费者
- 3.5、生产者
- 四、测试
- 五、自言自语
一、前言
概念
消息队列:“消息队列”是在消息的传输过程中保存消息的容器。
其实就是个 生产者--->消息队列<---消费者 的模型。集群就是蛮多蛮多而已。
作用:
主要解决应用耦合,异步消息,流量削锋等问题
应用场景:
异步处理,应用解耦(拆分多系统),流量削峰(秒杀活动、请求量过大)和消息通讯(发布公告、日志)四个场景。
此处只演示了最简单的一个图哈。
举例子:异步消息
使用消息队列后
消息中间件其实市面上已经有很多,如RabbitMq,RocketMq、ActiveMq、Kafka等,我拿Redis来做消息队列,其本意是1)为了熟悉Redis;2)Redis 确实可以来做简单的消息队列(狗头保命)
二、前期准备
就是需要个Redis,其他的倒是没啥特殊的啦。
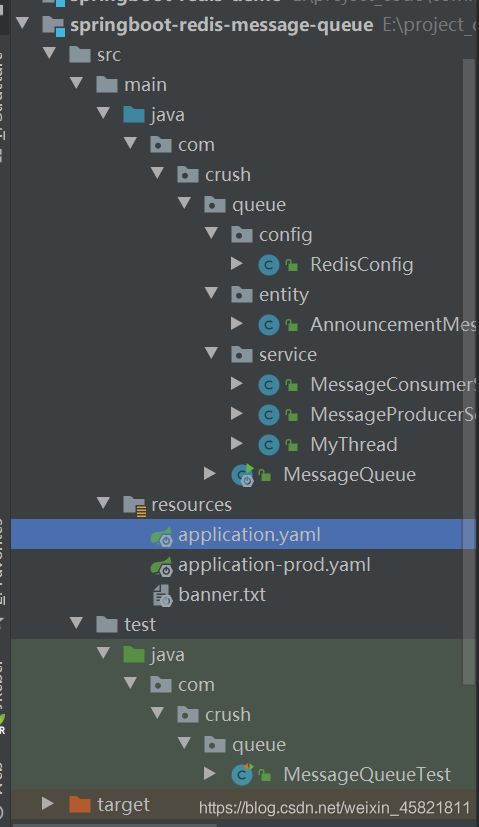
2.1、项目结构
一普通的SpringBoot的项目…
2.2、依赖的jar包
jar 也都是一些正常的jar包哈,没啥新奇玩意。
<parent>
    <groupId>org.springframework.bootgroupId>
    <artifactId>spring-boot-starter-parentartifactId>
    <version>2.5.2version>
    <relativePath/>
parent>
<dependencies>
    <dependency>
        <groupId>org.springframework.bootgroupId>
        <artifactId>spring-boot-starter-data-redisartifactId>
    dependency>
    <dependency>
        <groupId>org.apache.commonsgroupId>
        <artifactId>commons-pool2artifactId>
        <version>2.4.3version>
    dependency>
    <dependency>
        <groupId>org.springframework.bootgroupId>
        <artifactId>spring-boot-starterartifactId>
    dependency>
    <dependency>
        <groupId>com.alibabagroupId>
        <artifactId>fastjsonartifactId>
        <version>1.2.72version>
    dependency>
    <dependency>
        <groupId>junitgroupId>
        <artifactId>junitartifactId>
        <version>4.12version>
    dependency>
    <dependency>
        <groupId>org.springframework.bootgroupId>
        <artifactId>spring-boot-starter-testartifactId>
    dependency>
    <dependency>
        <groupId>org.projectlombokgroupId>
        <artifactId>lombokartifactId>
    dependency>
    <dependency>
        <groupId>org.springframework.bootgroupId>
        <artifactId>spring-boot-starter-webartifactId>
    dependency>
dependencies>
2.3、yml配置文件
分单机和集群,主要是上一篇文章带的…
单机配置文件
spring:
  redis:
    database: 0
    port: 6379
    host: localhost
    password:
    lettuce:
      pool:
        # 连接池最大连接数(使用负值表示没有限制)
        max-active: 1024
        # 连接池最大阻塞等待时间(使用负值表示没有限制)
        max-wait: 10000
        # 连接池中的最大空闲连接
        max-idle: 200
        # 连接池中的最小空闲连接
        min-idle: 0
    # 连接超时时间(毫秒)
    timeout: 10000
redis集群配置文件
server:
  port: 8089
spring:
  application:
    name: springboot-redis
  redis:
    password: 1234
    cluster:
      nodes:
        - IP地址:6379
        - IP地址:6380
        - IP地址:6381
        - IP地址:6382
        - IP地址:6383
        - IP地址:6384
      max-redirects: 3  # 获取失败 最大重定向次数
    lettuce:
      pool:
        max-active: 1000  #连接池最大连接数(使用负值表示没有限制)
        max-idle: 10 # 连接池中的最大空闲连接
        min-idle: 5 # 连接池中的最小空闲连接

#===========jedis配置方式=============================================
#    jedis:
#      pool:
#        max-active: 1000  # 连接池最大连接数(使用负值表示没有限制)
#        max-wait: -1ms      # 连接池最大阻塞等待时间(使用负值表示没有限制)
#        max-idle: 10      # 连接池中的最大空闲连接
#        min-idle: 5       # 连接池中的最小空闲连接
#
三、编码
3.1、config层
没有什么特殊的配置,
import com.fasterxml.jackson.annotation.JsonAutoDetect;
import com.fasterxml.jackson.annotation.PropertyAccessor;
import com.fasterxml.jackson.databind.ObjectMapper;
import org.springframework.boot.autoconfigure.condition.ConditionalOnClass;
import org.springframework.boot.autoconfigure.data.redis.RedisProperties;
import org.springframework.boot.context.properties.EnableConfigurationProperties;
import org.springframework.context.annotation.Bean;
import org.springframework.context.annotation.Configuration;
import org.springframework.data.redis.connection.RedisConnectionFactory;
import org.springframework.data.redis.core.RedisOperations;
import org.springframework.data.redis.core.RedisTemplate;
import org.springframework.data.redis.serializer.Jackson2JsonRedisSerializer;
import org.springframework.data.redis.serializer.StringRedisSerializer;

/**
 * redis 配置类
 * 1. 设置RedisTemplate序列化/返序列化
 *
 * @author cuberxp
 * @since 1.0.0
 * Create time 2020/1/23 0:06
 */
@Configuration
@ConditionalOnClass(RedisOperations.class)
@EnableConfigurationProperties(RedisProperties.class)
public class RedisConfig {

    @Bean
    public RedisTemplate<String, Object> redisTemplate(RedisConnectionFactory redisConnectionFactory) {
        RedisTemplate<String, Object> redisTemplate = new RedisTemplate<>();
        StringRedisSerializer stringRedisSerializer = new StringRedisSerializer();
        //设置value hashValue值的序列化
        Jackson2JsonRedisSerializer<Object> serializer = new Jackson2JsonRedisSerializer<Object>(
                Object.class);
        ObjectMapper om = new ObjectMapper();
        om.setVisibility(PropertyAccessor.ALL, JsonAutoDetect.Visibility.ANY);
        om.enableDefaultTyping(ObjectMapper.DefaultTyping.NON_FINAL);
        serializer.setObjectMapper(om);
        redisTemplate.setValueSerializer(serializer);
        redisTemplate.setHashValueSerializer(serializer);
        //key hasKey的序列化
        redisTemplate.setKeySerializer(stringRedisSerializer);
        redisTemplate.setHashKeySerializer(stringRedisSerializer);
        redisTemplate.setConnectionFactory(redisConnectionFactory);
        redisTemplate.afterPropertiesSet();
        return redisTemplate;
    }
}
3.2、信息实体类
加个实体类,模拟传递信息中需要用到的实体类。
import lombok.AllArgsConstructor;
import lombok.Data;
import lombok.NoArgsConstructor;

import java.io.Serializable;

/**
 * @author crush
 */
@Data
@AllArgsConstructor
@NoArgsConstructor
public class AnnouncementMessage implements Serializable {

    private static final long serialVersionUID = 8632296967087444509L;

    private String id;

    /*** 内容 */
    private String content;
}
3.3、MyThread类
随项目启动而启动。
import org.springframework.beans.factory.annotation.Autowired;
import org.springframework.boot.ApplicationArguments;
import org.springframework.boot.ApplicationRunner;
import org.springframework.stereotype.Component;

/**
 * @Author: crush
 * @Date: 2021-08-06 22:17
 * version 1.0
 * ApplicationRunner:
 * 用于指示 bean 在包含在SpringApplication时应该运行的SpringApplication 。
 * 通俗说就是 在这个项目运行的时候,它也会自动运行起来。
 */
@Component
public class MyThread implements ApplicationRunner {

    @Autowired
    MessageConsumerService messageConsumerService;

    @Override
    public void run(ApplicationArguments args) throws Exception {
        messageConsumerService.start();
    }
}
3.4、消费者
import java.util.concurrent.TimeUnit;
import com.crush.queue.entity.AnnouncementMessage;
import org.springframework.beans.factory.annotation.Autowired;
import org.springframework.data.redis.core.RedisTemplate;
import org.springframework.stereotype.Service;


/**
 * ApplicationRunner 实现这个接口可以跟随项目启动而启动
 * @author crush
 */
@Service
public class MessageConsumerService extends Thread {


    @Autowired
    private RedisTemplate<String,Object> redisTemplate;

    private volatile boolean flag = true;

    private String queueKey="queue";

    private Long popTime=1000L;

    @Override
    public void run() {
        try {
            AnnouncementMessage message;
            // 为了能一直循环而不结束
            while(flag && !Thread.currentThread().isInterrupted()) {
                message = (AnnouncementMessage) redisTemplate.opsForList().rightPop(queueKey,popTime,TimeUnit.SECONDS);
                System.out.println("接收到了" + message);
            }
        } catch (Exception e) {
            System.err.println(e.getMessage());
        }
    }

    public boolean isFlag() {
        return flag;
    }

    public void setFlag(boolean flag) {
        this.flag = flag;
    }

}
3.5、生产者
import com.crush.queue.entity.AnnouncementMessage;
import org.springframework.beans.factory.annotation.Autowired;
import org.springframework.data.redis.core.RedisTemplate;
import org.springframework.stereotype.Service;

@Service
public class MessageProducerService {

    @Autowired
    private RedisTemplate<String, Object> redisTemplate;

    private String queueKey="queue";

    public Long sendMeassage(AnnouncementMessage message) {
        System.out.println("发送了" + message);
        return redisTemplate.opsForList().leftPush(queueKey, message);
    }

}
四、测试
就是简单写了一个测试代码。
import com.crush.queue.entity.AnnouncementMessage;
import com.crush.queue.service.MessageConsumerService;
import com.crush.queue.service.MessageProducerService;
import org.junit.jupiter.api.Test;
import org.springframework.beans.factory.annotation.Autowired;
import org.springframework.boot.test.context.SpringBootTest;
/**
 * @Author: crush
 * @Date: 2021-08-06 17:11
 * version 1.0
 */
@SpringBootTest
public class MessageQueueTest {
    @Autowired
    private MessageProducerService producer;

    @Autowired
    private MessageConsumerService consumer;

    /**
     * 这个测时 的先启动主启动累,
     * 然后消费者可以一直在监听。
     */
    @Test
    public void testQueue2() {
        producer.sendMeassage(new AnnouncementMessage("1", "aaaa"));
        producer.sendMeassage(new AnnouncementMessage("2", "bbbb"));
        try {
            Thread.sleep(1000L);
        } catch (InterruptedException e) {
            e.printStackTrace();
        }
    }
}
注:这只是一个小demo ,很多细节都没有去考虑,只是一次对Redis做消息队列的初探,大家见谅。
五、自言自语
一次由搭建Redis Cluster集群开启的博客,终于结束了,算了好像还没,感觉下次可以多写点实用的。
不知道大家学习是什么样的,博主自己的感觉就是学了的东西,要通过自己去梳理一遍,或者说是去实践一遍,我觉得这样子,无论是对于理解还是记忆,都会更加深刻。
如若有不足之处,请不啬赐教!!
有疑惑之处,也可以留言或私信,定会第一时间回复。
这篇文章就到这里啦,下篇文章再见。一篇文章用Redis 实现消息队列(还在写)


